宿主机:
master:172.16.40.97
node1:172.16.40.98
node2:172.16.40.99
# 一、k8s初始化环境:(三台宿主机)
关闭防火墙和selinux
systemctl stop firewalld && systemctl disable firewalld
sed -ri '/^[^#]*SELINUX=/s#=.+$#=disabled#' /etc/selinux/config
setenforce 0
设置时间同步客户端
yum install chrony -y
cat <<EOF > /etc/chrony.conf
server ntp.aliyun.com iburst
stratumweight 0
driftfile /var/lib/chrony/drift
rtcsync
makestep 10 3
bindcmdaddress 127.0.0.1
bindcmdaddress ::1
keyfile /etc/chrony.keys
commandkey 1
generatecommandkey
logchange 0.5
logdir /var/log/chrony
EOF
systemctl restart chronyd
各主机之间相互DNS解析和ssh登录
略
升级内核
wget -O /etc/yum.repos.d/epel.repo http://mirrors.aliyun.com/repo/epel-7.repo
yum install wget git  jq psmisc -y
wget -O /etc/yum.repos.d/epel.repo http://mirrors.aliyun.com/repo/epel-7.repo
yum install https://mirrors.aliyun.com/saltstack/yum/redhat/salt-repo-latest-2.el7.noarch.rpm
sed -i "s/repo.saltstack.com/mirrors.aliyun.com\/saltstack/g" /etc/yum.repos.d/salt-latest.repo
yum update -y
更新重启
自选版本
export Kernel_Vsersion=4.18.9-1
wget  http://mirror.rc.usf.edu/compute_lock/elrepo/kernel/el7/x86_64/RPMS/kernel-ml{,-devel}-${Kernel_Vsersion}.el7.elrepo.x86_64.rpm
yum localinstall -y kernel-ml*
查看这个内核里是否有这个内核模块
find /lib/modules -name '*nf_conntrack_ipv4*' -type f
修改内核启动顺序,默认启动的顺序应该为1,升级以后内核是往前面插入,为0(如果每次启动时需要手动选择哪个内核,该步骤可以省略)
grub2-set-default 0 && grub2-mkconfig -o /etc/grub2.cfg
使用下面命令看看确认下是否启动默认内核指向上面安装的内核
grubby --default-kernel
docker官方的内核检查脚本建议(RHEL7/CentOS7: User namespaces disabled; add ‘user_namespace.enable=1’ to boot command line),使用下面命令开启
grubby --args="user_namespace.enable=1" --update-kernel="$(grubby --default-kernel)"
重新加载内核
reboot
需要设定/etc/sysctl.d/k8s.conf的系统参数
cat <<EOF > /etc/sysctl.d/k8s.conf
net.ipv4.ip_forward = 1
net.bridge.bridge-nf-call-ip6tables = 1
net.bridge.bridge-nf-call-iptables = 1
fs.may_detach_mounts = 1
vm.overcommit_memory=1
vm.panic_on_oom=0
fs.inotify.max_user_watches=89100
fs.file-max=52706963
fs.nr_open=52706963
net.netfilter.nf_conntrack_max=2310720
EOF
sysctl --system
检查系统内核和模块是否适合运行 docker (仅适用于 linux 系统)
curl https://raw.githubusercontent.com/docker/docker/master/contrib/check-config.sh > check-config.sh
bash ./check-config.sh
安装docker-ce
curl -fsSL "https://get.docker.com/" | bash -s -- --mirror Aliyun
mkdir -p /etc/docker/
cat>/etc/docker/daemon.json<<EOF
{
  "registry-mirrors": ["https://fz5yth0r.mirror.aliyuncs.com"],
  "storage-driver": "overlay2",
  "storage-opts": [
    "overlay2.override_kernel_check=true"
  ],
  "log-driver": "json-file",
  "log-opts": {
    "max-size": "100m",
    "max-file": "3"
  }
}
EOF
设置docker开机启动,CentOS安装完成后docker需要手动设置docker命令补全
yum install -y epel-release bash-completion && cp /usr/share/bash-completion/completions/docker /etc/bash_completion.d/
systemctl enable --now docker
#二、安装k8s集群**
三台宿主机进行kubectl kubelet kubeadm安装:
cat <<EOF > /etc/yum.repos.d/kubernetes.repo
[kubernetes]
name=Kubernetes
baseurl=https://mirrors.aliyun.com/kubernetes/yum/repos/kubernetes-el7-x86_64/
enabled=1
gpgcheck=1
repo_gpgcheck=1
gpgkey=https://mirrors.aliyun.com/kubernetes/yum/doc/yum-key.gpg https://mirrors.aliyun.com/kubernetes/yum/doc/rpm-package-key.gpg
EOF
yum install -y kubelet kubeadm kubectl
systemctl enable kubelet
master宿主机忽略交换分区未关闭warning:
cat <<EOF > /etc/sysconfig/kubelet
KUBELET_EXTRA_ARGS=--fail-swap-on=false
EOF
systemctl daemon-reload
master节点进行kubeadm初始化
kubeadm init --kubernetes-version=v1.13.1 --pod-network-cidr=10.244.0.0/16 --service-cidr=10.96.0.0/16 --ignore-preflight-errors=Swap --image-repository=registry.cn-hangzhou.aliyuncs.com/google_containers
*[init] Using Kubernetes version: v1.13.1
[preflight] Running pre-flight checks
[preflight] Pulling images required for setting up a Kubernetes cluster
[preflight] This might take a minute or two, depending on the speed of your internet connection
[preflight] You can also perform this action in beforehand using ‘kubeadm config images pull’
[kubelet-start] Writing kubelet environment file with flags to file “/var/lib/kubelet/kubeadm-flags.env”
[kubelet-start] Writing kubelet configuration to file “/var/lib/kubelet/config.yaml”
[kubelet-start] Activating the kubelet service
[certs] Using certificateDir folder “/etc/kubernetes/pki”
[certs] Generating “ca” certificate and key
[certs] Generating “apiserver-kubelet-client” certificate and key
[certs] Generating “apiserver” certificate and key
[certs] apiserver serving cert is signed for DNS names [master kubernetes kubernetes.default kubernetes.default.svc kubernetes.default.svc.cluster.local] and IPs [10.96.0.1 172.16.40.97]
[certs] Generating “front-proxy-ca” certificate and key
[certs] Generating “front-proxy-client” certificate and key
[certs] Generating “etcd/ca” certificate and key
[certs] Generating “etcd/server” certificate and key
[certs] etcd/server serving cert is signed for DNS names [master localhost] and IPs [172.16.40.97 127.0.0.1 ::1]
[certs] Generating “etcd/peer” certificate and key
[certs] etcd/peer serving cert is signed for DNS names [master localhost] and IPs [172.16.40.97 127.0.0.1 ::1]
[certs] Generating “etcd/healthcheck-client” certificate and key
[certs] Generating “apiserver-etcd-client” certificate and key
[certs] Generating “sa” key and public key
[kubeconfig] Using kubeconfig folder “/etc/kubernetes”
[kubeconfig] Writing “admin.conf” kubeconfig file
[kubeconfig] Writing “kubelet.conf” kubeconfig file
[kubeconfig] Writing “controller-manager.conf” kubeconfig file
[kubeconfig] Writing “scheduler.conf” kubeconfig file
[control-plane] Using manifest folder “/etc/kubernetes/manifests”
[control-plane] Creating static Pod manifest for “kube-apiserver”
[control-plane] Creating static Pod manifest for “kube-controller-manager”
[control-plane] Creating static Pod manifest for “kube-scheduler”
[etcd] Creating static Pod manifest for local etcd in “/etc/kubernetes/manifests”
[wait-control-plane] Waiting for the kubelet to boot up the control plane as static Pods from directory “/etc/kubernetes/manifests”. This can take up to 4m0s
[apiclient] All control plane components are healthy after 20.003620 seconds
[uploadconfig] storing the configuration used in ConfigMap “kubeadm-config” in the “kube-system” Namespace
[kubelet] Creating a ConfigMap “kubelet-config-1.13” in namespace kube-system with the configuration for the kubelets in the cluster
[patchnode] Uploading the CRI Socket information “/var/run/dockershim.sock” to the Node API object “master” as an annotation
[mark-control-plane] Marking the node master as control-plane by adding the label “node-role.kubernetes.io/master=’’”
[mark-control-plane] Marking the node master as control-plane by adding the taints [node-role.kubernetes.io/master:NoSchedule]
[bootstrap-token] Using token: 2s9xxt.8lgyw6yzt21qq8xf
[bootstrap-token] Configuring bootstrap tokens, cluster-info ConfigMap, RBAC Roles
[bootstraptoken] configured RBAC rules to allow Node Bootstrap tokens to post CSRs in order for nodes to get long term certificate credentials
[bootstraptoken] configured RBAC rules to allow the csrapprover controller automatically approve CSRs from a Node Bootstrap Token
[bootstraptoken] configured RBAC rules to allow certificate rotation for all node client certificates in the cluster
[bootstraptoken] creating the “cluster-info” ConfigMap in the “kube-public” namespace
[addons] Applied essential addon: CoreDNS
[addons] Applied essential addon: kube-proxy

Your Kubernetes master has initialized successfully!

To start using your cluster, you need to run the following as a regular user:

mkdir -p $HOME/.kube
sudo cp -i /etc/kubernetes/admin.conf $HOME/.kube/config
sudo chown $(id -u):$(id -g) $HOME/.kube/config

You should now deploy a pod network to the cluster.
Run “kubectl apply -f [podnetwork].yaml” with one of the options listed at:
https://kubernetes.io/docs/concepts/cluster-administration/addons/

You can now join any number of machines by running the following on each node
as root:

kubeadm join 172.16.40.97:6443 –token 2s9xxt.8lgyw6yzt21qq8xf –discovery-token-ca-cert-hash sha256:c141fb0608b4b83136272598d2623589d73546762abc987391479e8e049b0d76*
各节点用kubectl访问访问集群
mkdir -p $HOME/.kube
cp -i /etc/kubernetes/admin.conf $HOME/.kube/config
chown $(id -u):$(id -g) $HOME/.kube/config
接下来我们来安装flannel网络插件
wget https://raw.githubusercontent.com/sky-daiji/k8s-yaml/master/kube-flannel.yml
kubectl apply -f  kube-flannel.yml
master节点查看集群状态
[root@master ~]# kubectl get cs
NAME                 STATUS    MESSAGE              ERROR
controller-manager   Healthy   ok
scheduler            Healthy   ok
etcd-0               Healthy   {"health": "true"}
添加各节点进去集群
kubeadm join 172.16.40.97:6443 --token 2s9xxt.8lgyw6yzt21qq8xf --discovery-token-ca-cert-hash sha256:c141fb0608b4b83136272598d2623589d73546762abc987391479e8e049b0d76
查看节点是否都添加到集群里
[root@master ~]# kubectl get node
NAME     STATUS   ROLES    AGE   VERSION
master   Ready    master   15m   v1.13.1
node1    Ready    <none>   13m   v1.13.1
node2    Ready    <none>   13m   v1.13.1
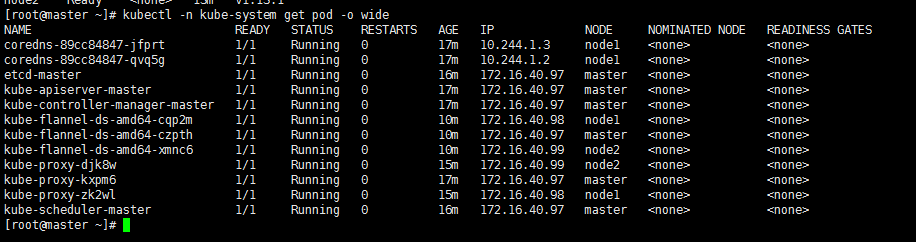
查看k8s各自组件运行情况
安装kuber-dashboard插件
wget https://github.com/sky-daiji/k8s-yaml/blob/master/kubernetes-dashboard.yaml
wget https://github.com/sky-daiji/k8s-yaml/blob/master/admin-token.yaml
kubectl apply -f kubernetes-dashboard.yaml -f admin-token.yaml
查看kubernetes-dashboard插件安装是否成功
kubectl get pod -n kube-system |grep kubernetes-dashboard
访问Dashboard
https://172.16.40.97:30091
选择Token令牌模式登录。
kubectl describe secret/$(kubectl get secret -n kube-system |grep admin|awk '{print $1}') -n kube-system