一.前言
本文介绍springboot集成Rabbitmq的具体使用.rabbitmq采用centos的安装方式,具体详细安装方法可参考前面的文章:https://blog.csdn.net/u010520146/article/details/84454004
二.相关概念
消息队列通常有三个概念:发送消息(生产者)、队列、接收消息(消费者)。RabbitMQ在这个基本概念之上,多做了一层抽象,在发送消息和队列之间,加入了交换机。这样发送消息和队列就没有直接关系,而是通过交换机来做转发,交换机会根据分发策略把消息转给队列。
三.开发实例
本文采用springboot的版本为1.5.9.RELEASE
1.pom.xml加入
		<dependency>
			<groupId>org.springframework.boot</groupId>
			<artifactId>spring-boot-starter-amqp</artifactId>
		</dependency>
2.配置文件 application.yml中加入
其中注意端口号为5672
spring:
  rabbitmq:
    host: 192.168.153.135
    port: 5672
    username: lss
    password: 888888
    virtual-host: /
3.配置文件
(1) 创建连接工厂实例,配置连接信息
@Configuration
public class RabbitConfig {
    private final Logger logger = LoggerFactory.getLogger(this.getClass());

    @Value("${spring.rabbitmq.host}")
    private String host;

    @Value("${spring.rabbitmq.port}")
    private int port;

    @Value("${spring.rabbitmq.username}")
    private String username;

    @Value("${spring.rabbitmq.password}")
    private String password;
    @Bean
    @ConfigurationProperties(prefix = "spring.rabbitmq")
    public ConnectionFactory connectionFactory() {
        CachingConnectionFactory connectionFactory = new CachingConnectionFactory(host,port);
        connectionFactory.setUsername(username);
        connectionFactory.setPassword(password);
        connectionFactory.setVirtualHost("/");
        connectionFactory.setPublisherConfirms(true);
        return connectionFactory;
    }
(2)实例化RabbitTemplate 消息模板
@Bean
    @Scope(ConfigurableBeanFactory.SCOPE_PROTOTYPE)
    //必须是prototype类型
    public RabbitTemplate rabbitTemplate() {
        RabbitTemplate template = new RabbitTemplate(connectionFactory());
        return template;
    }
(3) 实例化A.B.C.D队列,以供测试
	public static final String QUEUE_A = "QUEUE_A";
    public static final String QUEUE_B = "QUEUE_B";
    public static final String QUEUE_C = "QUEUE_C";
    public static final String QUEUE_D = "QUEUE_D";

  /**
     * 实例化队列
     * @return
     */
    @Bean
    public Queue queueA() {
        return new Queue(QUEUE_A, true); //队列持久
    }

    @Bean
    public Queue queueB() {
        return new Queue(QUEUE_B, true); //队列持久
    }

    @Bean
    public Queue queueC() {
        return new Queue(QUEUE_C, true); //队列持久
    }
    @Bean
    public Queue queueD() {
        return new Queue(QUEUE_D, true); //队列持久
    }
(4) 实例化4种不同交换机以供测试
FanoutExchange: 将消息分发到所有的绑定队列,无routingkey的概念
HeadersExchange :通过添加属性key-value匹配
DirectExchange:按照routingkey分发到指定队列
TopicExchange:多关键字匹配
    public static final String EXCHANGE_A = "ecchange_fanout";
    public static final String EXCHANGE_B = "exchange_direct";
    public static final String EXCHANGE_C = "exchange_header";
    public static final String EXCHANGE_D = "exchange_topic";

	@Bean
    public FanoutExchange fanoutExchange() {
        return new FanoutExchange(EXCHANGE_A);
    }

    @Bean
    public DirectExchange directExchange() {
        return new DirectExchange(EXCHANGE_B);
    }

    @Bean
    public HeadersExchange headersexchange() {
        return new HeadersExchange(EXCHANGE_C);
    }

    @Bean
    public TopicExchange topicexchange() {
        return new TopicExchange(EXCHANGE_D);
    }
(5) 绑定队列到交换机
针对DirectExchange交换机:把队列A绑定到交换机上面
 @Bean
    public Binding bindingA() {
        return BindingBuilder.bind(queueA()).to(directExchange()).with(RabbitConfig.ROUTINGKEY_A);
    }
针对FanoutExchange交换机,将A.B.C队列绑定到交换机A上面
@Bean
    Binding bindingExchangeB(Queue queueB, FanoutExchange fanoutExchange) {
        return BindingBuilder.bind(queueB).to(fanoutExchange);
    }
    @Bean
    Binding bindingExchangeC(Queue queueC, FanoutExchange fanoutExchange) {
        return BindingBuilder.bind(queueC).to(fanoutExchange);
    }
    @Bean
    Binding bindingExchangeD(Queue queueD, FanoutExchange fanoutExchange) {
        return BindingBuilder.bind(queueD).to(fanoutExchange);
    }
针对主题模式交换机 前缀匹配到topic.即可接受
  @Bean
    Binding bindingExchangeMessage2(Queue queueD, TopicExchange exchange) {
        return BindingBuilder.bind(queueD).to(exchange).with("topic.#");
    }
针对主题模式交换机 前缀匹配到topic.lss0555 即可接受
    @Bean
    Binding bindingExchangeMessage(Queue queueC, TopicExchange exchange) {
        return BindingBuilder.bind(queueC).to(exchange).with("topic.lss0555");
    }
4.实例化5个消息接收器以供测试使用
1.QueueAReceiver_A
QueueAReceiver_A绑定的是消息队列QUEUE_A
@Component
public class QueueAReceiver_A {
    private final Logger logger = LoggerFactory.getLogger(this.getClass());

    @RabbitHandler
    @RabbitListener(queues = RabbitConfig.QUEUE_A)
    public void process(String msg) {
        logger.info("接收处理队列A消息: " +msg);
    }
}
2.QueueBReceiver_B1
QueueAReceiver_B1绑定的是消息队列QUEUE_B
@Component
public class QueueBReceiver_B1 {
    private final Logger logger = LoggerFactory.getLogger(this.getClass());
    @RabbitHandler
    @RabbitListener(queues = RabbitConfig.QUEUE_B)
    public void process(String content) {
        logger.info("接收处理队列B1消息: " + content);
    }
}
3.QueueBReceiver_B2
QueueAReceiver_B2绑定的是消息队列QUEUE_B
@Component
public class QueueBReceiver_B2 {
    private final Logger logger = LoggerFactory.getLogger(this.getClass());
    @RabbitHandler
    @RabbitListener(queues = RabbitConfig.QUEUE_B)
    public void process(String content) {
        logger.info("接收处理队列B2消息: " + content);
    }
}
4.QueueBReceiver_C
QueueAReceiver_C绑定的是消息队列QUEUE_C
@Component
public class QueueBReceiver_C {
    private final Logger logger = LoggerFactory.getLogger(this.getClass());
    @RabbitHandler
    @RabbitListener(queues = RabbitConfig.QUEUE_C)
    public void process(String content) {
        logger.info("接收处理队列C消息: " + content);
    }
}
5.QueueBReceiver_D
QueueAReceiver_D绑定的是消息队列QUEUE_D
@Component
public class QueueBReceiver_D {
    private final Logger logger = LoggerFactory.getLogger(this.getClass());
    @RabbitHandler
    @RabbitListener(queues = RabbitConfig.QUEUE_D)
    public void process(String content) {
        logger.info("接收处理队列D消息: " + content);
    }
}
5.不同模式测试
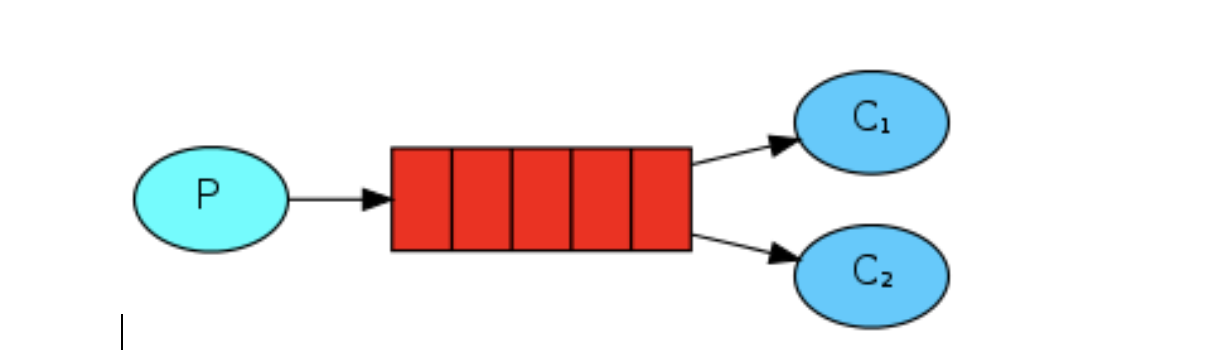
一 .单发送单接收
如下图所示:P代表生产者,C代表消费者,红色代码消息队列。P将消息发送到消息队列,C对消息进行处理
1.创建一个生产者
发送消息到消息队列A,相应的队列接收器是QueueAReceiver_A

 @Autowired
 private RabbitTemplate rabbitTemplate;
 public void sendMsg1(String content) {
   rabbitTemplate.convertAndSend(RabbitConfig.QUEUE_A,content);
}
2.创建一个测试用例
 @Autowired
 RabbitMsgProduct msgProducer;

 @GetMapping("/sendMsg1")
    public String sendMsg1(String msg){
        msgProducer.sendMsg1(msg);
        return "success";
    }
访问 http://localhost:8085/sendMsg1?msg=hello
结果如下,符合预期
INFO c.e.s.r.MsgReceive.QueueAReceiver_A - 接收处理队列A消息: hello
二 .工作模式(竞争)
竞争消费者如下图:一个生产者,一个队列,多个消费者。
同样是点对点模式,但是在消费者之间,对消费队列是有一些规则策略的,如:公平分发策略,轮询分发策略等等。
1.创建消息生产者
绑定到消息队列B,相应的消息队列接收器有QueueBReceiver_B1,QueueBReceiver_B2
public void sendMsg2(String content) {
     rabbitTemplate.convertAndSend(RabbitConfig.QUEUE_B,content);
}
2.新建一个测试用例
 @GetMapping("/sendMsg2")
    public String sendMsg2(String msg){
      msgProducer.sendMsg2(msg);
      return "success";
 }
多次访问: http://localhost:8085/sendMsg2?msg=hello
结果如下,符合预期
INFO  c.e.s.r.M.QueueBReceiver_B2 - 接收处理队列B2消息: hello
INFO  c.e.s.r.M.QueueBReceiver_B1 - 接收处理队列B1消息: hello
 INFO  c.e.s.r.M.QueueBReceiver_B2 - 接收处理队列B2消息: hello
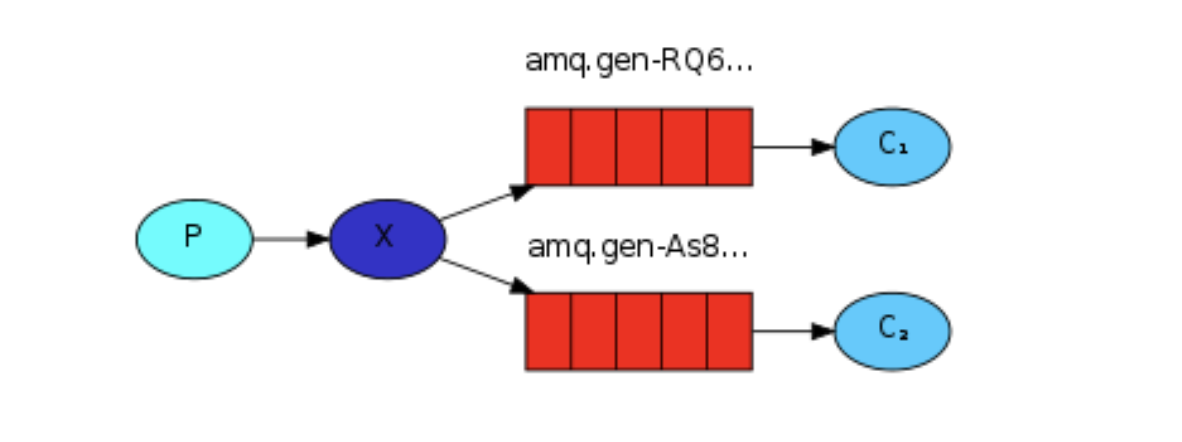
三.发布订阅模式
如下图:生产者将消息不是直接发送到队列,而是发送到X交换机,然后由交换机发送给两个队列,两个消费者各自监听一个队列,来消费消息。
这种方式实现同一个消息被多个消费者消费。工作模式是同一个消息只能有一个消费者。
1.新建一个消息生产者
首先创建三个队列QUEUE_A,QUEUE_B,QUEUE_C
然后创建交换机 fanoutExchange ,再将三个队列绑定到该交换机上,这几步在前面配置文件已有说明。
接着,新建消息生产者,将消息发送到交换机ecchange_fanout上
 public void sendMsg3(String content) {
        CorrelationData correlationId = new CorrelationData(UUID.randomUUID().toString());
        rabbitTemplate.convertAndSend(RabbitConfig.EXCHANGE_A, RabbitConfig.ROUTINGKEY_A, content, correlationId);
    }
2.新建测试用例
 @GetMapping("/sendMsg3")
    public String sendMsg3(String msg){
       msgProducer.sendMsg3(msg);
       return "success";
   }
访问: http://localhost:8085/sendMsg3?msg=hello
结果如下,符合预期
INFO  c.e.s.r.M.QueueBReceiver_B2 - 接收处理队列B2消息: hello
INFO  c.e.s.r.MsgReceive.QueueBReceiver_C - 接收处理队列C消息: hello
INFO  c.e.s.r.MsgReceive.QueueBReceiver_D - 接收处理队列D消息: hello
如果绑定的是DirectExchange类型交换机,该交换机绑定的是消息队列QUEUE_A,则新建消息生产者
 public void sendMsg4(String content) {
        CorrelationData correlationId = new CorrelationData(UUID.randomUUID().toString());
        rabbitTemplate.convertAndSend(RabbitConfig.EXCHANGE_B, RabbitConfig.ROUTINGKEY_A, content, correlationId);
    }
测试,访问: http://localhost:8085/sendMsg4?msg=hello
结果如下,只有接收器QueueAReceiver_A收到消息,符合预期
INFO c.e.s.r.MsgReceive.QueueAReceiver_A - 接收处理队列A消息: hello
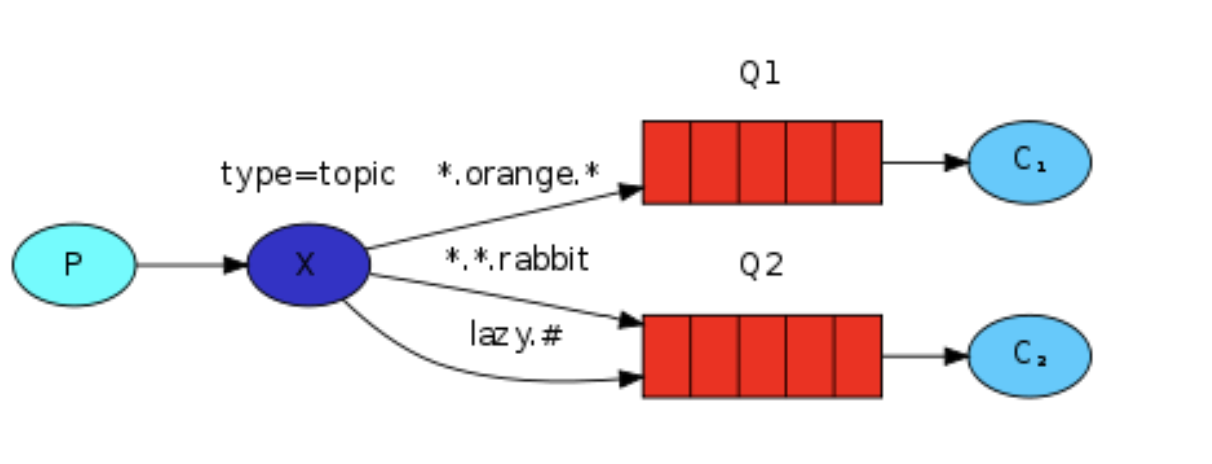
四.主题模式
如下图所示:发送端不只按固定的routing key发送消息,而是按字符串匹配发送,接收端同样如此,符号#匹配一个或多个词,符号*匹配不多不少一个词。
1.新建消息生产者
首先创建TopicExchange类型交换机,即
	@Bean
    public TopicExchange topicexchange() {
        return new TopicExchange(EXCHANGE_D);
    }
然后创建不同匹配模式绑定到消息队列
  //针对主题模式交换机,绑定到消息队列C  前缀匹配到topic.lss0555 即可接受
    @Bean
    Binding bindingExchangeMessage(Queue queueC, TopicExchange exchange) {
        return BindingBuilder.bind(queueC).to(exchange).with("topic.lss0555");
    }
    //针对主题模式交换机,绑定到消息队列D  前缀匹配到topic. 即可接受
    @Bean
    Binding bindingExchangeMessage2(Queue queueD, TopicExchange exchange) {
        return BindingBuilder.bind(queueD).to(exchange).with("topic.#");
    }
新建3个消息生产者,发送消息到到交换机上,匹配关键字,以供测试使用
匹配关键字 topic.12345
  public void sendMsg6_1(String content) {
        rabbitTemplate.convertAndSend(RabbitConfig.EXCHANGE_D, "topic.12345", content);
    }
匹配关键字 topic.lss0555
   public void sendMsg6_2(String content) {
        rabbitTemplate.convertAndSend(RabbitConfig.EXCHANGE_D, "topic.lss0555", content);
    }
匹配关键字 topic.lss05556666
  public void sendMsg6_3(String content) {
        rabbitTemplate.convertAndSend(RabbitConfig.EXCHANGE_D, "topic.lss05556666", content);
    }
访问方法 sendMsg6_1
结果如下,符合预期
INFO c.e.s.r.MsgReceive.QueueBReceiver_D - 接收处理队列D消息: hello
访问方法 sendMsg6_2
结果如下,符合预期
INFO  c.e.s.r.MsgReceive.QueueBReceiver_C - 接收处理队列C消息: hello
INFO  c.e.s.r.MsgReceive.QueueBReceiver_D - 接收处理队列D消息: hello
访问方法 sendMsg6_3
结果如下,符合预期
INFO c.e.s.r.MsgReceive.QueueBReceiver_D - 接收处理队列D消息: hello