打响2019第一炮-Python爬虫入门
2018年已经成为过去,还记得在2018年新年写过一篇【Shell编程】打响2018第一炮-shell编程之for循环语句,那在此时此刻,也是写一篇关于编程方面,不过要比18年的稍微高级点。 So,mark一下,也希望对您有所帮助。
进入正题,在双十一想必大家都逛过淘宝and京东,比如我们需要买一部手机或电脑,但是我们需要点开手机或者电脑页面看需要购买的商品价格,型号,评论,等等信息。 你没有听错,本章目的获取京东商城手机&电脑的数据,包括价格,评论,型号等信息。
一、认识爬虫
1.1、什么是爬虫?
爬虫:一段自动抓取互联网信息的程序,从互联网上抓取对于我们有价值的信息。
1.2、Python爬虫架构
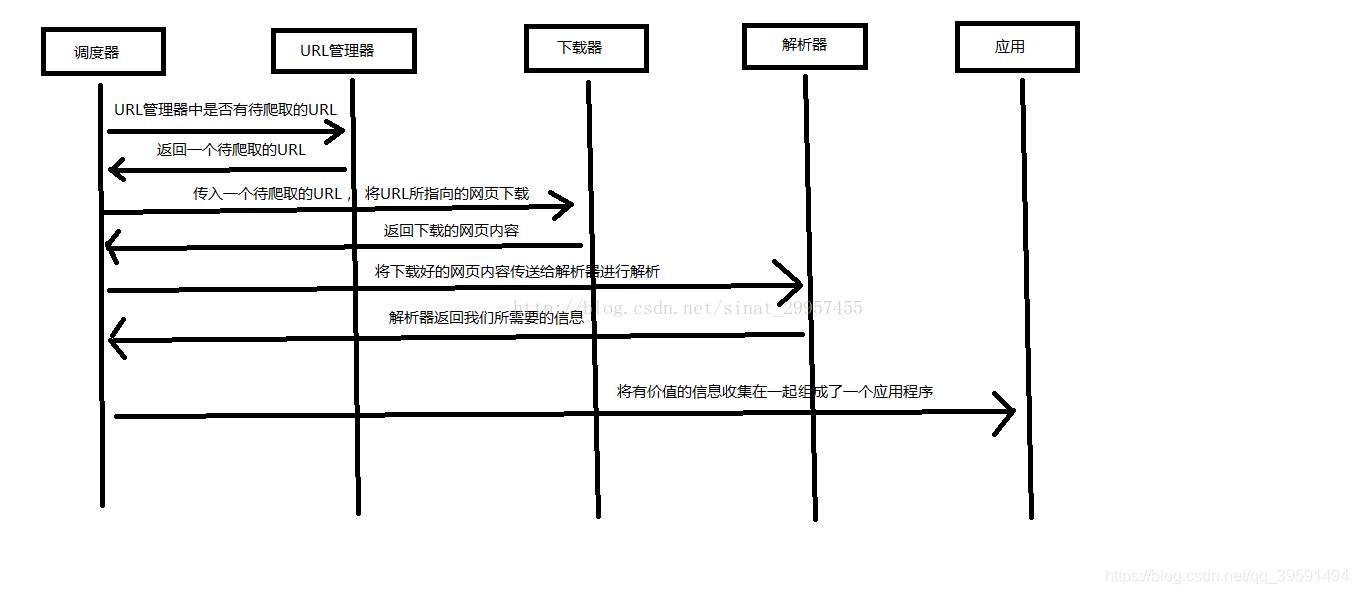
- 调度器:相当于一台电脑的CPU,主要负责调度URL管理器、下载器、解析器之间的协调工作。
- URL管理器:包括待爬取的URL地址和已爬取的URL地址,防止重复抓取URL和循环抓取URL,实现URL管理器主要用三种方式,通过内存、数据库、缓存数据库来实现。
- 网页下载器:通过传入一个URL地址来下载网页,将网页转换成一个字符串,网页下载器有urllib2(Python官方基础模块)包括需要登录、代理、和cookie,requests(第三方包)
- 网页解析器:将一个网页字符串进行解析,可以按照我们的要求来提取出我们有用的信息,也可以根据DOM树的解析方式来解析。网页解析器有正则表达式(直观,将网页转成字符串通过模糊匹配的方式来提取有价值的信息,当文档比较复杂的时候,该方法提取数据的时候就会非常的困难)、html.parser(Python自带的)、beautifulsoup(第三方插件,可以使用Python自带的html.parser进行解析,也可以使用lxml进行解析,相对于其他几种来说要强大一些)、lxml(第三方插件,可以解析 xml 和 HTML),html.parser 和 beautifulsoup 以及 lxml 都是以 DOM 树的方式进行解析的。
- 应用程序:就是从网页中提取的有用数据组成的一个应用。
下面用一个图来解释一下调度器是如何协调工作的:
以上内容来自:http://www.runoob.com/w3cnote/python-spider-intro.html
二、训练爬虫
训练自己爬虫的技巧,从简单的网页开始,掌握多种技能(语言,html,css,js等等),在训练的过程中积累经验,逐渐可以爬取任意类型的网站。
2.1、爬前准备
2.1.1、爬虫类型
- 小爬:各种库来爬
- 中爬:框架
- 大爬:搜索引擎
2.1.2、目的
- 解决数据来源的问题
- 做行业分析
- 完成自动化操作
- 做搜索引擎
2.1.3、目标类型
- 新闻/博客/微博
- 图片
- 新闻
- 评论
- 电影视频
- 视频
- 评论
- 音乐
- 音频
- 评论
三、开始爬虫
本章为爬虫入门,所以我们只需要安装几个Python库即可,如下:
-
requests | pip install requests -
bs4 | pip install bs4 -
lxml | pip install lxml
3.1、Python之requests库
快速上手
requests已安装requests最新版
让我们从一些简单的示例开始吧。
3.1.1、发送请求
我们每天访问百度,其实就是一次请求,这个requests作用其实就是使用代码模拟我们人类给网站发送了一次请求。 首先我们需要导入requests库 如下:
In [2]: import requests # 导入requests库
导入之后我们就可以使用requests库中的方法了,例如我们需要获取我csdn某一篇文章。
r = requests.get('https://blog.csdn.net/qq_39591494/article/details/85331388')
现在,我们有一个名字为:r的Response响应对象,也就是我们访问网站,网站肯定会给我们数据。一些参数如下:
In [4]: r.status_code # 查看访问状态码 200为ok 是成功的
Out[4]: 200
In [5]: r.headers # 查看响应头部
Out[5]:
{'Server': 'openresty',
'Date': 'Tue, 01 Jan 2019 06:52:56 GMT',
'Content-Type': 'text/html; charset=UTF-8',
'Transfer-Encoding': 'chunked',
'Connection': 'keep-alive',
'Keep-Alive': 'timeout=20',
'Set-Cookie': 'uuid_tt_dd=10_7631126010-1546325576025-268248; Expires=Thu, 01 Jan 2025 00:00:00 GMT; Path=/; Domain=.csdn.net;, dc_session_id=10_1546325576025.334557; Expires=Thu, 01 Jan 2025 00:00:00 GMT; Path=/; Domain=.csdn.net;',
'Vary': 'Accept-Encoding',
'Content-Encoding': 'gzip', 'Strict-Transport-Security': 'max-age= 31536000'}

r.request.headers # 请求头
Out[6]: {'User-Agent': 'python-requests/2.20.0',
'Accept-Encoding': 'gzip, deflate',
'Accept': '*/*',
'Connection': 'keep-alive'}
Requests简便的API意味着所有HTTP请求类型都是显而易见的。例如,你可以这样发送一个HTTP POST请求:
r = requests.post("http://httpbin.org/post")
漂亮,对吧?那么其他HTTP请求类型:PUT, DELETE, HEAD以及OPTIONS又是如何的呢?都是一样的简单:
In [11]: r = requests.put("http://httpbin.org/put")
In [12]: r = requests.delete("http://httpbin.org/delete")
n [13]:  r = requests.head("http://httpbin.org/get")
In [14]: r = requests.options("http://httpbin.org/get")
在这里http://httpbin.org/只是一个测试网站
3.1.2、Json响应内容
若网站响应的内容为json格式那么requests中也有一个内置的JSON解码器,助你处理JSON数据:
In [21]: r = requests.get('http://httpbin.org/json')

In [22]: r.status_code
Out[22]: 200

In [23]: r.json()
Out[23]:
{'slideshow': {'author': 'Yours Truly',
  'date': 'date of publication',
  'slides': [{'title': 'Wake up to WonderWidgets!', 'type': 'all'},
   {'items': ['Why <em>WonderWidgets</em> are great',
     'Who <em>buys</em> WonderWidgets'],
    'title': 'Overview',
    'type': 'all'}],
  'title': 'Sample Slide Show'}}
如何查看返回源码?
In [25]: r = requests.get('http://httpbin.org/')

In [26]: r.status_code
Out[26]: 200

In [27]: r.text
更多requests内容请参考:http://docs.python-requests.org/zh_CN/latest/#
3.2、Python爬虫利器二之Beautiful Soup的用法
简单来说,Beautiful Soup 是python的一个库,最主要的功能是从网页抓取数据。官方解释如下:
Beautiful Soup提供一些简单的、python式的函数用来处理导航、搜索、修改分析树等功能。它是一个工具箱,通过解析文档为用户提供需要抓取的数据,因为简单,所以不需要多少代码就可以写出一个完整的应用程序Beautiful Soup自动将输入文档转换为Unicode编码,输出文档转换为utf-8编码。你不需要考虑编码方式,除非文档没有指定一个编码方式,这时,Beautiful Soup就不能自动识别编码方式了。然后,你仅仅需要说明一下原始编码方式就可以了Beautiful Soup已成为和lxml、html6lib一样出色的python解释器,为用户灵活地提供不同的解析策略或强劲的速度。
3.2.1、Beautiful Soup安装
Beautiful Soup 3 目前已经停止开发,推荐在现在的项目中使用Beautiful Soup 4,不过它已经被移植到BS4了,也就是说导入时我们需要 import bs4 。所以这里我们用的版本是 Beautiful Soup 4.3.2 (简称BS4)。
bs4已安装bs4最新版
下表列出了主要的解析器,以及它们的优缺点:
| 解析器 | 使用方法 | 优势 | 劣势 |
|---|---|---|---|
| Python标准库 | BeautifulSoup(markup, “html.parser”) | Python的内置标准库,执行速度适中,文档容错能力强 | Python 2.7.3 or 3.2.2)前 的版本中文档容错能力差 |
| lxml HTML 解析器 | BeautifulSoup(markup, “lxml”) | 速度快、文档容错能力强 | 需要安装C语言库 |
| lxml XML 解析器 | BeautifulSoup(markup, “xml”)、BeautifulSoup(markup, [“lxml”, “xml”]) | 速度快、唯一支持XML的解析器 | 需要安装C语言库 |
| html5lib | BeautifulSoup(markup, “html5lib”) | 最好的容错性、以浏览器的方式解析文档、生成HTML5格式的文档 | 速度慢、不依赖外部扩展 |
以下内容通过soup对象调用
| 方法/属性 | 含义 | 示例 |
|---|---|---|
| prettify() | 漂亮的格式化打印内容 | soup.prettify() |
| text | 返回标签里面的字符串 | soup.text |
| tag | html 文档中的标签名 | soup.head、soup.title、soup.p等 |
| find() | 返回第一个找到的对象 | soup.find(‘a’) |
| find_all() | 返回所有找到的对象 | soup.find_all(‘a’) |
| get() | 根据soup里面对象的属性取到数据,类似字典。 | for link soup.find_all(‘a’): —> print(‘link.get(‘href’)’) |
本章内容重点学习find & find_all即可, 案例代码
html_doc = """
<html><head><title>The Dormouse's story</title></head>

<p class="title"><b>The Dormouse's story</b></p>

<p class="story">Once upon a time there were three little sisters; and their names were
<a href="http://example.com/elsie" class="sister" id="link1">Elsie</a>,
<a href="http://example.com/lacie" class="sister" id="link2">Lacie</a> and
<a href="http://example.com/tillie" class="sister" id="link3">Tillie</a>;
and they lived at the bottom of a well.</p>

<p class="story">...</p>
"""
查找所有关于title标签
#!/usr/bin/env python
# -*- coding:utf-8 -*-
from bs4 import BeautifulSoup
soup = BeautifulSoup(html_doc, 'lxml')
title = soup.find_all('title')
print(title)
>>> [<title>The Dormouse's story</title>]
查找所有的p标签
#!/usr/bin/env python
# -*- coding:utf-8 -*-
from bs4 import BeautifulSoup
soup = BeautifulSoup(html_doc, 'lxml')
p = soup.find_all('p')
print(p)
>>>
[<p class="title"><b>The Dormouse's story</b></p>, <p class="story">Once upon a time there were three little sisters; and their names were
<a class="sister" href="http://example.com/elsie" id="link1">Elsie</a>,
<a class="sister" href="http://example.com/lacie" id="link2">Lacie</a> and
<a class="sister" href="http://example.com/tillie" id="link3">Tillie</a>;
and they lived at the bottom of a well.</p>, <p class="story">...</p>]
查找p标签中的title
#!/usr/bin/env python
# -*- coding:utf-8 -*-

from bs4 import BeautifulSoup
soup = BeautifulSoup(html_doc, 'lxml')
p = soup.find_all('p', 'title')
print(p)
>>> [<p class="title"><b>The Dormouse's story</b></p>]
查找a标签
#!/usr/bin/env python
# -*- coding:utf-8 -*-
from bs4 import BeautifulSoup
soup = BeautifulSoup(html_doc, 'lxml')
a = soup.find_all('a')
print(a)
>>>
[<a class="sister" href="http://example.com/elsie" id="link1">Elsie</a>,
<a class="sister" href="http://example.com/lacie" id="link2">Lacie</a>,
<a class="sister" href="http://example.com/tillie" id="link3">Tillie</a>]
查找id="link2"标签
#!/usr/bin/env python
# -*- coding:utf-8 -*-
from bs4 import BeautifulSoup
soup = BeautifulSoup(html_doc, 'lxml')
link = soup.find_all(id="link2")
print(link)
>>> [<a class="sister" href="http://example.com/lacie" id="link2">Lacie</a>]
查找所包含id属性的tag
#!/usr/bin/env python
# -*- coding:utf-8 -*-
from bs4 import BeautifulSoup
soup = BeautifulSoup(html_doc, 'lxml')
link = soup.find_all(id=True)
print(link)
>>>
[<a class="sister" href="http://example.com/elsie" id="link1">Elsie</a>,
<a class="sister" href="http://example.com/lacie" id="link2">Lacie</a>,
<a class="sister" href="http://example.com/tillie" id="link3">Tillie</a>]
使用多个指定名字的参数可以同时过滤tag的多个属性:
#!/usr/bin/env python
# -*- coding:utf-8 -*-
import re
from bs4 import BeautifulSoup
soup = BeautifulSoup(html_doc, 'lxml')
link = soup.find_all(href=re.compile("lacie"), id="link2")
print(link)
>>> [<a class="sister" href="http://example.com/lacie" id="link2">Lacie</a>]
按CSS搜索
按照CSS类名搜索tag的功能非常实用,但标识CSS类名的关键字class在Python中是保留字,使用 class 做参数会导致语法错误.从Beautiful Soup的4.1.1版本开始,可以通过class_ 参数搜索有指定CSS类名的tag。
#!/usr/bin/env python
# -*- coding:utf-8 -*-
import re
from bs4 import BeautifulSoup
soup = BeautifulSoup(html_doc, 'lxml')
CLS = soup.find('a', class_ = "sister")
print(CLS)
>>> <a class="sister" href="http://example.com/elsie" id="link1">Elsie</a>
#!/usr/bin/env python
# -*- coding:utf-8 -*-
import re
from bs4 import BeautifulSoup
soup = BeautifulSoup(html_doc, 'lxml')
CLS = soup.find_all('a', class_ = "sister")
print(CLS)
>>>
[<a class="sister" href="http://example.com/elsie" id="link1">Elsie</a>,
<a class="sister" href="http://example.com/lacie" id="link2">Lacie</a>,
<a class="sister" href="http://example.com/tillie" id="link3">Tillie</a>]
结合正则查找
#!/usr/bin/env python
# -*- coding:utf-8 -*-
import re
from bs4 import BeautifulSoup
soup = BeautifulSoup(html_doc, 'lxml')
CLS = soup.find(class_ = re.compile("ti"))
print(CLS)
>>> <p class="title"><b>The Dormouse's story</b></p>
完全匹配 class 的值时,如果CSS类名的顺序与实际不符,将搜索不到结果:
#!/usr/bin/env python
# -*- coding:utf-8 -*-
import re
from bs4 import BeautifulSoup
soup = BeautifulSoup(html_doc, 'lxml')
CLS = soup.find('p', attrs={'class':'title'})
print(CLS)
>>> <p class="title"><b>The Dormouse's story</b></p>
更多关于Beautiful Soup内容:https://www.crummy.com/software/BeautifulSoup/bs4/doc.zh/
3.3、开始正题
经过以上的铺垫,现在正式开始写代码,我们需要获取京东的电脑数据,首先我们需要打开京东网站去搜索电脑如下:
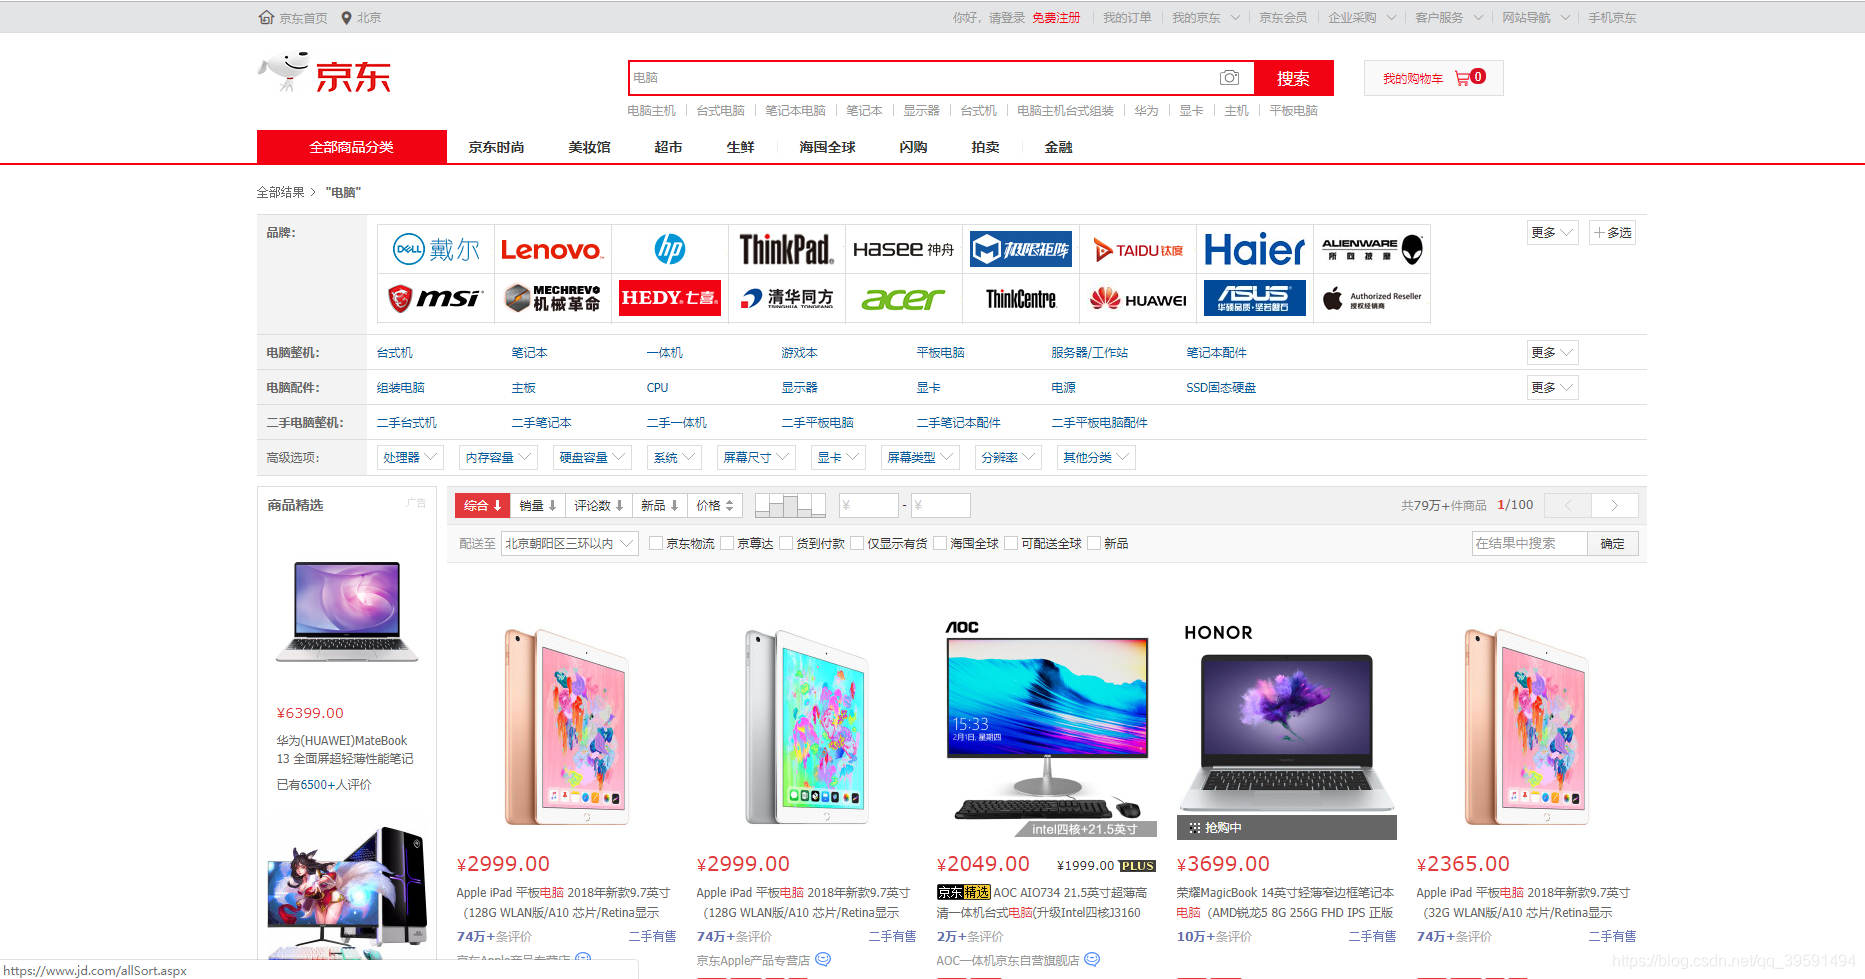
3.3.1、选择其中一台电脑选择右键检查


我们目的是需要取京东这一个页面上所有的电脑数据,包括价格,评论,名称等数据,那么在取所有数据之前我们第一步应该需要取第一台电脑的数据,如下:
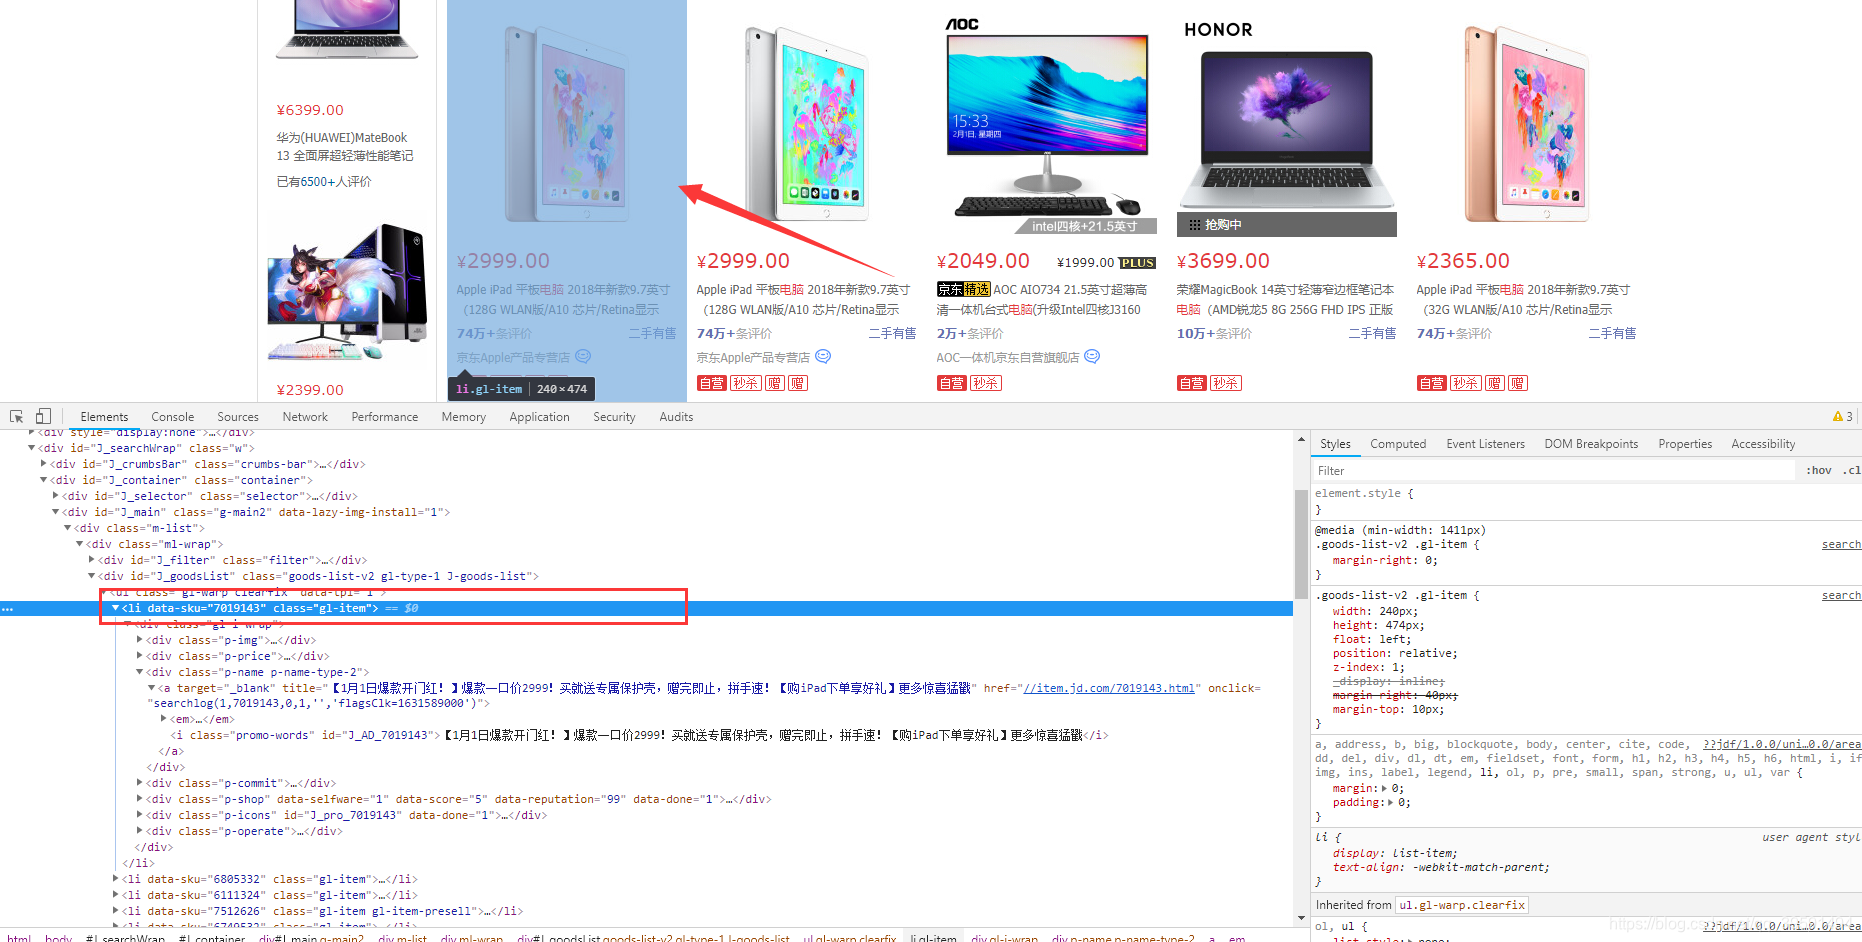
当我们选中Li标签时,页面会将水印指定到第一台电脑上,如果我们选择第二个Li标签呢? 如下:
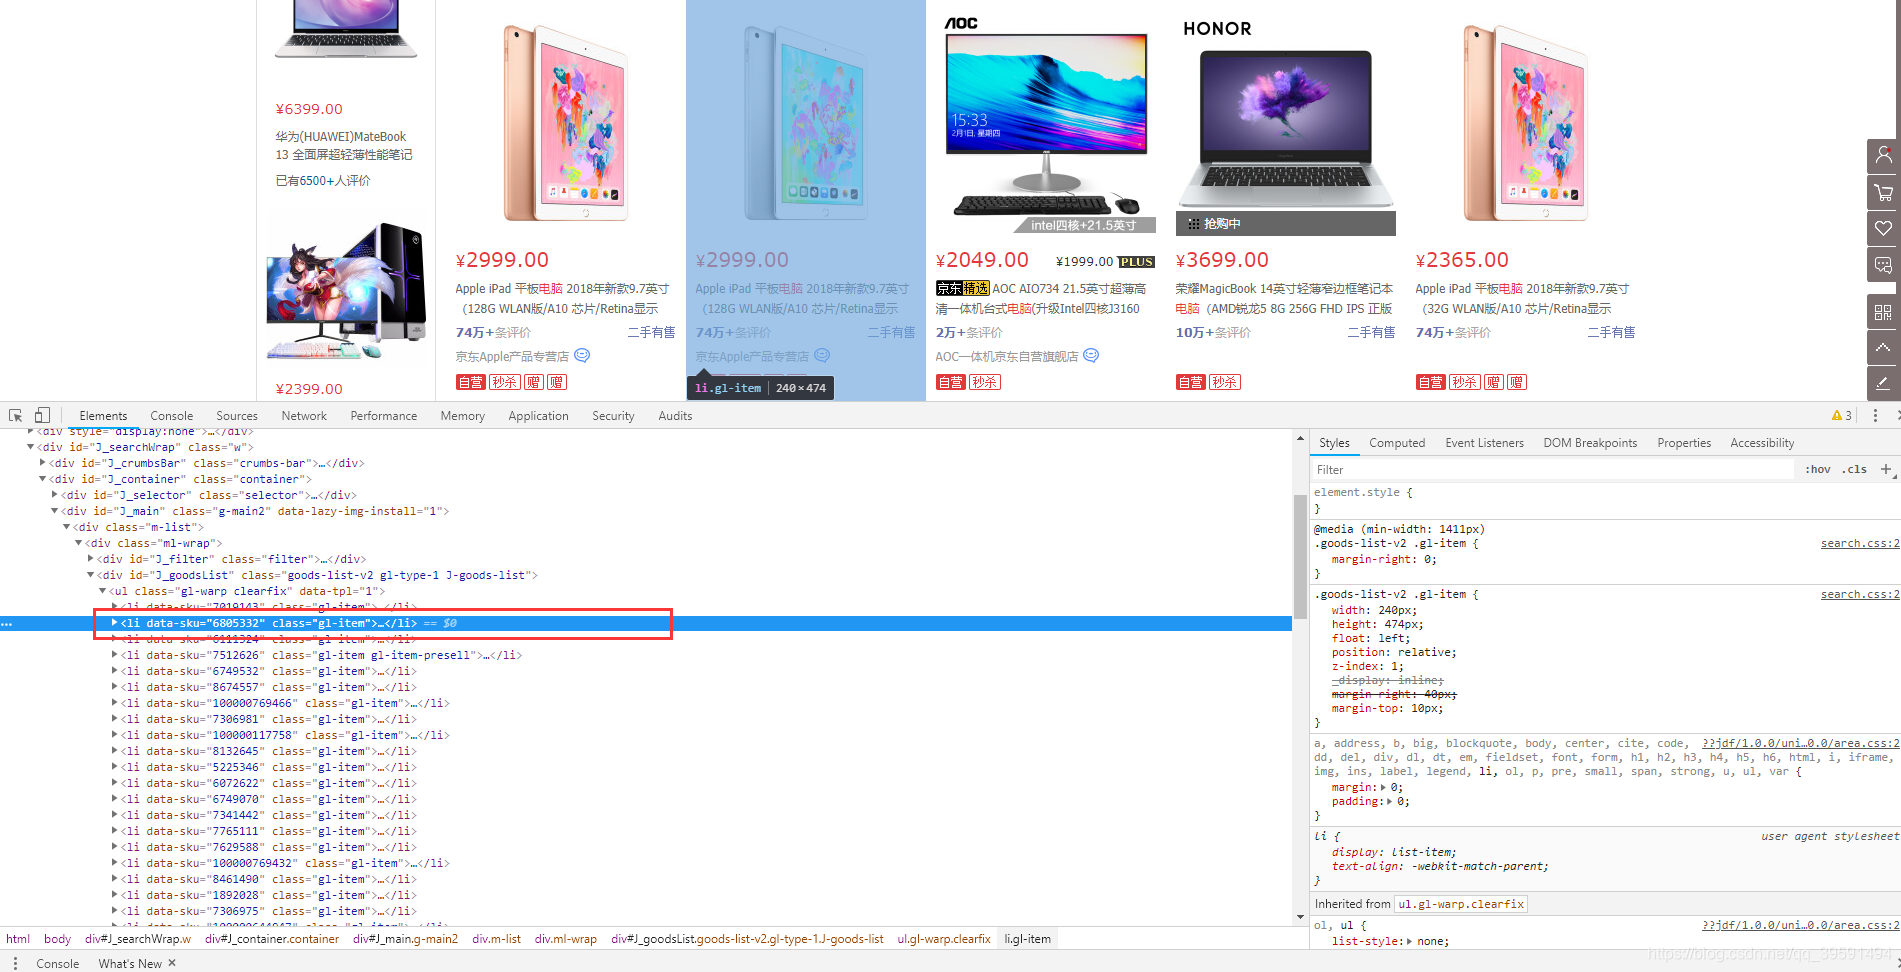
因此可以得出,在目前此页面中每一台电脑的数据都在< li data-sku >标签中。将< li data-sku >代码拷贝。选中< Li data-sku=“6805332”>—>右键—>Copy—>Copy elemrent. 内容如下:
<li data-sku="6805332" class="gl-item">
<div class="gl-i-wrap">
<div class="p-img">
<a target="_blank" title="【1月1日爆款开门红!】爆款一口价2999!买就送专属保护壳,赠完即止,拼手速!【购iPad下单享好礼】更多惊喜猛戳" href="//item.jd.com/6805332.html" onclick="searchlog(1,6805332,1,2,'','flagsClk=1631589000')">
<img width="220" height="220" class="" data-img="1" source-data-lazy-img="" data-lazy-img="done" src="//img12.360buyimg.com/n7/jfs/t16759/298/1134242689/85617/2b4ccc02/5abb0fd5Nd40c72e1.jpg">
</a> <div data-lease="" data-catid="2694" data-venid="1000000127" data-presale="" data-done="1"></div>
</div>
<div class="p-price">
<strong class="J_6805332" data-done="1"><em>¥</em><i>2999.00</i></strong> </div>
<div class="p-name p-name-type-2">
<a target="_blank" title="【1月1日爆款开门红!】爆款一口价2999!买就送专属保护壳,赠完即止,拼手速!【购iPad下单享好礼】更多惊喜猛戳" href="//item.jd.com/6805332.html" onclick="searchlog(1,6805332,1,1,'','flagsClk=1631589000')">
<em>Apple iPad 平板<font class="skcolor_ljg">电脑</font> 2018年新款9.7英寸(128G WLAN版/A10 芯片/Retina显示屏/Touch ID MR7K2CH/A)银色</em>
<i class="promo-words" id="J_AD_6805332">【1月1日爆款开门红!】爆款一口价2999!买就送专属保护壳,赠完即止,拼手速!【购iPad下单享好礼】更多惊喜猛戳</i>
</a>
</div>
<div class="p-commit">
<a target="_blank" href="//paipai.jd.com/pc/list.html?pid=6805332" class="spu-link">二手有售</a>
<strong><a id="J_comment_6805332" target="_blank" href="//item.jd.com/6805332.html#comment" onclick="searchlog(1,6805332,1,3,'','flagsClk=1631589000')">74万+</a>条评价</strong>
</div>
<div class="p-shop" data-selfware="1" data-score="5" data-reputation="99" data-done="1">
<span class="J_im_icon"><a target="_blank" class="curr-shop" onclick="searchlog(1,1000000127,0,58)" href="//mall.jd.com/index-1000000127.html" title="京东Apple产品专营店">京东Apple产品专营店</a><b class="im-02" style="background:url(//img14.360buyimg.com/uba/jfs/t26764/156/1205787445/713/9f715eaa/5bc4255bN0776eea6.png) no-repeat;" title="联系客服" onclick="searchlog(1,1000000127,0,61)"></b></span> </div>
<div class="p-icons" id="J_pro_6805332" data-done="1">
<i class="goods-icons J-picon-tips J-picon-fix" data-idx="1" data-tips="京东自营,品质保障">自营</i>
<i class="goods-icons4 J-picon-tips J-picon-fix" data-tips="天天低价,正品保证">秒杀</i><i class="goods-icons4 J-picon-tips" data-tips="购买本商品送赠品">赠</i>
<i class="goods-icons4 J-picon-tips" data-tips="购买本商品送赠品">赠</i> </div>
<div class="p-operate">
<a class="p-o-btn contrast J_contrast" data-sku="6805332" href="javascript:;" onclick="searchlog(1,6805332,1,6,'','flagsClk=1631589000')"><i></i>对比</a>
<a class="p-o-btn focus J_focus" data-sku="6805332" href="javascript:;" onclick="searchlog(1,6805332,1,5,'','flagsClk=1631589000')"><i></i>关注</a>
<a class="p-o-btn addcart" href="//cart.jd.com/gate.action?pid=6805332&pcount=1&ptype=1" target="_blank" onclick="searchlog(1,6805332,1,4,'','flagsClk=1631589000')" data-limit="0"><i></i>加入购物车</a>
</div>
</div>
</li>
以上代码就是刚刚页面中的某一台电脑的源码,接下来我们就可以通过bs4 取到我们的内容如下:
查找电脑价格

#!/usr/bin/env python
# -*- coding:utf-8 -*-
import re
from bs4 import BeautifulSoup

jd_Computer_html = """
<li data-sku="6805332" class="gl-item">
------------------------------>此内容为单台电脑源码
"""

soup = BeautifulSoup(jd_Computer_html, "lxml")
Computer_price = soup.find('div', attrs={'class':'p-price'}).find('i').text
print(f"电脑的价格为:{Computer_price}元")
>>> 电脑的价格为:2999.00元
获取电脑名称
Computer_price = soup.find('div', attrs={'class':'p-price'}).find('i').text
print(f"电脑的价格为:{Computer_price}元")

Computer_name = soup.find('div', attrs={'class':'p-name p-name-type-2'}).find('em').text
print(f"电脑的名称为:{Computer_name}")
>>>
电脑的价格为:2999.00元
电脑的名称为:Apple iPad 平板电脑 2018年新款9.7英寸(128G WLAN版/A10 芯片/Retina显示屏/Touch ID MR7K2CH/A)银色
获取电脑地址

soup = BeautifulSoup(jd_Computer_html, "lxml")

Computer_price = soup.find('div', attrs={'class':'p-price'}).find('i').text
print(f"电脑的价格为:{Computer_price}元")

Computer_name = soup.find('div', attrs={'class':'p-name p-name-type-2'}).find('em').text
print(f"电脑的名称为:{Computer_name}")
>>>
电脑的价格为:2999.00元
电脑的名称为:Apple iPad 平板电脑 2018年新款9.7英寸(128G WLAN版/A10 芯片/Retina显示屏/Touch ID MR7K2CH/A)银色
完整代码
#!/usr/bin/env python
# -*- coding:utf-8 -*-
import re
from bs4 import BeautifulSoup
jd_Computer_html = """
<li data-sku="6805332" class="gl-item">
<div class="gl-i-wrap">
<div class="p-img">
<a target="_blank" title="【1月1日爆款开门红!】爆款一口价2999!买就送专属保护壳,赠完即止,拼手速!【购iPad下单享好礼】更多惊喜猛戳" href="//item.jd.com/6805332.html" onclick="searchlog(1,6805332,1,2,'','flagsClk=1631589000')">
<img width="220" height="220" class="" data-img="1" source-data-lazy-img="" data-lazy-img="done" src="//img12.360buyimg.com/n7/jfs/t16759/298/1134242689/85617/2b4ccc02/5abb0fd5Nd40c72e1.jpg">
</a> <div data-lease="" data-catid="2694" data-venid="1000000127" data-presale="" data-done="1"></div>
</div>
<div class="p-price">
<strong class="J_6805332" data-done="1"><em>¥</em><i>2999.00</i></strong> </div>
<div class="p-name p-name-type-2">
<a target="_blank" title="【1月1日爆款开门红!】爆款一口价2999!买就送专属保护壳,赠完即止,拼手速!【购iPad下单享好礼】更多惊喜猛戳" href="//item.jd.com/6805332.html" onclick="searchlog(1,6805332,1,1,'','flagsClk=1631589000')">
<em>Apple iPad 平板<font class="skcolor_ljg">电脑</font> 2018年新款9.7英寸(128G WLAN版/A10 芯片/Retina显示屏/Touch ID MR7K2CH/A)银色</em>
<i class="promo-words" id="J_AD_6805332">【1月1日爆款开门红!】爆款一口价2999!买就送专属保护壳,赠完即止,拼手速!【购iPad下单享好礼】更多惊喜猛戳</i>
</a>
</div>
<div class="p-commit">
<a target="_blank" href="//paipai.jd.com/pc/list.html?pid=6805332" class="spu-link">二手有售</a>
<strong><a id="J_comment_6805332" target="_blank" href="//item.jd.com/6805332.html#comment" onclick="searchlog(1,6805332,1,3,'','flagsClk=1631589000')">74万+</a>条评价</strong>
</div>
<div class="p-shop" data-selfware="1" data-score="5" data-reputation="99" data-done="1">
<span class="J_im_icon"><a target="_blank" class="curr-shop" onclick="searchlog(1,1000000127,0,58)" href="//mall.jd.com/index-1000000127.html" title="京东Apple产品专营店">京东Apple产品专营店</a><b class="im-02" style="background:url(//img14.360buyimg.com/uba/jfs/t26764/156/1205787445/713/9f715eaa/5bc4255bN0776eea6.png) no-repeat;" title="联系客服" onclick="searchlog(1,1000000127,0,61)"></b></span> </div>
<div class="p-icons" id="J_pro_6805332" data-done="1">
<i class="goods-icons J-picon-tips J-picon-fix" data-idx="1" data-tips="京东自营,品质保障">自营</i>
<i class="goods-icons4 J-picon-tips J-picon-fix" data-tips="天天低价,正品保证">秒杀</i><i class="goods-icons4 J-picon-tips" data-tips="购买本商品送赠品">赠</i>
<i class="goods-icons4 J-picon-tips" data-tips="购买本商品送赠品">赠</i> </div>
<div class="p-operate">
<a class="p-o-btn contrast J_contrast" data-sku="6805332" href="javascript:;" onclick="searchlog(1,6805332,1,6,'','flagsClk=1631589000')"><i></i>对比</a>
<a class="p-o-btn focus J_focus" data-sku="6805332" href="javascript:;" onclick="searchlog(1,6805332,1,5,'','flagsClk=1631589000')"><i></i>关注</a>
<a class="p-o-btn addcart" href="//cart.jd.com/gate.action?pid=6805332&pcount=1&ptype=1" target="_blank" onclick="searchlog(1,6805332,1,4,'','flagsClk=1631589000')" data-limit="0"><i></i>加入购物车</a>
</div>
</div>
</li>
"""
soup = BeautifulSoup(jd_Computer_html, "lxml")
Computer_price = soup.find('div', attrs={'class':'p-price'}).find('i').text
print(f"电脑的价格为:{Computer_price}元")
Computer_name = soup.find('div', attrs={'class':'p-name p-name-type-2'}).find('em').text
print(f"电脑的名称为:{Computer_name}")
>>>
电脑的价格为:2999.00元
电脑的名称为:Apple iPad 平板电脑 2018年新款9.7英寸(128G WLAN版/A10 芯片/Retina显示屏/Touch ID MR7K2CH/A)银色
3.3.2、获取全部电脑信息
在以上例子中我们找到了京东某一台电脑的源码,使用Beautiful Soup找到商品的价格,名称,地址,ID等信息,如果需要找到全部的电脑信息那么我们需要通过循环来一条条找到商品的信息标签。
目前得知所有的< Li >标签为每台电脑如下:

我们只需要通过循环把每台电脑找到也就是< Li > 然后通过BeautifulSoup方法来循环找到我们需要的数据即可。
download 函数
#!/usr/bin/env python
# -*- coding:utf-8 -*-
import re
import requests
from requests.exceptions import RequestException
from bs4 import BeautifulSoup

def download(url, headers, num_retries=3):
    print("download", url)
    try:
        response = requests.get(url, headers=headers)
        print(response.status_code)
        if response.status_code == 200:
            return response.content

        return None
    except RequestException as e:
        print(e.response)
        html = ""
        if hasattr(e.response, 'status_code'):
            code = e.response.status_code
            print('error code', code)
            if num_retries > 0 and 500 <= code < 600:
                html = download(url, headers, num_retries - 1)
        else:
            code = None
    return html
find函数
def find_Computer(url, headers):
    r = download(url, headers=headers)
    # print(r)
    page = BeautifulSoup(r, "lxml")

    all_items = page.find_all('li', attrs={'class':'gl-item'})
    for all in all_items:

        Computer_id = all["data-sku"]
        print(f"电脑ID为:{Computer_id}")

        Computer_price = all.find('div', attrs={'class': 'p-price'}).find('i').text
        print(f"电脑的价格为:{Computer_price}元")

        Computer_name = all.find('div', attrs={'class': 'p-name p-name-type-2'}).find('em').text
        print(f"电脑的名称为:{Computer_name}")
main()
def main():
    headers = {
        'User-agent': "Mozilla/5.0 (Windows NT 10.0; WOW64) AppleWebKit/537.36 (KHTML, like Gecko) Chrome/66.0.3359.139 Safari/537.36",
        "referer": "https://passport.jd.com"
    }
    URL = "https://search.jd.com/Search?keyword=%E7%94%B5%E8%84%91&enc=utf-8&wq=%E7%94%B5%E8%84%91&pvid=1ff18312e8ef48febe71a66631674848"

    find_Computer(URL, headers=headers)
download函数有三个参数url、headers、num_retries、url为商品的地址,headers为请求头部,num_retries重试次数
流程:
1、要取所有的电脑数据,首先得获得所有电脑的网页源码,以及url地址如下:


2、首先使用requests库中的.get方法发送一个请求至京东电脑页面,头部修改为浏览器访问,否则默认为python

如果相应的状态码为:200 那么return 返回网站源码,如果访问非200则调用重试

3、状态码返回200后证明是正常的,将返回的源码通过 BeautifulSoup 生成对象page,接下来就可以通过page对象对返回的源码进行查找等操作:

4、接下来通过for循环将找到的所有电脑源码进行循环。如下:

5、最后输出结果
如下:

代码如下:
#!/usr/bin/env python
# -*- coding:utf-8 -*-
import re
import requests
from requests.exceptions import RequestException
from bs4 import BeautifulSoup

def download(url, headers, num_retries=3):
    print("download", url)
    try:
        response = requests.get(url, headers=headers)
        print(response.status_code)
        if response.status_code == 200:
            return response.content

        return None
    except RequestException as e:
        print(e.response)
        html = ""
        if hasattr(e.response, 'status_code'):
            code = e.response.status_code
            print('error code', code)
            if num_retries > 0 and 500 <= code < 600:
                html = download(url, headers, num_retries - 1)
        else:
            code = None
    return html


def find_Computer(url, headers):
    r = download(url, headers=headers)
    # print(r)
    page = BeautifulSoup(r, "lxml")

    all_items = page.find_all('li', attrs={'class':'gl-item'})
    for all in all_items:

        Computer_id = all["data-sku"]
        print(f"电脑ID为:{Computer_id}")

        Computer_price = all.find('div', attrs={'class': 'p-price'}).find('i').text
        print(f"电脑的价格为:{Computer_price}元")

        Computer_name = all.find('div', attrs={'class': 'p-name p-name-type-2'}).find('em').text
        print(f"电脑的名称为:{Computer_name}")


def main():
    headers = {
        'User-agent': "Mozilla/5.0 (Windows NT 10.0; WOW64) AppleWebKit/537.36 (KHTML, like Gecko) Chrome/66.0.3359.139 Safari/537.36",
        "referer": "https://passport.jd.com"
    }
    URL = "https://search.jd.com/Search?keyword=%E7%94%B5%E8%84%91&enc=utf-8&wq=%E7%94%B5%E8%84%91&pvid=1ff18312e8ef48febe71a66631674848"

    find_Computer(URL, headers=headers)

if __name__ == '__main__':
    main()
末:将数据保存至csv
#!/usr/bin/env python
# -*- coding:utf-8 -*-

import requests
import csv
from requests.exceptions import RequestException
from bs4 import BeautifulSoup

def download(url, headers, num_retries=3):
    print("download", url)
    try:
        response = requests.get(url, headers=headers)
        print(response.status_code)
        if response.status_code == 200:
            return response.content

        return None
    except RequestException as e:
        print(e.response)
        html = ""
        if hasattr(e.response, 'status_code'):
            code = e.response.status_code
            print('error code', code)
            if num_retries > 0 and 500 <= code < 600:
                html = download(url, headers, num_retries - 1)
        else:
            code = None
    return html


def find_Computer(url, headers):
    r = download(url, headers=headers)

    page = BeautifulSoup(r, "lxml")

    all_items = page.find_all('li', attrs={'class':'gl-item'})

    with open("Computer.csv", 'w', newline='') as f:
        writer = csv.writer(f)
        fields = ('ID', '名称', '价格')
        writer.writerow(fields)

        for all in all_items:
            Computer_id = all["data-sku"]
            print(f"电脑ID为:{Computer_id}")

            Computer_name = all.find('div', attrs={'class':'p-name p-name-type-2'}).find('em').text
            print(f"电脑的名称为:{Computer_name}")

            Computer_price = all.find('div', attrs={'class':'p-price'}).find('i').text
            print(f"电脑的价格为:{Computer_price}元")

            row = []
            row.append(Computer_id)
            row.append(Computer_name)
            row.append(str(Computer_price) + "元")
            writer.writerow(row)

def main():
    headers = {
        'User-agent': "Mozilla/5.0 (Windows NT 10.0; WOW64) AppleWebKit/537.36 (KHTML, like Gecko) Chrome/66.0.3359.139 Safari/537.36",
        "referer": "https://passport.jd.com"
    }
    URL = "https://search.jd.com/Search?keyword=macbook%20pro&enc=utf-8&suggest=5.def.0.V09&wq=mac&pvid=d3b040ed68154b06a9ff9532a10b4cac"

    find_Computer(URL, headers=headers)

if __name__ == '__main__':
    main()


获取评论、好评度,多页获取等。 2019年第二炮见~~~
新年快乐,希望对您有所帮助,再见~
