CentOS7环境安装Kubernetes四部曲之四:安装kubectl工具
转自--https://blog.csdn.net/boling_cavalry/article/details/79624655
2018年03月20日 16:40:57
阅读数:2117
本文是《CentOS7环境安装Kubernetes四部曲》系列的终篇,经历了前三篇文章的实战,我们用rancher搭建了具备master和node的完整K8S环境,但是目前还不能通过kubectl工具在K8S环境做更多的操作,本章我们来实战安装和配置kubectl工具;
原文地址:http://blog.csdn.net/boling_cavalry/article/details/79624655
前三篇文章链接
- 《CentOS7环境安装Kubernetes四部曲之一:标准化机器准备》;
- 《CentOS7环境安装Kubernetes四部曲之二:配置模板和安装master》;
- 《CentOS7环境安装Kubernetes四部曲之三:添加节点》;
kubectl工具安装在哪里?
kubectl是个客户端工具,可以安装在任意一台Linux、windows或者Mac电脑上,只要这个电脑能够连接master节点,本次实战我们将kubectl安装在一台全新的CentOS7机器上;
下载kubectl工具
有三种下载方式,您可以选择其中任意一种:
1. 在linux机器上执行以下命令下载:
<span style="color:#000000"><code class="language-shell">curl -LO https://storage<span style="color:#009900">.googleapis</span><span style="color:#009900">.com</span>/kubernetes-release/release/$(curl -s https://storage<span style="color:#009900">.googleapis</span><span style="color:#009900">.com</span>/kubernetes-release/release/stable<span style="color:#009900">.txt</span>)/bin/linux/amd64/kubectl</code></span>- 1
2.在我的GitHub下载,地址是:https://github.com/zq2599/blog_demos/blob/master/k8s_tools/kubectl/linux/kubectl.zip,在这个页面点击”download”按钮即可下载,下载后记得解压;
3. 在csdn下载,地址:https://download.csdn.net/download/boling_cavalry/10297309
设置工具
- kubectl文件下载到linux机器后,执行命令chmod +x ./kubectl,给文件可执行权限;
- 执行以下命令,将kubectl移动到可以全局访问的目录下:
<span style="color:#000000"><code class="language-shell">mv ./kubectl /usr/<span style="color:#000088">local</span>/bin/kubectl</code></span>- 1
3. 在linux机器的任意目录都能执行kubectl,直接输入kubectl然后回车,可以看到如下信息:
<span style="color:#000000"><code class="language-shell">kubectl controls the Kubernetes cluster manager.

Find more information <span style="color:#000088">at</span> <span style="color:#000088">https</span>://github.com/kubernetes/kubernetes.

Basic Commands (Beginner):
  <span style="color:#4f4f4f">create</span>         Create a resource <span style="color:#4f4f4f">from</span> a <span style="color:#4f4f4f">file</span> or <span style="color:#4f4f4f">from</span> <span style="color:#000088">stdin</span>.
  expose         Take a replication controller, service, deployment or pod and expose <span style="color:#000088">it</span> <span style="color:#000088">as</span> a <span style="color:#4f4f4f">new</span> Kubernetes Service
  run            Run a particular image <span style="color:#000088">on</span> <span style="color:#009900">the</span> <span style="color:#009900">cluster</span>
  <span style="color:#4f4f4f">set</span>            Set specific features <span style="color:#000088">on</span> <span style="color:#009900">objects</span>
  run-container  Run a particular image <span style="color:#000088">on</span> <span style="color:#009900">the</span> <span style="color:#009900">cluster</span>. <span style="color:#009900">This</span> <span style="color:#009900">command</span> <span style="color:#009900">is</span> <span style="color:#009900">deprecated</span>, <span style="color:#009900">use</span> <span style="color:#009900">"run"</span> <span style="color:#009900">instead</span>

Basic Commands (Intermediate):
  <span style="color:#4f4f4f">get</span>            Display <span style="color:#009900">one</span> or many resources
  explain        Documentation of resources
  edit           Edit a resource <span style="color:#000088">on</span> <span style="color:#009900">the</span> <span style="color:#009900">server</span>
<span style="color:#4f4f4f">delete</span> Delete resources <span style="color:#000088">by</span> filenames, <span style="color:#000088">stdin</span>, resources and names, or <span style="color:#000088">by</span> resources and label selector</code></span>- 1
- 2
- 3
- 4
- 5
- 6
- 7
- 8
- 9
- 10
- 11
- 12
- 13
- 14
- 15
- 16
工具已经准备好,接下来我们把配置做好,使得kubectl可以连接到K8S上执行命令;
配置参数
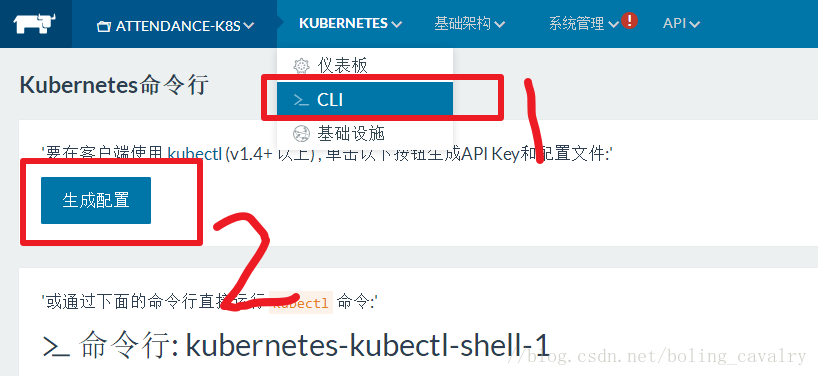
- 在rancher的管理页面上,点击下图红框1中的”CLI”,在出现的页面中点击红框2中的”生成配置“:
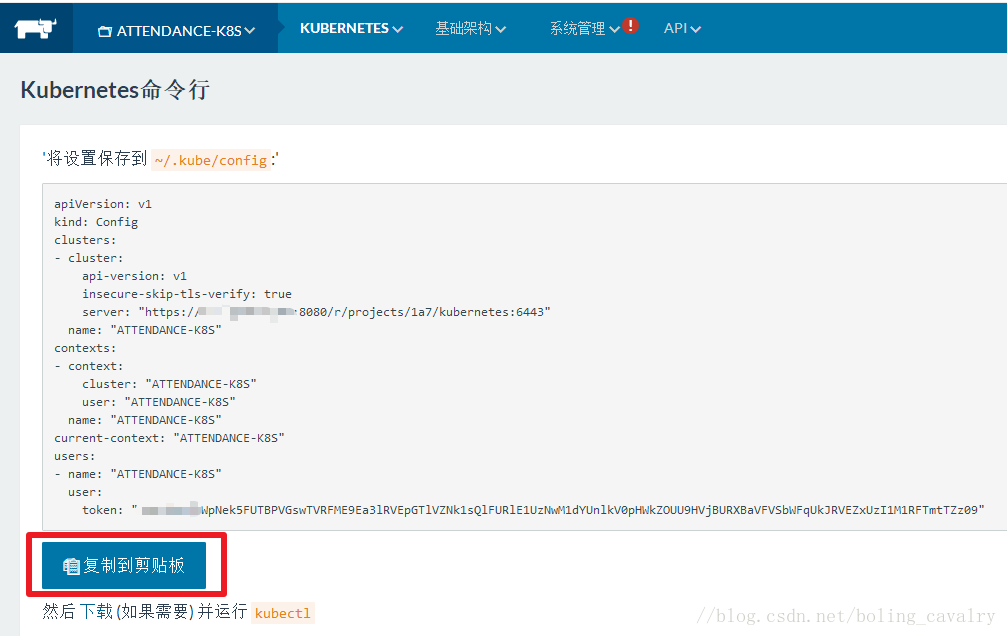
- 如下图,点击红框中的”复制到剪切板“,将按钮上方的配置信息复制下来:
- 在linux机器上,在家目录创建.kube文件夹,命令如下:
<span style="color:#000000"><code class="language-shell"><span style="color:#000088">mkdir</span> ~<span style="color:#008800">/.kube</span></code></span>- 1
4. 在.kube文件夹下新建一个名为config的文件,把刚才复制的配置信息粘贴进来;
至此,kubectl工具的安装配置就完成了,输入命令get service -a -o wide –all-namespaces试试,可以看到当前的服务列表:
<span style="color:#000000"><code class="language-shell">[root@v-test-test ~]# kubectl get service -a -o wide --all-namespaces
NAMESPACE     NAME                   TYPE        CLUSTER-IP      EXTERNAL-IP   PORT(S)          AGE       SELECTOR
default       kubernetes             ClusterIP   10.43.0.1       <span style="color:#006666"><<span style="color:#4f4f4f">none</span>></span>        443/TCP          20h       <span style="color:#006666"><<span style="color:#4f4f4f">none</span>></span>
default       tomcat001              NodePort    10.43.243.24    <span style="color:#006666"><<span style="color:#4f4f4f">none</span>></span>        8080:30018/TCP   4h        name=tomcat001
kube-system   heapster               ClusterIP   10.43.157.242   <span style="color:#006666"><<span style="color:#4f4f4f">none</span>></span>        80/TCP           20h       k8s-app=heapster
kube-system   kube-dns               ClusterIP   10.43.0.10      <span style="color:#006666"><<span style="color:#4f4f4f">none</span>></span>        53/UDP,53/TCP    20h       k8s-app=kube-dns
kube-system   kubernetes-dashboard   ClusterIP   10.43.199.86    <span style="color:#006666"><<span style="color:#4f4f4f">none</span>></span>        80/TCP           20h       k8s-app=kubernetes-dashboard
kube-system   monitoring-grafana     ClusterIP   10.43.112.198   <span style="color:#006666"><<span style="color:#4f4f4f">none</span>></span>        80/TCP           20h       k8s-app=grafana
kube-system   monitoring-influxdb    ClusterIP   10.43.200.65    <span style="color:#006666"><<span style="color:#4f4f4f">none</span>></span>        8086/TCP         20h       k8s-app=influxdb
kube-system tiller-deploy ClusterIP 10.43.28.153 <span style="color:#006666"><<span style="color:#4f4f4f">none</span>></span> 44134/TCP 20h app=helm,name=tiller</code></span>- 1
- 2
- 3
- 4
- 5
- 6
- 7
- 8
- 9
- 10
至此,《CentOS7环境安装Kubernetes四部曲》就全部结束了,希望能够帮助您快速搭建环境,然后一起开始愉快的K8S之旅;