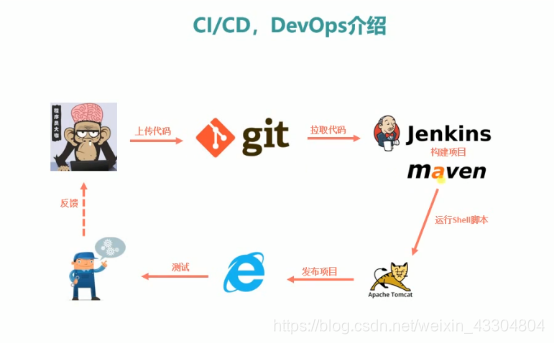
Jenkins的Pipeline流水线
| 主机名 | IP地址 | 备注 |
|---|---|---|
| Git | 192.168.146.136 | Git服务器 |
| Jenkins | 192.168.146.137 | Jenkins服务器 |
- Pipeline流水线介绍
(1) Jenkins Pipeline(或者简称为“Pipeline”)是一套插件,支持在 Jenkins 中实施和集成持续交付流水线。
持续交付(CD)流水线是将软件从版本控制发布到用户和客户的过程的自动化表达。对软件的每一次改变(在源代码控制中提交)都会在发布过程中经历一个复杂的过程。这个过程包括以可靠和可重复的方式构建软件,以及通过测试和部署的多个阶段来推进构建的软件(称为“构建”)。
Pipeline 提供了一套可扩展的工具,用于通过 Pipeline domain-specific language(DSL)语法将交付流水线“作为代码”建模。
Jenkins Pipeline 的定义写在称为 Jenkinsfile 的文本文件中,这个文件可以提交到项目的代码控制仓库。这是“Pipeline-as-code”的基础。 将 CD 流水线作为应用程序的一部分进行版本控制,并像任何其他代码一样进行审查。
(2) 创建 Jenkinsfile 文件并且提交到版本控制有下面几个好处:
对所有的 branches 和 pull 请求自动创建 Pipeline。
Pipeline 上的代码审查/迭代(along with the remaining source code)。
审核追踪 Pipeline
Pipeline 的单一真实来源,可由项目的多个成员查看和编辑。
虽然用于定义 Pipeline 的语法无论是在 Web UI 中还是在 Jenkinsfile 中是相同的,但在 Jenkinsfile 中定义 Pipeline 并提交到源代码控制中通常被认为是最佳实践。
(3) Pipeline的几个基本概念:
Stage: 阶段,一个Pipeline可以划分为若干个Stage,每个Stage代表一组操作。注意,Stage是一个逻辑分组的概念,可以跨多个Node。
Node: 节点,一个Node就是一个Jenkins节点,或者是Master,或者是Agent,是执行Step的具体运行期环境。
Step: 步骤,Step是最基本的操作单元,小到创建一个目录,大到构建一个Docker镜像,由各类Jenkins Plugin提供。
-
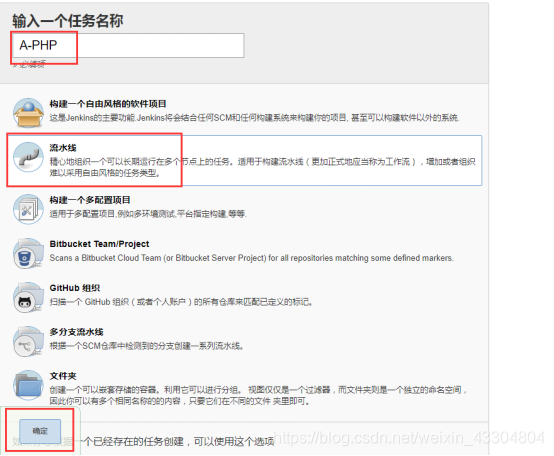
创建一个基于Pipeline流水线的项目
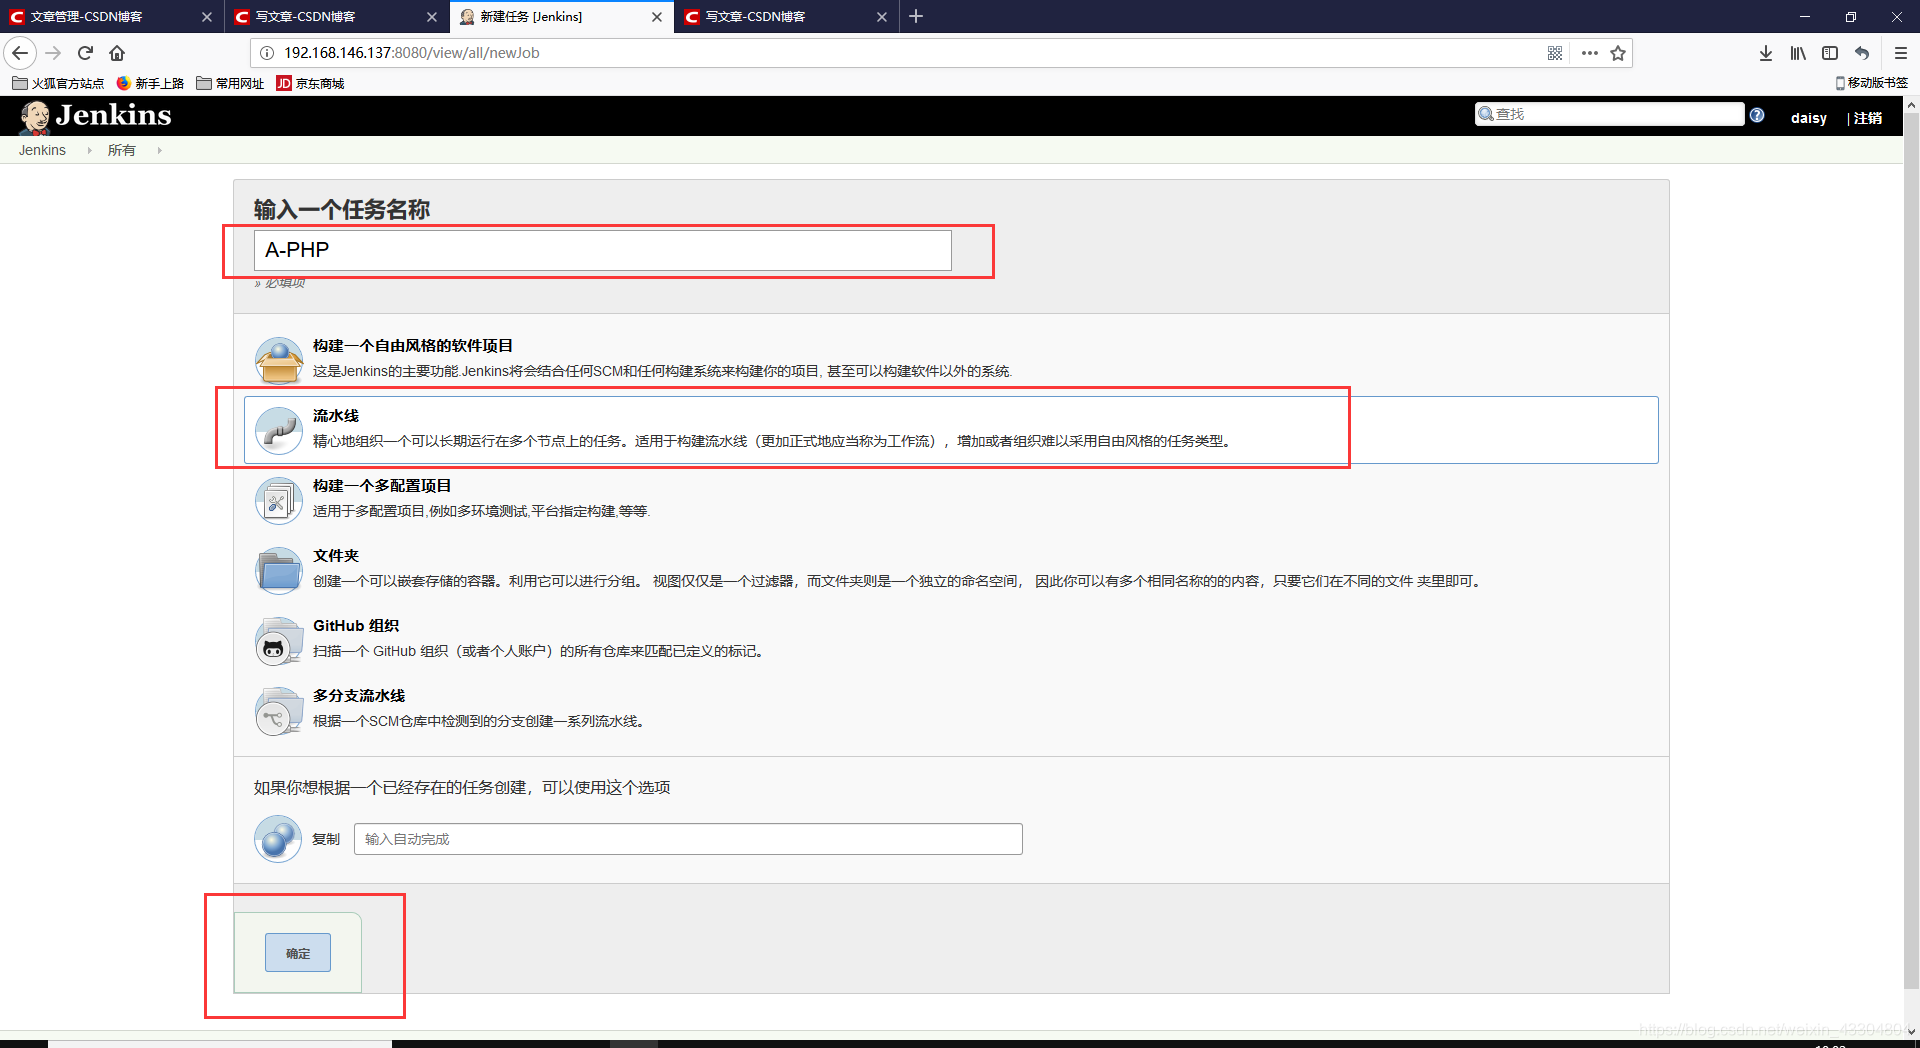
-
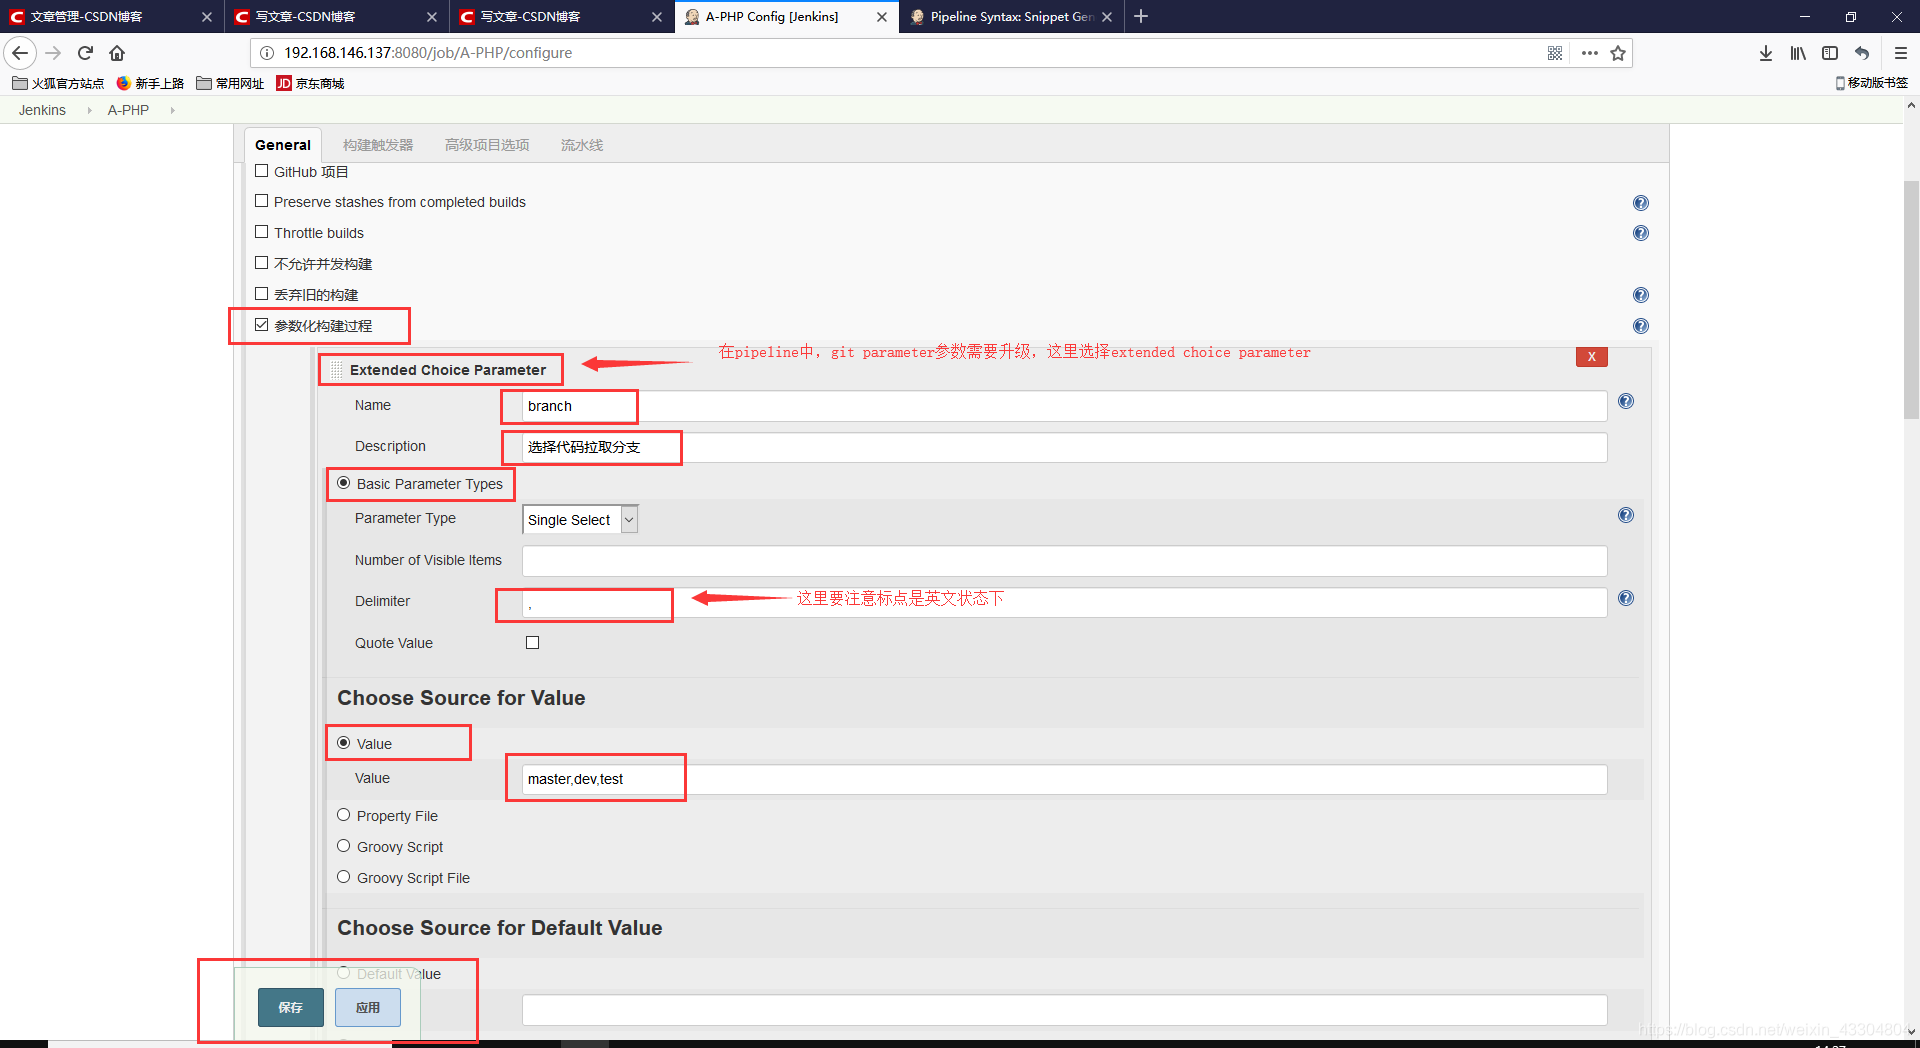
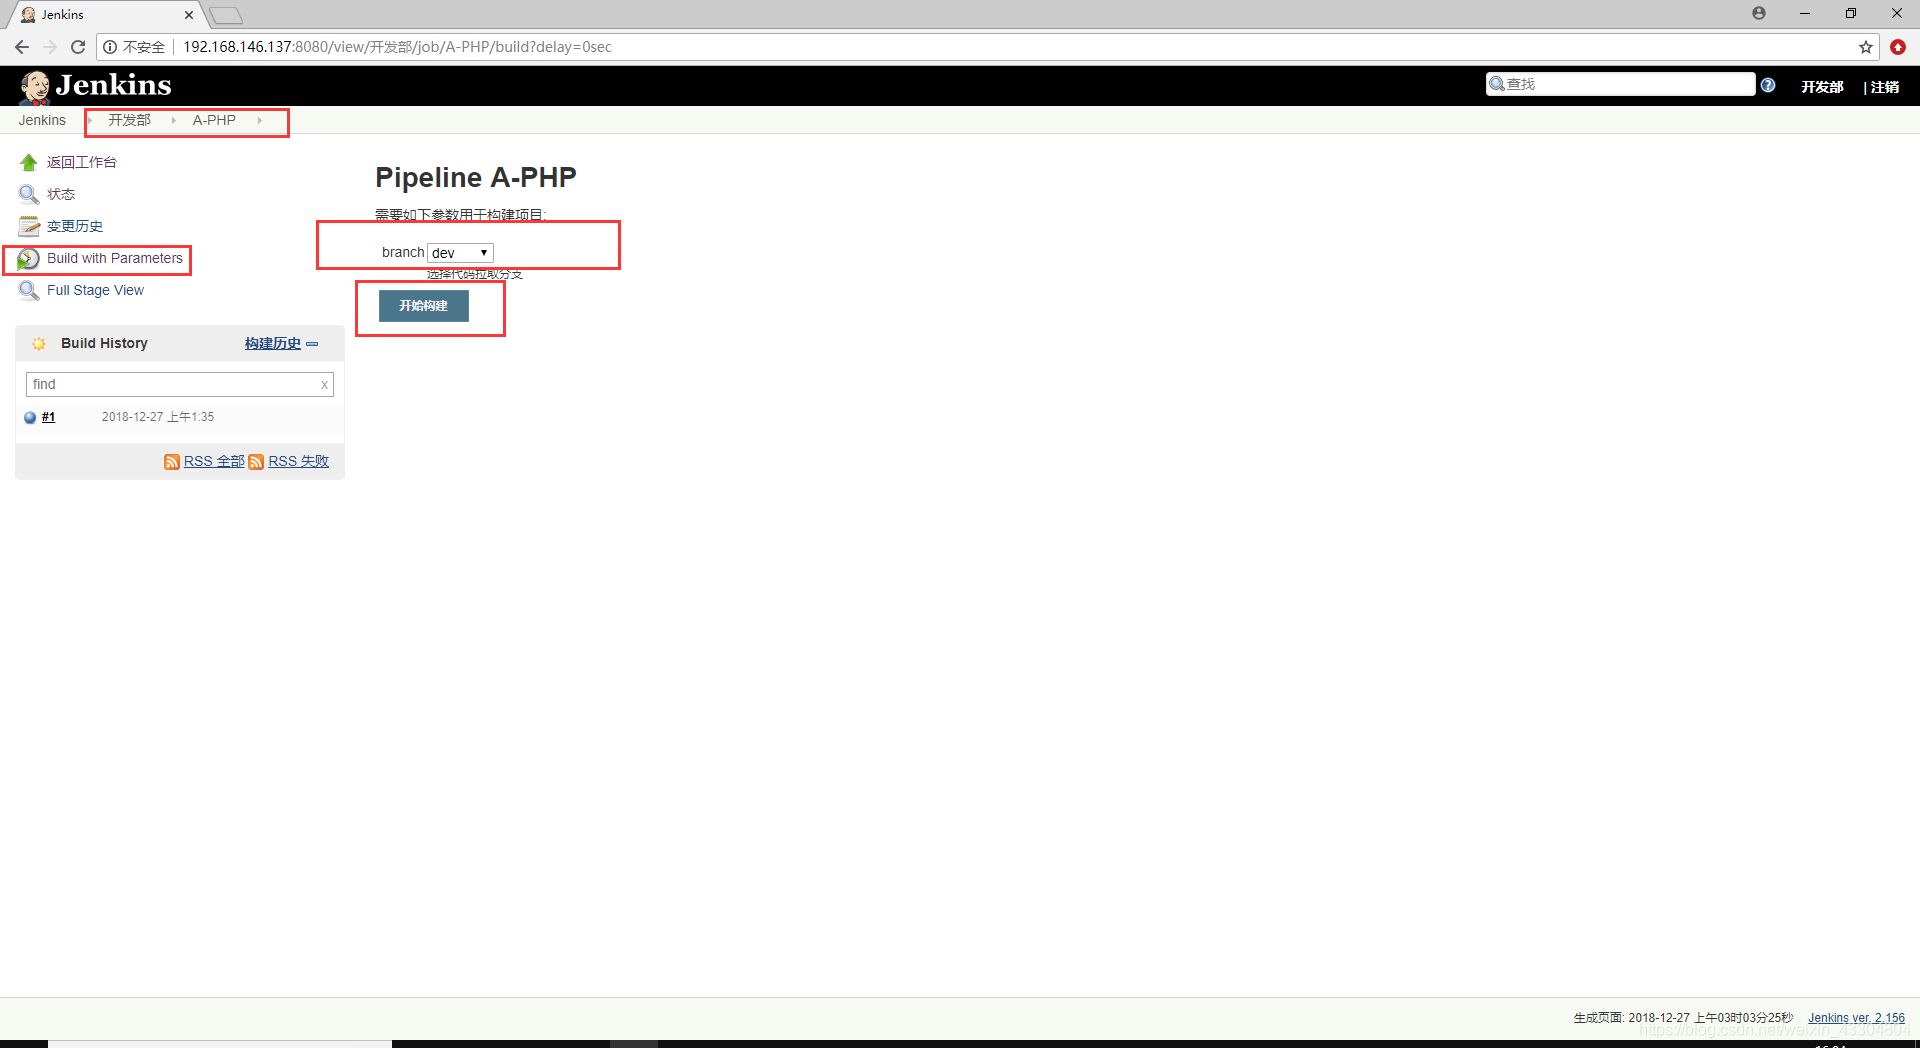
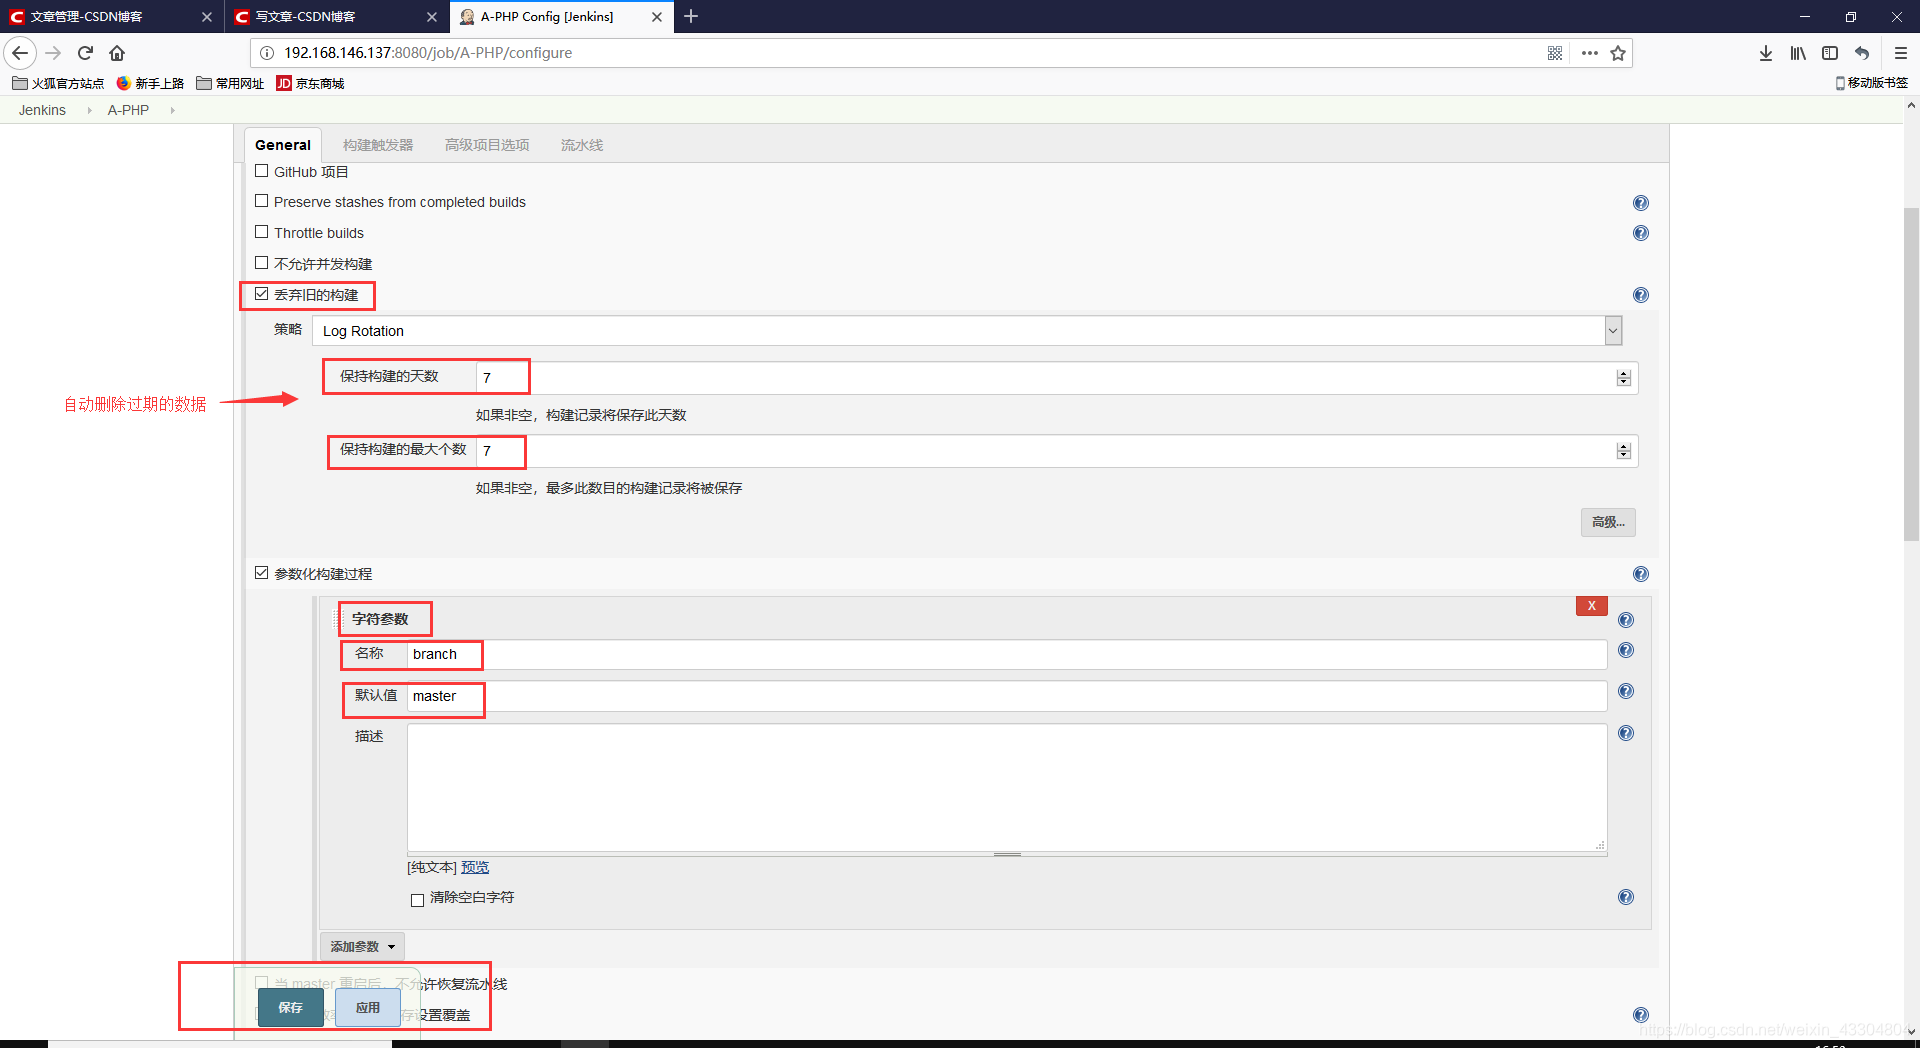
添加项目Git参数化构建
 node:代表单台服务器的节点
 -
Pipeline脚本语法架构介绍
#Pipeline脚本语法架构
node ('slave节点名') {          #被操控的节点服务器
   def 变量    #def可以进行变量声明
   stage('阶段名A'){     #流水线阶段一
       执行步骤A
       执行步骤B
       执行步骤C
   }
   stage('阶段名B'){     #流水线阶段二
       执行步骤A
        执行步骤B
       执行步骤C
   }
    stage('阶段名C'){     #流水线阶段三
       执行步骤A
       执行步骤B
       执行步骤C
   }
}
#流水线模板脚本
node {
   def mvnHome
   stage('Preparation') { // for display purposes
      // Get some code from a GitHub repository
      git 'https://github.com/jglick/simple-maven-project-with-tests.git'
      // Get the Maven tool.
      // ** NOTE: This 'M3' Maven tool must be configured
      // **       in the global configuration.
      mvnHome = tool 'M3'
   }
   stage('Build') {
      // Run the maven build         # “//” 注释
      if (isUnix()) {
         sh "'${mvnHome}/bin/mvn' -Dmaven.test.failure.ignore clean package"
      } else {
         bat(/"${mvnHome}\bin\mvn" -Dmaven.test.failure.ignore clean package/)
      }
   }
   stage('Results') {
      junit '**/target/surefire-reports/TEST-*.xml'
      archive 'target/*.jar'
   }
}
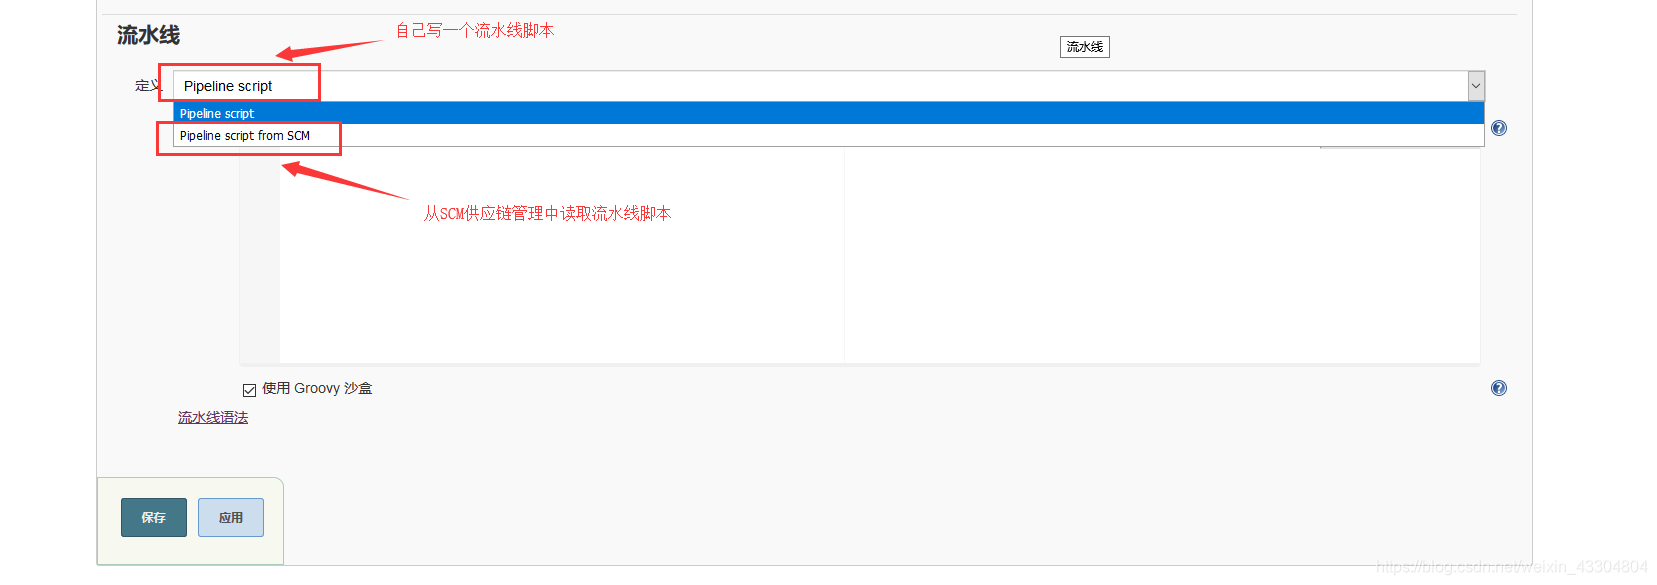
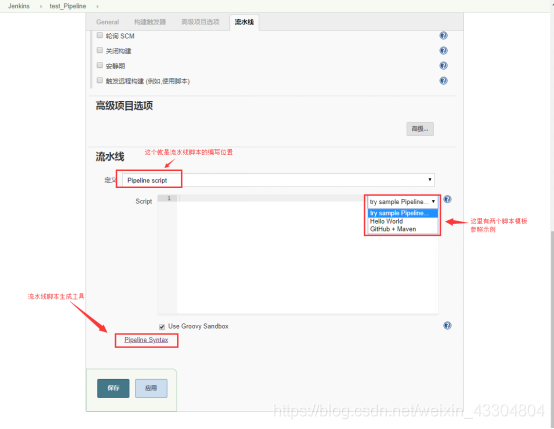
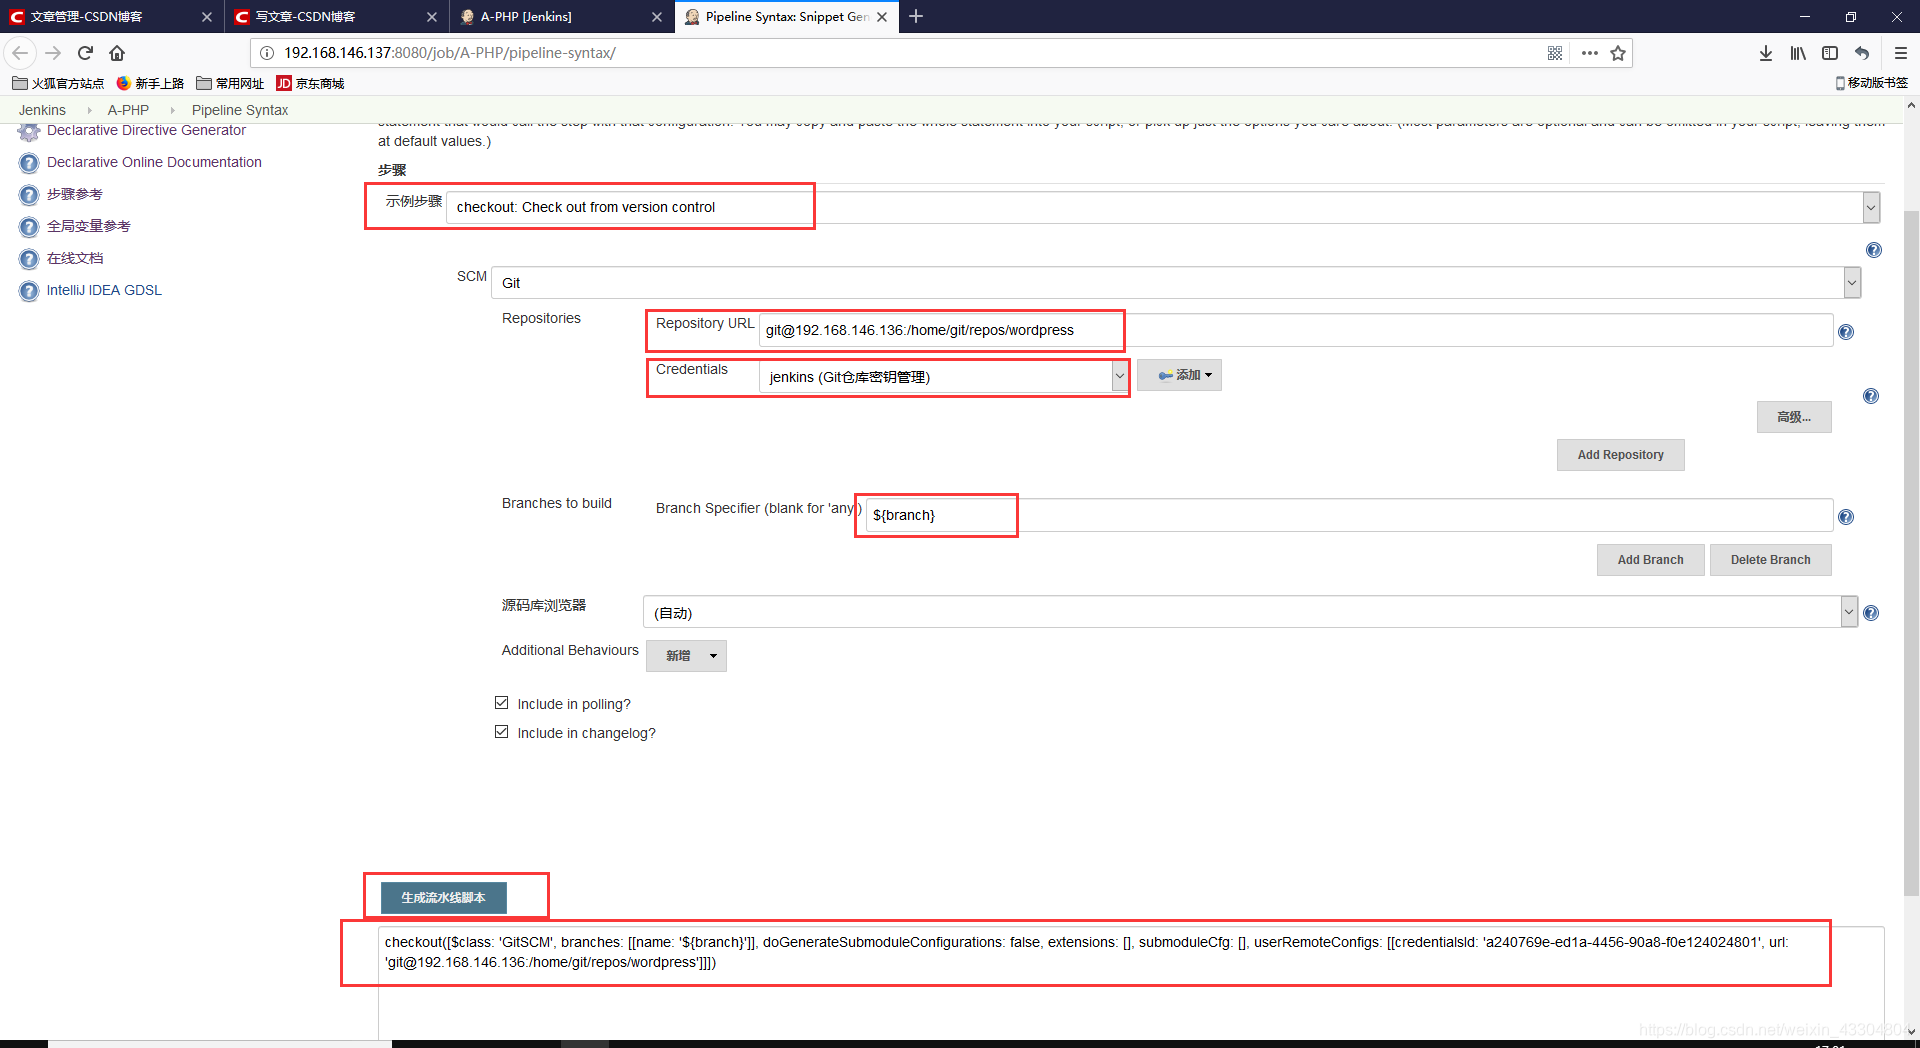
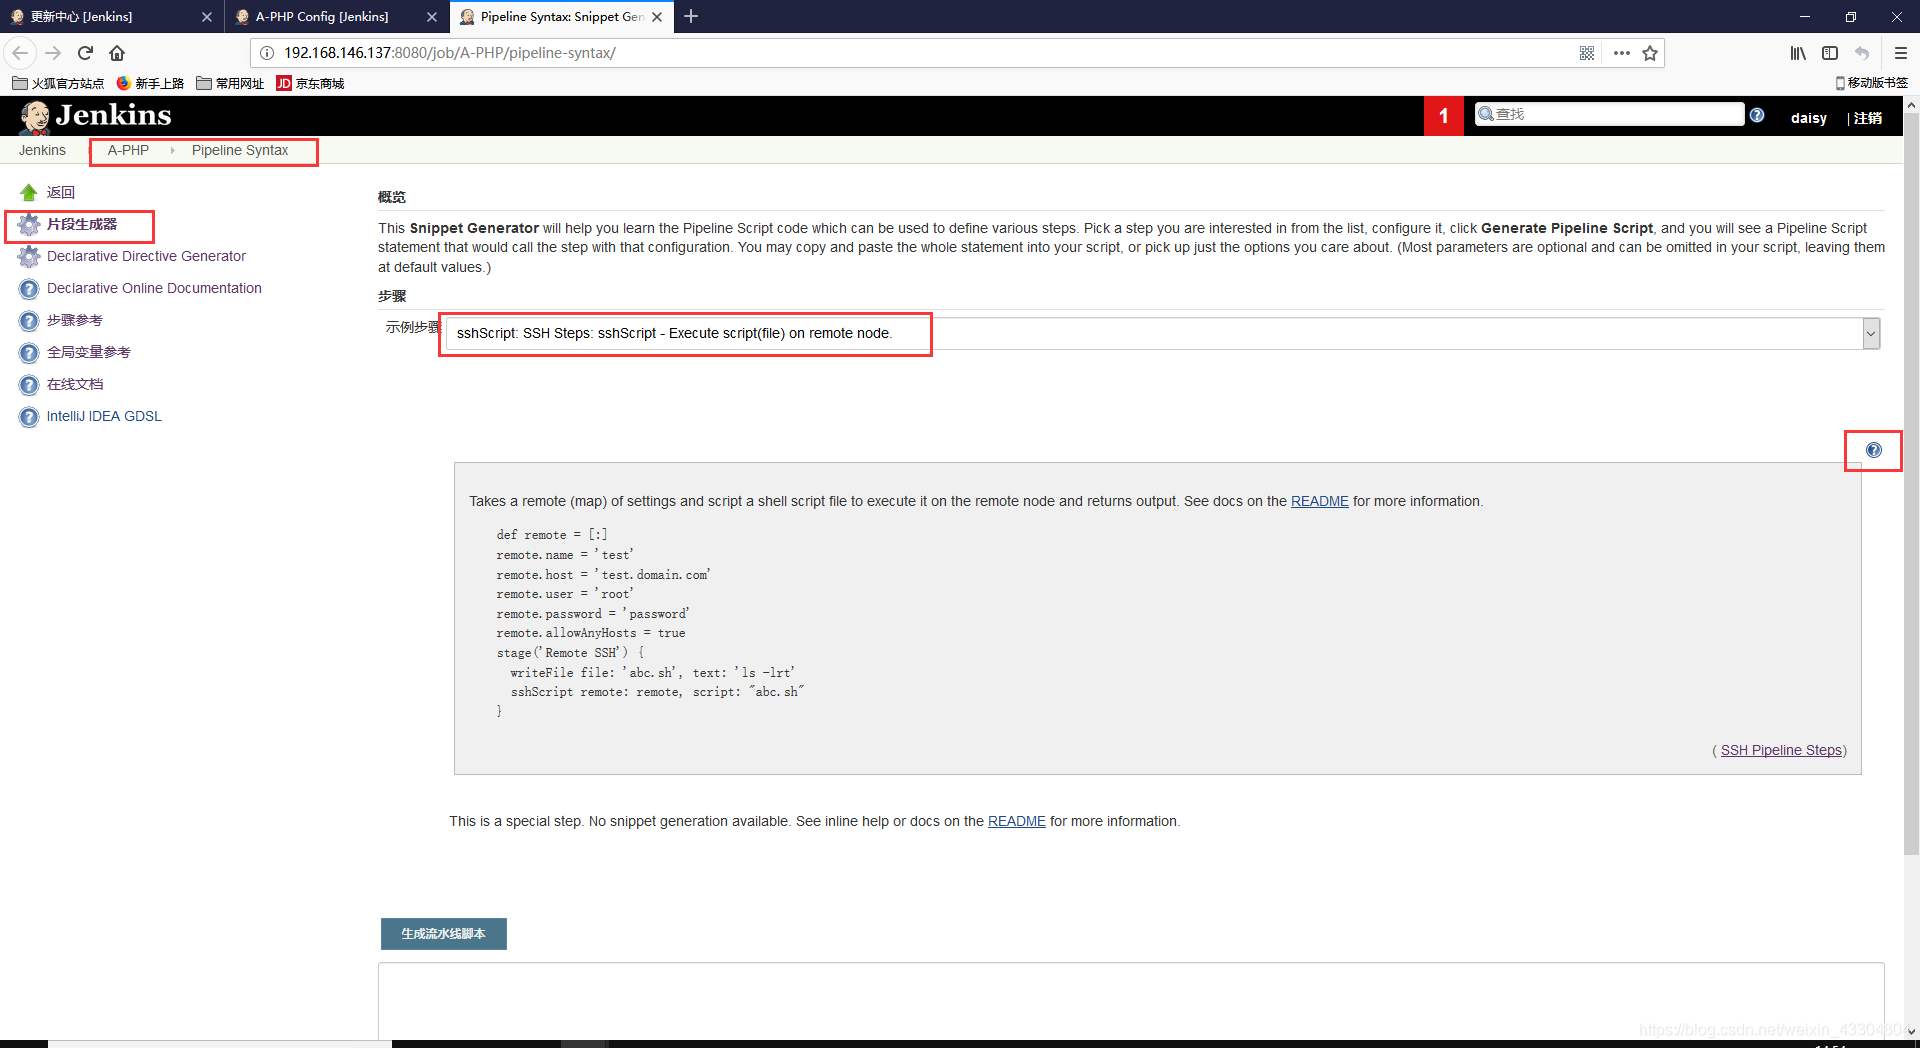
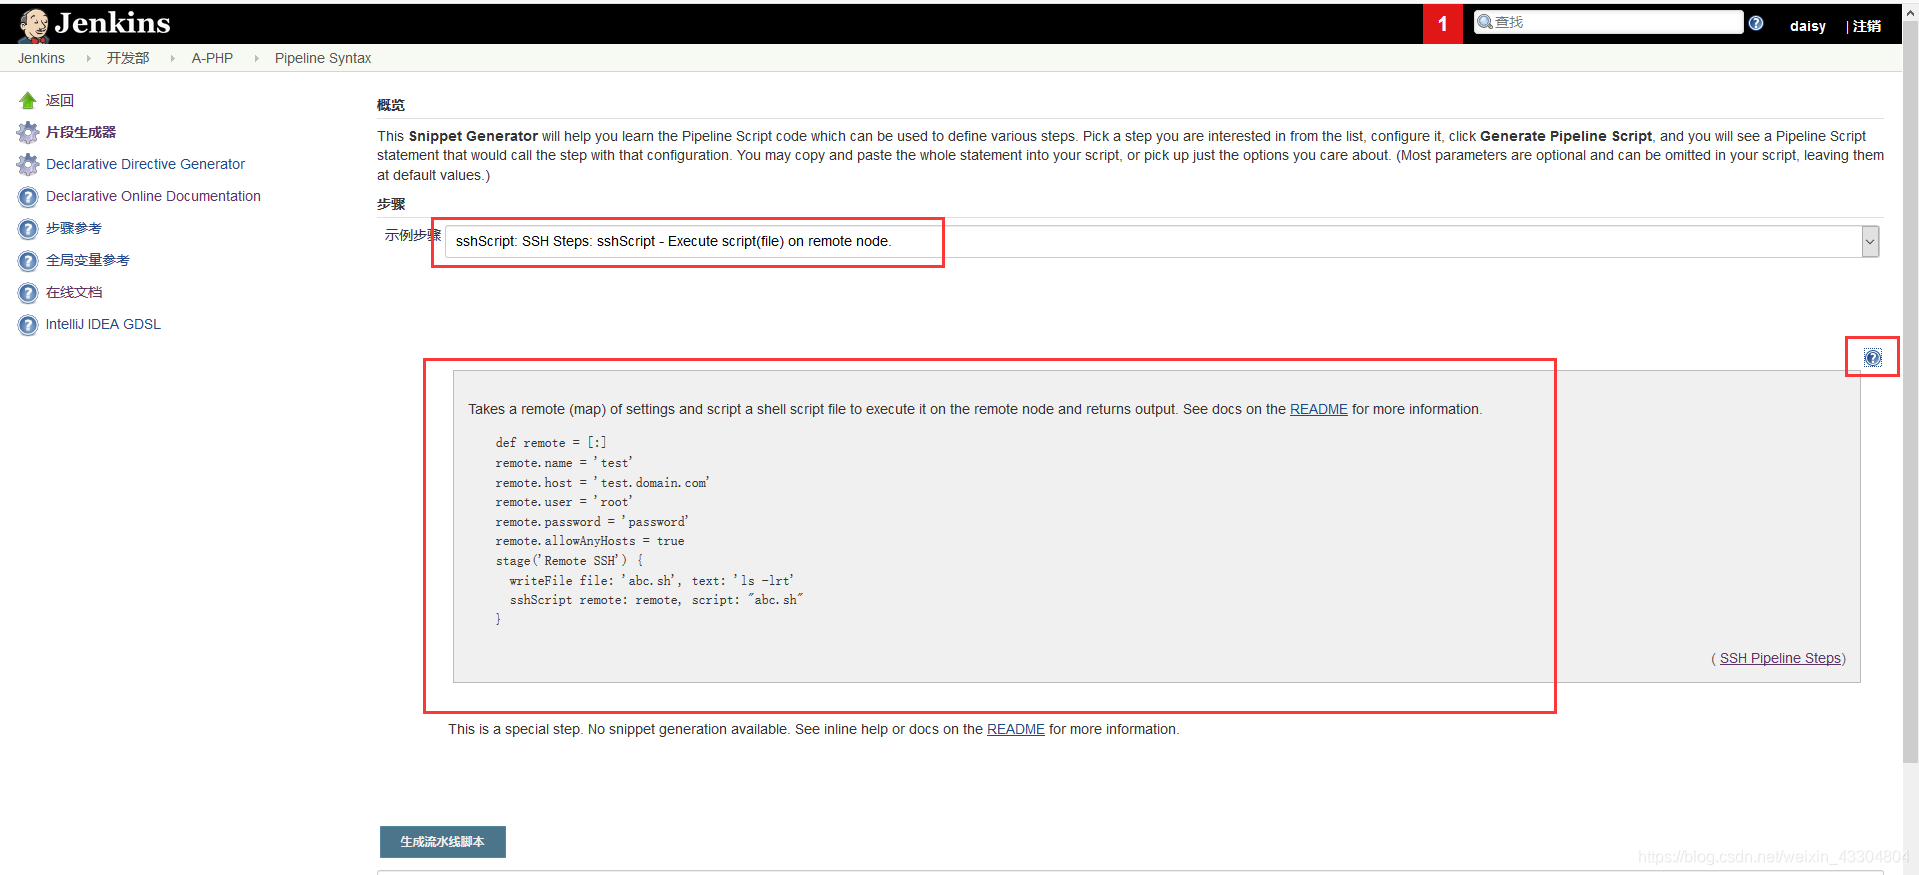
- 利用Pipeline Syntax,编写Pipeline Script并构建
(1)进入Pipeline Syntax
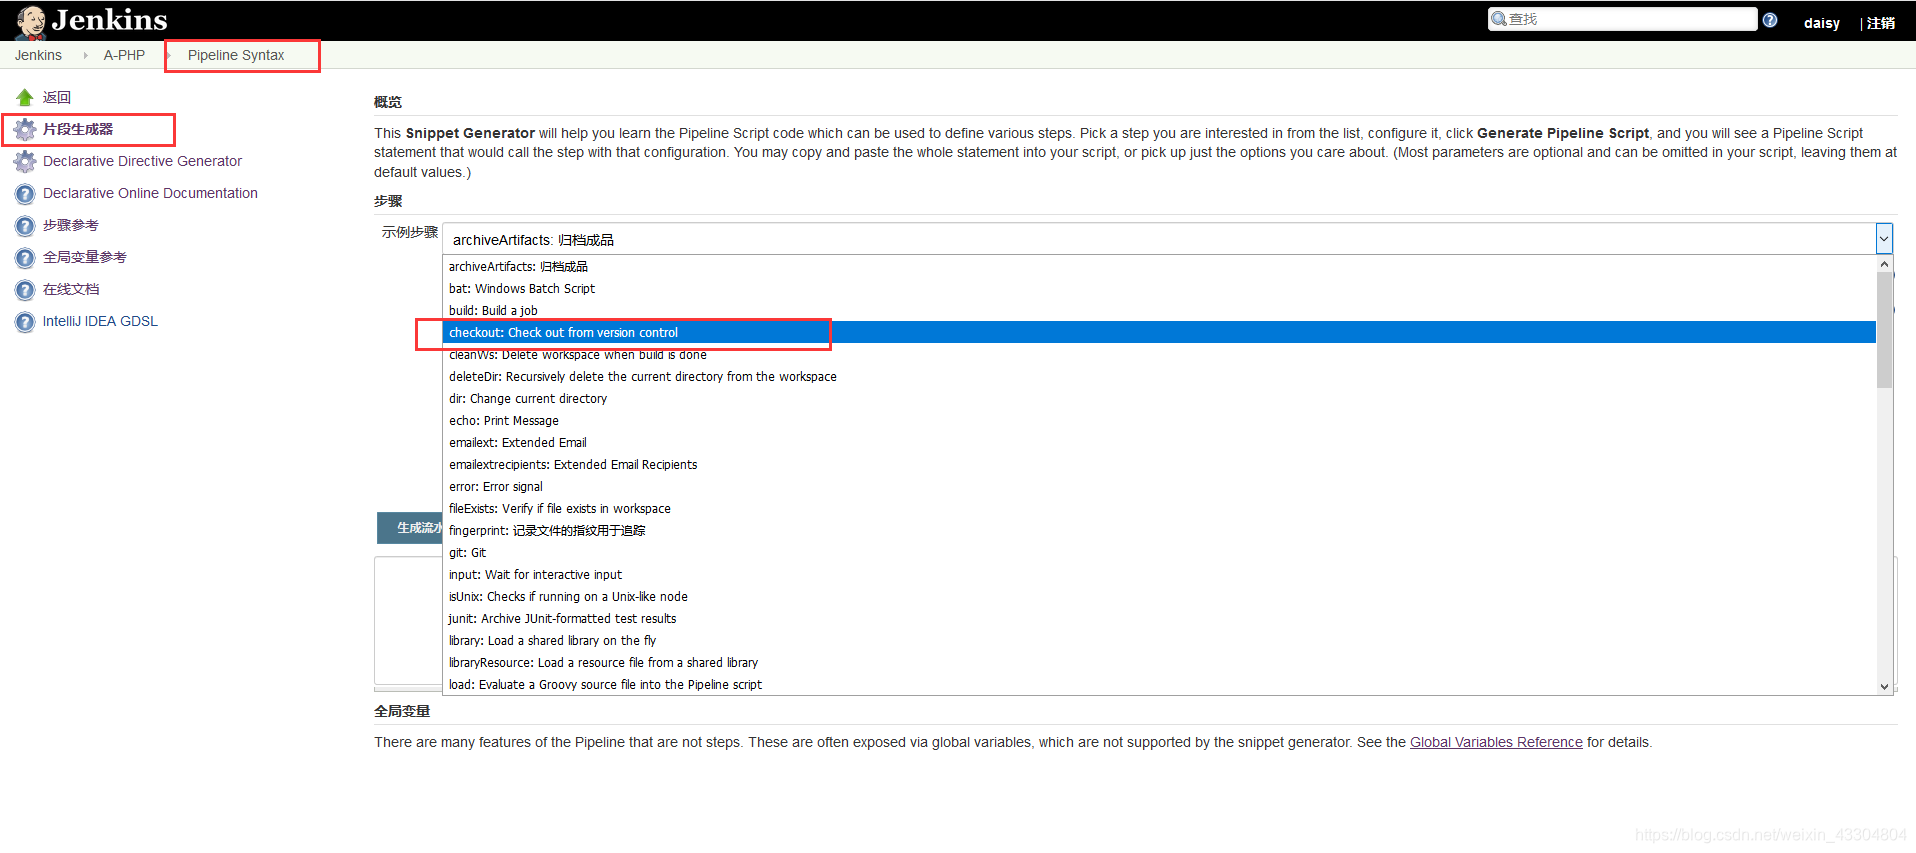 (2)通过脚本代码生成器,生成Pipeline脚本代码
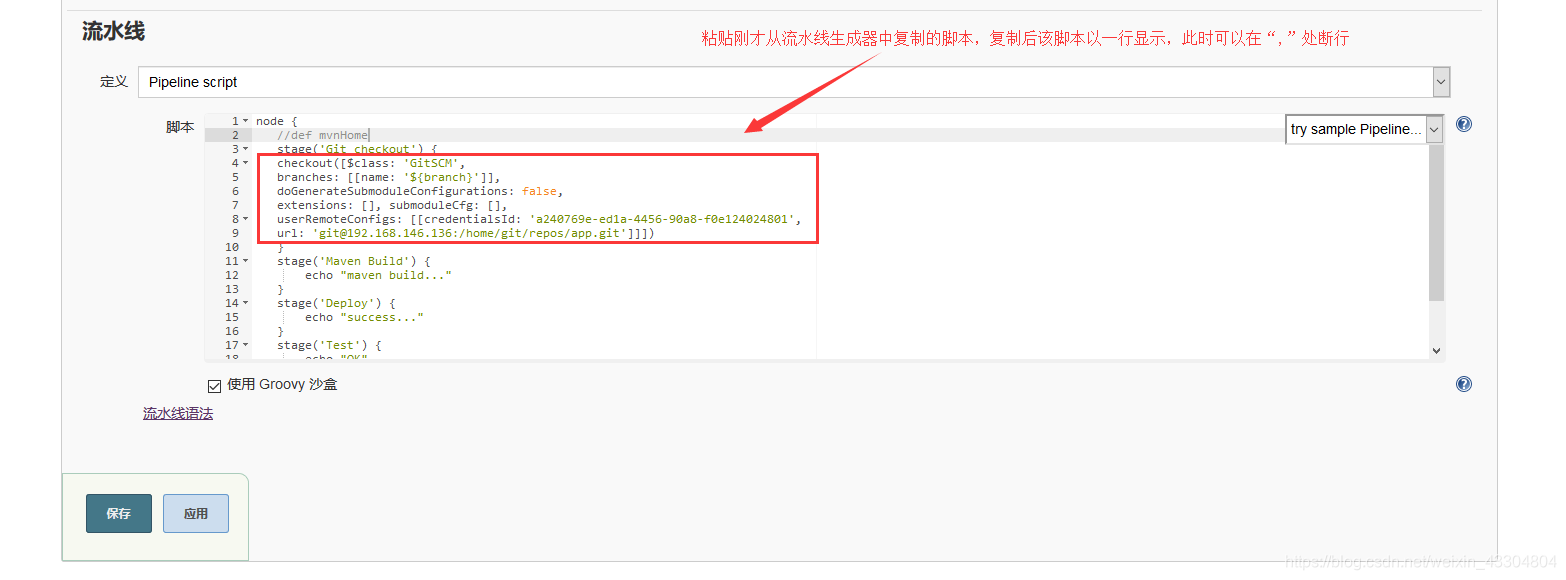
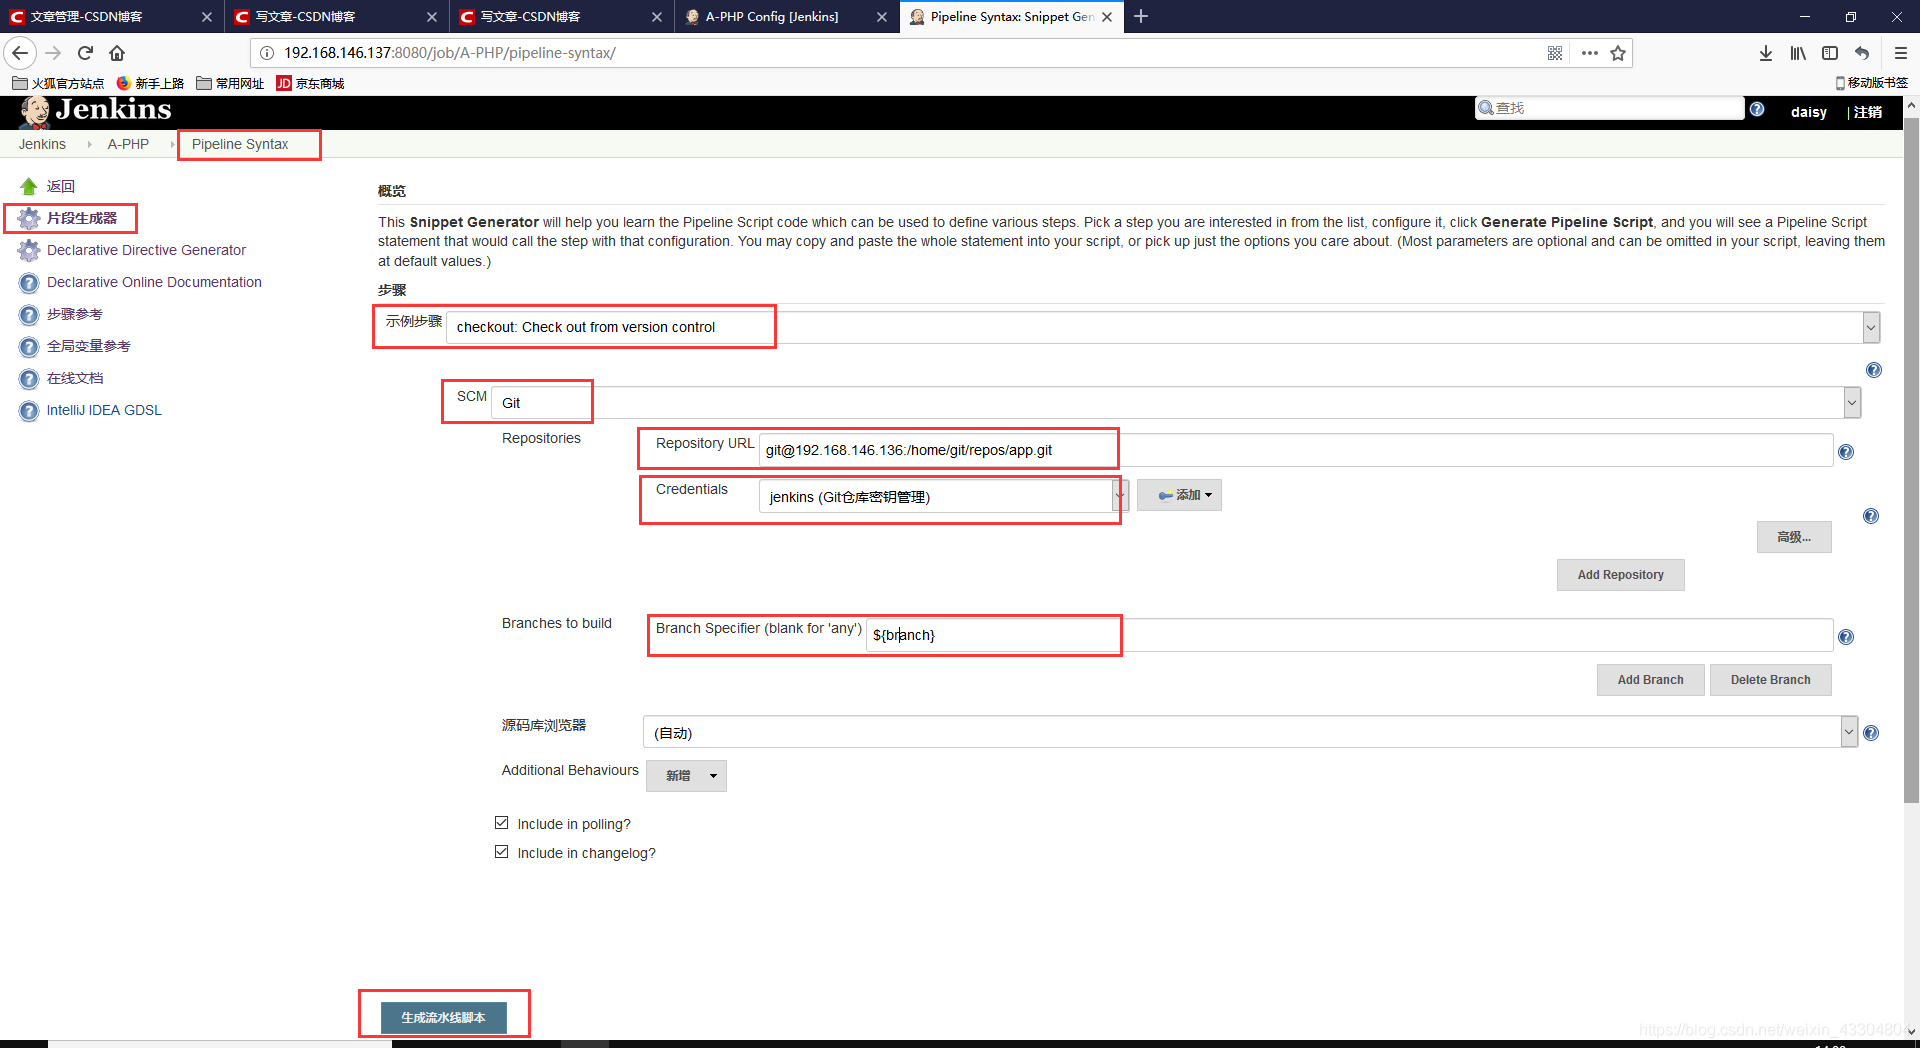 (3)将生成的代码复制到流水线脚本相应步骤的stage函数里


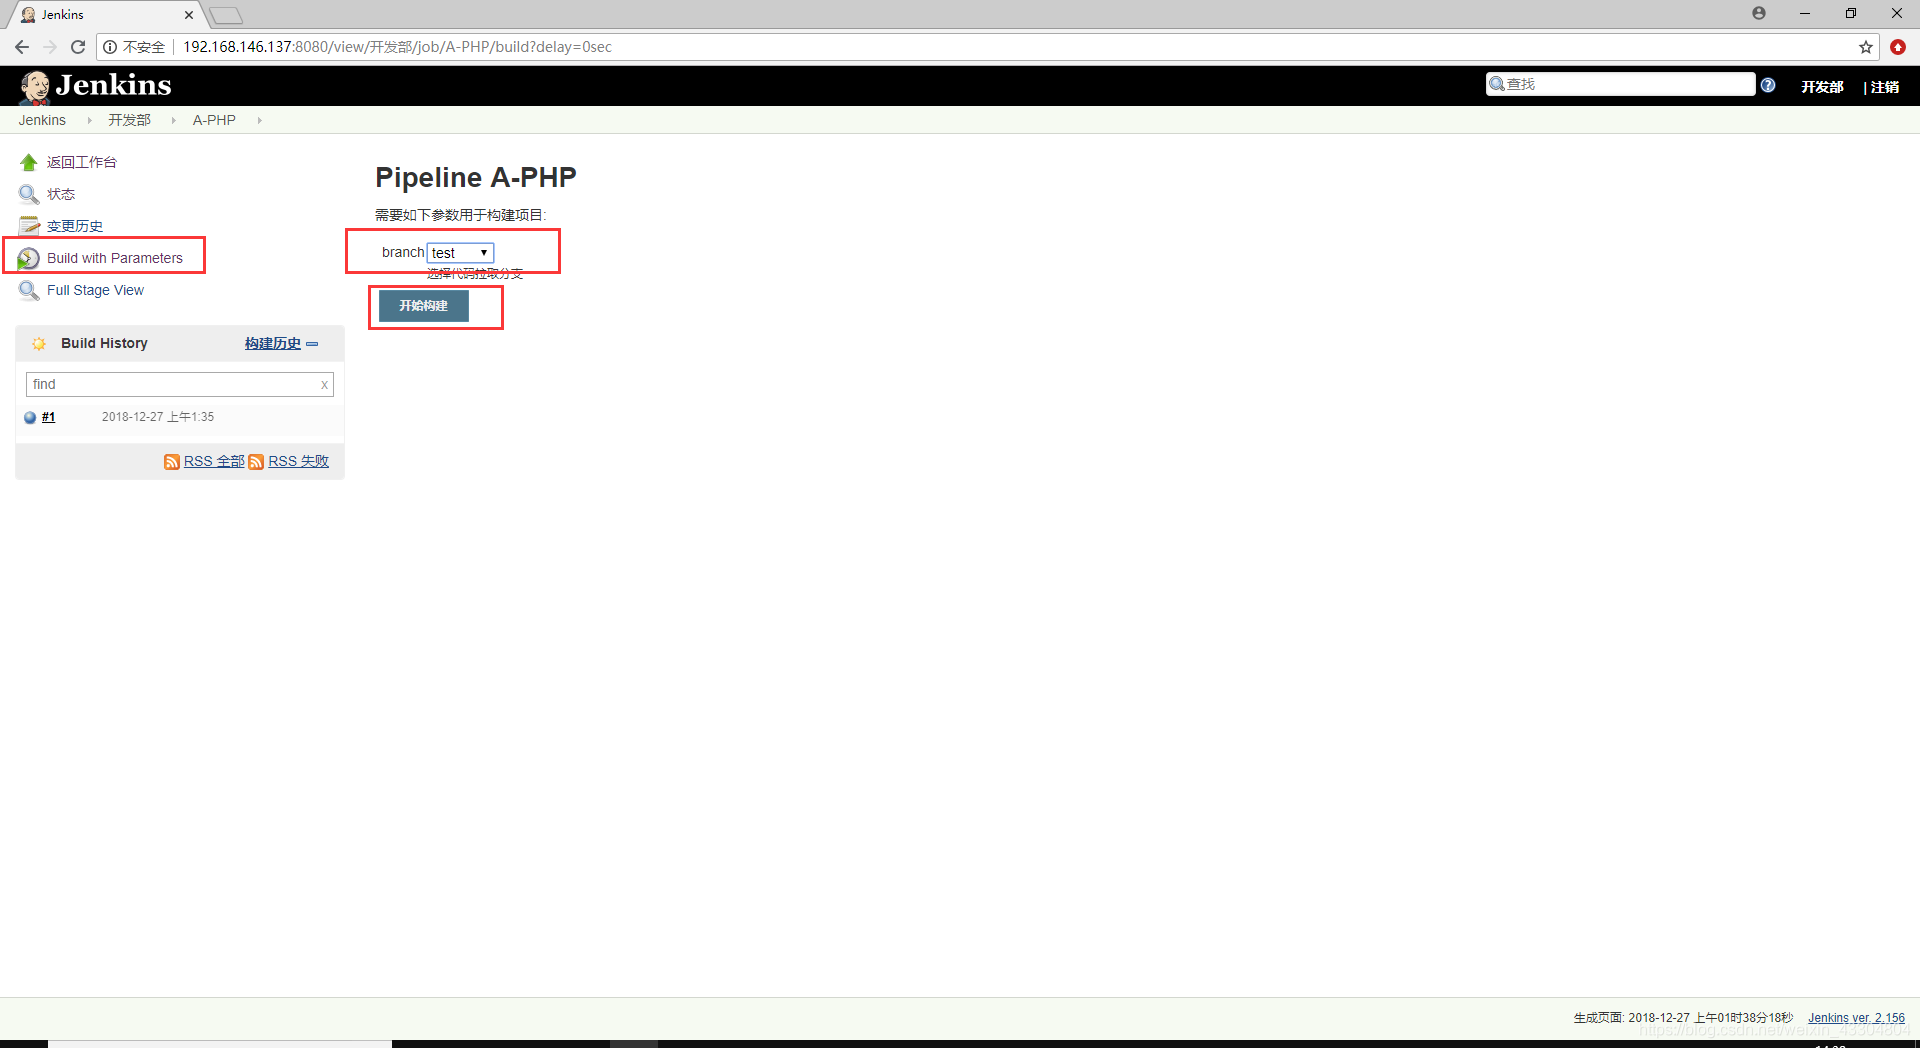
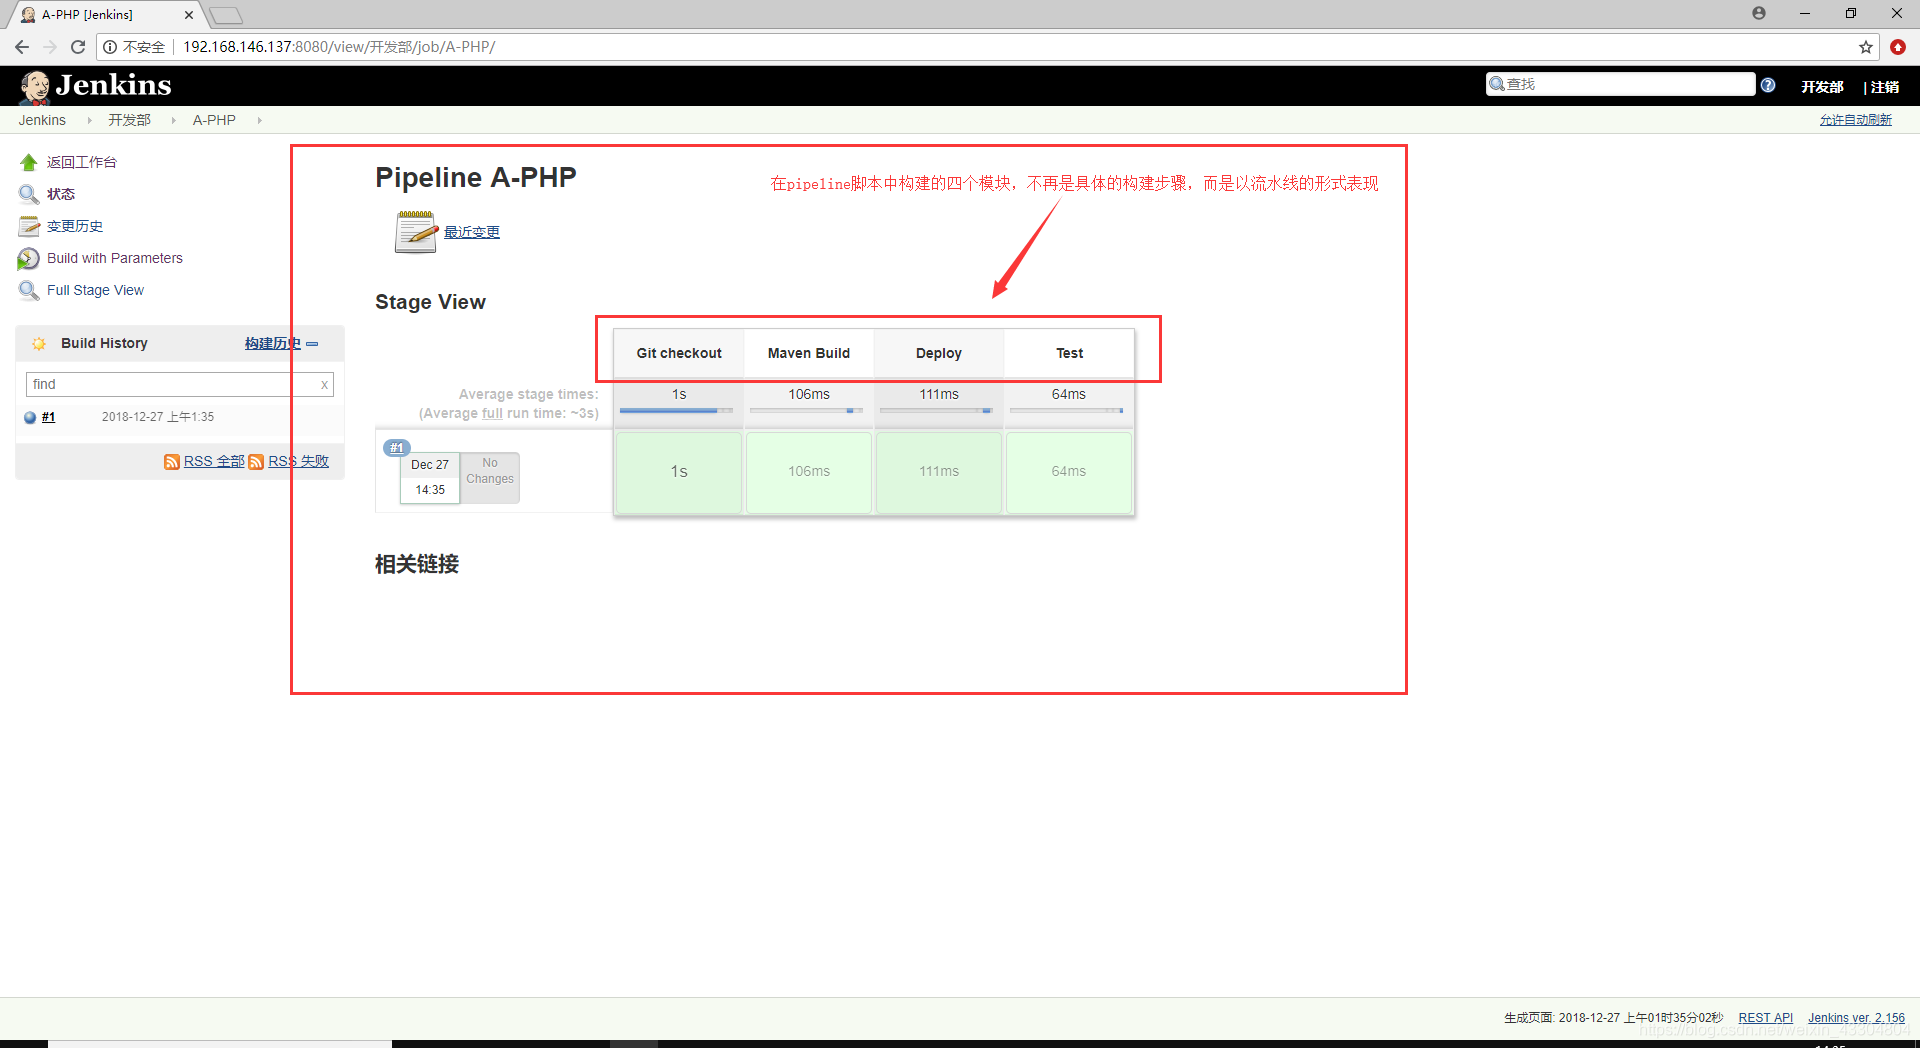
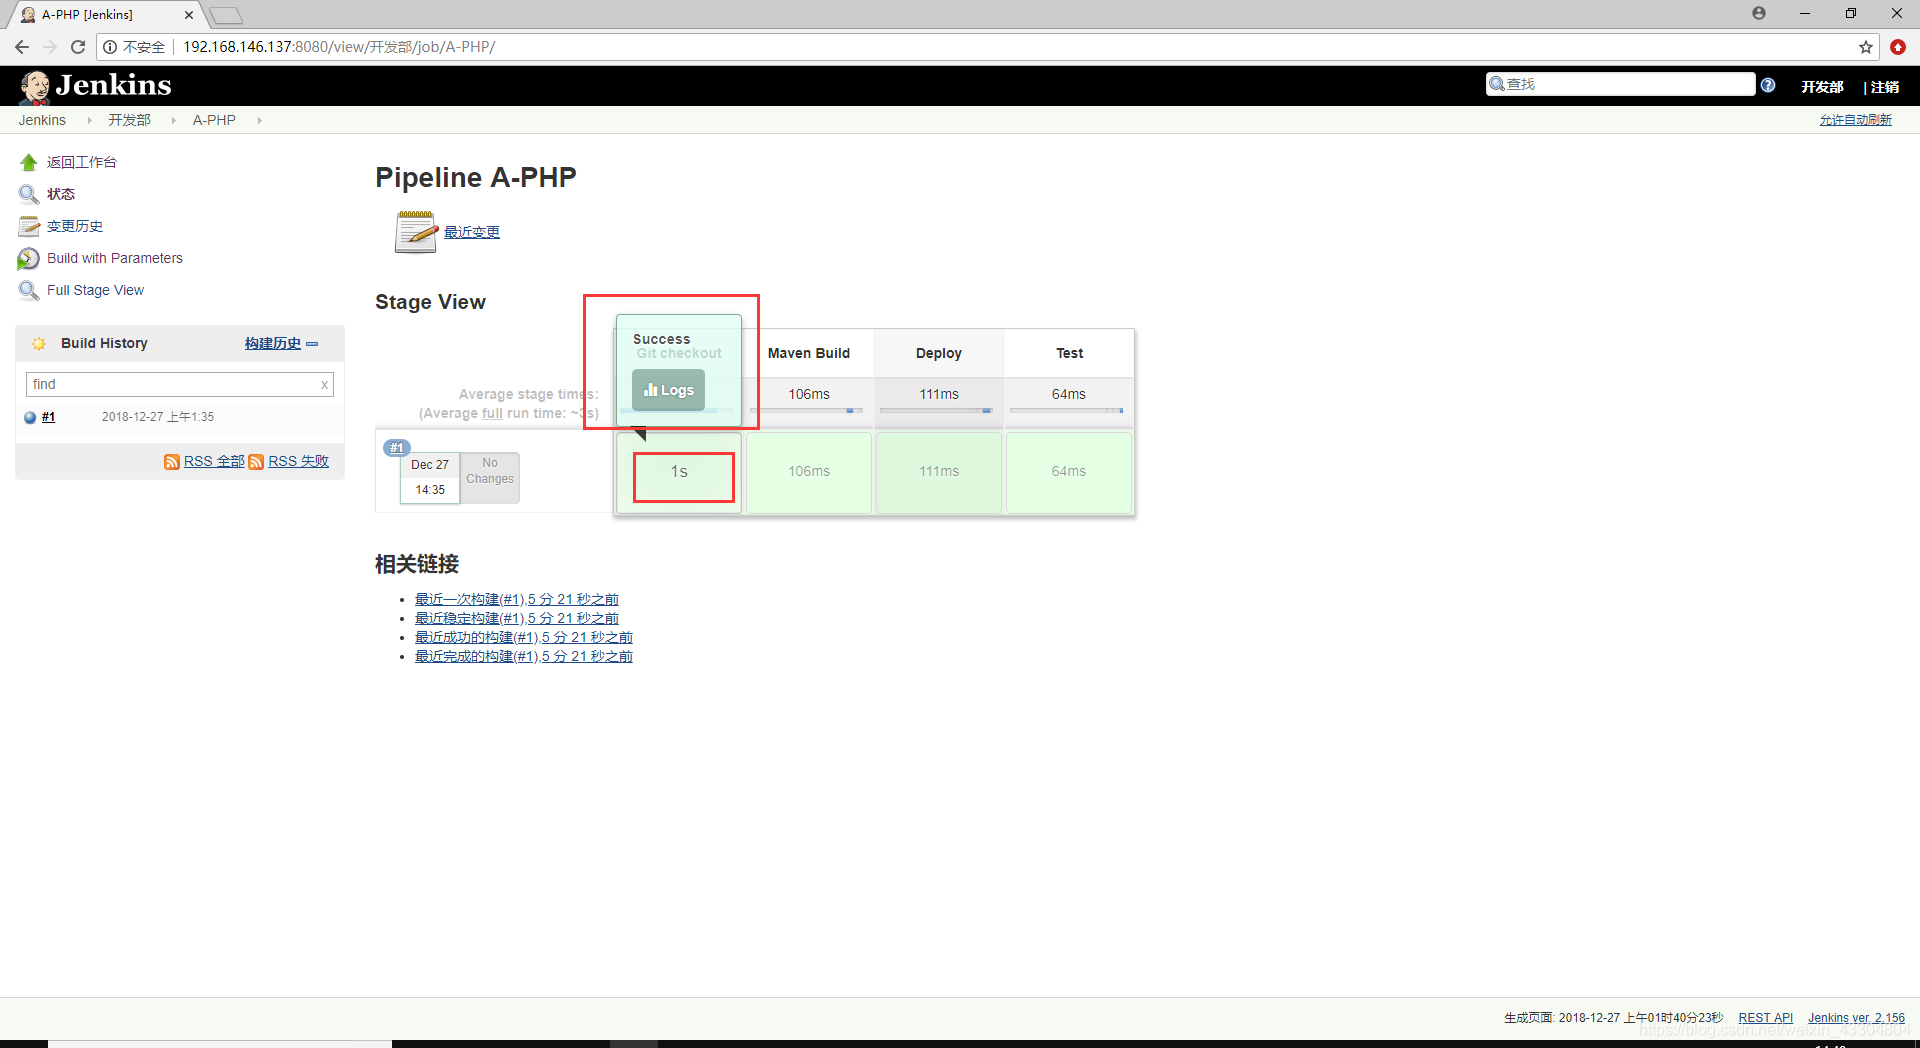
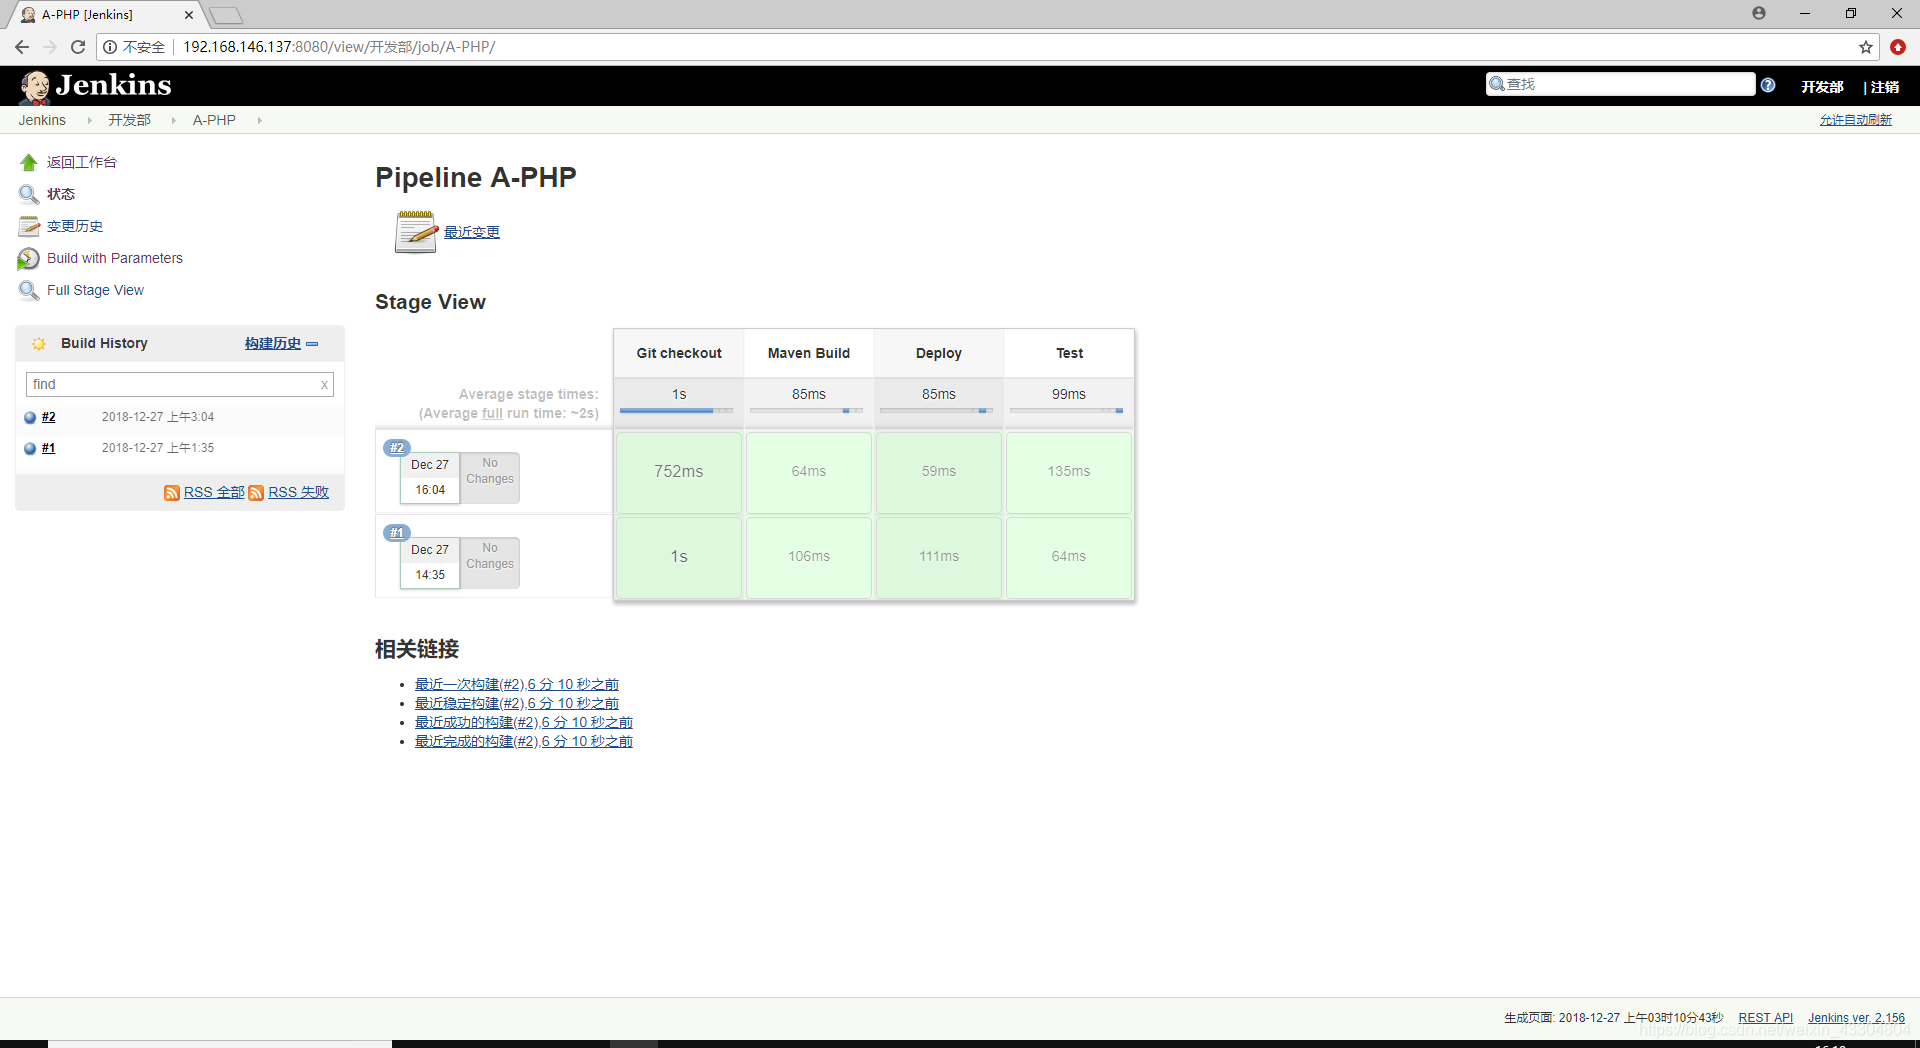
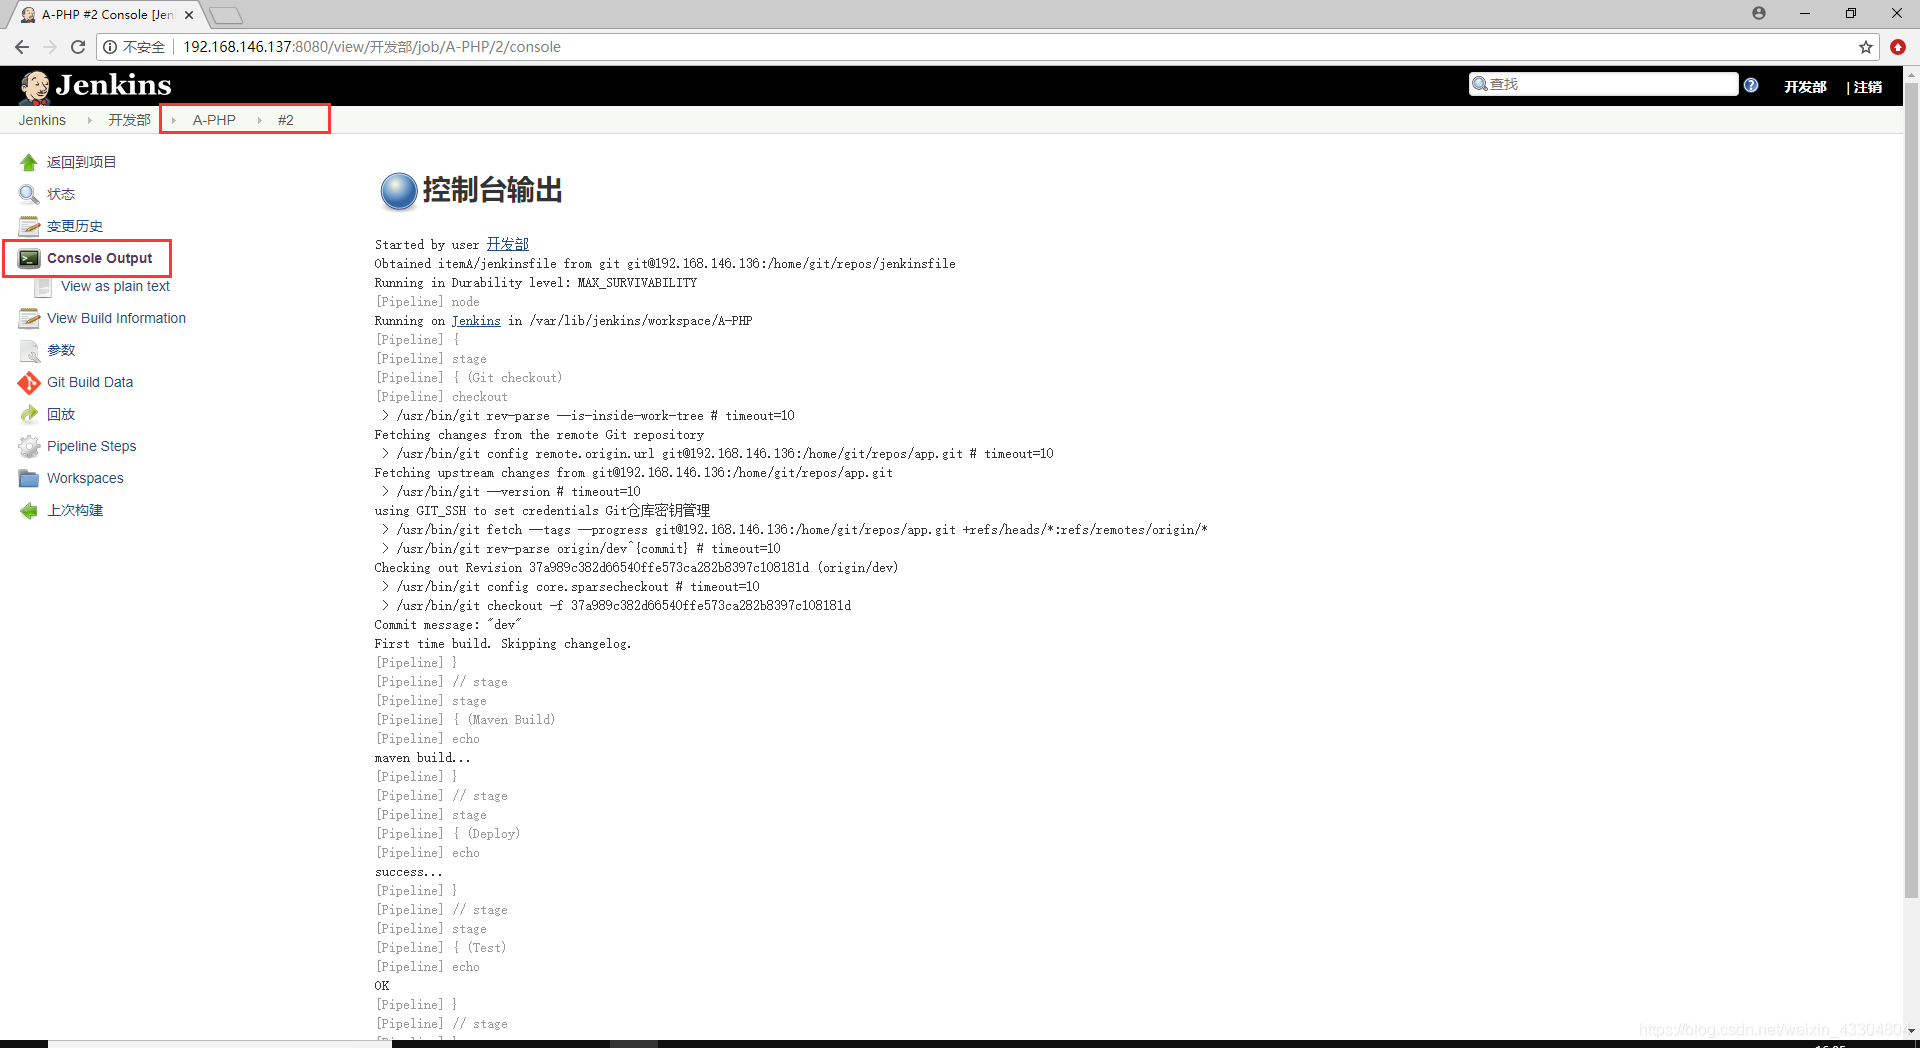
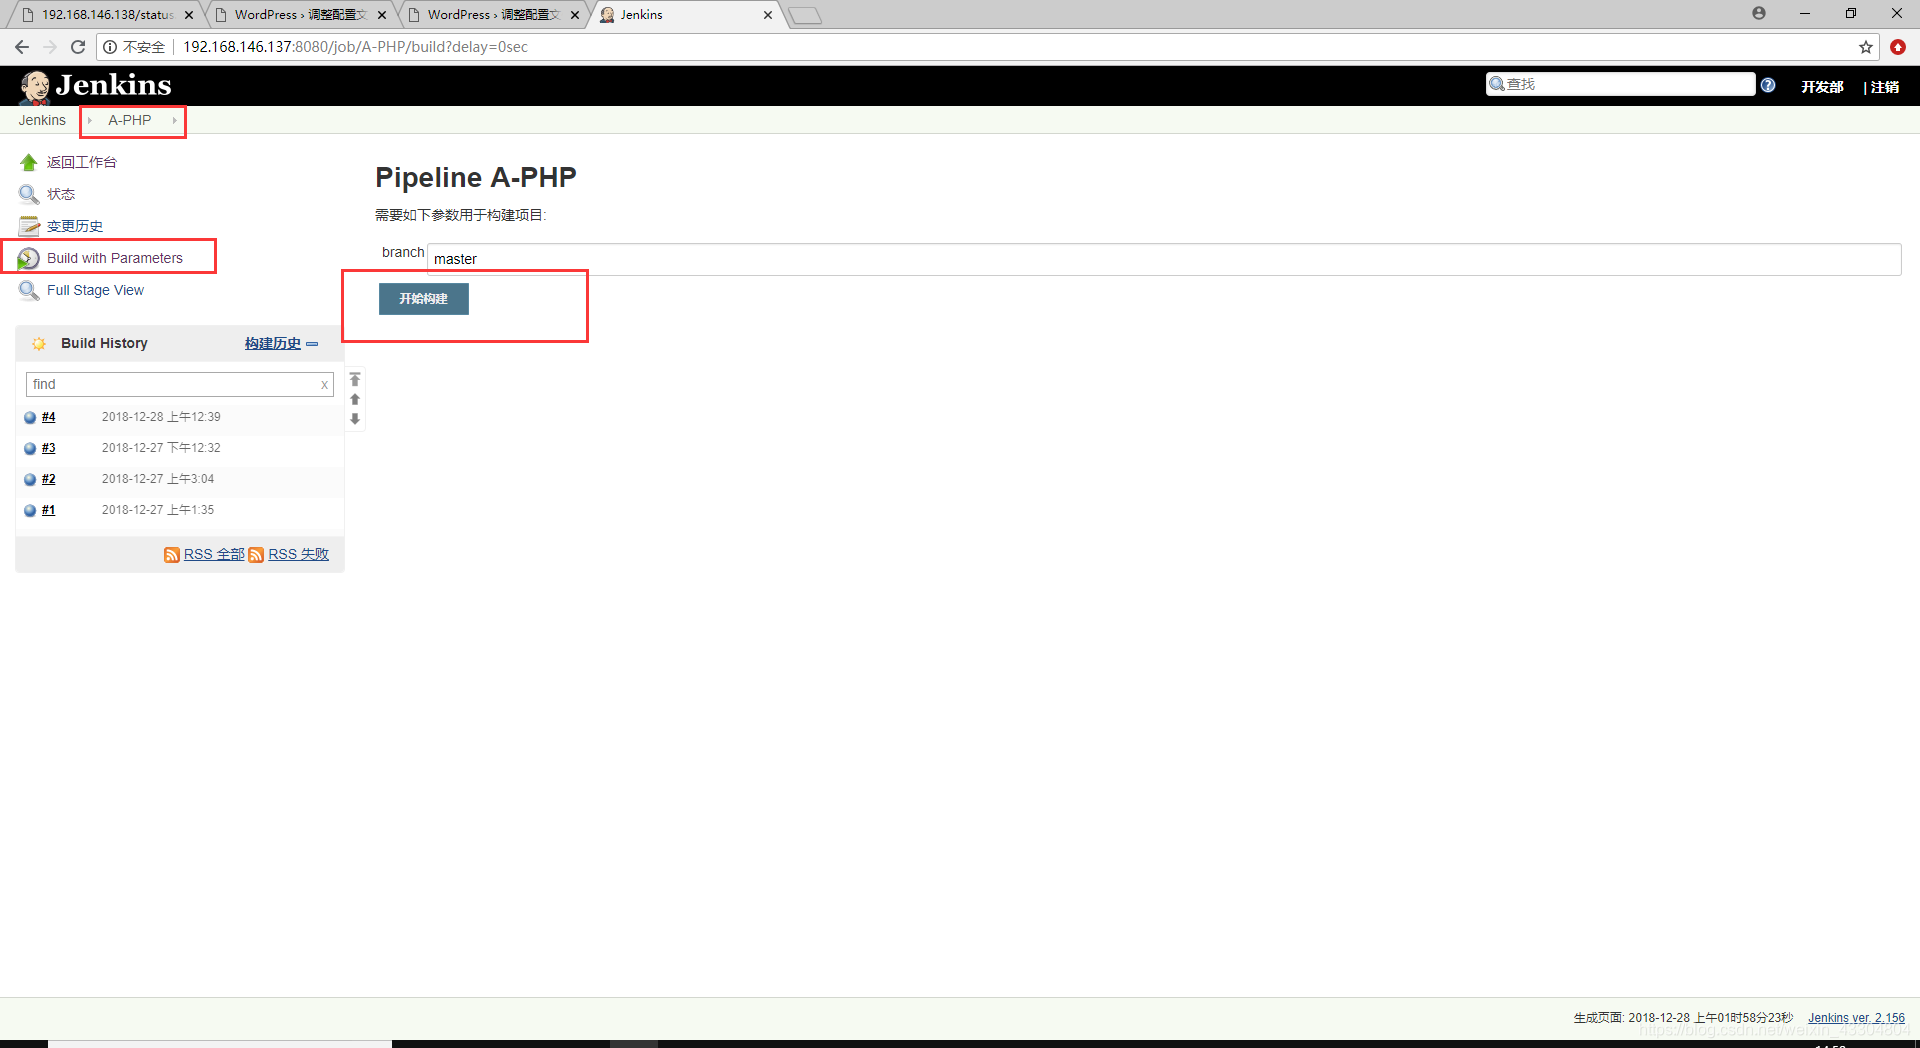
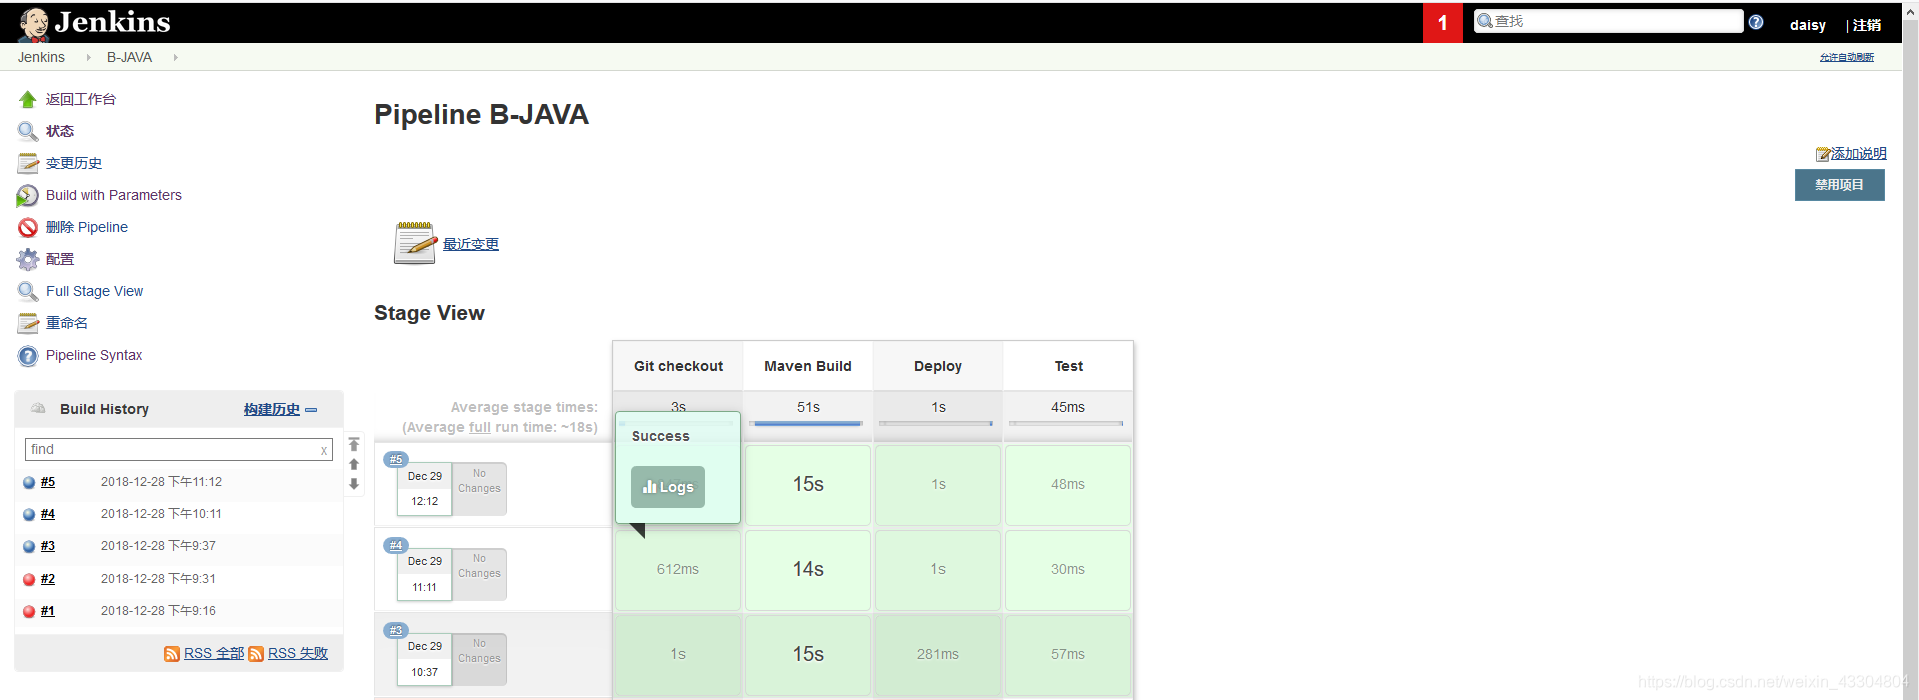
(4)开始构建Pipeline项目

[root@localhost workspace]# cd /test/
[root@localhost test]# cd app/
[root@localhost app]# ls
test.txt
[root@localhost app]# git remote -v
origin	[email protected]:/home/git/repos/app.git (fetch)
origin	[email protected]:/home/git/repos/app.git (push)
[root@localhost app]# git branch -a
* dev
  master
  test
  remotes/origin/HEAD -> origin/master
  remotes/origin/dev
  remotes/origin/master
  remotes/origin/test
[root@localhost app]# cd /var/lib/jenkins/
[root@localhost jenkins]# cd workspace/
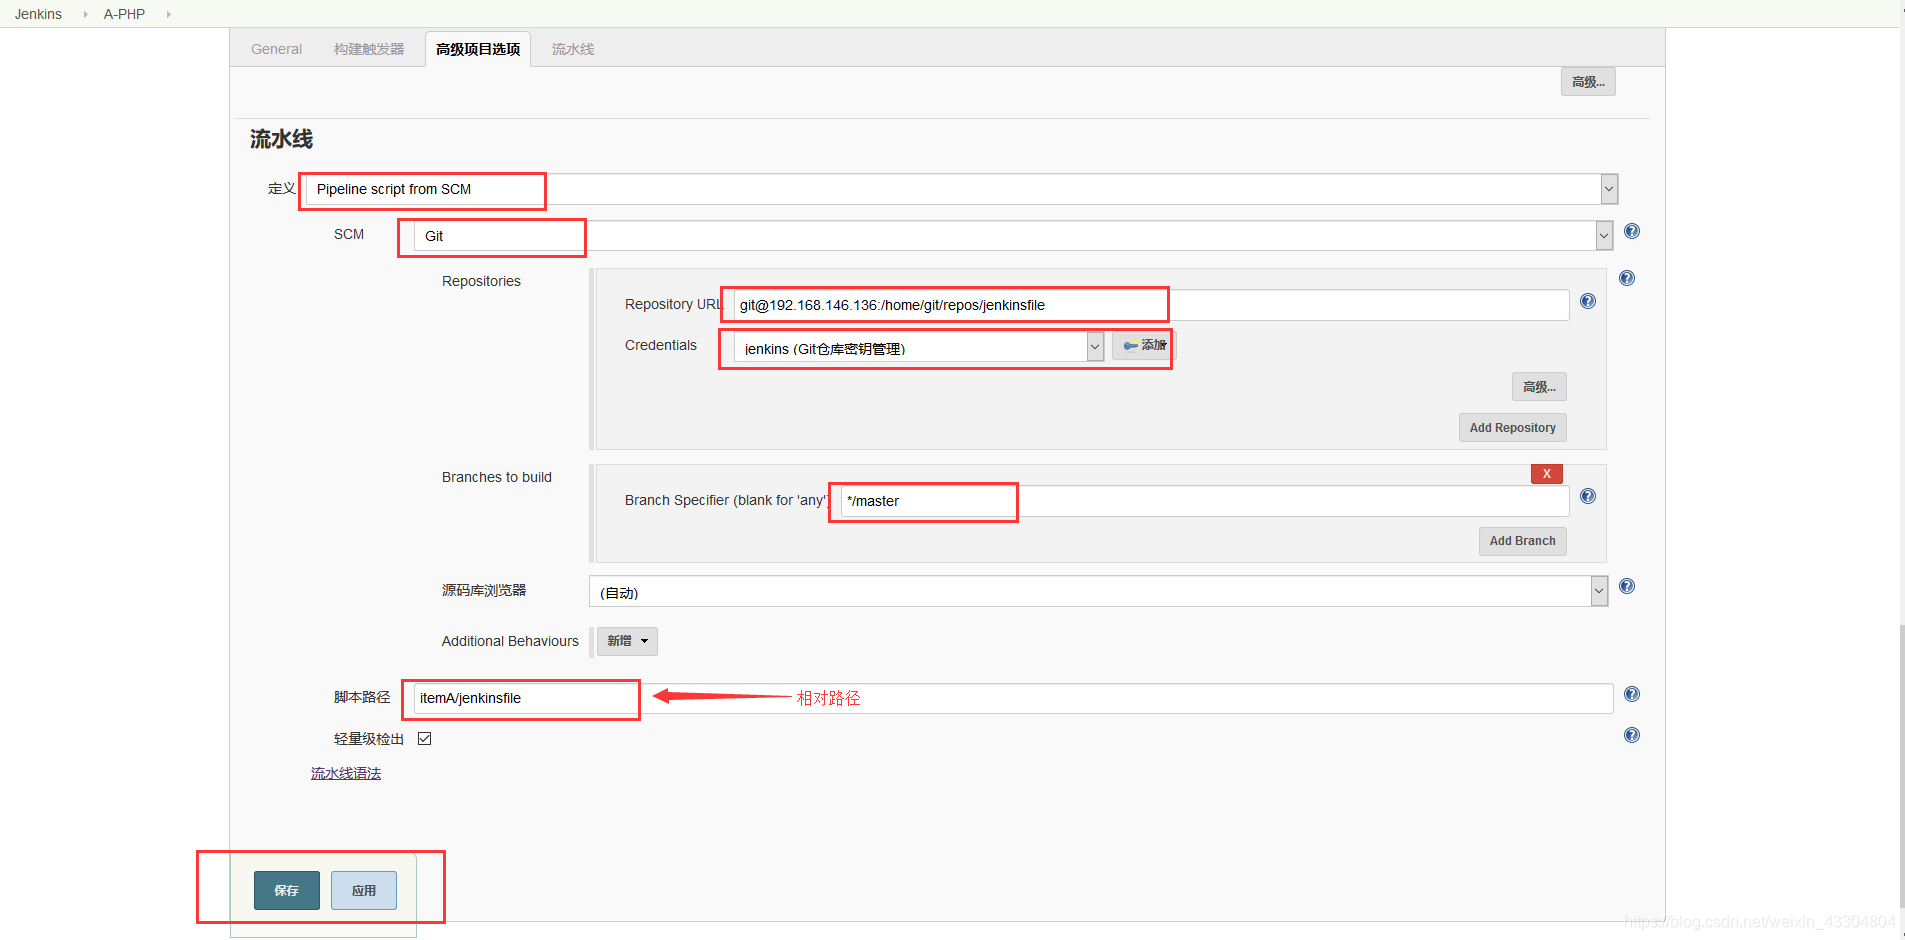
- 从远程仓库下载Pipeline Script,并构建
(1)在Git服务器上创建一个存放Pipeline脚本的仓库
[root@localhost ~]# su - git
Last login: Thu Dec 27 00:56:35 EST 2018 on pts/1
Last failed login: Thu Dec 27 00:58:54 EST 2018 from 192.168.146.137 on ssh:notty
There were 12 failed login attempts since the last successful login.
[git@localhost ~]$ cd /home/git/repos/
[git@localhost repos]$ ls
app.git
[git@localhost repos]$ mkdir jenkinsfile		#创建存放Pipeline脚本的仓库
[git@localhost repos]$ cd jenkinsfile/
[git@localhost jenkinsfile]$ git --bare init			#初始化仓库
Initialized empty Git repository in /home/git/repos/jenkinsfile/
(2)在jenkins服务器上,往远程仓库提交一个Pipeline脚本。
[root@localhost ~]# cd /test/
[root@localhost test]# ls
app
[root@localhost test]# rm -rf *
[root@localhost test]# git clone [email protected]:/home/git/repos/jenkinsfile
Cloning into 'jenkinsfile'...
warning: You appear to have cloned an empty repository.
Checking connectivity... done.
[root@localhost test]# ls
jenkinsfile
[root@localhost test]# cd jenkinsfile/
[root@localhost jenkinsfile]# ls
[root@localhost jenkinsfile]# mkdir itemA
[root@localhost jenkinsfile]# ls
itemA
[root@localhost jenkinsfile]# mkdir itemB
[root@localhost jenkinsfile]# cd itemA
[root@localhost itemA]# vim jenkinsfile
node {
   //def mvnHome
   stage('Git checkout') {
   checkout([$class: 'GitSCM',
   branches: [[name: '${branch}']],
   doGenerateSubmoduleConfigurations: false,
   extensions: [], submoduleCfg: [],
   userRemoteConfigs: [[credentialsId: 'a240769e-ed1a-4456-90a8-f0e124024801',
   url: '[email protected]:/home/git/repos/app.git']]])
   }
   stage('Maven Build') {
       echo "maven build..."
   }
   stage('Deploy') {
       echo "success..."
   }
   stage('Test') {
       echo "OK"
   }
}
#将脚本推送到远程仓库的master分支
[root@localhost itemA]# git add *
[root@localhost itemA]# git commit -m "jenkinsfile commit"
[master (root-commit) 1f3715d] jenkinsfile commit
 1 file changed, 21 insertions(+)
 create mode 100644 itemA/jenkinsfile
[root@localhost itemA]# git push -u origin master
Counting objects: 4, done.
Compressing objects: 100% (2/2), done.
Writing objects: 100% (4/4), 559 bytes | 0 bytes/s, done.
Total 4 (delta 0), reused 0 (delta 0)
To 192.168.146.136:/home/git/repos/jenkinsfile
 * [new branch]      master -> master
Branch master set up to track remote branch master from origin.
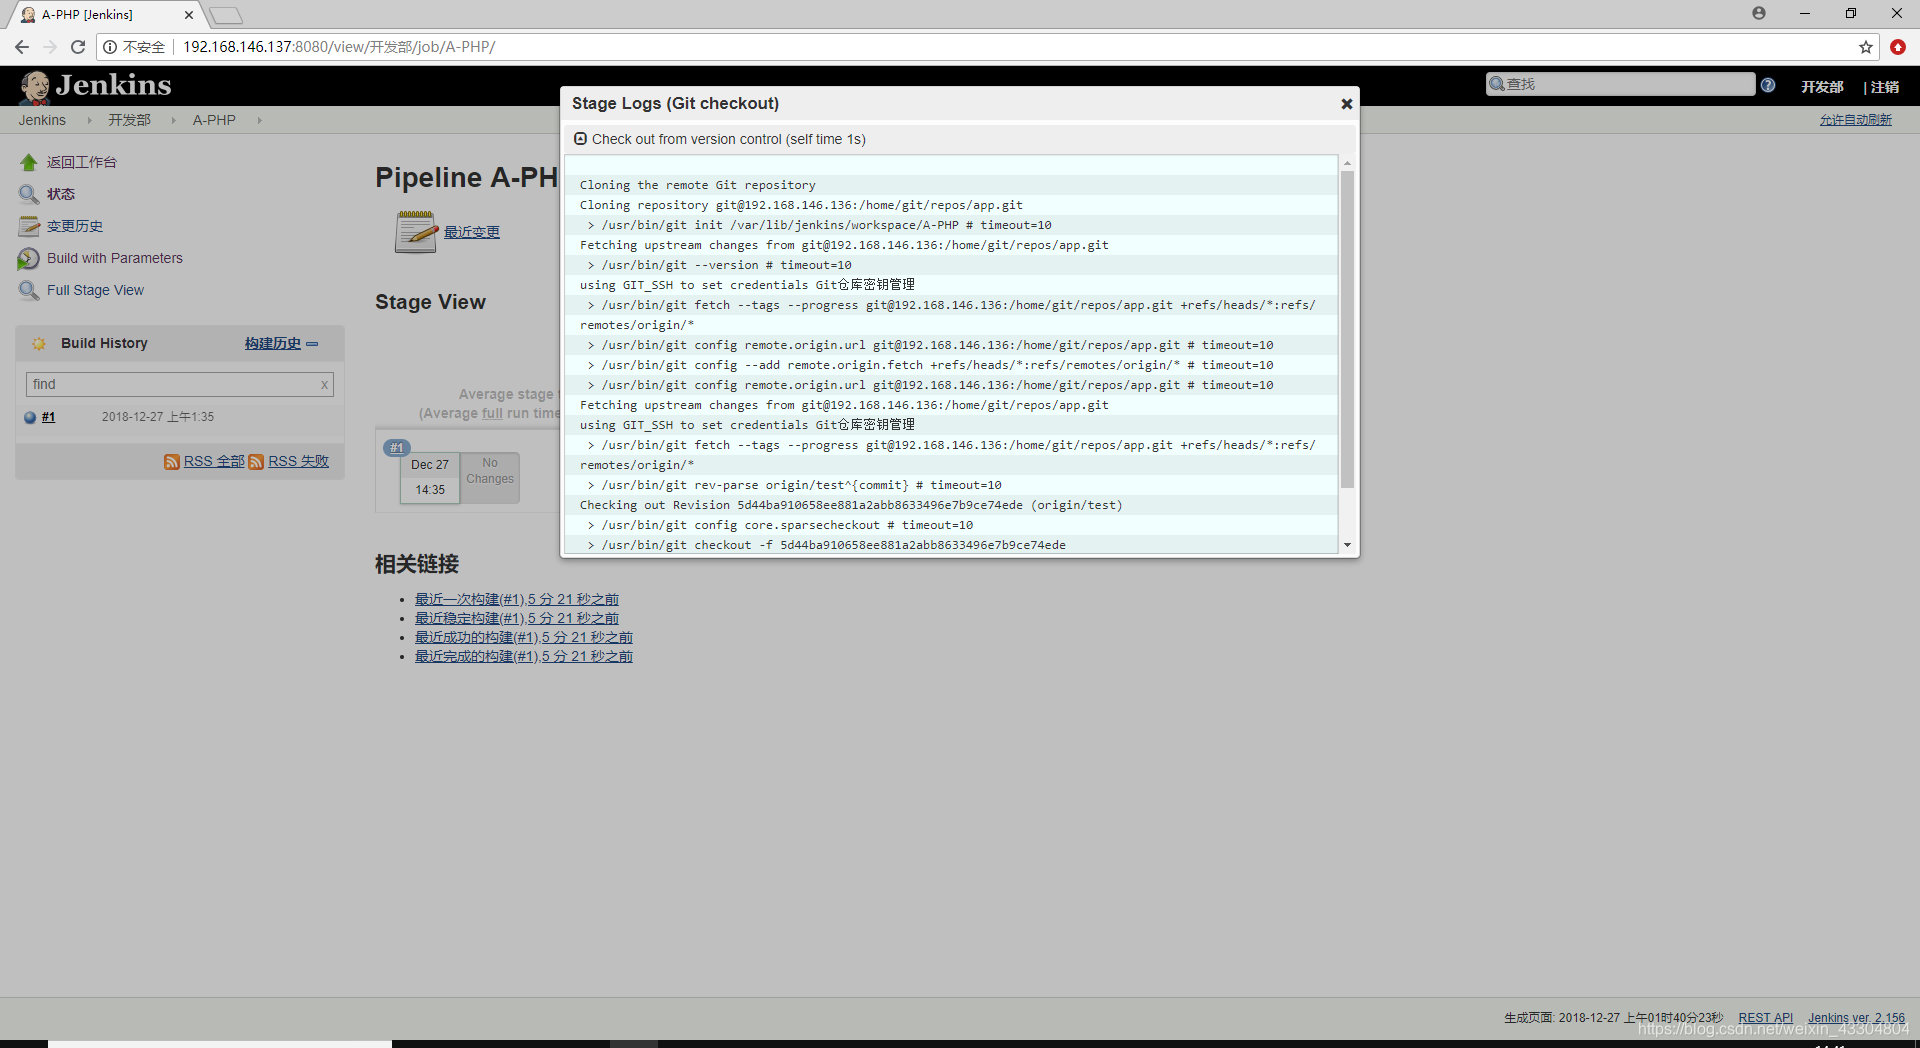
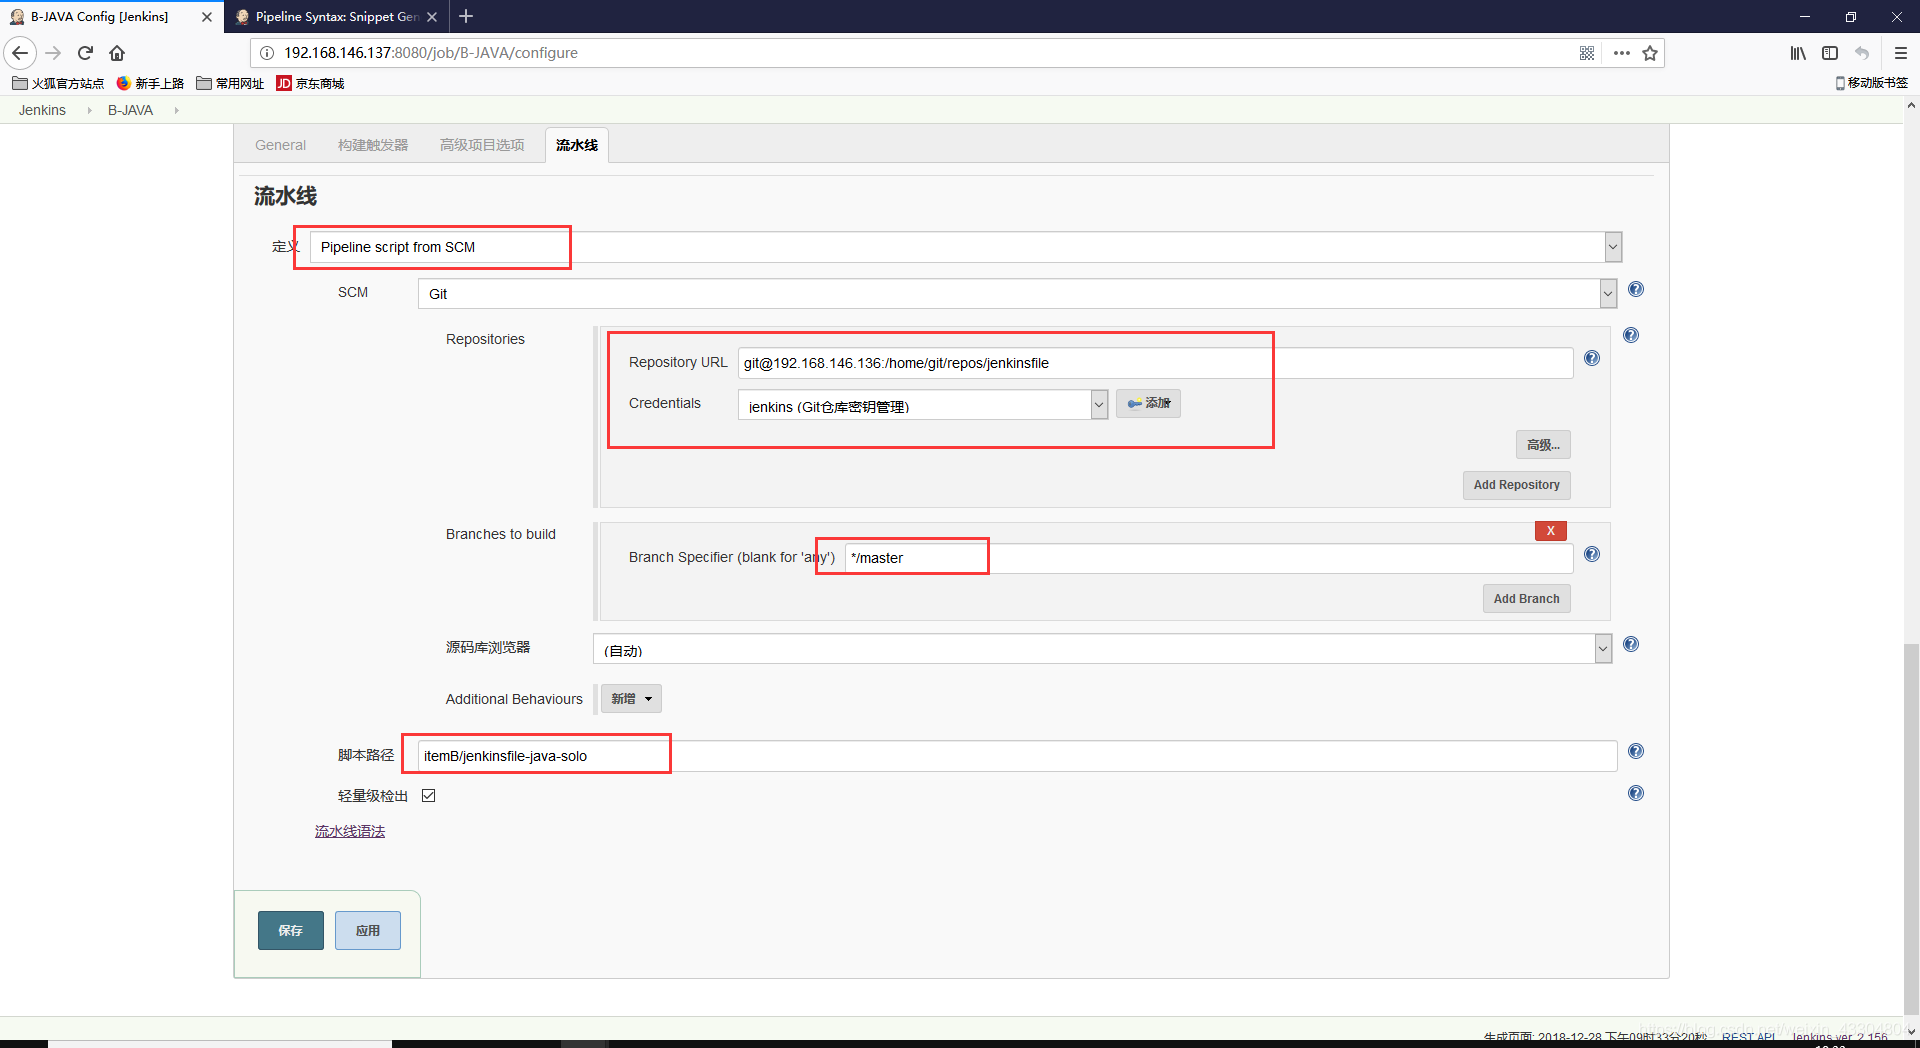
(3)利用远程仓库里的Pipeline脚本,进行流水线的构建
项目案例一:Jenkins+Pipeline+Git+PHP博客项目流水线自动发布
| 主机名 | IP地址 | 备注 |
|---|---|---|
| Git | 192.168.146.136 | Git服务器 |
| Jenkins | 192.168.146.137 | Jenkins服务器 |
| Web | 192.168.146.138 | Web服务器 |
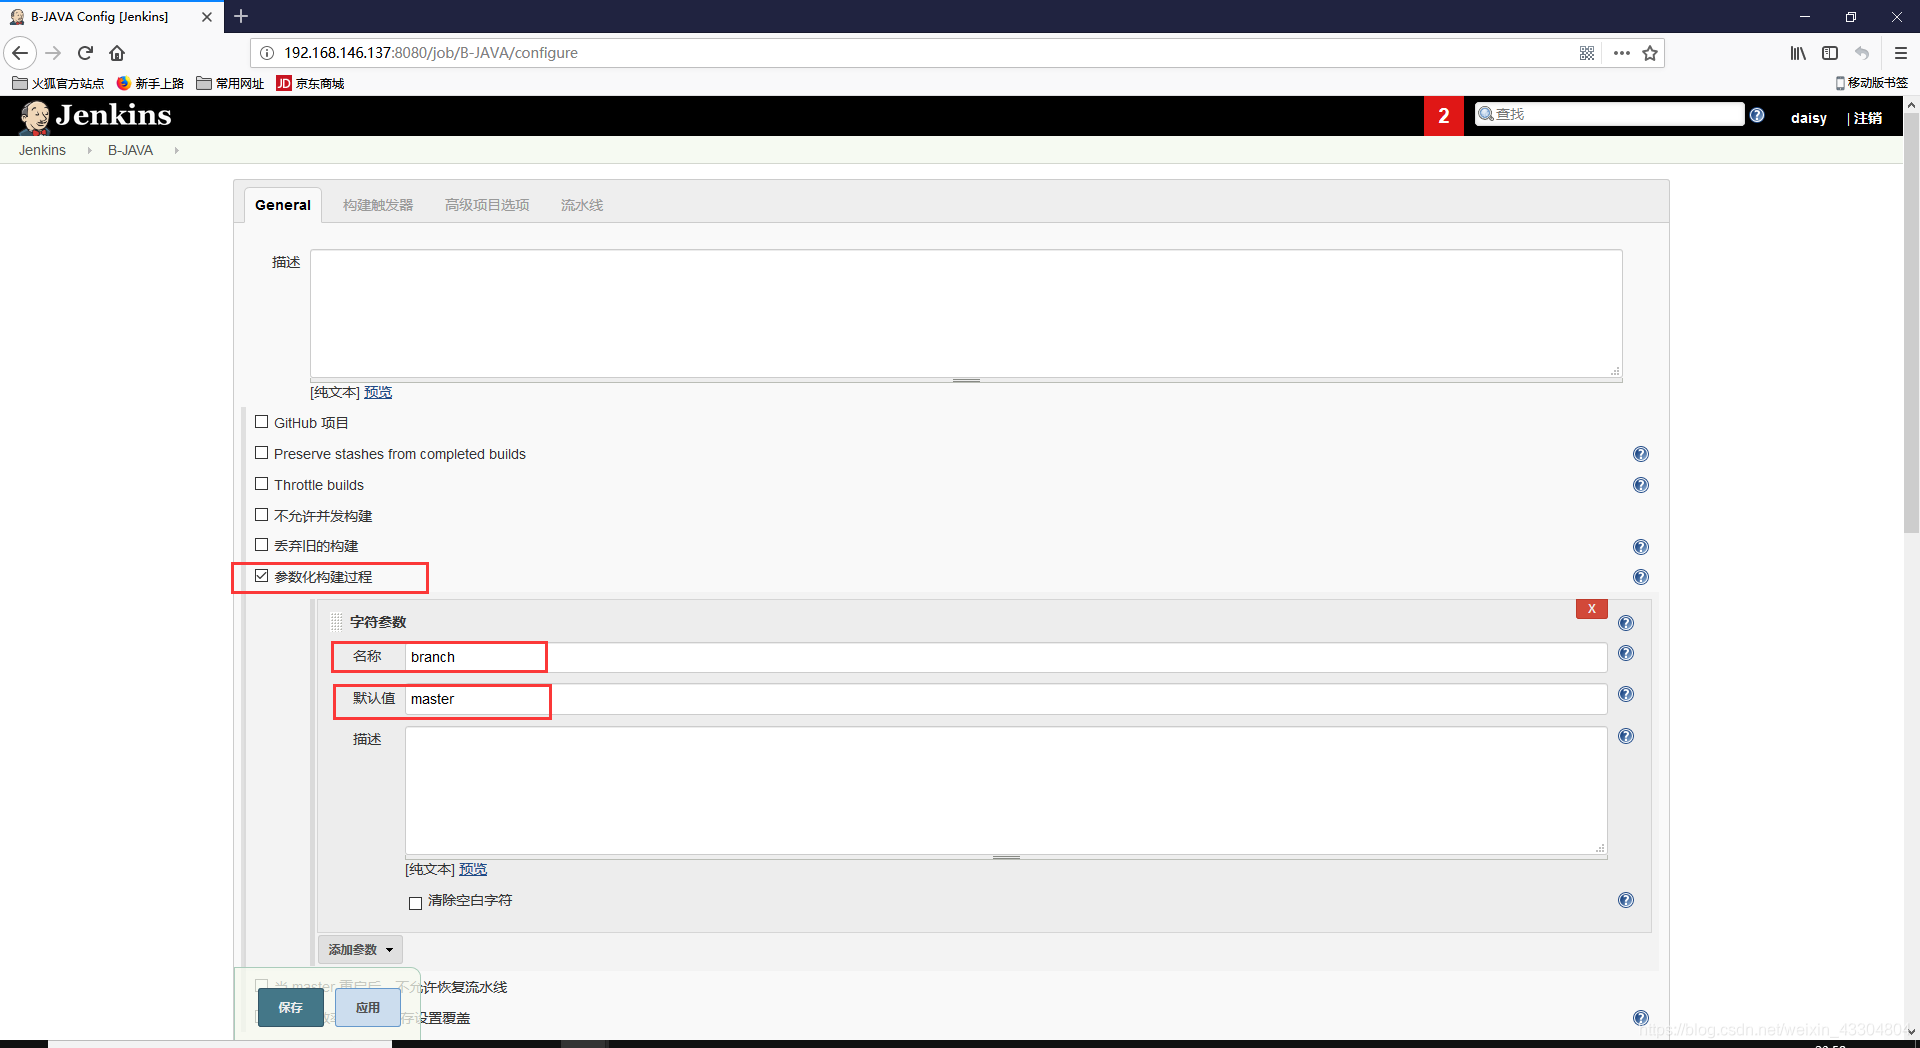
- 创建一个Pipeline流水线项目并进行参数化构建
流水线一般情况下是用在线上环境,测试环境一般不用流水线,因为数据经常变更;测试环境不支持Git参数化构建,而线上环境只拉取master。
由于我们仍旧打算将pipeline脚本放在远程Git仓库里,因此我们需要从远程Git仓库拉取Pipeline脚本,所以,参数化构建不支持Git的参数化。我们只能使用字符结构的参数化构建。
- 下载用于自动化发布的PHP源码wordpress源码包,并上传远程git仓库
#在Git中操作
[root@localhost ~]# su - git
Last login: Thu Dec 27 00:56:35 EST 2018 on pts/1
Last failed login: Thu Dec 27 00:58:54 EST 2018 from 192.168.146.137 on ssh:notty
There were 12 failed login attempts since the last successful login.
[git@localhost jenkinsfile]$ cd /home/git/repos/
[git@localhost repos]$ ls
app.git  jenkinsfile
[git@localhost repos]$ mkdir wordpress
[git@localhost repos]$ cd wordpress/
[git@localhost wordpress]$ git --bare init
Initialized empty Git repository in /home/git/repos/wordpress/
[git@localhost wordpress]$ ls
branches  config  description  HEAD  hooks  info  objects  refs
在NginxWeb中操作(提前创建jdk、maven、git环境)
[root@localhost git-2.9.5]# git config --global user.email "[email protected]"
[root@localhost git-2.9.5]# git config --global user.name "daisy"
[root@localhost ~]# mkdir -p /mycode
#下载wordpres源代码
[root@localhost ~]# tar xf wordpress-4.9.4-zh_CN.tar.gz -C /mycode/
[root@localhost ~]# cd /mycode/
[root@localhost mycode]# mv wordpress wordpress111
[root@localhost mycode]# ls
wordpress111
#在jenkins服务器上,克隆创建好的远程Git仓库
[root@localhost mycode]# git clone [email protected]:/home/git/repos/wordpress
Cloning into 'wordpress'...
The authenticity of host '192.168.146.136 (192.168.146.136)' can't be established.
ECDSA key fingerprint is SHA256:14NKIeIbfU5Cx3usA72K/AmnoeDt/UyH+SII8+rV1dA.
ECDSA key fingerprint is MD5:60:ab:53:4a:f8:fc:74:2b:93:1e:6f:b3:4c:e4:33:de.
Are you sure you want to continue connecting (yes/no)? yes
Warning: Permanently added '192.168.146.136' (ECDSA) to the list of known hosts.
[email protected]'s password:
warning: You appear to have cloned an empty repository.
Checking connectivity... done.
[root@localhost mycode]# ls
wordpress wordpress111
[root@localhost mycode]# mv wordpress111/* wordpress
[root@localhost mycode]# rm -rf wordpress111/
[root@localhost mycode]# ls
wordpress
#在项目代码里加入一个健康检查测试页面,并推送到远程Git仓库
[root@localhost mycode]# cd wordpress/
[root@localhost mycode]# ls
index.php wp-admin wp-cron.php wp-mail.php
license.txt wp-blog-header.php wp-includes wp-settings.php
readme.html wp-comments-post.php wp-links-opml.php wp-signup.php
wp-config-sample.php wp-load.php wp-trackback.php
wp-activate.php wp-content wp-login.php xmlrpc.php
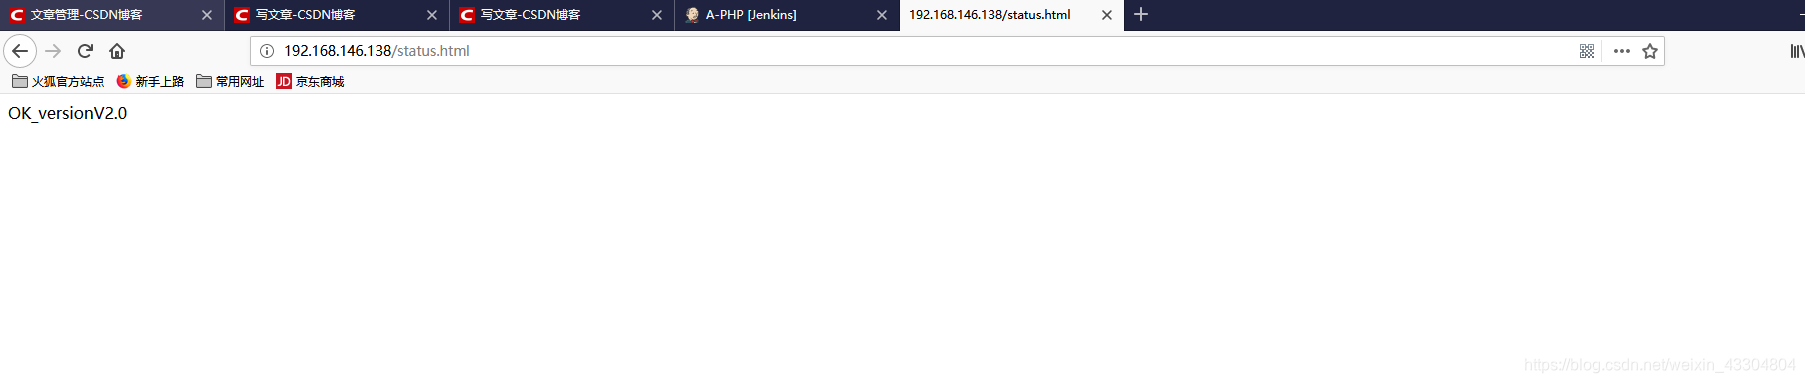
[root@localhost mycode]# vim status.html
[root@localhost mycode]# cat status.html
OK_versionV2.0
#在jenkins上提交代码到远程Git仓库
[root@localhost mycode]# git add *
[root@localhost mycode]# git commit -m "wordpress"
[root@localhost wordpress]# git remote -v
origin [email protected]:/home/git/repos/wordpress (fetch)
origin [email protected]:/home/git/repos/wordpress (push)
[root@localhost wordpress]# git push -u origin master
[email protected]'s password:
Counting objects: 1661, done.
Compressing objects: 100% (1635/1635), done.
Writing objects: 100% (1661/1661), 8.86 MiB | 8.40 MiB/s, done.
Total 1661 (delta 173), reused 0 (delta 0)
To 192.168.146.136:/home/git/repos/wordpress
* [new branch] master -> master
Branch master set up to track remote branch master from origin.
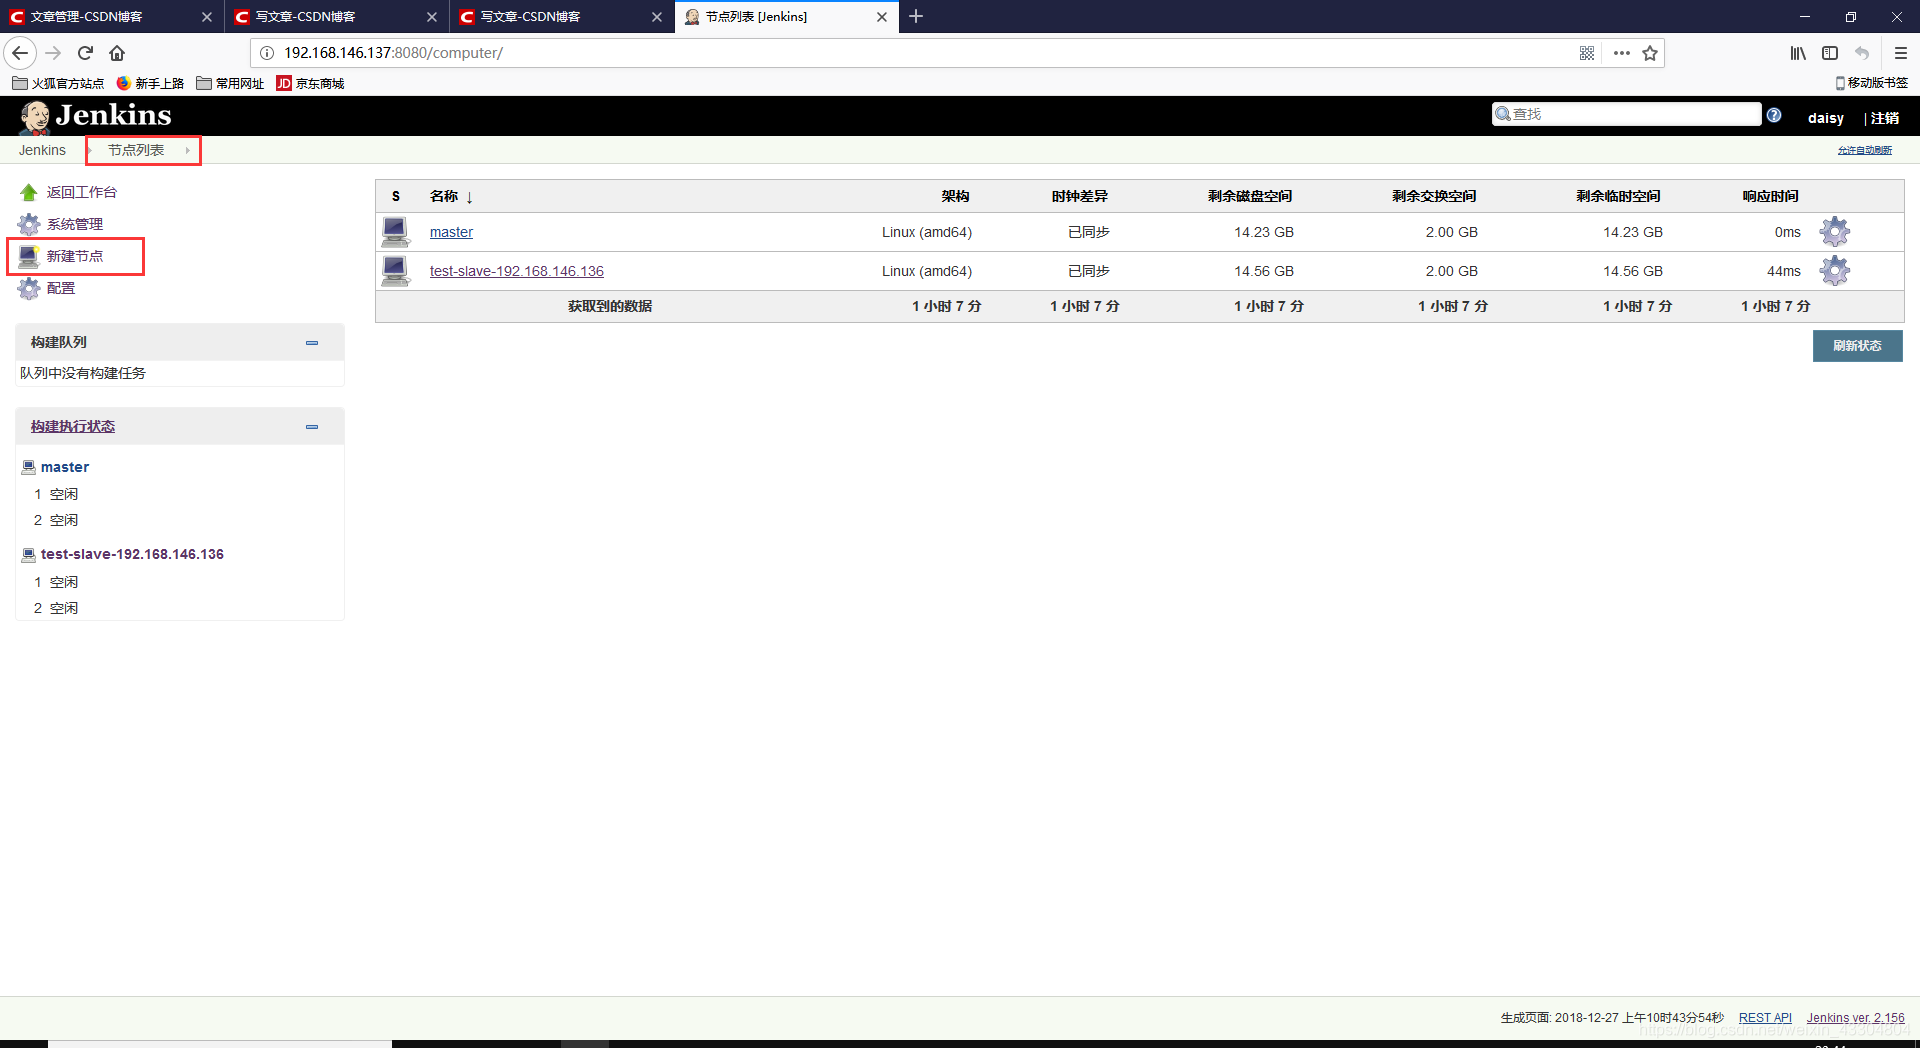
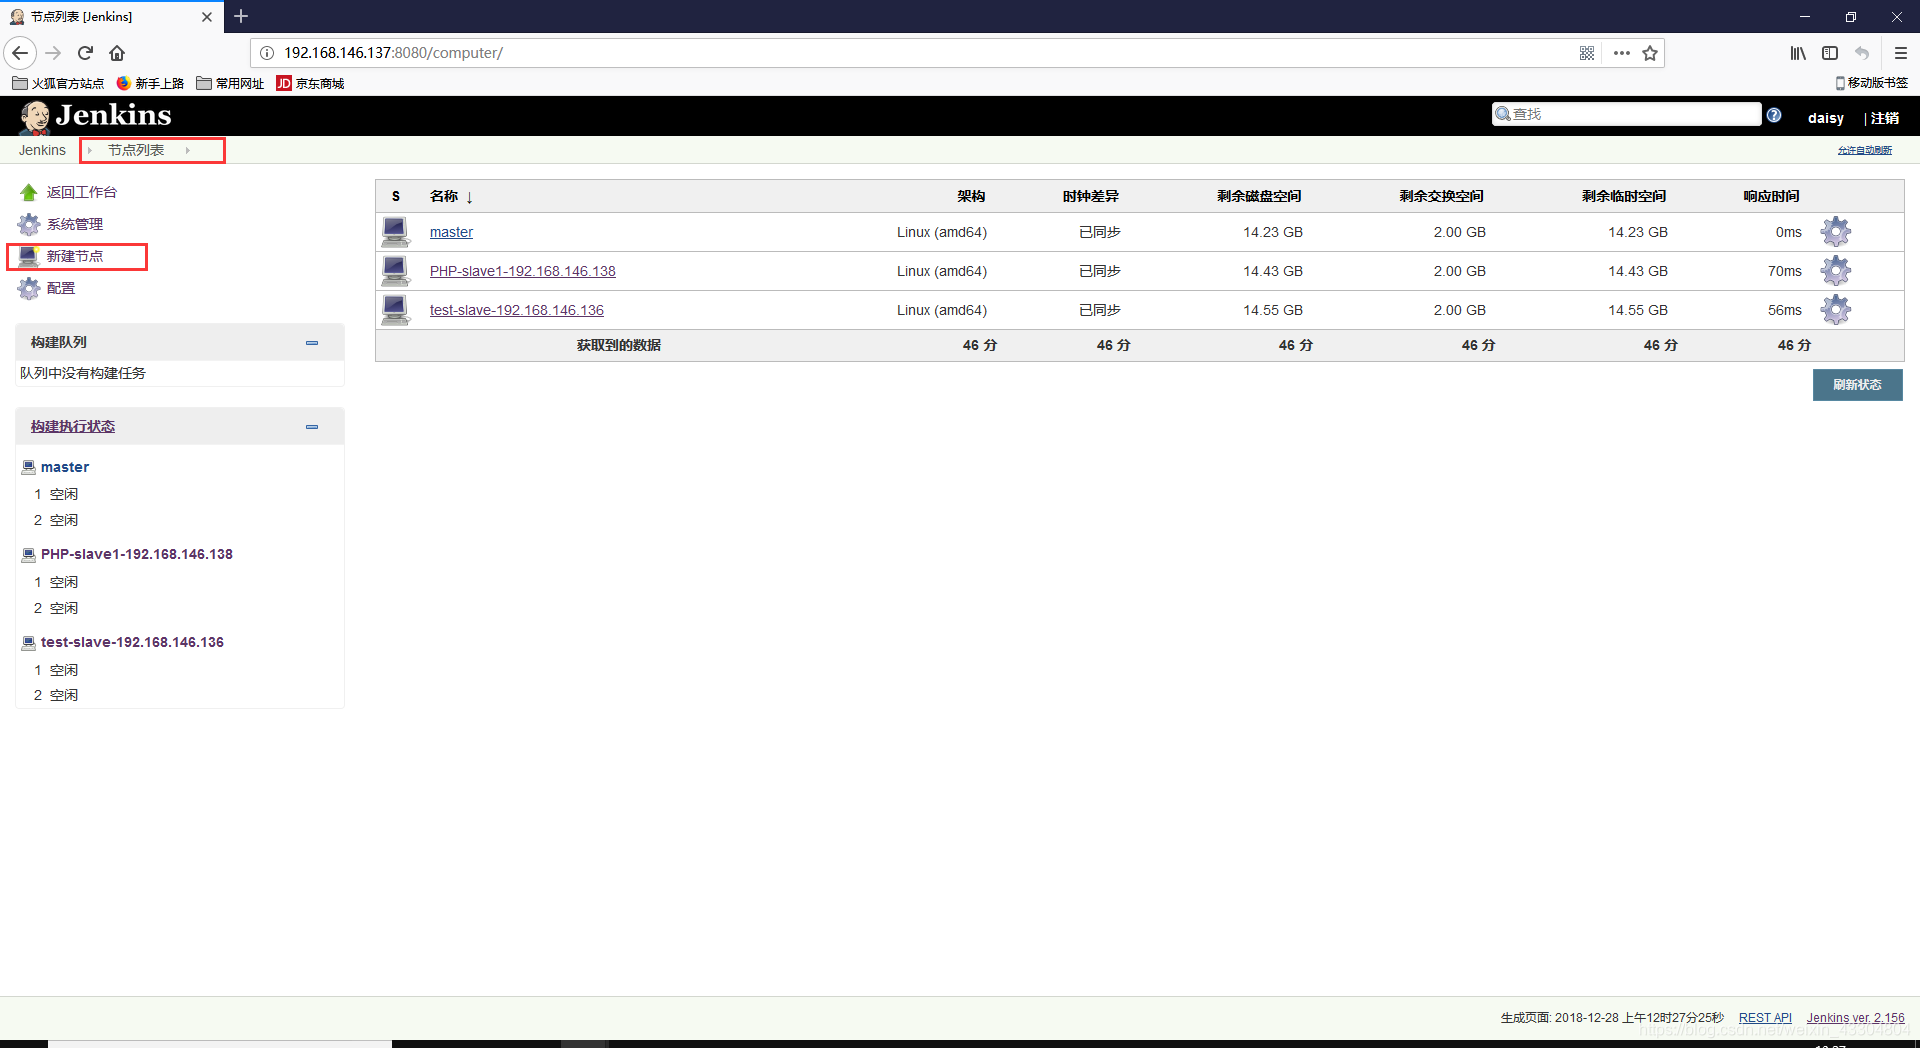
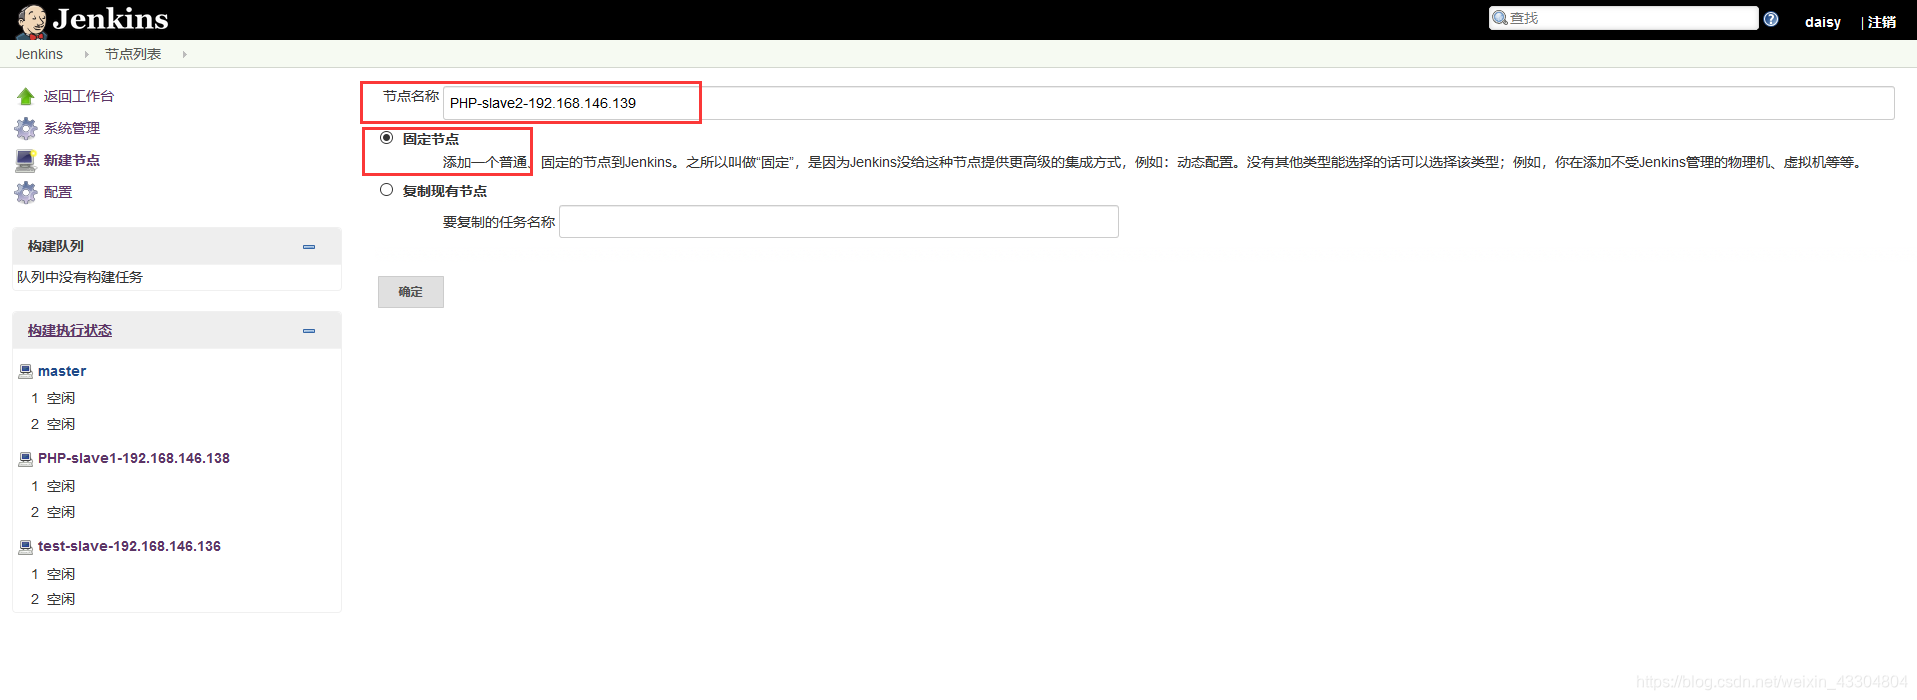
- 设置分布式构建的slave管理节点
我们计划利用分布式构建的方式,启动pipeline的流水线项目发布
slave管理节点就设置为需要用于发布项目的Web服务器
(1) 添加用于连接slave代理节点的SSH证书
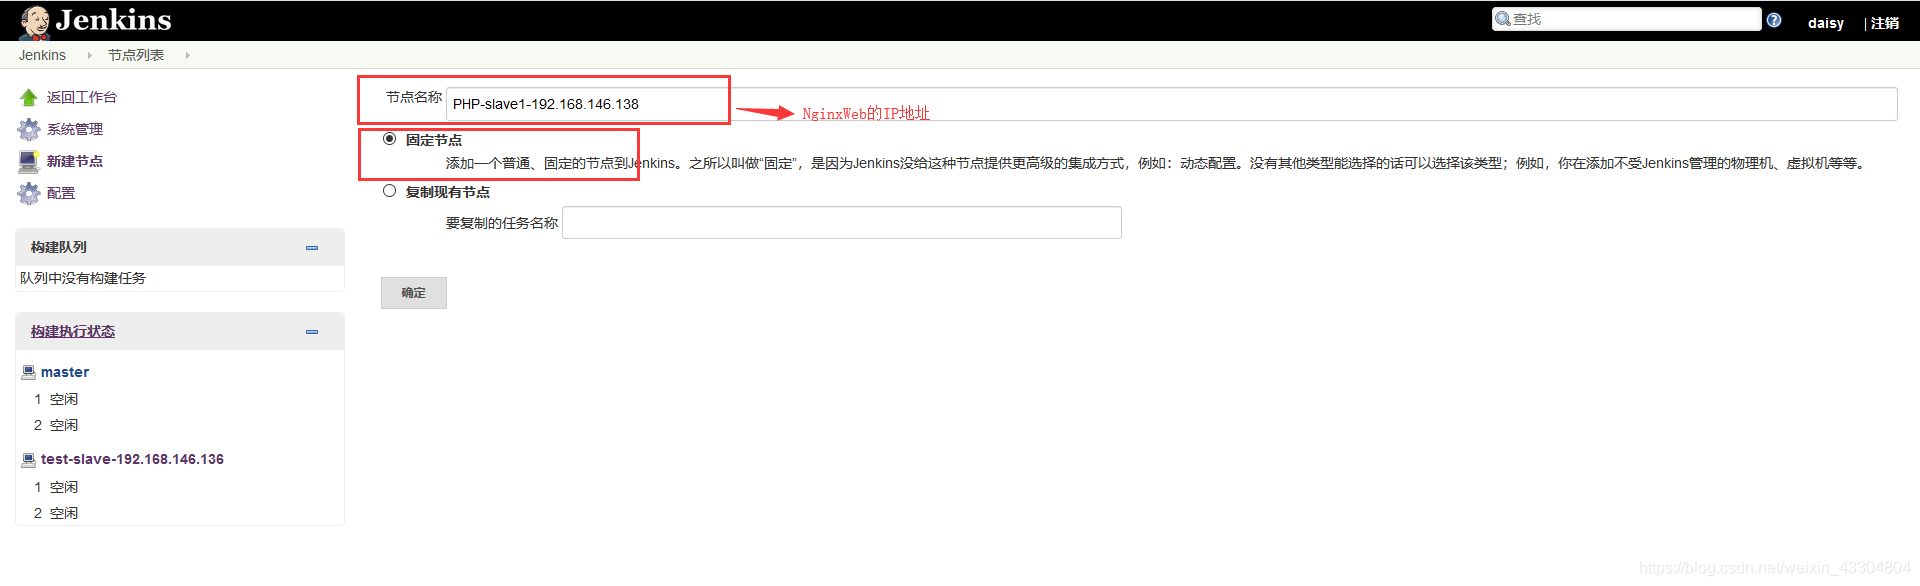
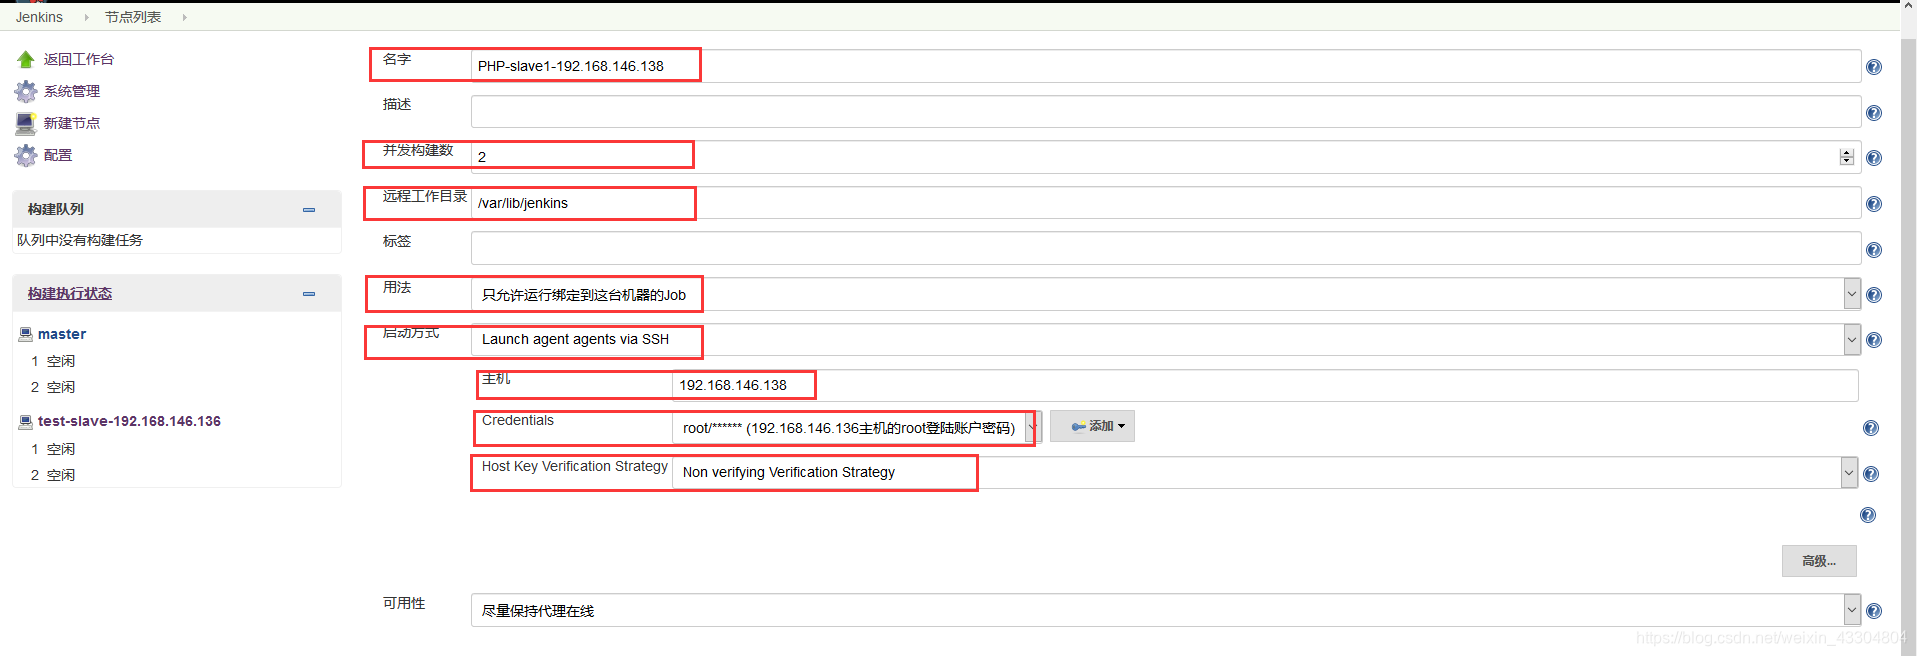
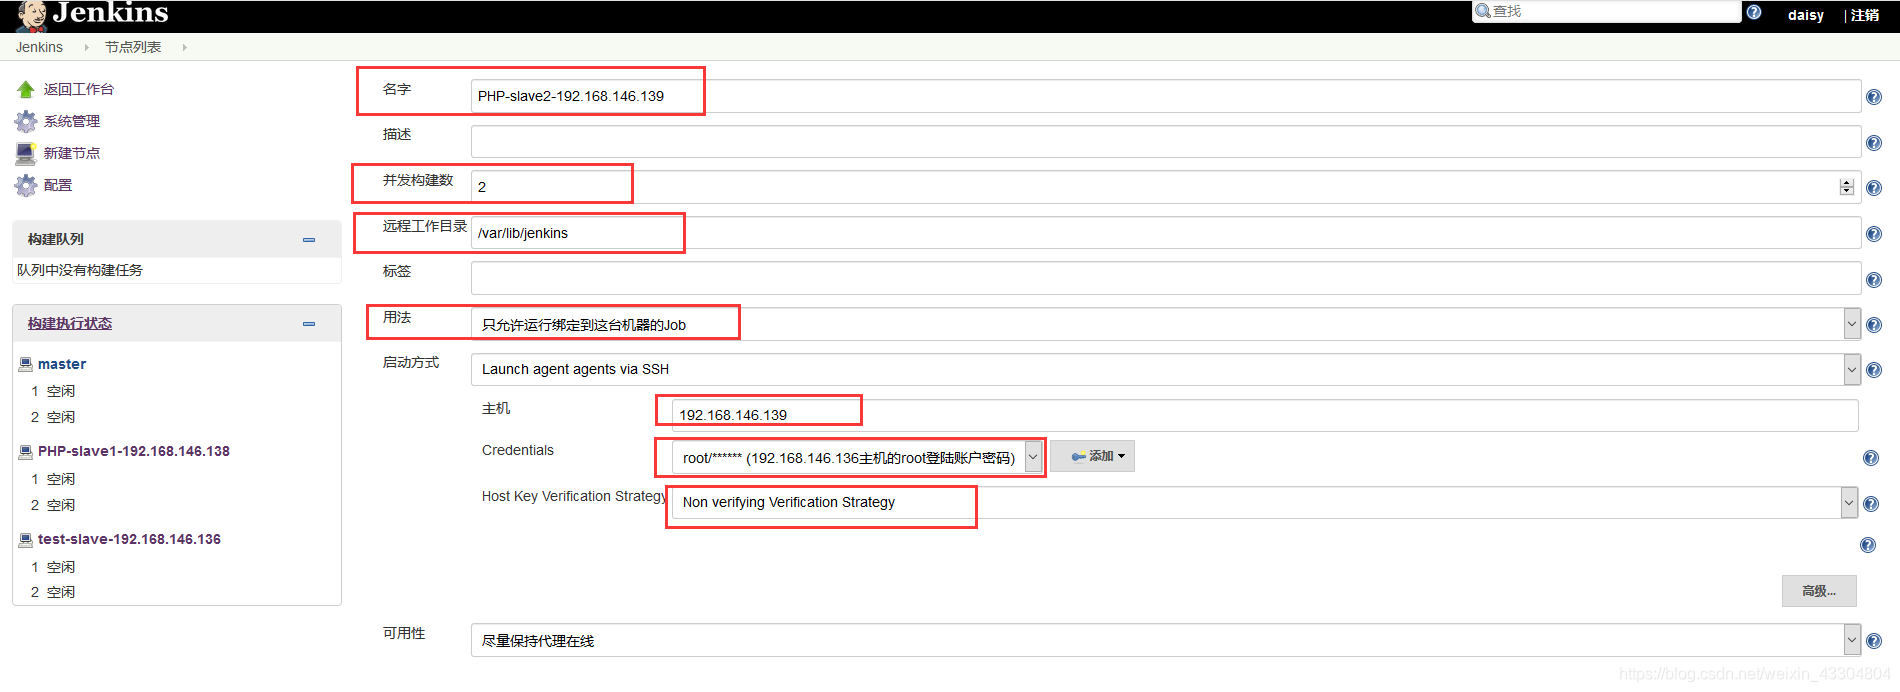
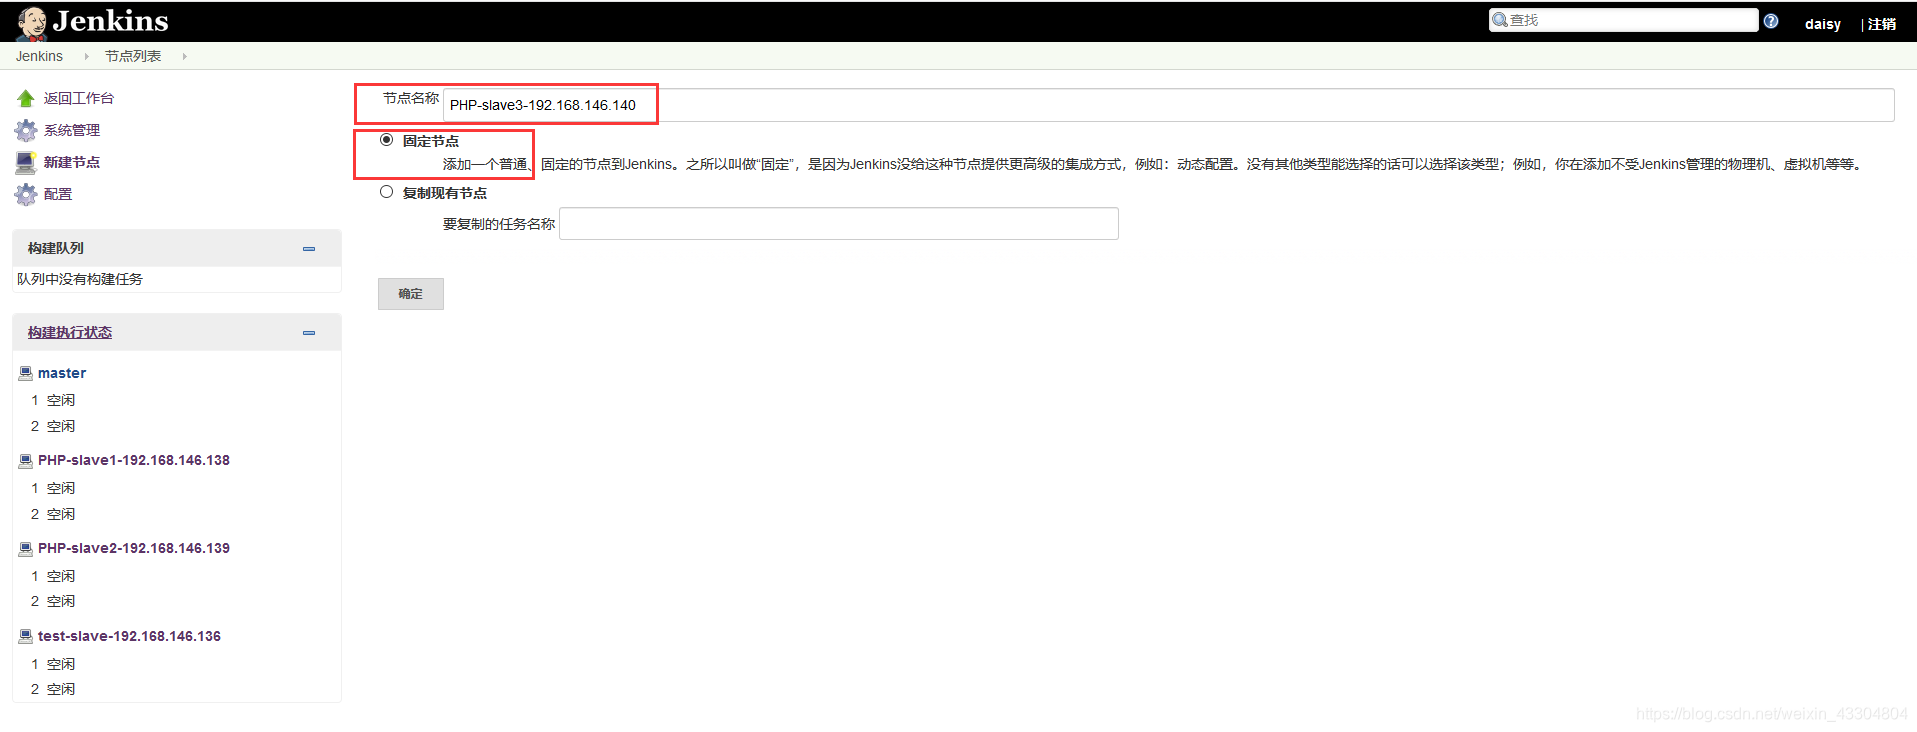
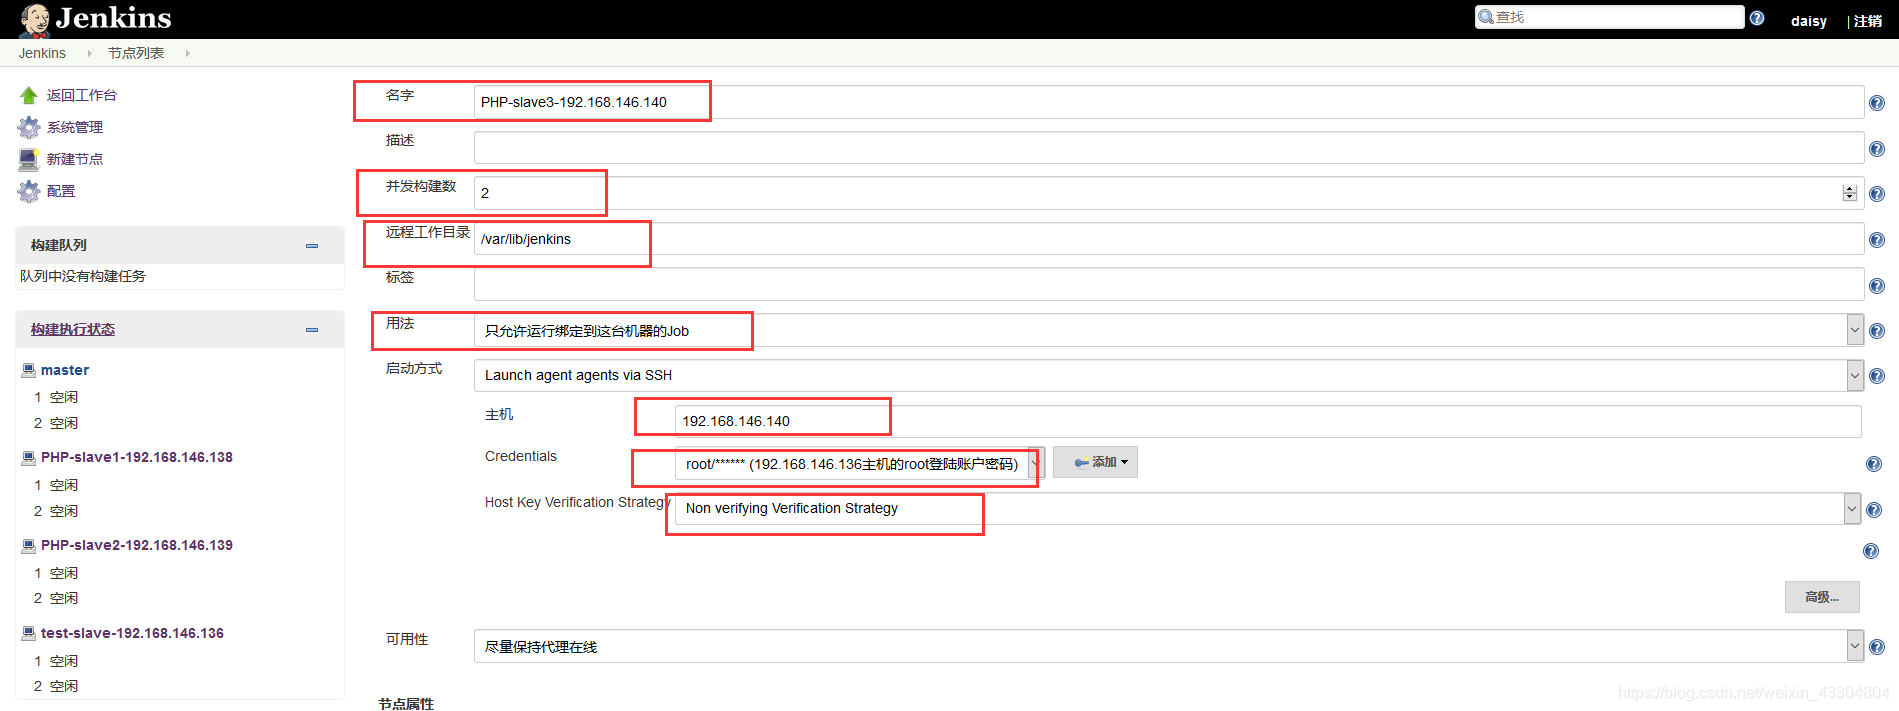
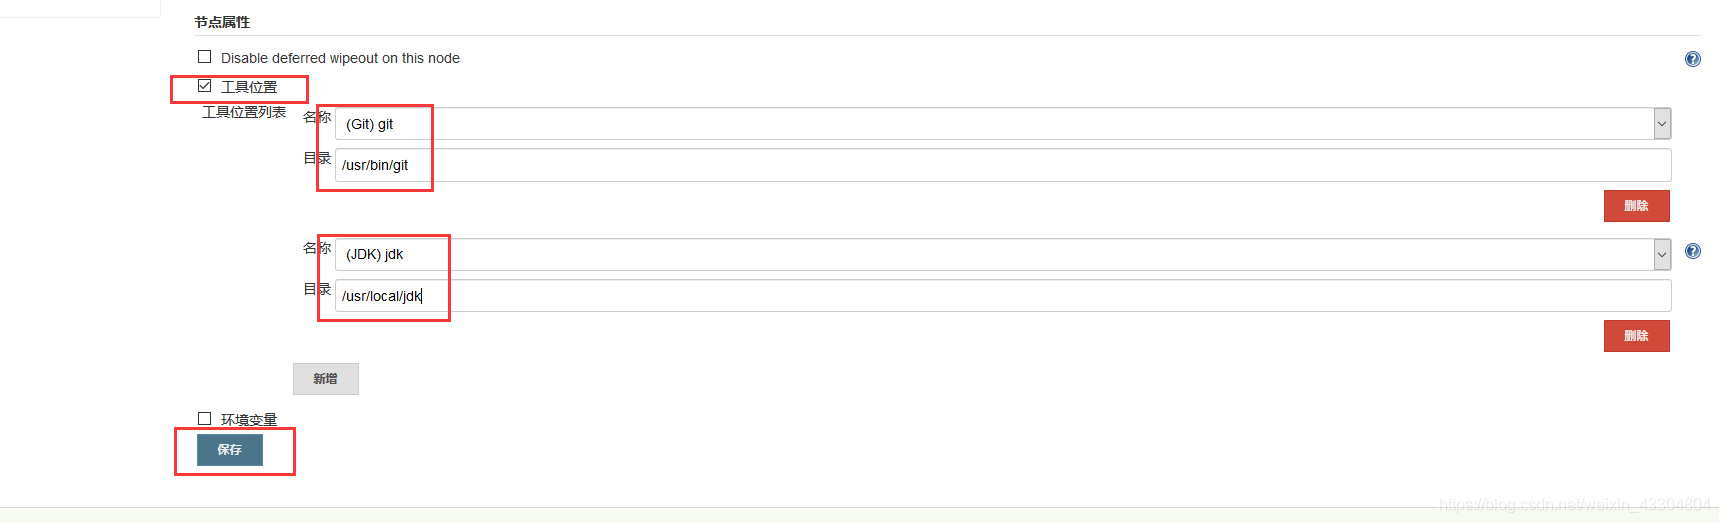
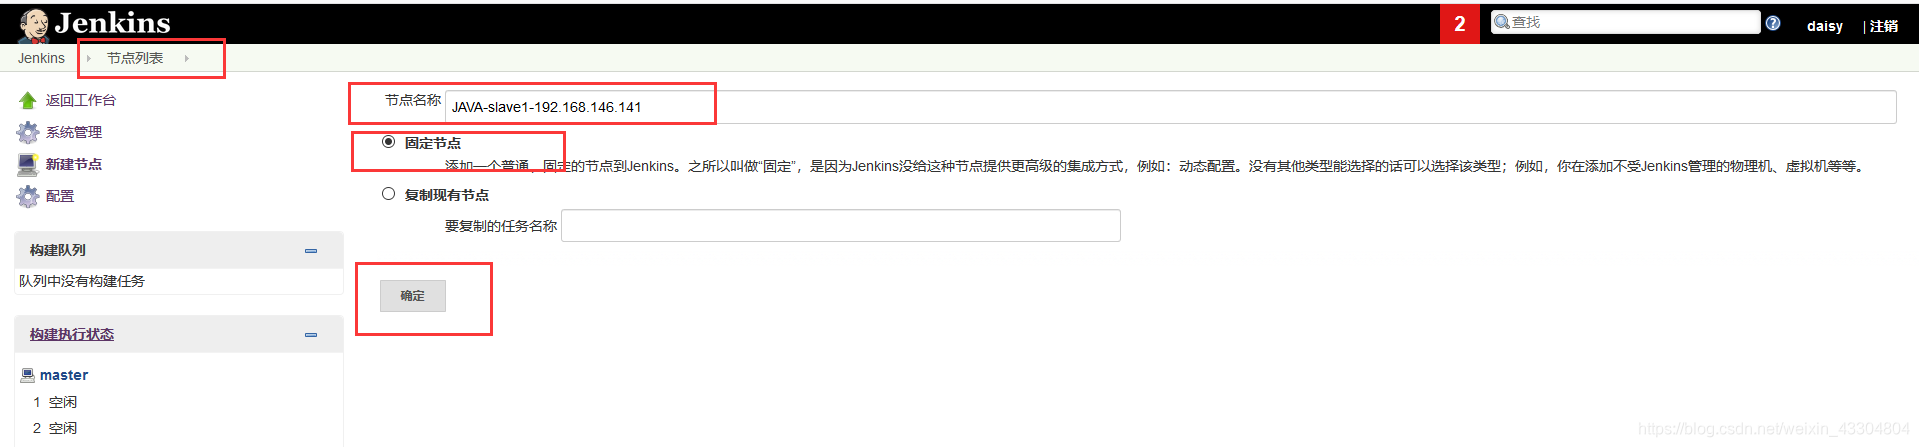
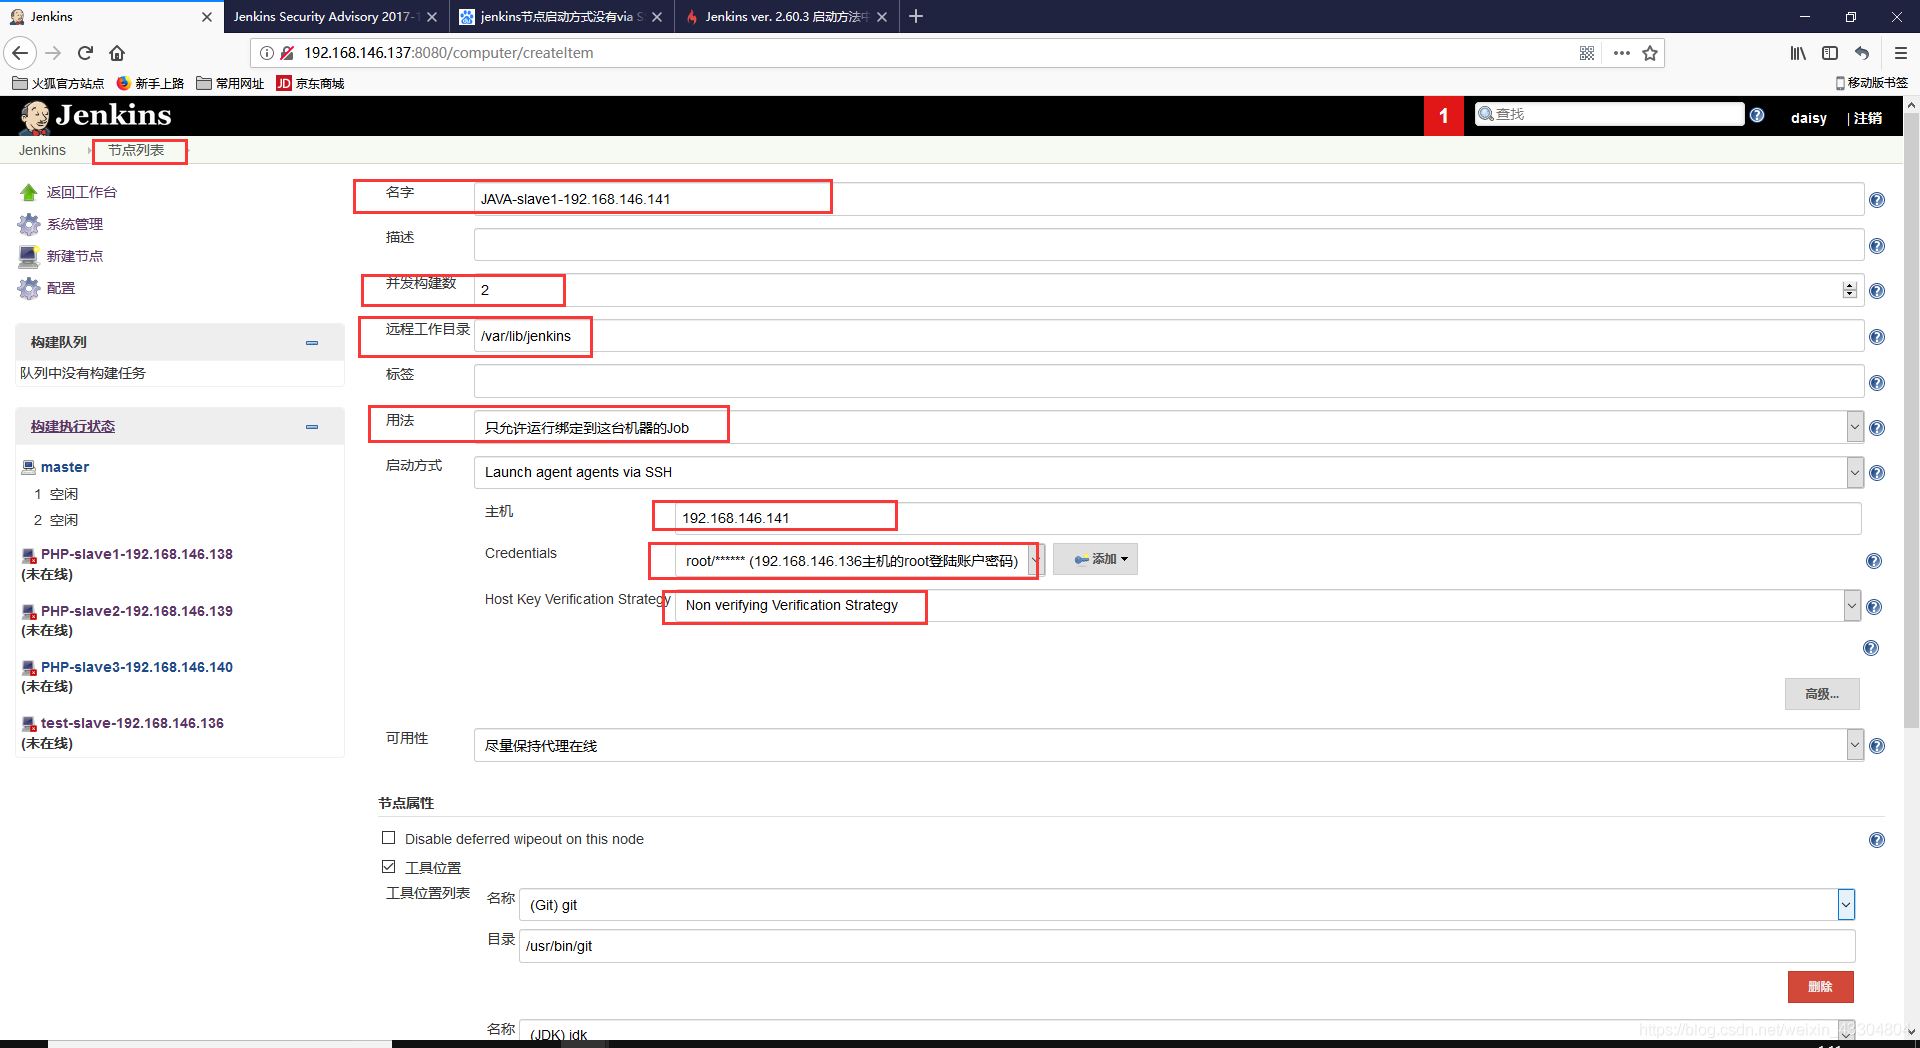
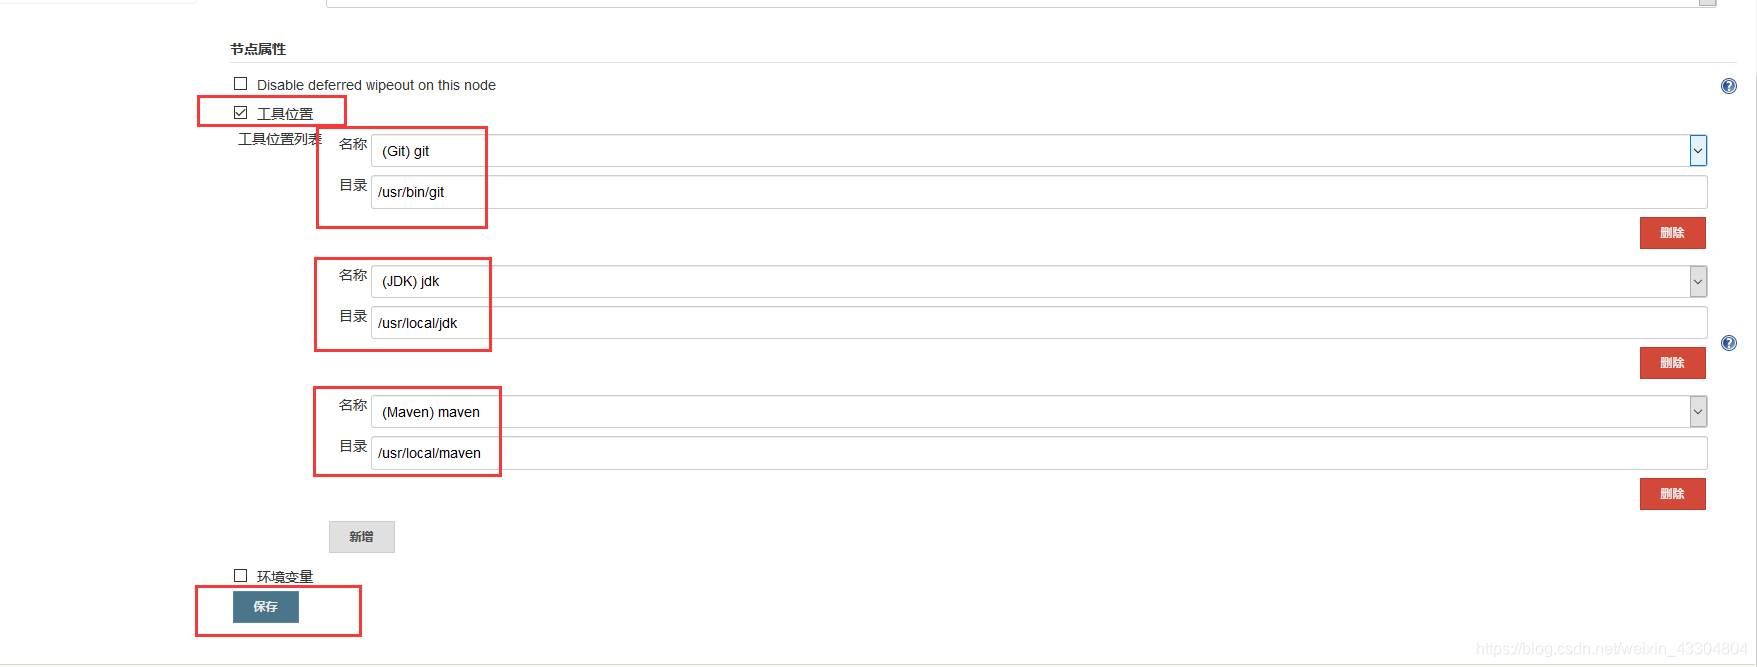
 (2) 添加并设置slave管理从节点
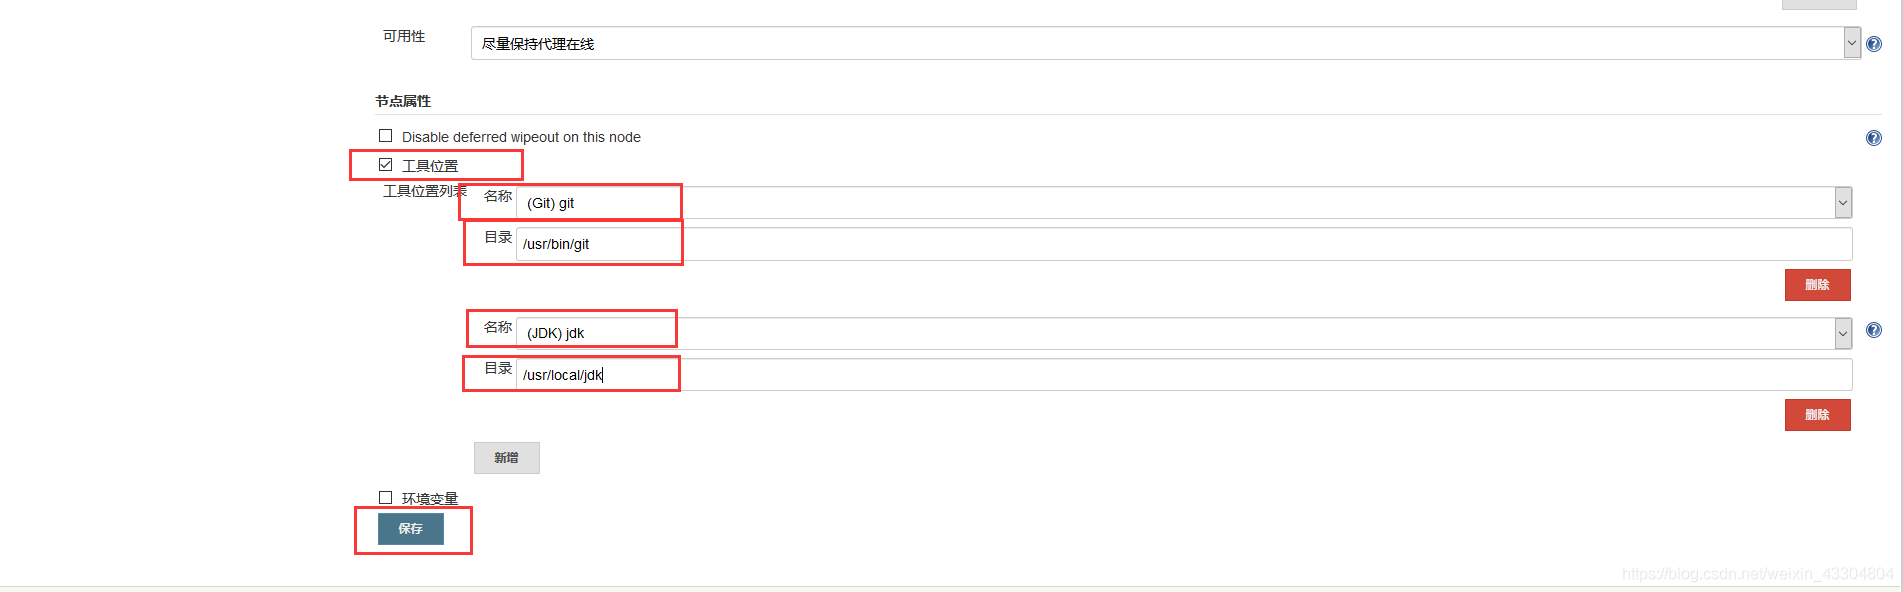
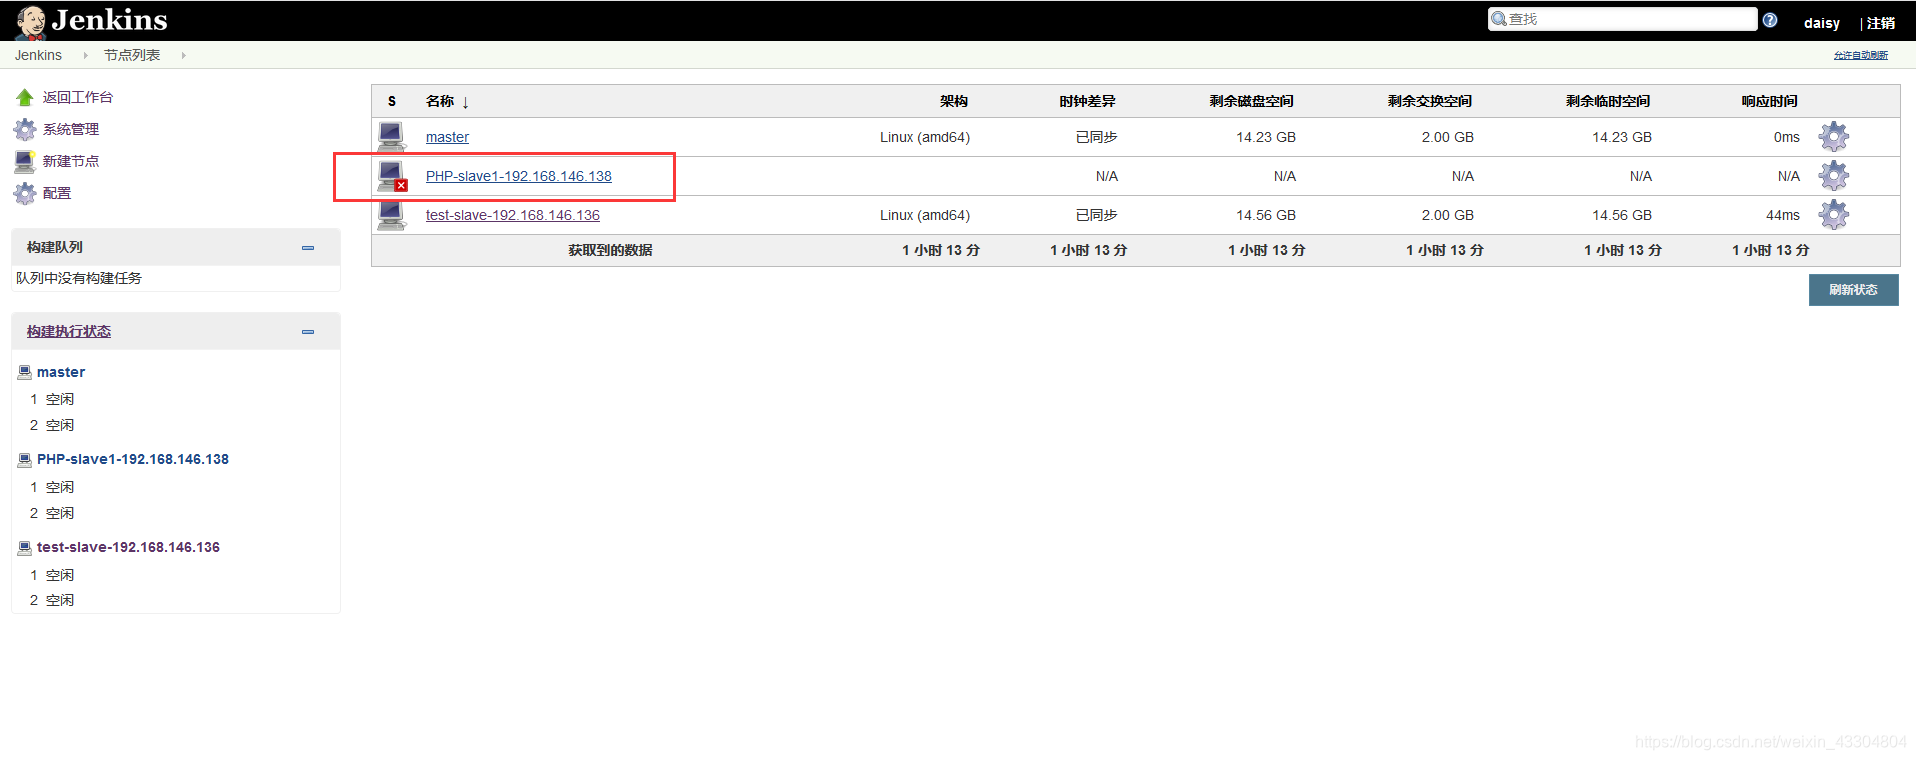
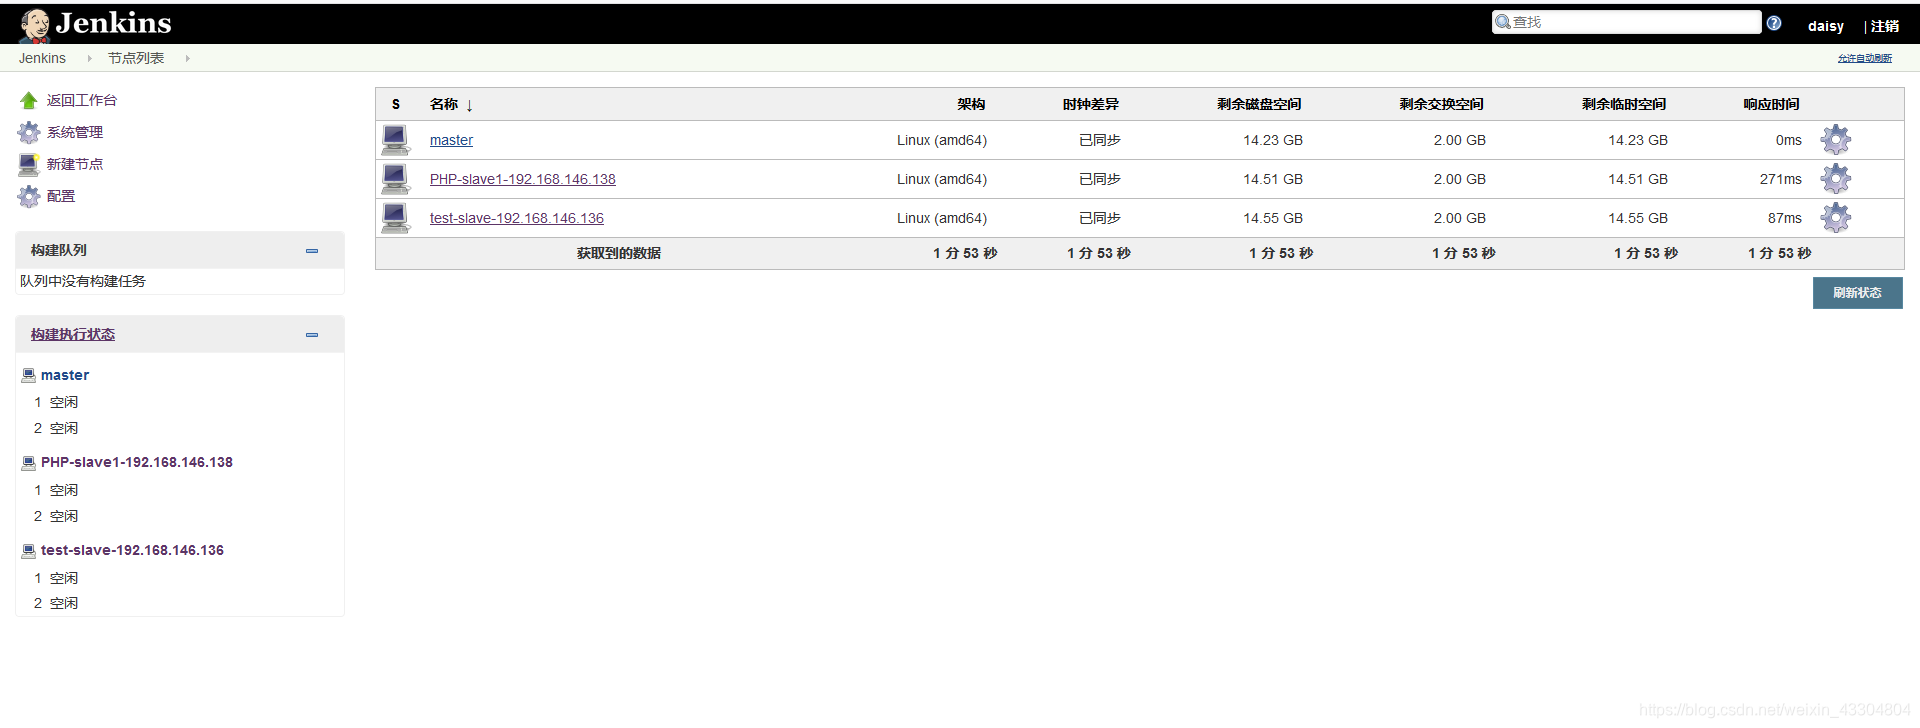
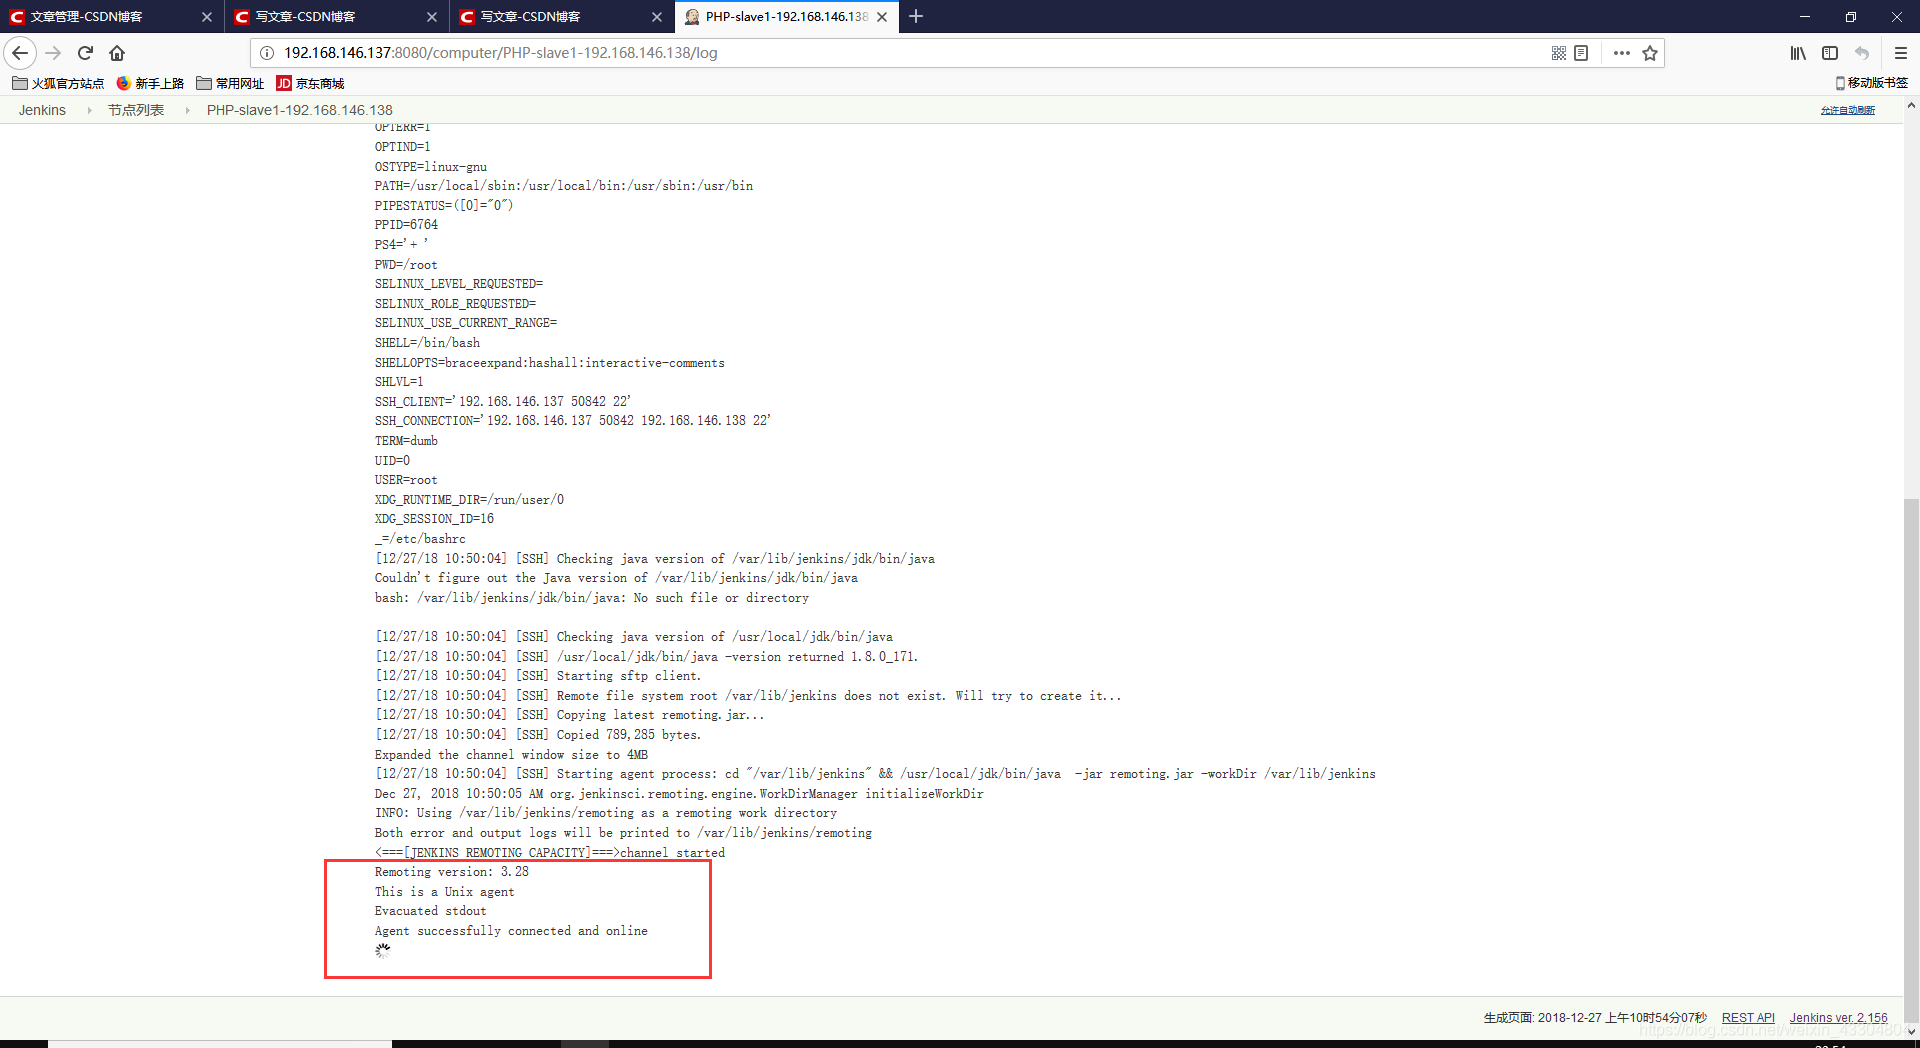
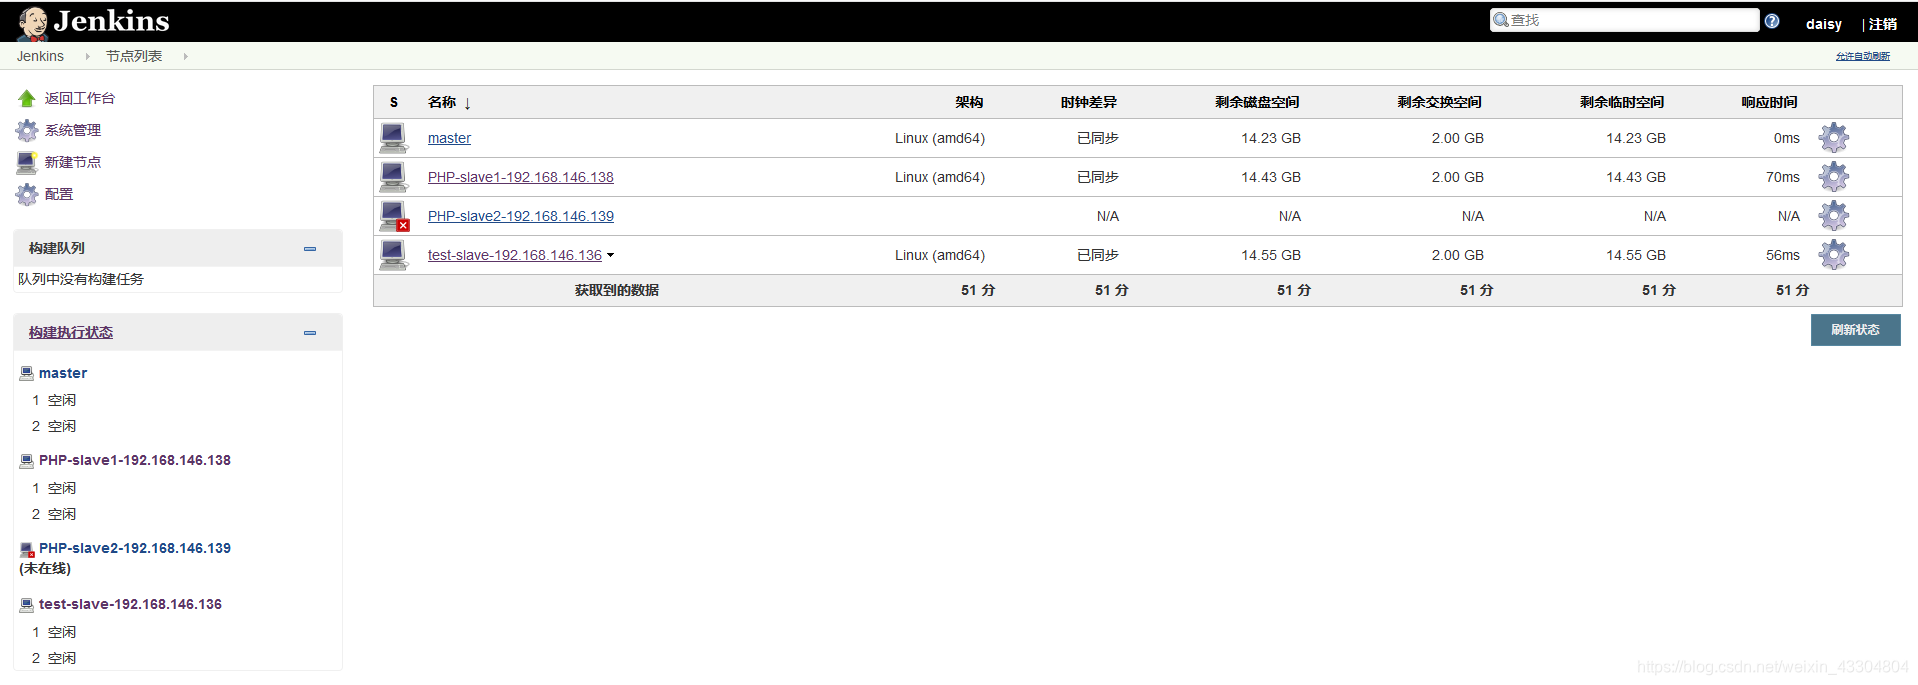
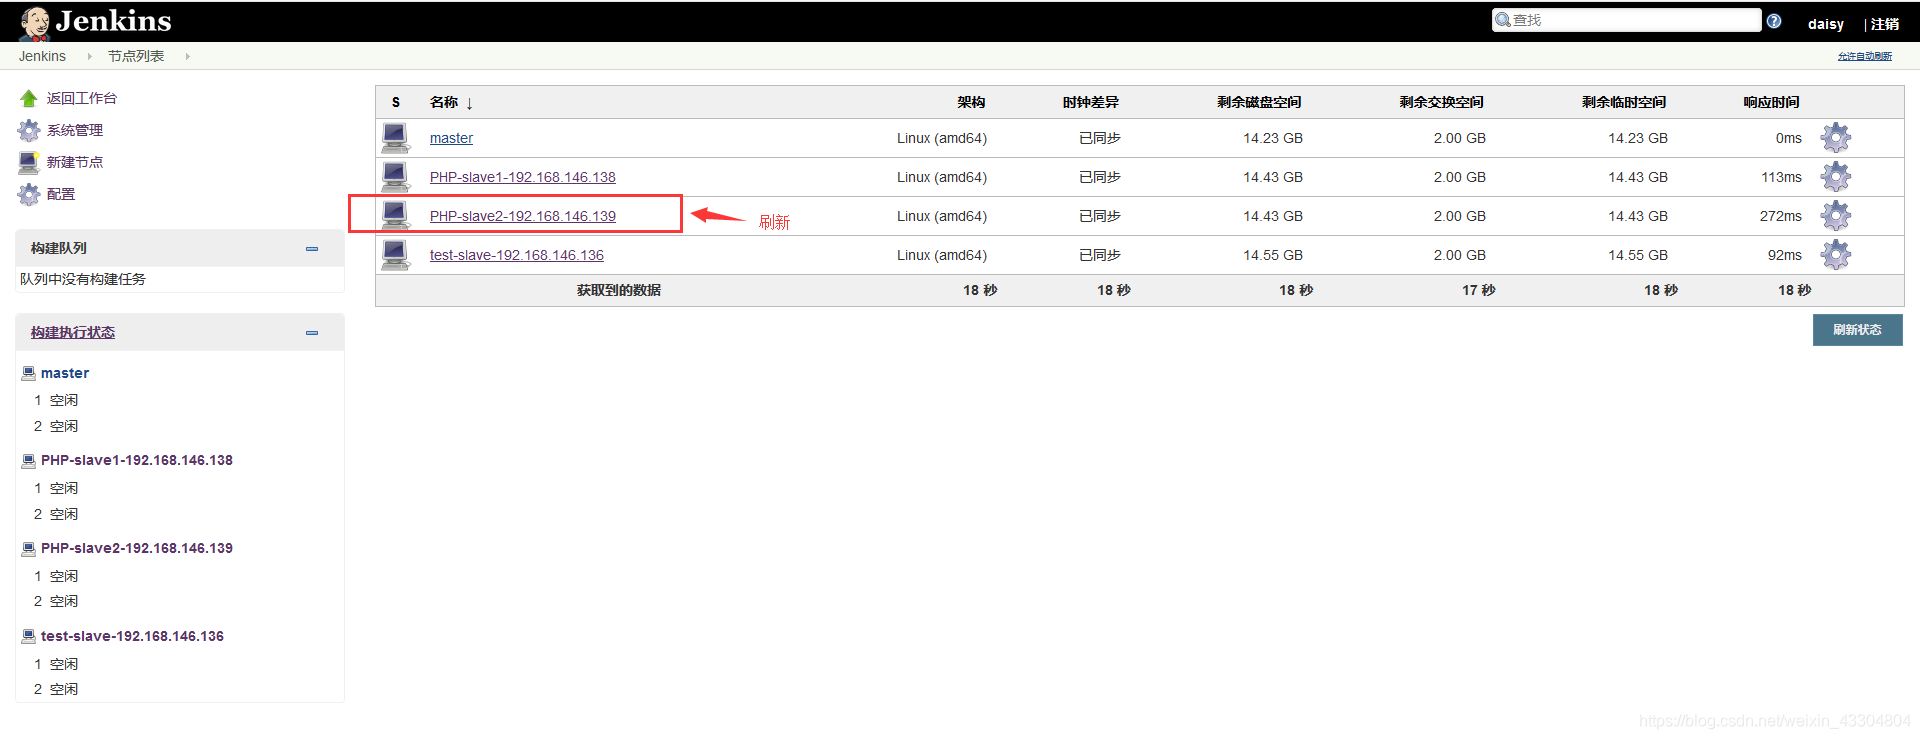
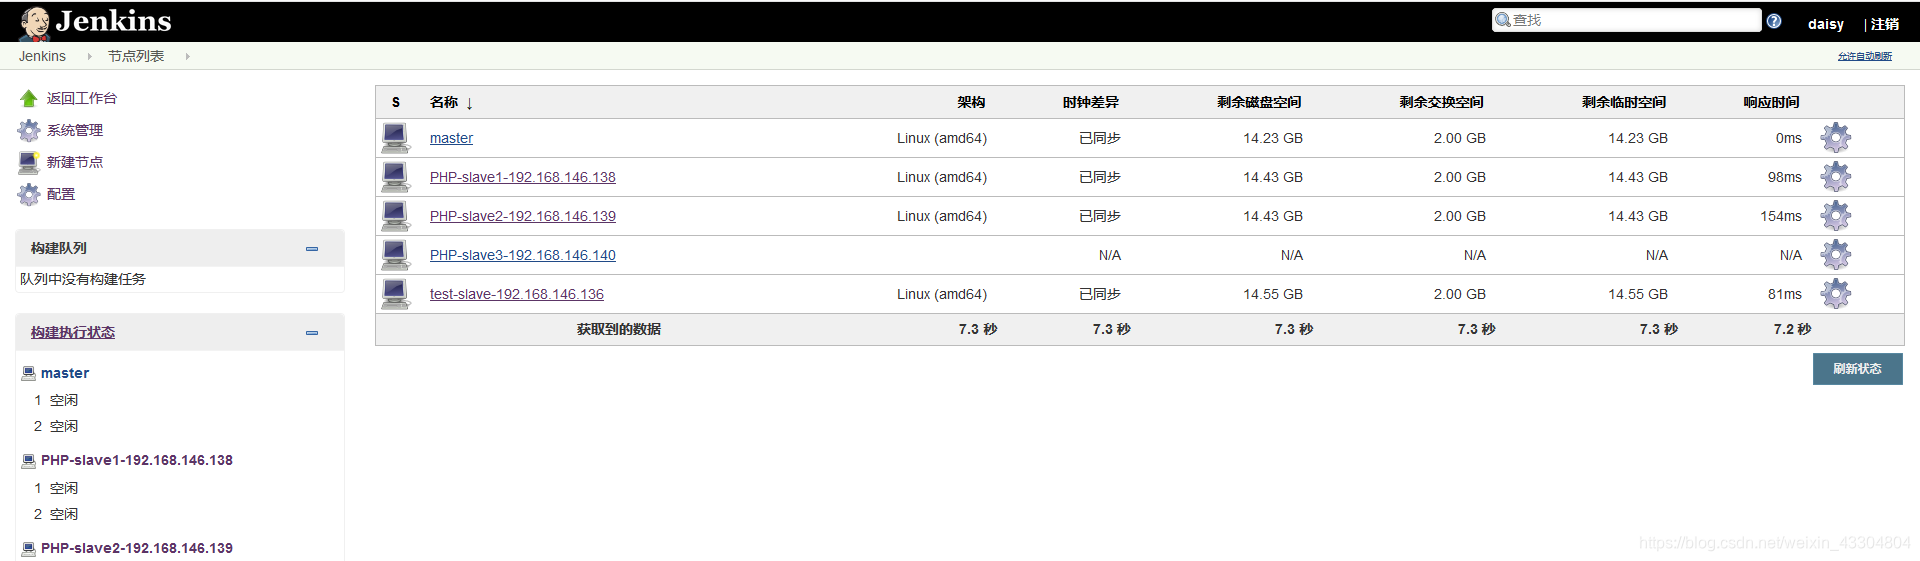
(3) slave从节点安装java环境,并启动jenkins的slave管理节点
#解压安装jdk
[root@localhost ~]# tar xf jdk-8u171-linux-x64.tar.gz -C /usr/local
[root@localhost ~]# cd /usr/local
[root@localhost local]# mv jdk1.8.0_171 jdk
[root@localhost local]# /usr/local/jdk/bin/java -version
java version "1.8.0_171"
Java(TM) SE Runtime Environment (build 1.8.0_171-b11)
Java HotSpot(TM) 64-Bit Server VM (build 25.171-b11, mixed mode)
#配置java环境
[root@localhost local]# sed -i.org '$a export JAVA_HOME=/usr/local/jdk/' /etc/profile
[root@localhost local]# sed -i.org '$a export PATH=$PATH:$JAVA_HOME/bin' /etc/profile
[root@localhost local]# sed -i.org '$a export CLASSPATH=.$CLASSPATH:$JAVA_HOME/lib:$JAVA_HOME/lib/tools.jar' /etc/profile
[root@localhost local]# tail -3 /etc/profile
export JAVA_HOME=/usr/local/jdk/
export PATH=$PATH:$JAVA_HOME/bin
export CLASSPATH=.$CLASSPATH:$JAVA_HOME/lib:$JAVA_HOME/lib/tools.jar
[root@localhost local]# source /etc/profile
[root@localhost local]# java -version
java version "1.8.0_171"
Java(TM) SE Runtime Environment (build 1.8.0_171-b11)
Java HotSpot(TM) 64-Bit Server VM (build 25.171-b11, mixed mode)
#设置软链接
[root@localhost ~]# ln -s /usr/local/jdk/bin/* /usr/local/bin/
 该日志表示PHP启动成功
(4) Web服务器安装LNMP环境,并手动拉取代码模拟访问
[root@localhost ~]# yum -y install epel-release
[root@localhost ~]# yum -y install nginx php-fpm php-mysql
[root@localhost ~]# cd /etc/nginx/
[root@localhost nginx]# ls
conf.d                fastcgi_params.default  nginx.conf           uwsgi_params.default
default.d             koi-utf                 nginx.conf.default   win-utf
fastcgi.conf          koi-win                 scgi_params
fastcgi.conf.default  mime.types              scgi_params.default
fastcgi_params        mime.types.default      uwsgi_params
[root@localhost nginx]# cp nginx.conf{,.bak}
[root@localhost nginx]# egrep -v "#|^$" nginx.conf.bak > nginx.conf
[root@localhost nginx]# vim nginx.conf
user nginx;
worker_processes auto;
error_log /var/log/nginx/error.log;
pid /run/nginx.pid;
include /usr/share/nginx/modules/*.conf;
events {
    worker_connections 1024;
}
http {
    log_format  main  '$remote_addr - $remote_user [$time_local] "$request" '
                      '$status $body_bytes_sent "$http_referer" '
                      '"$http_user_agent" "$http_x_forwarded_for"';
    access_log  /var/log/nginx/access.log  main;
    sendfile            on;
    tcp_nopush          on;
    tcp_nodelay         on;
    keepalive_timeout   65;
    types_hash_max_size 2048;
    include             /etc/nginx/mime.types;
    default_type        application/octet-stream;
    include /etc/nginx/conf.d/*.conf;					#include了一个配置文件目录
    server {
        listen       80 default_server;					#默认的server配置(如果用IP访问就进入这个server)
        listen       [::]:80 default_server;
        server_name  _;
        root         /usr/share/nginx/html;				#默认的网页目录
        include /etc/nginx/default.d/*.conf;
        location / {
        }
        error_page 404 /404.html;
            location = /40x.html {
        }
        error_page 500 502 503 504 /50x.html;
            location = /50x.html {
        }
    }
}
#由于默认的配置文件include了/etc/nginx/conf.d/*.conf因此我们增加一个server配置文件即可
[root@localhost nginx]# pwd
/etc/nginx
[root@localhost nginx]# ls
conf.d                fastcgi_params.default  nginx.conf           uwsgi_params
default.d             koi-utf                 nginx.conf.bak       uwsgi_params.default
fastcgi.conf          koi-win                 nginx.conf.default   win-utf
fastcgi.conf.default  mime.types              scgi_params
fastcgi_params        mime.types.default      scgi_params.default
[root@localhost conf.d]# vim nginx.conf
events {
        worker_connections 1024;
}
http {
        include  mime.types;
        default_type  application/octet-stream;
        sendfile   on;
        keepalive_timeout  65;
        server {

                listen 80;
                server_name www.yunjisuan.com;
                root /usr/share/nginx/html/www.yunjisuan.com;
                location / {
                        index index.php index.html;
                }
                location ~ \.php {
                        fastcgi_index index.php;
                        fastcgi_pass 127.0.0.1:9000;
                        include fastcgi.conf;
                }
        }
}

#创建网页目录
[root@localhost conf.d]# cd /usr/share/nginx/html/
[root@localhost html]# ls
404.html  50x.html  index.html  nginx-logo.png  poweredby.png
[root@localhost html]# mkdir www.yunjisuan.com
[root@localhost html]# cd www.yunjisuan.com/
[root@localhost www.yunjisuan.com]# ls
[root@localhost www.yunjisuan.com]#

#将网页目录权限授权给apache程序用户
[root@localhost nginx]# ll -d html/
drwxr-xr-x. 3 root root 124 Dec 27 11:29 html/
[root@localhost html]# id apache
uid=48(apache) gid=48(apache) groups=48(apache)
[root@localhost nginx]# chown -R apache html
[root@localhost nginx]# ll -d html/
drwxr-xr-x. 3 apache root 124 Dec 27 11:29 html/

#启动nginx服务和php-fpm服务
[root@localhost ~]# systemctl start nginx
[root@localhost ~]# systemctl enable nginx
Created symlink from /etc/systemd/system/multi-user.target.wants/nginx.service to /usr/lib/systemd/system/nginx.service.
[root@localhost ~]# ss -antup | grep 80
tcp    LISTEN     0      128       *:80                    *:*                   users:(("n
tcp    LISTEN     0      128      :::80                   :::*                   users:(("n
[root@localhost ~]# systemctl start php-fpm
[root@localhost ~]# systemctl enable php-fpm
Created symlink from /etc/systemd/system/multi-user.target.wants/php-fpm.service to /usr/lib/systemd/system/php-fpm.service.
[root@localhost ~]# ss -antup | grep 9000
tcp    LISTEN     0      128    127.0.0.1:9000                  *:*                   users2,fd=0),("php-fpm",pid=7431,fd=0),("php-fpm",pid=7429,fd=6))
做好宿主机的域名映射后,浏览器访问测试
5. 在远程Git仓库中创建一个用于构建的Pipeline脚本
在流水线脚本生成器中操作
配置 jenkinsfile-php-wp脚本
在jenkins服务器上进行如下操作
[root@localhost itemA]# cd /test/
[root@localhost test]# ls
jenkinsfile
[root@localhost test]# cd jenkinsfile/
[root@localhost jenkinsfile]# ls
itemA itemB
[root@localhost jenkinsfile]# cd itemA
[root@localhost itemA]# ls
jenkinsfile
[root@localhost itemA]# cp jenkinsfile jenkinsfile-php-wp
[root@localhost itemA]# vim jenkinsfile-php-wp
node ("PHP-slave1-192.168.146.138") {
//def mvnHome
stage('Git php-wp checkout') {
checkout([$class: 'GitSCM', branches: [[name: '${branch}']],
doGenerateSubmoduleConfigurations: false,
extensions: [], submoduleCfg: [],
userRemoteConfigs: [[credentialsId: 'a240769e-ed1a-4456-90a8-f0e124024801',
url: '[email protected]:/home/git/repos/wordpress']]])
}
stage('Copy code') {
sh ''' #sh语句,一行显示时,用“sh ' ' ”表示;多行显示时,用“sh ''' ''' ”表示
rm -rf ${WORKSPACE}/.git # ${WORKSPACE} 是Jenkins的内置变量,相当于/var/lib/jenkins/项目名
[ -d /data/backup ] || mkdir -p /data/backup
mv /usr/share/nginx/html/www.yunjisuan.com /data/backup/www.yunjisuan.com-$(date +%F_%T)
cp -rf ${WORKSPACE} /usr/share/nginx/html/www.yunjisuan.com
'''
}
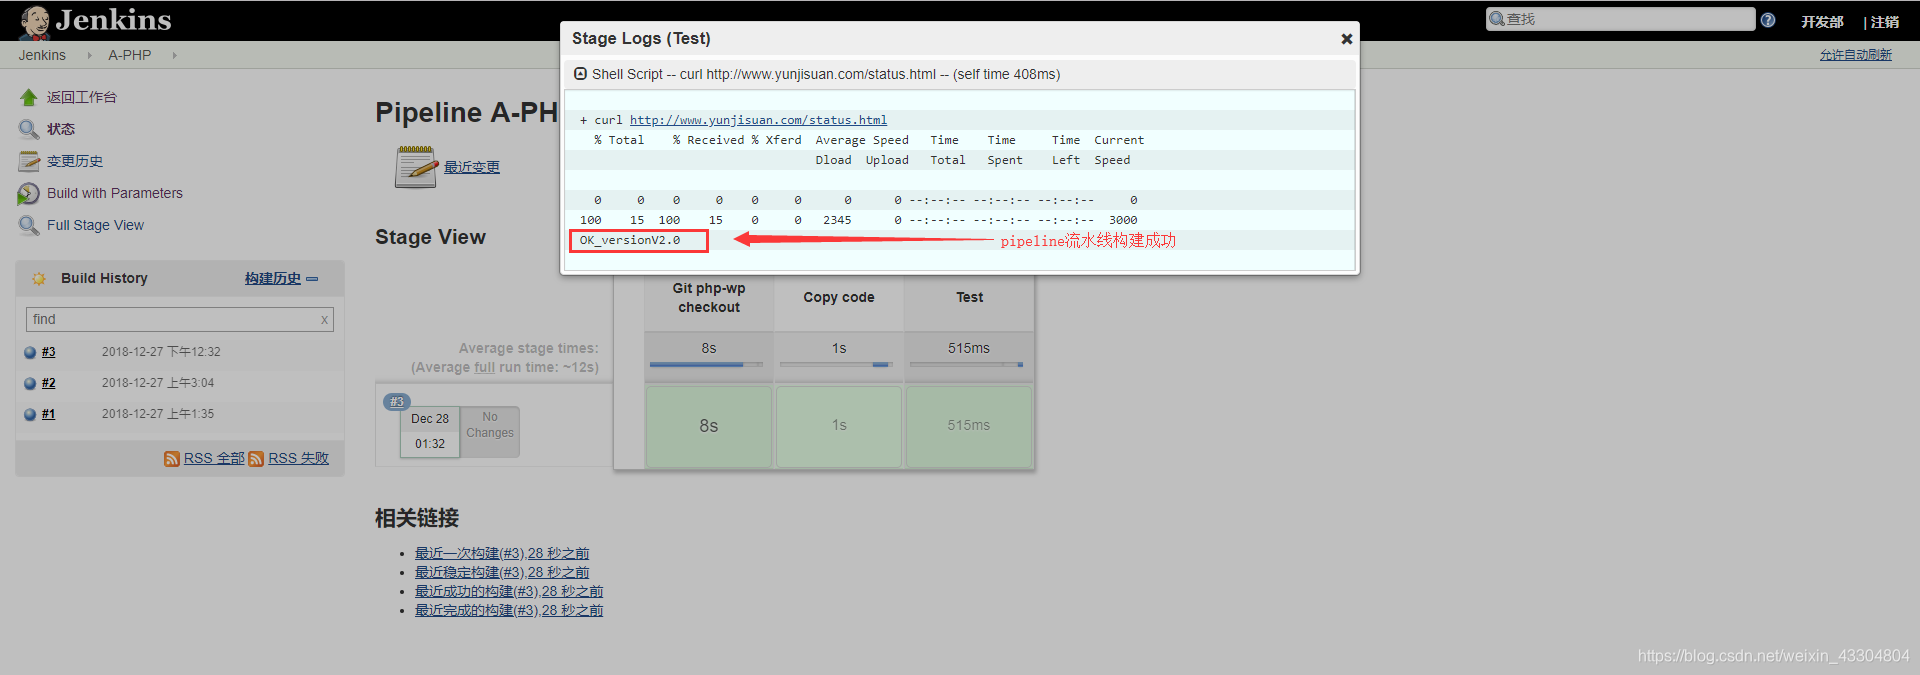
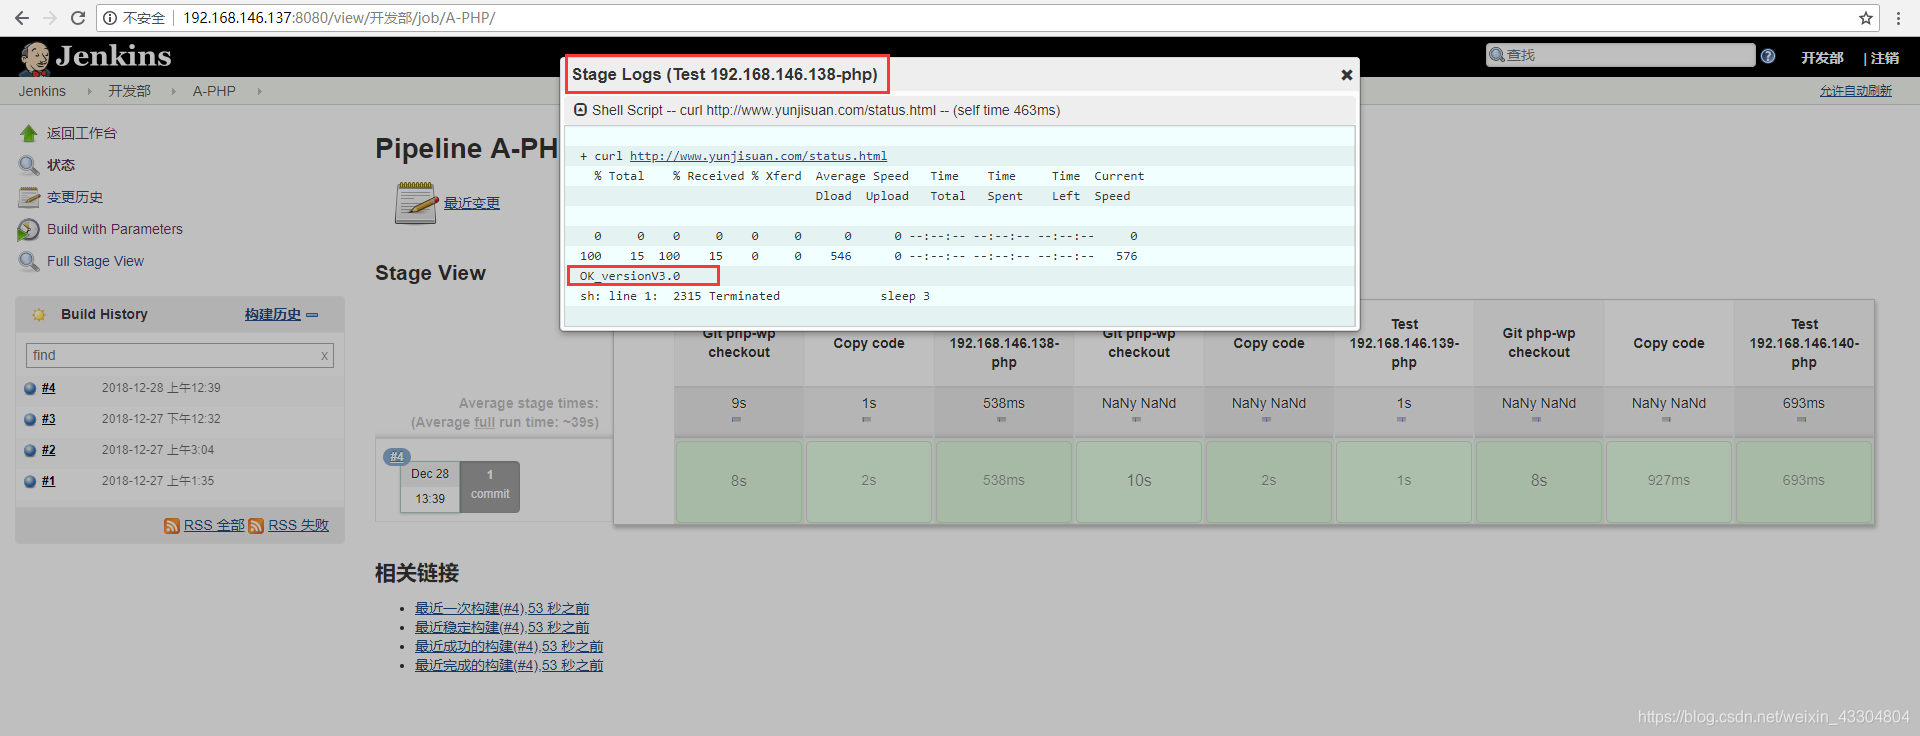
stage('Test') {
sh 'curl http://www.yunjisuan.com/status.html'
}
}
#推送到Git远程仓库
[root@localhost itemA]# cd ..
[root@localhost jenkinsfile]# git add *
[root@localhost jenkinsfile]# git commit -m "123123"
[master 362e774] 123123
1 file changed, 22 insertions(+)
create mode 100644 itemA/jenkinsfile-php-wp
[root@localhost jenkinsfile]# git remote -v
origin [email protected]:/home/git/repos/jenkinsfile (fetch)
origin [email protected]:/home/git/repos/jenkinsfile (push)
[root@localhost jenkinsfile]# git push -u origin master
Counting objects: 4, done.
Compressing objects: 100% (3/3), done.
Writing objects: 100% (4/4), 736 bytes | 0 bytes/s, done.
Total 4 (delta 0), reused 0 (delta 0)
To 192.168.146.136:/home/git/repos/jenkinsfile
1f3715d..362e774 master -> master
Branch master set up to track remote branch master from origin.
- 在NginxWeb端做本地映射
[root@localhost ~]# echo "`hostname -I` www.yunjisuan.com" >> /etc/hosts
[root@localhost ~]# tail -1 /etc/hosts
192.168.146.138  www.yunjisuan.com
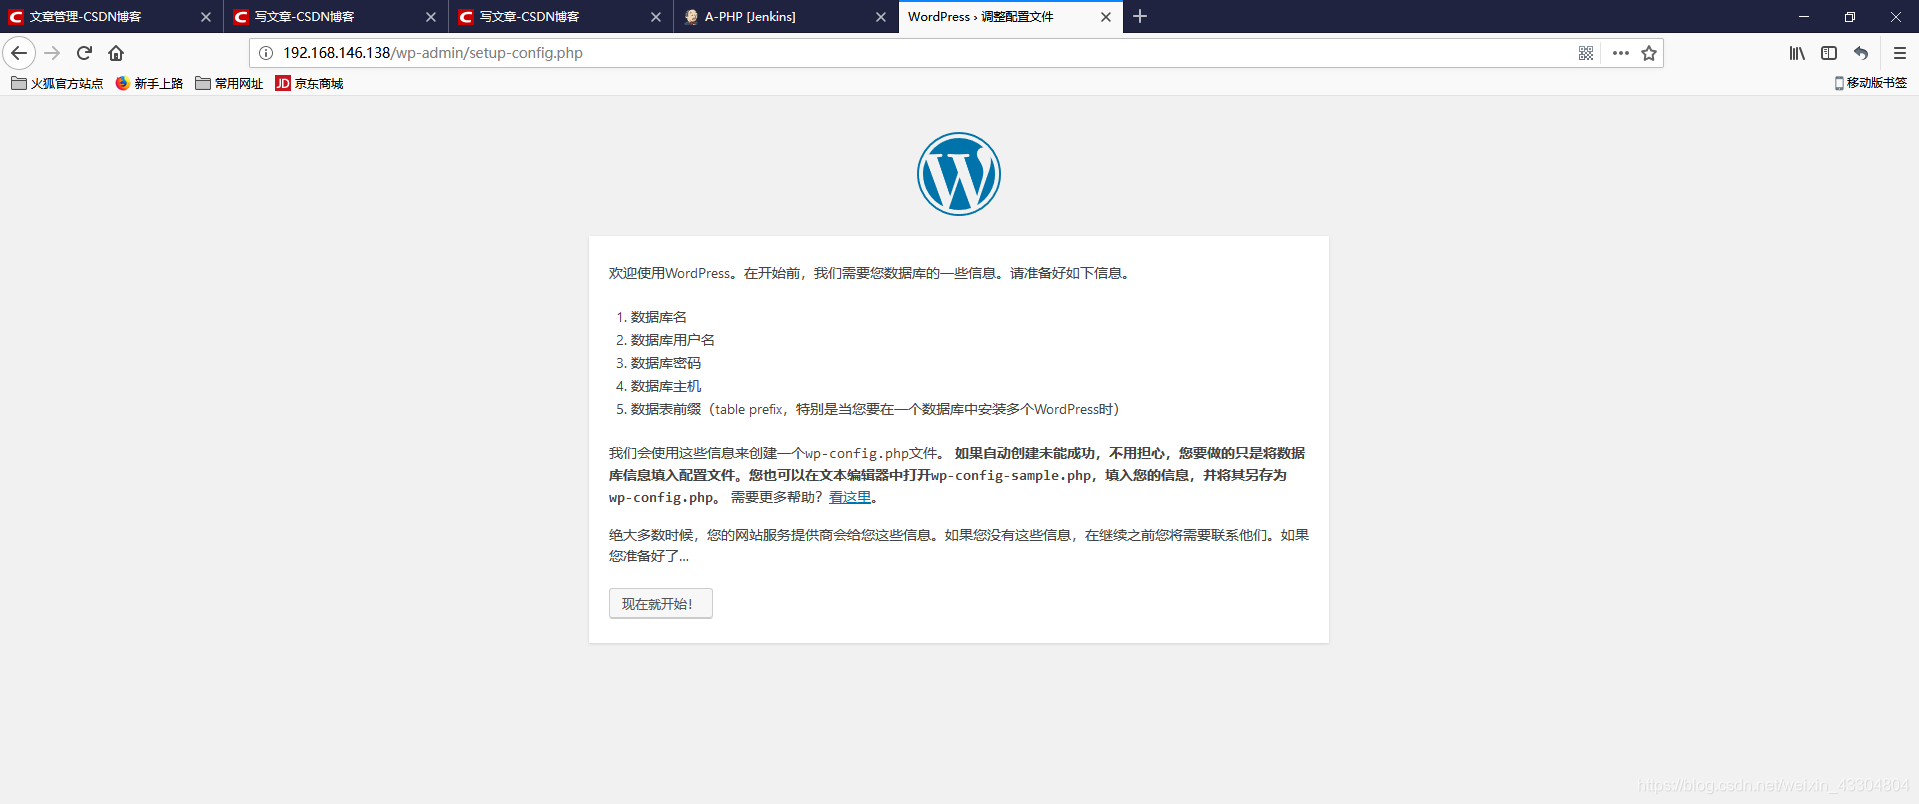
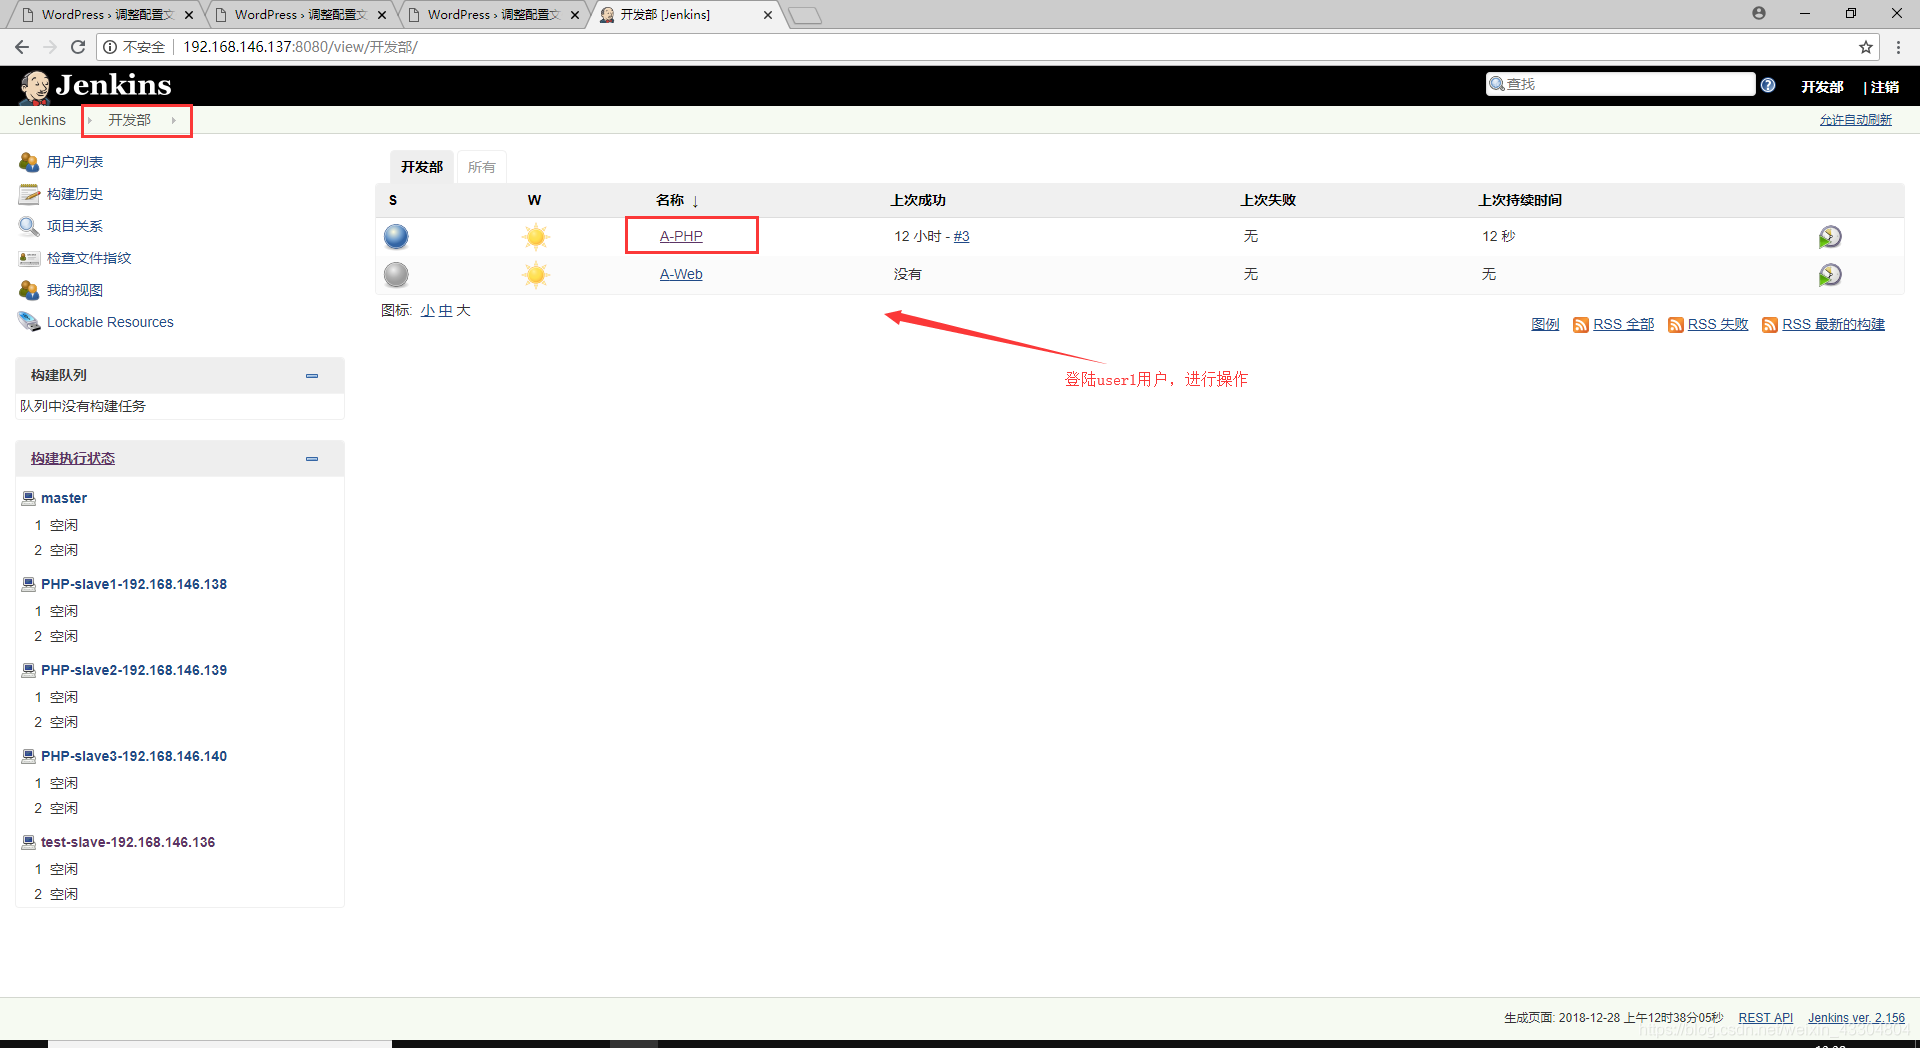
- 浏览器访问jenkins进行PHP项目流水线发布构建
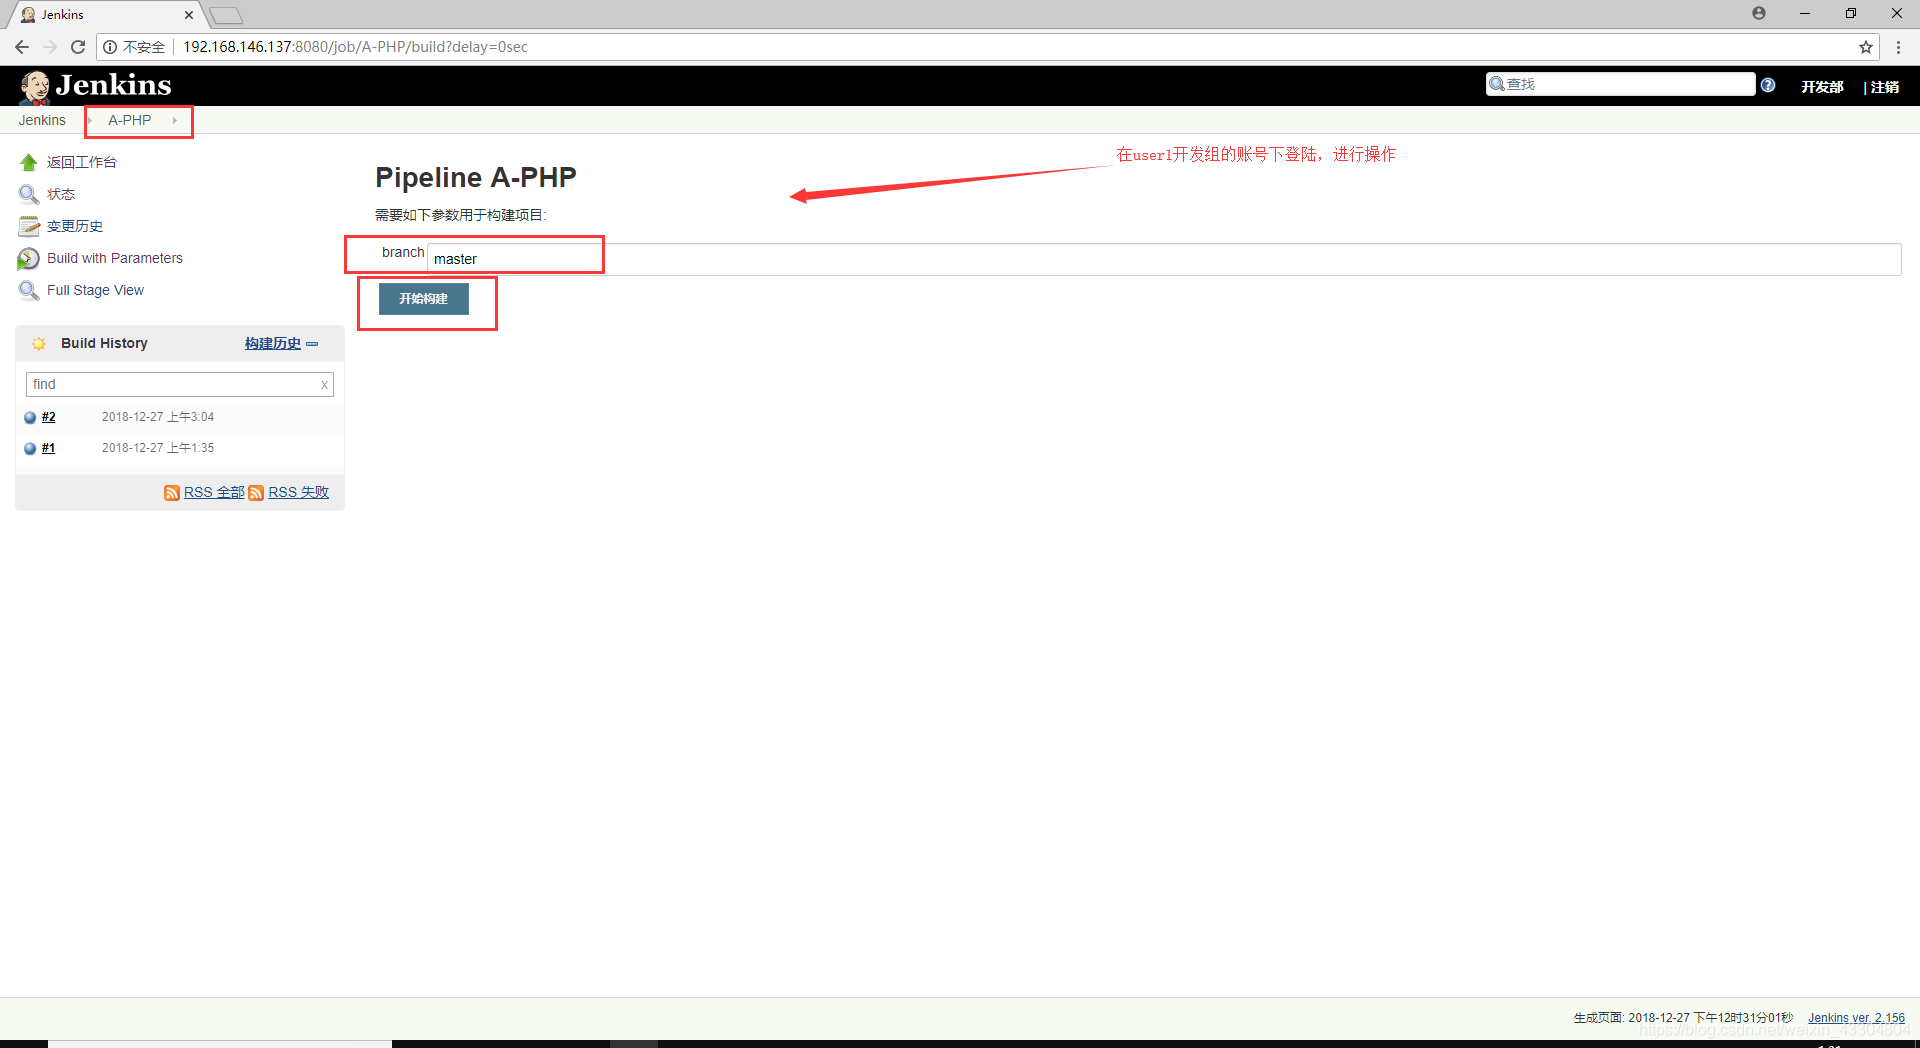
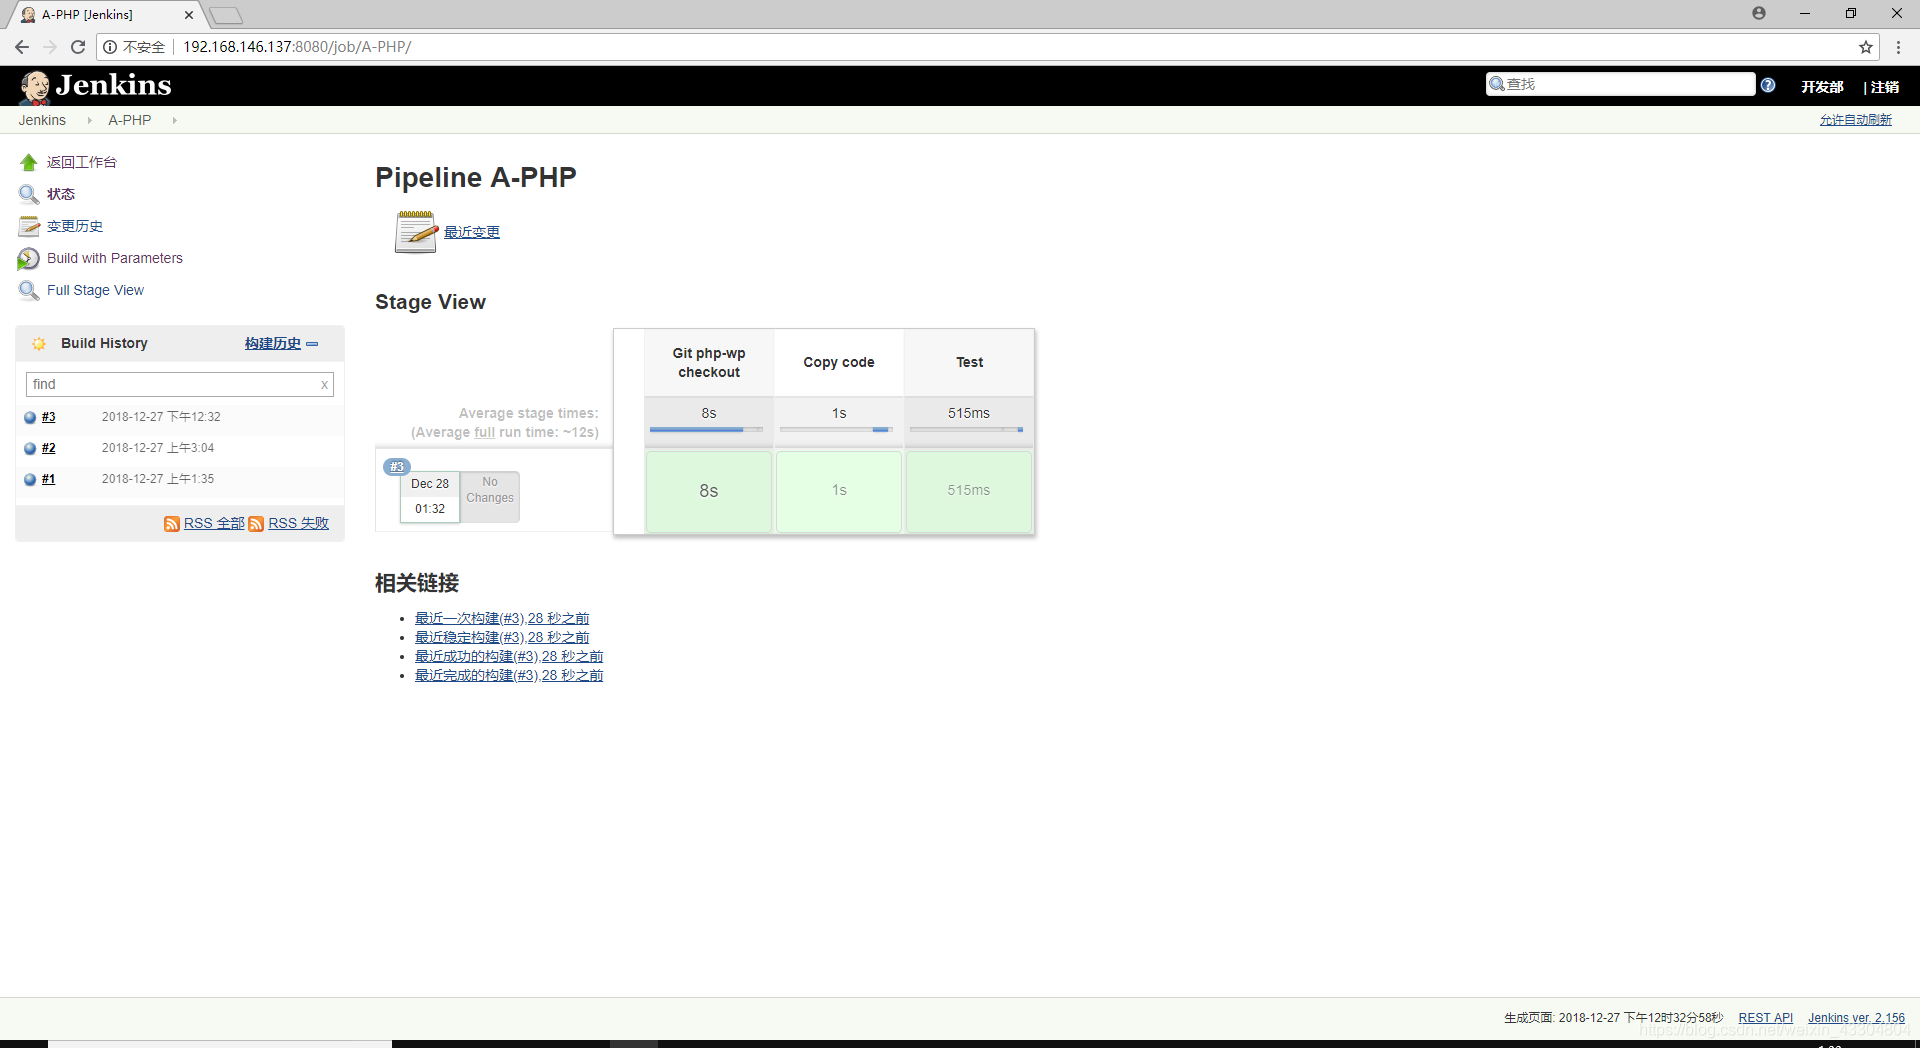
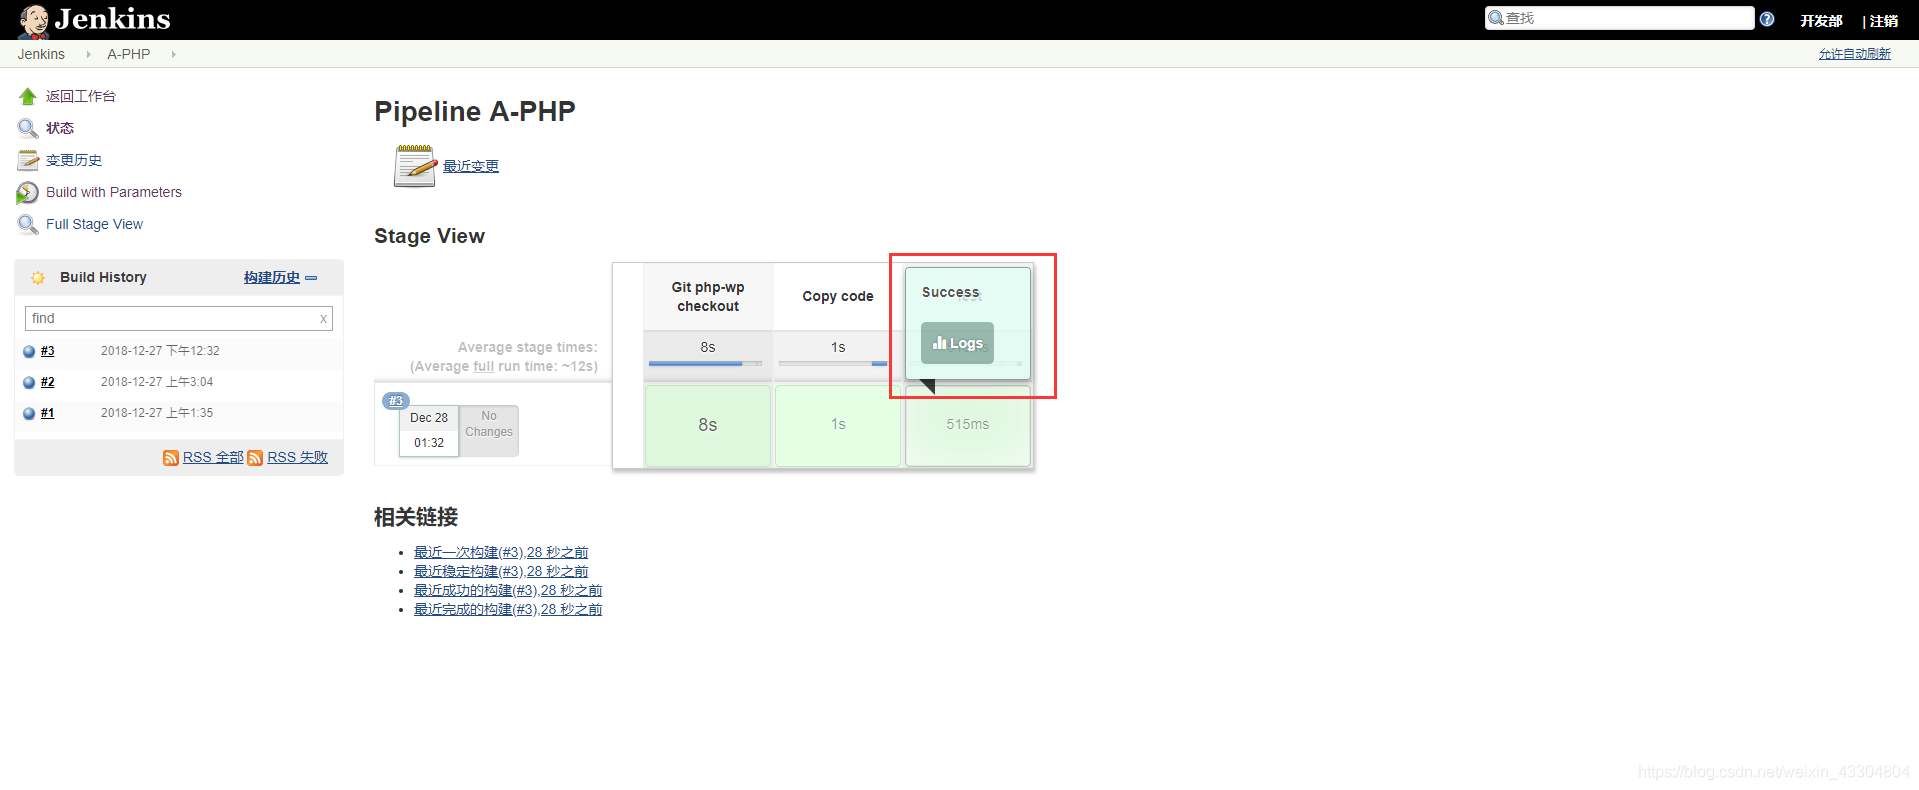
 在NginxWeb下操作
[root@localhost ~]# cd /var/lib/jenkins/
[root@localhost jenkins]# ls
remoting  remoting.jar  workspace
[root@localhost jenkins]# cd workspace/
[root@localhost workspace]# ls
A-PHP  A-PHP@tmp
[root@localhost workspace]# cd A-PHP
[root@localhost A-PHP]# ls
index.php        wp-admin              wp-cron.php        wp-mail.php
license.txt      wp-blog-header.php    wp-includes        wp-settings.php
readme.html      wp-comments-post.php  wp-links-opml.php  wp-signup.php
status.html      wp-config-sample.php  wp-load.php        wp-trackback.php
wp-activate.php  wp-content            wp-login.php       xmlrpc.php
[root@localhost A-PHP]# cat status.html
OK_versionV2.0
[root@localhost A-PHP]# ls /data/backup/
www.yunjisuan.com-2018-12-27_12:32:41
[root@localhost A-PHP]# cd /usr/share/nginx/html/
[root@localhost html]# ls
404.html  50x.html  index.html  nginx-logo.png  poweredby.png  www.yunjisuan.com
[root@localhost html]# cd www.yunjisuan.com/
[root@localhost www.yunjisuan.com]# ls
index.php        wp-admin              wp-cron.php        wp-mail.php
license.txt      wp-blog-header.php    wp-includes        wp-settings.php
readme.html      wp-comments-post.php  wp-links-opml.php  wp-signup.php
status.html      wp-config-sample.php  wp-load.php        wp-trackback.php
wp-activate.php  wp-content            wp-login.php       xmlrpc.php
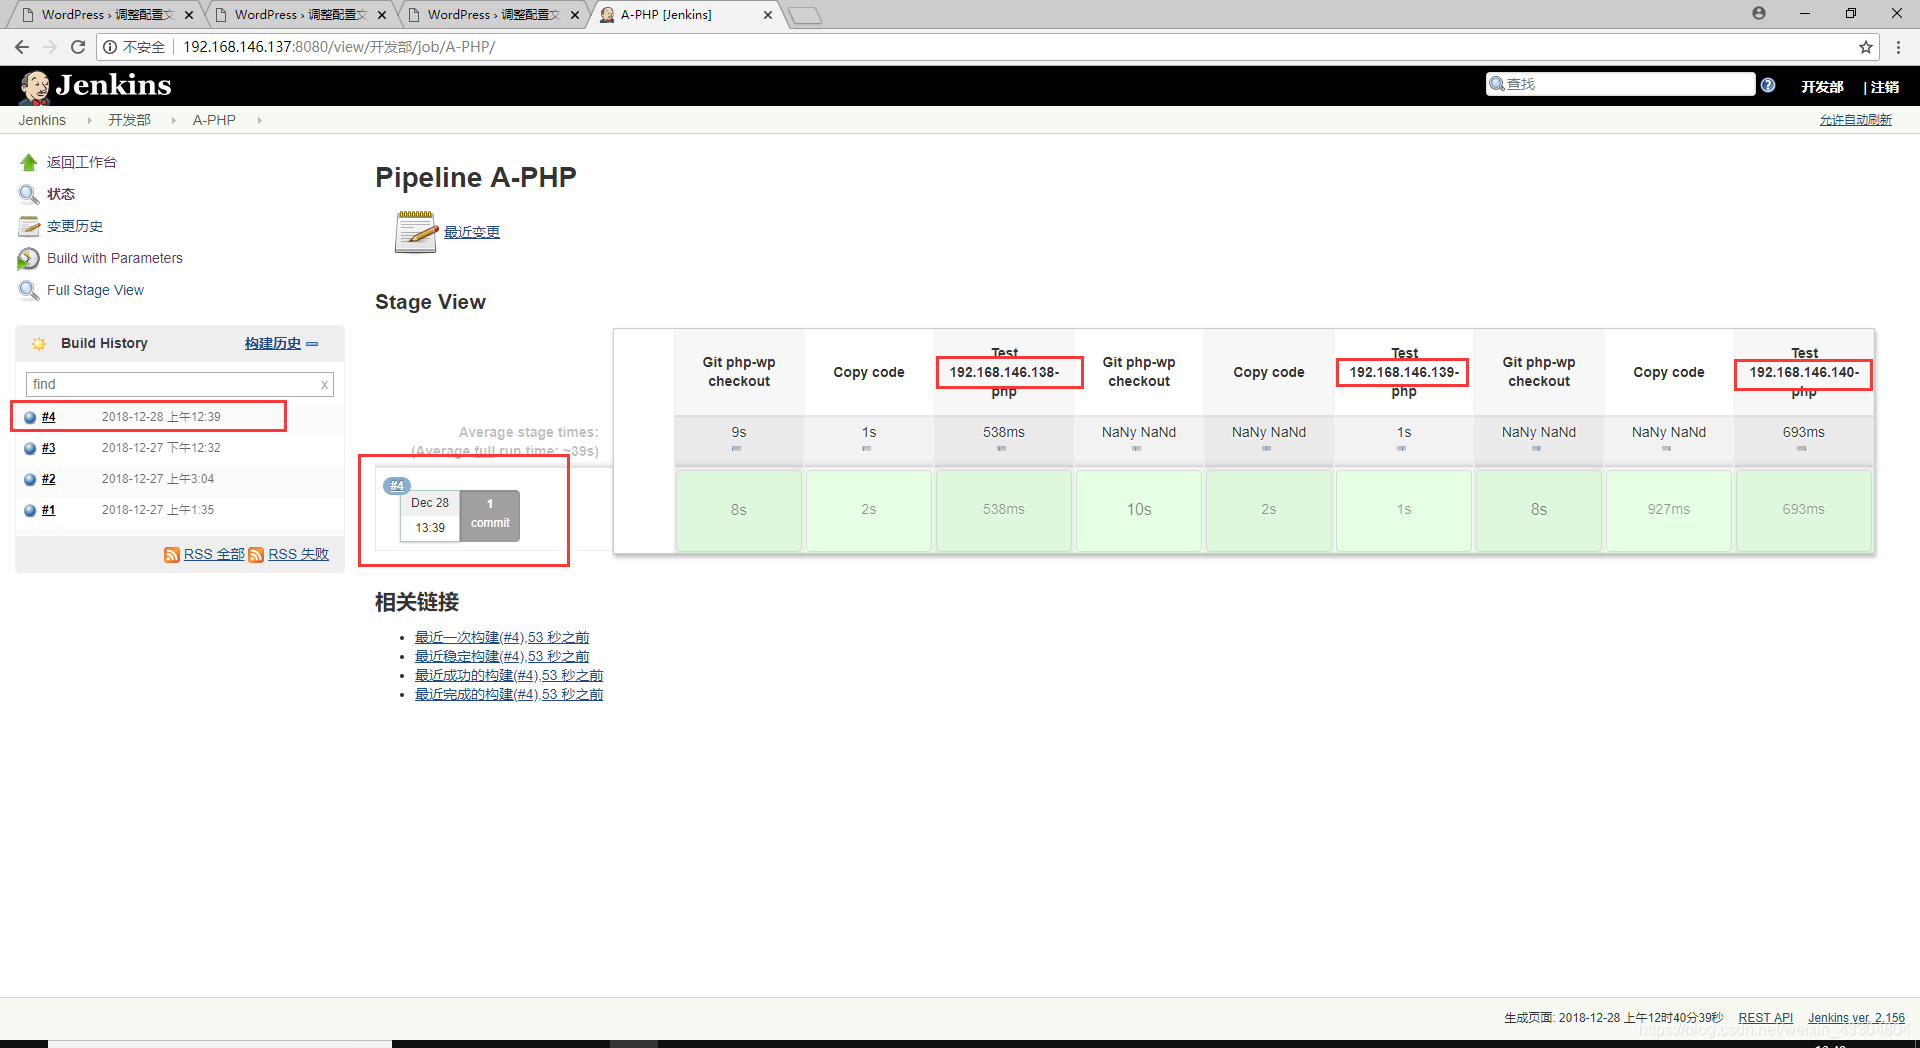
Jenkins+Pipeline+Git+PHP博客项目多节点流水线自动发布
- 环境部署
| 主机名 | IP地址 | 备注 |
|---|---|---|
| Git | 192.168.146.136 | Git服务器 |
| Jenkins | 192.168.146.137 | Jenkins服务器 |
| Web01 | 192.168.146.138 | Web服务器 |
| Web02 | 192.168.146.139 | Web服务器 |
| Web03 | 192.168.146.140 | Web服务器 |
Git服务器:
git-2.9.5.tar.gz
apache-maven-3.5.0-bin.tar.gz
jdk-8u171-linux-x64.tar.gz
Jenkins服务器:
git-2.9.5.tar.gz
jenkins-2.156-1.1.noarch.rpm
apache-maven-3.5.0-bin.tar.gz
jdk-8u171-linux-x64.tar.gz
Web服务器:
git-2.9.5.tar.gz
apache-maven-3.5.0-bin.tar.gz
jdk-8u171-linux-x64.tar.gz
wordpress-4.9.4-zh_CN.tar.gz
#在NginxWeb01中操作
[root@www ~]# cd /mycode/
[root@www mycode]# ls
wordpress
[root@www mycode]# cd wordpress/
[root@www wordpress]# ls
index.php wp-admin wp-cron.php wp-mail.php
license.txt wp-blog-header.php wp-includes wp-settings.php
readme.html wp-comments-post.php wp-links-opml.php wp-signup.php
status.html wp-config-sample.php wp-load.php wp-trackback.php
wp-activate.php wp-content wp-login.php xmlrpc.php
[root@www wordpress]# vim status.html
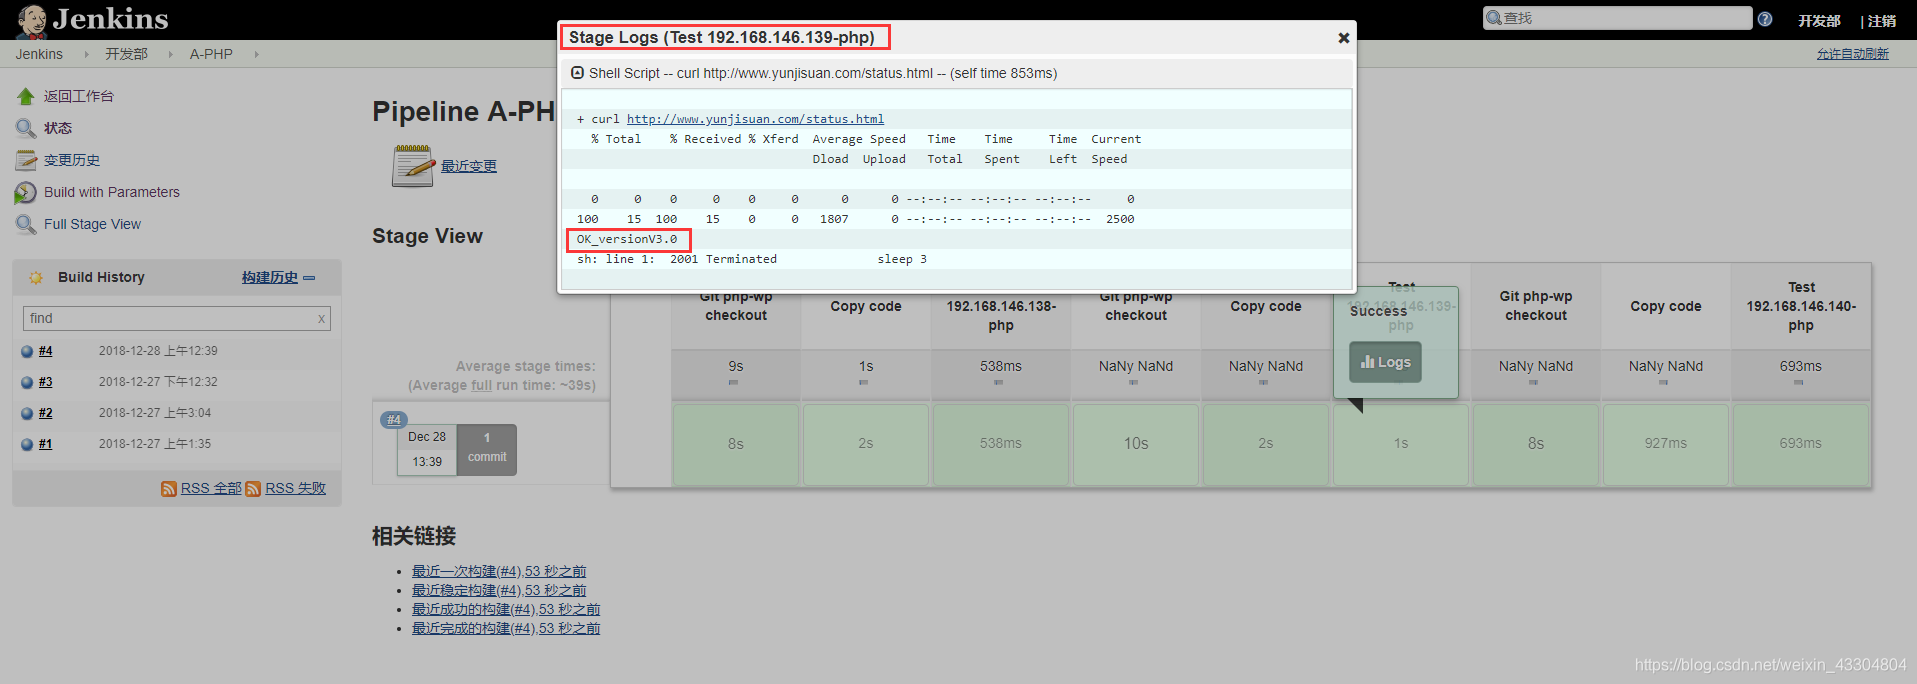
OK_versionV3.0
#提交更新的代码
[root@www wordpress]# git add *
[root@www wordpress]# git commit -m "versionV3.0"
[master 530c401] versionV3.0
Committer: root <[email protected]>
Your name and email address were configured automatically based
on your username and hostname. Please check that they are accurate.
You can suppress this message by setting them explicitly. Run the
following command and follow the instructions in your editor to edit
your configuration file:
git config --global --edit
After doing this, you may fix the identity used for this commit with:
git commit --amend --reset-author
1 file changed, 1 insertion(+), 1 deletion(-)
[root@www wordpress]# git config --global user.email "[email protected]"
[root@www wordpress]# git config --global user.name "daisy"
[root@www wordpress]# git remote -v
origin [email protected]:/home/git/repos/wordpress (fetch)
origin [email protected]:/home/git/repos/wordpress (push)
[root@www wordpress]# git push -u origin master
[email protected]'s password:
Counting objects: 3, done.
Compressing objects: 100% (2/2), done.
Writing objects: 100% (3/3), 270 bytes | 0 bytes/s, done.
Total 3 (delta 1), reused 0 (delta 0)
To 192.168.146.136:/home/git/repos/wordpress
5ba2f63..530c401 master -> master
Branch master set up to track remote branch master from origin.
#在NginxWeb02中操作
[root@localhost ~]# echo "`hostname -I` www.yunjisuan.com" >> /etc/hosts
[root@localhost ~]# tail -1 /etc/hosts
192.168.146.139  www.yunjisuan.com
#在NginxWeb03中操作
[root@localhost ~]# echo "`hostname -I` www.yunjisuan.com" >> /etc/hosts
[root@localhost ~]# tail -1 /etc/hosts
192.168.146.140  www.yunjisuan.com
#在Jenkins服务端操作,修改流水线生成脚本
[root@localhost ~]# cd /test/
[root@localhost test]# ls
jenkinsfile
[root@localhost test]# cd jenkinsfile/
[root@localhost jenkinsfile]# ls
itemA  itemB
[root@localhost jenkinsfile]# cd itemA/
[root@localhost itemA]# ls
jenkinsfile  jenkinsfile-php-wp
[root@localhost itemA]# vim jenkinsfile-php-wp
[root@localhost itemA]# cp jenkinsfile-php-wp{,.bak}
[root@localhost itemA]# mv jenkinsfile-php-wp.bak /tmp/
[root@localhost itemA]# ls
jenkinsfile  jenkinsfile-php-wp
[root@localhost itemA]# vim jenkinsfile-php-wp
node ("PHP-slave1-192.168.146.138") {				#NginxWeb01节点
   //def mvnHome
   stage('Git php-wp checkout') {
        checkout([$class: 'GitSCM', branches: [[name: '${branch}']],
        userRemoteConfigs: [[credentialsId: 'a240769e-ed1a-4456-90a8-f0e124024801',
        url: '[email protected]:/home/git/repos/wordpress']]])
   }
        rm -rf ${WORKSPACE}/.git
        [ -d /data/backup ] || mkdir -p /data/backup
        cp -rf ${WORKSPACE} /usr/share/nginx/html/www.yunjisuan.com        '''   stage('Test 192.168.146.138-php') {       sh 'curl http://www.yunjisuan.com/status.html'
}
node ("PHP-slave2-192.168.146.139") {					#NginxWeb02节点
   //def mvnHome
   stage('Git php-wp checkout') {
        checkout([$class: 'GitSCM', branches: [[name: '${branch}']],
        userRemoteConfigs: [[credentialsId: 'a240769e-ed1a-4456-90a8-f0e124024801',
        url: '[email protected]:/home/git/repos/wordpress']]])
   }
        rm -rf ${WORKSPACE}/.git
        [ -d /data/backup ] || mkdir -p /data/backup
        cp -rf ${WORKSPACE} /usr/share/nginx/html/www.yunjisuan.com        '''   }       stage('Test 192.168.146.139-php') {       sh 'curl http://www.yunjisuan.com/status.html'   }
}
node ("PHP-slave3-192.168.146.140") {				#NginxWeb03节点
   //def mvnHome
   stage('Git php-wp checkout') {
        checkout([$class: 'GitSCM', branches: [[name: '${branch}']],
        doGenerateSubmoduleConfigurations: false,
        extensions: [], submoduleCfg: [],
        userRemoteConfigs: [[credentialsId: 'a240769e-ed1a-4456-90a8-f0e124024801',
        url: '[email protected]:/home/git/repos/wordpress']]])
   }
   stage('Copy code') {
       sh '''
        rm -rf ${WORKSPACE}/.git
        [ -d /data/backup ] || mkdir -p /data/backup
        mv /usr/share/nginx/html/www.yunjisuan.com /data/backup/www.yunjisuan.com-$(date +%F_%T)
        cp -rf ${WORKSPACE} /usr/share/nginx/html/www.yunjisuan.com        '''
   }
   stage('Test 192.168.146.140-php') {
       sh 'curl http://www.yunjisuan.com/status.html'
   }
}
#提交更新流水线脚本
[root@localhost itemA]# git add *
[root@localhost itemA]# git commit -m "3 node"
[master 2be47ae] 3 node
 1 file changed, 43 insertions(+), 1 deletion(-)
[root@localhost itemA]# git remote -v
origin	[email protected]:/home/git/repos/jenkinsfile (fetch)
origin	[email protected]:/home/git/repos/jenkinsfile (push)
[root@localhost itemA]# git push -u origin master
Counting objects: 4, done.
Compressing objects: 100% (3/3), done.
Writing objects: 100% (4/4), 783 bytes | 0 bytes/s, done.
Total 4 (delta 0), reused 0 (delta 0)
To 192.168.146.136:/home/git/repos/jenkinsfile
   362e774..2be47ae  master -> master
Branch master set up to track remote branch master from origin.


利用从节点远程部署Web服务器(通过SSH方式实现)
- 通过SSH分发脚本
- 通过SSH直接下命令
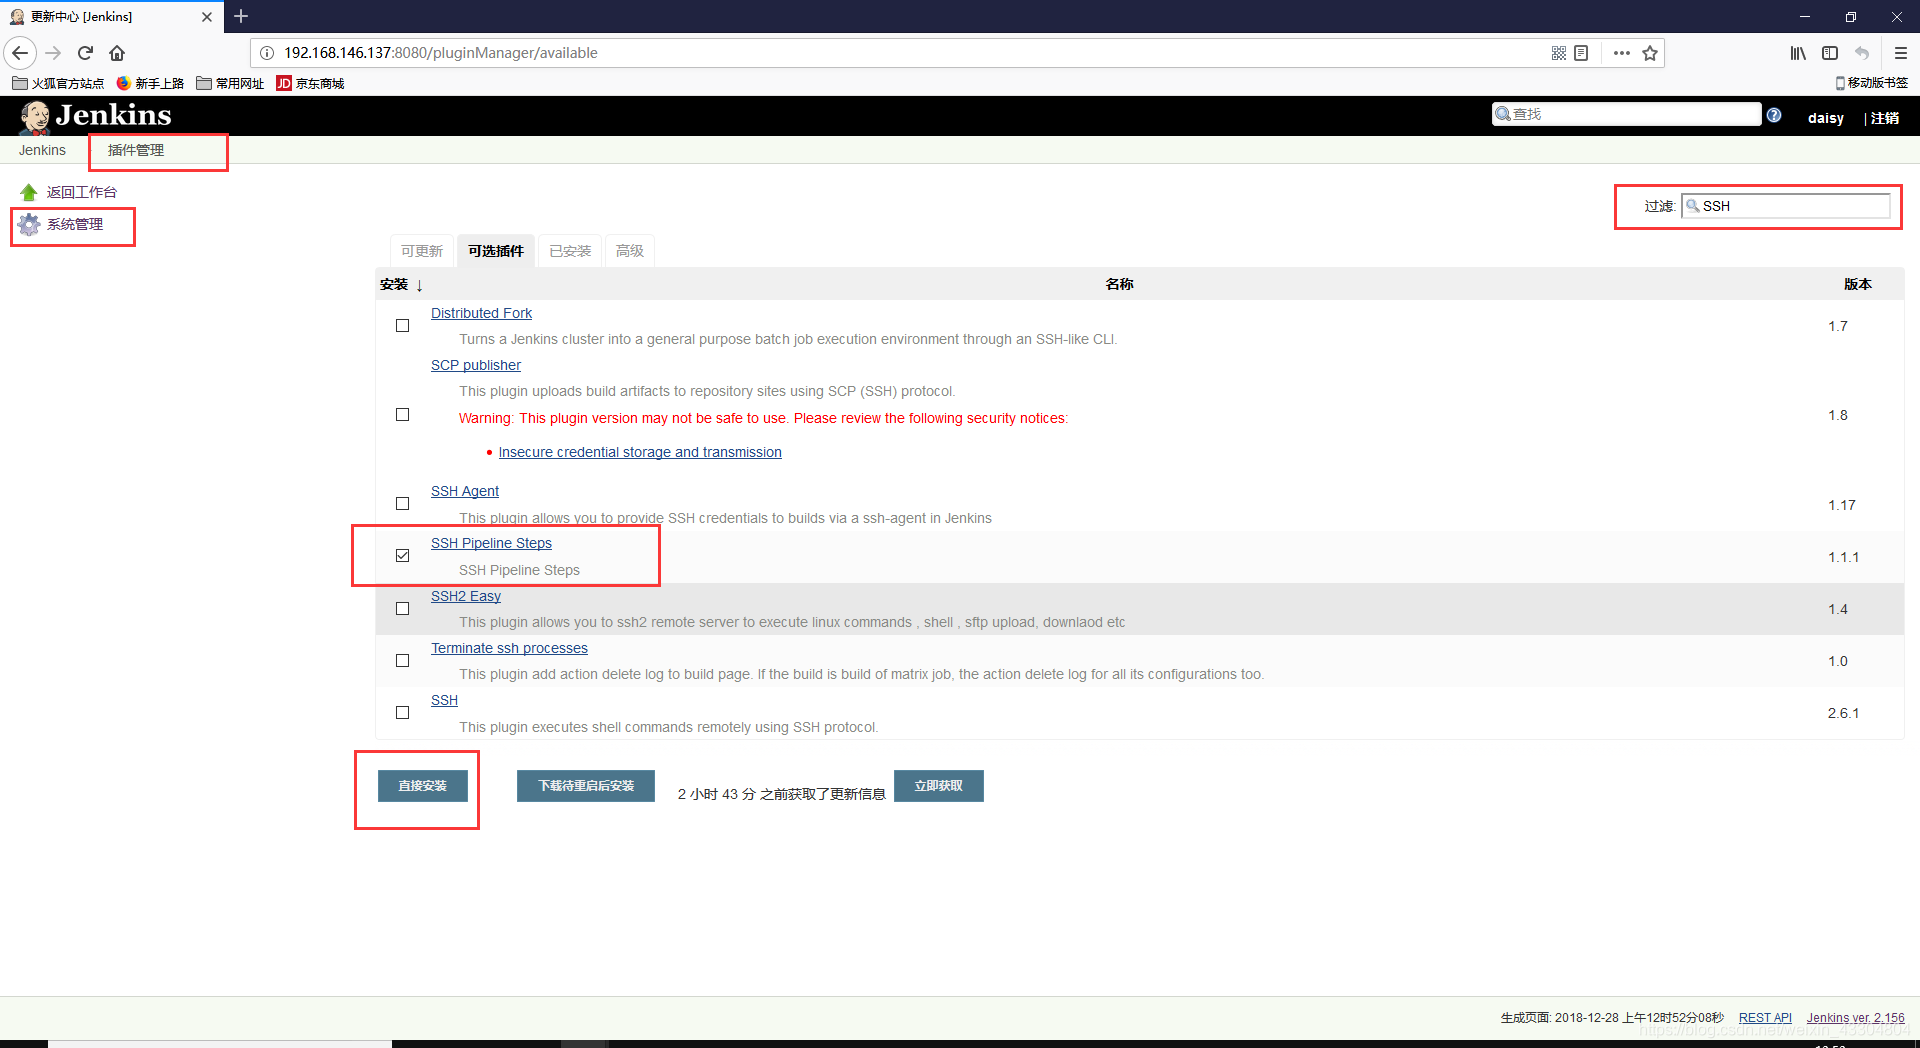
- 安装SSH Pipeline Steps插件(使SSH主持流水线)
 通过主Jenkins服务器向从节点NginxWeb01下任务,让从节点NginxWeb01通过SSH的方式向NginxWeb02和NginxWeb03服务器分发脚本;把脚本用scp过去之后覆盖;用流水线脚本把代码发过去,使本地脚本远程激活并执行在对方电脑中
[root@localhost jenkinsfile]# ls
itemA  itemB
[root@localhost jenkinsfile]# cd itemA
[root@localhost itemA]# ls
jenkinsfile  jenkinsfile-php-wp
[root@localhost itemA]# mv mv jenkinsfile-php-wp jenkinsfile-php-wp.bak
mv: target ‘jenkinsfile-php-wp.bak’ is not a directory
[root@localhost itemA]# mv jenkinsfile-php-wp jenkinsfile-php-wp.bak
[root@localhost itemA]# ls
jenkinsfile  jenkinsfile-php-wp.bak
[root@localhost itemA]# mv /tmp/jenkinsfile-php-wp.bak ./jenkinsfile-php-wp
[root@localhost itemA]# ls
jenkinsfile  jenkinsfile-php-wp  jenkinsfile-php-wp.bak
#编辑流水线脚本
[root@localhost itemA]# vim jenkinsfile-php-wp

node ("PHP-slave1-192.168.146.138") {
   def remote = [:]
   remote.name = 'test'
   remote.user = 'root'
   remote.allowAnyHosts = true
   stage('Git php-wp checkout') {
node ("PHP-slave1-192.168.146.138") {
   def remote = [:]
   remote.name = 'test'
   remote.user = 'root'
   remote.allowAnyHosts = true
   stage('Git php-wp checkout') {
        sh 'echo "`hostname -I`"'
        checkout([$class: 'GitSCM', branches: [[name: '${branch}']],
        doGenerateSubmoduleConfigurations: false,
        extensions: [], submoduleCfg: [],
        userRemoteConfigs: [[credentialsId: 'a240769e-ed1a-4456-90a8-f0e124024801',
        url: '[email protected]:/home/git/repos/wordpress']]])
   }
   stage('SSH 192.168.146.139') {
        remote.host = '192.168.146.139'
        remote.password = '123456'
        writeFile file: 'ssh.sh', text:'echo "`hostname -I`"'
        sshScript remote:remote, script: "ssh.sh"
   }
   stage('SSH 192.168.146.140') {
        remote.host = '192.168.146.140'
        remote.password = '123456'
        writeFile file: 'ssh.sh', text:'''
echo "`hostname -I`"
echo "hello daisy"
echo "who are you"
'''
        sshScript remote:remote, script: "ssh.sh"

   }
}
#将流水线脚本提交到Jenkins Web界面
[root@localhost itemA]# git add *
[root@localhost itemA]# git commit -m "123"
[master a243de3] 123
 2 files changed, 32 insertions(+), 64 deletions(-)
 rewrite itemA/jenkinsfile-php-wp (83%)
 copy itemA/{jenkinsfile-php-wp => jenkinsfile-php-wp.bak} (100%)
[root@localhost itemA]# git push -u origin master
Counting objects: 4, done.
Compressing objects: 100% (3/3), done.
Writing objects: 100% (4/4), 782 bytes | 0 bytes/s, done.
Total 4 (delta 0), reused 0 (delta 0)
To 192.168.146.136:/home/git/repos/jenkinsfile
   2be47ae..a243de3  master -> master
Branch master set up to track remote branch master from origin.
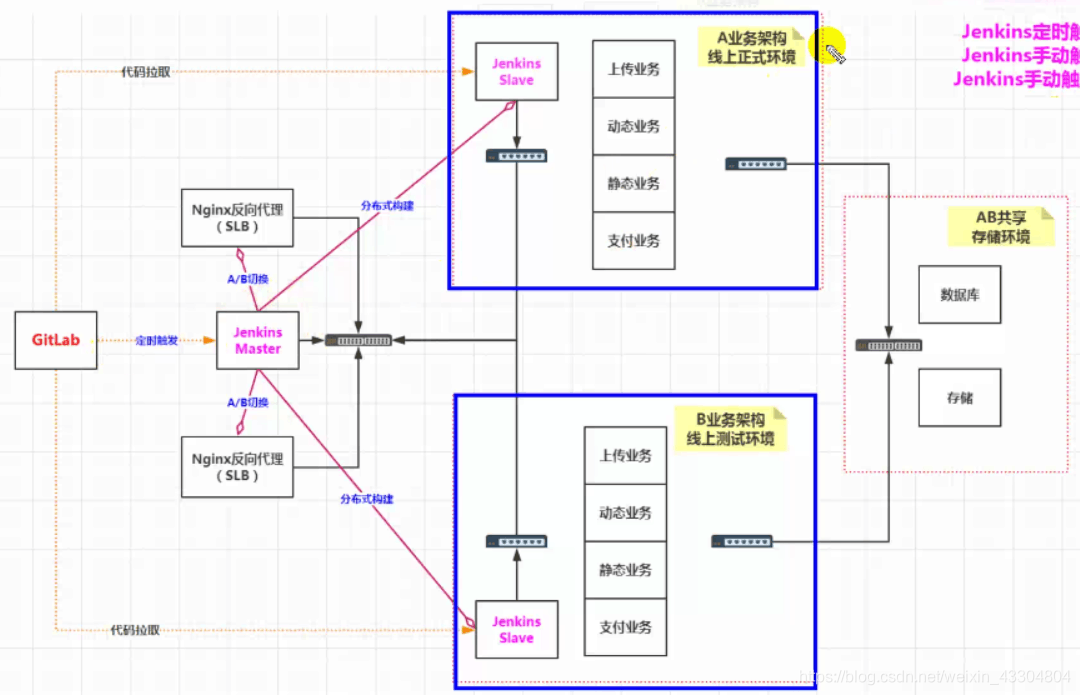 A/B业务架构互切是通过Jenkins master向nginx反向代理分发不同的nginx配置文件,
gitlab可以通过定时触发的方式或党master有变化时向master触发,假设平时是由A架构线上环境,此时流水线可以采用每天零点比对触发或者脚本触发,钩子触发的形式;
一旦gitlab上的master版本更新或者是主动激活,自动触发Jenkins代码上线,Jenkins会通知slaveB节点,slaveB节点就会通过SSH的方式将B架构网段的的所有web全部覆盖,并将原本代码全部备份,进行代码更新。
此时,公司的测试可以连接B节点的代码进行测试。若开发、测试没有问题出现,就会由运维开始A/B切换,将nginx的配置文件进行替换(reload),把slaveA节点的流量引流到slaveB节点上(reload),就会达到上线目的。
这类操作的优点在于:无论是PHP还是tomcat都可以操作,不影响用户体验;
当在使用新的代码过程中出现问题,此时可以reload切换至A节点,不影响用户的体验,开发测试再去解决B节点上出现的问题。
项目案例二:流水线自动化发布Java项目
| 主机名 | IP地址 | 备注 |
|---|---|---|
| Git | 192.168.146.136 | Git服务器 |
| Jenkins | 192.168.146.137 | Jenkins服务器 |
| Tomcat | 192.168.146.141 | Tomcat服务器 |
Tomcat服务器环境部署
#在tomcat服务器进行如下操作
#部署jdk
[root@localhost ~]# ls
anaconda-ks.cfg                apache-tomcat-8.5.31.tar.gz  jdk-8u171-linux-x64.tar.gz
apache-maven-3.5.0-bin.tar.gz  git-2.9.5.tar.gz
[root@localhost ~]# tar xf  jdk-8u171-linux-x64.tar.gz  -C /usr/local/
[root@localhost ~]#  cd /usr/local/
[root@localhost local]# mv jdk1.8.0_171/ jdk
[root@localhost local]# ln -s /usr/local/jdk/bin/java /usr/local/bin/
[root@localhost local]# java -version
java version "1.8.0_171"
Java(TM) SE Runtime Environment (build 1.8.0_171-b11)
Java HotSpot(TM) 64-Bit Server VM (build 25.171-b11, mixed mode)

#部署Java环境变量
[root@localhost local]# vim /etc/profile
#在末尾加上环境变量
export JAVA_HOME=/usr/local/jdk/
export PATH=$PATH:$JAVA_HOME/bin
export CLASSPATH=.$CLASSPATH:$JAVA_HOME/lib:$JAVA_HOME/lib/tools.jar
[root@localhost local]# source /etc/profile

#部署maven
[root@localhost ~]# tar xf apache-maven-3.5.0-bin.tar.gz -C /usr/local/
[root@localhost ~]# cd /usr/local/
[root@localhost local]# mv apache-maven-3.5.0 maven
[root@localhost local]# sed -i '$a MAVEN_HOME=/usr/local/maven' /etc/profile
[root@localhost local]# sed -i '$a export PATH=${MAVEN_HOME}/bin:$PATH' /etc/profile
[root@localhost local]# tail -2 /etc/profile
MAVEN_HOME=/usr/local/maven
export PATH=${MAVEN_HOME}/bin:$PATH
[root@localhost local]# source /etc/profile
[root@localhost local]# mvn -v
Apache Maven 3.5.0 (ff8f5e7444045639af65f6095c62210b5713f426; 2017-04-03T15:39:06-04:00)
Maven home: /usr/local/maven
Java version: 1.8.0_171, vendor: Oracle Corporation
Java home: /usr/local/jdk/jre
Default locale: en_US, platform encoding: UTF-8
OS name: "linux", version: "3.10.0-862.el7.x86_64", arch: "amd64", family: "unix"

#解压tomcat
[root@localhost ~]#  tar xf apache-tomcat-8.5.31.tar.gz -C /usr/local/
[root@localhost ~]# cd /usr/local/
[root@localhost local]# mv apache-tomcat-8.5.31 tomcat
[root@localhost local]# cd tomcat/
[root@localhost tomcat]# ls
bin  conf  lib  LICENSE  logs  NOTICE  RELEASE-NOTES  RUNNING.txt  temp  webapps  work
[root@localhost tomcat]# rm -rf webapps/*
[root@localhost tomcat]# ls webapps/

#部署tomcat环境变量
[root@localhost tomcat]# echo 'export TOMCAT_HOME=/usr/local/tomcat' >> /etc/profile
[root@localhost tomcat]# source /etc/profile

#自动部署需要解压maven构建后的war包,因此需要安装unzip
[root@localhost tomcat]# yum -y install unzip
[root@localhost tomcat]# which unzip
/usr/bin/unzip

#自动部署需要git远程仓库代码,因此需要安装git
[root@localhost ~]# yum -y install curl-devel expat-devel gettext-devel openssl-devel zlib-devel
[root@localhost ~]# yum -y install gcc perl-ExtUtils-MakeMaker
[root@localhost ~]# tar xf git-2.9.5.tar.gz -C /usr/src/
[root@localhost ~]# cd /usr/src/git-2.9.5/
[root@localhost git-2.9.5]# ./configure --prefix=/usr/local/git
[root@localhost git-2.9.5]# make && make install
[root@localhost git-2.9.5]# ln -sf /usr/local/git/bin/* /usr/bin/
[root@localhost git-2.9.5]# which git
/usr/bin/git
#源码编译需要链接git的命令库
[root@localhost git-2.9.5]# ln -s /usr/libexec/git-core/* /usr/bin/
[root@localhost git-2.9.5]# git --version
git version 2.9.5
构建一个B-JAVA流水线项目

下载solo项目源代码并上传Git远程仓库
#在Git服务器上进行操作
[root@localhost ~]# cd /home/git/repos/
[root@localhost repos]# ls
app.git  wordpress
[root@localhost repos]# mkdir jenkinsfile/
[root@localhost repos]# mkdir solo.git
[root@localhost repos]# cd solo.git/
[root@localhost solo.git]# git --bare init
Initialized empty Git repository in /home/git/repos/solo.git/
[root@localhost solo.git]# cd ..
[root@localhost repos]# cd jenkinsfile/
[root@localhost jenkinsfile]# git --bare init
Initialized empty Git repository in /home/git/repos/jenkinsfile/
[root@localhost jenkinsfile]# cd ..
[root@localhost repos]# chown -R git.git jenkinsfile/
[root@localhost repos]# chown -R git.git solo.git/
#在jenkins上进行操作
#解压solo.tar.gz源代码包
[root@localhost ~]# tar xf solo.tar.gz
[root@localhost ~]# mkdir -p /mycode
[root@localhost ~]# cd /mycode/
[root@localhost mycode]# git clone [email protected]:/home/git/repos/solo.git
Cloning into 'solo'...
warning: You appear to have cloned an empty repository.
Checking connectivity... done.
[root@localhost mycode]# mv ~/solo/* solo/
[root@localhost mycode]# cd solo/
[root@localhost solo]# ls
CHANGE_LOGS.html    Dockerfile   LICENSE       pom.xml    README_zh_CN.md
docker-compose.yml  gulpfile.js  package.json  README.md  src
[root@localhost solo]# git add *
[root@localhost solo]# git commit -m "solo"
[root@localhost solo]# git remote -v
origin	[email protected]:/home/git/repos/solo.git (fetch)
origin	[email protected]:/home/git/repos/solo.git (push)
[root@localhost solo]# git push -u origin master
Counting objects: 2099, done.
Compressing objects: 100% (2044/2044), done.
Writing objects: 100% (2099/2099), 27.44 MiB | 18.92 MiB/s, done.
Total 2099 (delta 367), reused 0 (delta 0)
To 192.168.146.136:/home/git/repos/solo.git
 * [new branch]      master -> master
Branch master set up to track remote branch master from origin.

#为了最后的测试,需要修改源代码的一个配置文件
[root@localhost ~]# cd /mycode/solo/
[root@localhost solo]# ls
CHANGE_LOGS.html    Dockerfile   LICENSE       pom.xml    README_zh_CN.md
docker-compose.yml  gulpfile.js  package.json  README.md  src
[root@localhost solo]# cd src/main/resources/
[root@localhost resources]# ls
docker                 lang_zh_CN.properties  log4j.properties  solo.properties
druid.properties       latke.properties       mail.properties
etc                    lib                    opensearch.xml
lang_en_US.properties  local.properties       repository.json
[root@localhost resources]# vim latke.properties
29 serverHost=192.168.146.141				#tomcat节点服务器的IP地址
31 serverPort=8080
[root@localhost resources]# cd /mycode/solo
[root@localhost solo]# git add *
[root@localhost solo]# git commit -m "ip"
[master 30deda0] ip
 1 file changed, 1 insertion(+), 1 deletion(-)
[root@localhost solo]# git push -u origin master
Counting objects: 6, done.
Compressing objects: 100% (6/6), done.
Writing objects: 100% (6/6), 524 bytes | 0 bytes/s, done.
Total 6 (delta 3), reused 0 (delta 0)
To 192.168.146.136:/home/git/repos/solo.git
   93a1ab5..30deda0  master -> master
Branch master set up to track remote branch master from origin.
创建一个流水线脚本并提交Git远程仓库
#在jenkins服务器上操作
[root@localhost solo]# cd ~
[root@localhost ~]# mkdir -p /jenkinsfile
[root@localhost ~]# cd /jenkinsfile/
[root@localhost jenkinsfile]# git clone [email protected]:/home/git/repos/jenkinsfile
Cloning into 'jenkinsfile'...
remote: Counting objects: 16, done.
remote: Compressing objects: 100% (11/11), done.
remote: Total 16 (delta 1), reused 0 (delta 0)
Receiving objects: 100% (16/16), done.
Resolving deltas: 100% (1/1), done.
Checking connectivity... done.
[root@localhost jenkinsfile]# ls
jenkinsfile
[root@localhost jenkinsfile]# cd jenkinsfile/
[root@localhost jenkinsfile]# ls
itemA
[root@localhost jenkinsfile]# mkdir itemB
[root@localhost jenkinsfile]# ls
itemA  itemB

#在Jenkins上配置流水线脚本
[root@localhost jenkinsfile]# cd itemB
[root@localhost itemB]# ls
jenkinsfile-java-solo
[root@localhost itemB]# cat jenkinsfile-java-solo
node ("JAVA-slave1-192.168.146.141") {
   //def mvnHome
   stage('Git checkout') {
   checkout([$class: 'GitSCM',
   branches: [[name: '*/master']],
   doGenerateSubmoduleConfigurations: false,
   extensions: [], submoduleCfg: [],
   userRemoteConfigs: [[credentialsId: 'a240769e-ed1a-4456-90a8-f0e124024801',
   url: '[email protected]:/home/git/repos/solo.git']]])
   }
   stage('Maven Build') {
	sh '/usr/local/maven/bin/mvn clean package -Dmaven.test.skip=true'
   }
   stage('Deploy') {
	sh '''WWWROOT=/usr/local/tomcat/webapps/ROOT
	[ -d /data/backup ] || mkdir -p /data/backup
	if [ -d $WWWROOT ];then
		mv $WWWROOT /data/backup/tomcat-$(date +%F_%T)
	fi
	unzip ${WORKSPACE}/target/*.war -d $WWWROOT
	PID=$(ps -ef | grep tomcat | egrep -v "grep|$$" | awk \'{print $2}\')
	[ -n "$PID" ] && kill -9 $PID
	/bin/bash /usr/local/tomcat/bin/startup.sh'''
   }
   stage('Test') {
       echo "success"
   }
}
#在Jenkins中提交流水线脚本
[root@localhost jenkinsfile]# git add *
[root@localhost jenkinsfile]# git commit -m "scripts"
[master 80a6cc6] scripts
 1 file changed, 29 insertions(+)
 create mode 100644 itemB/jenkinsfile-java-solo
[root@localhost jenkinsfile]# git push -u origin master
Counting objects: 4, done.
Compressing objects: 100% (3/3), done.
Writing objects: 100% (4/4), 878 bytes | 0 bytes/s, done.
Total 4 (delta 0), reused 0 (delta 0)
To 192.168.146.136:/home/git/repos/jenkinsfile
   a243de3..80a6cc6  master -> master
Branch master set up to track remote branch master from origin.
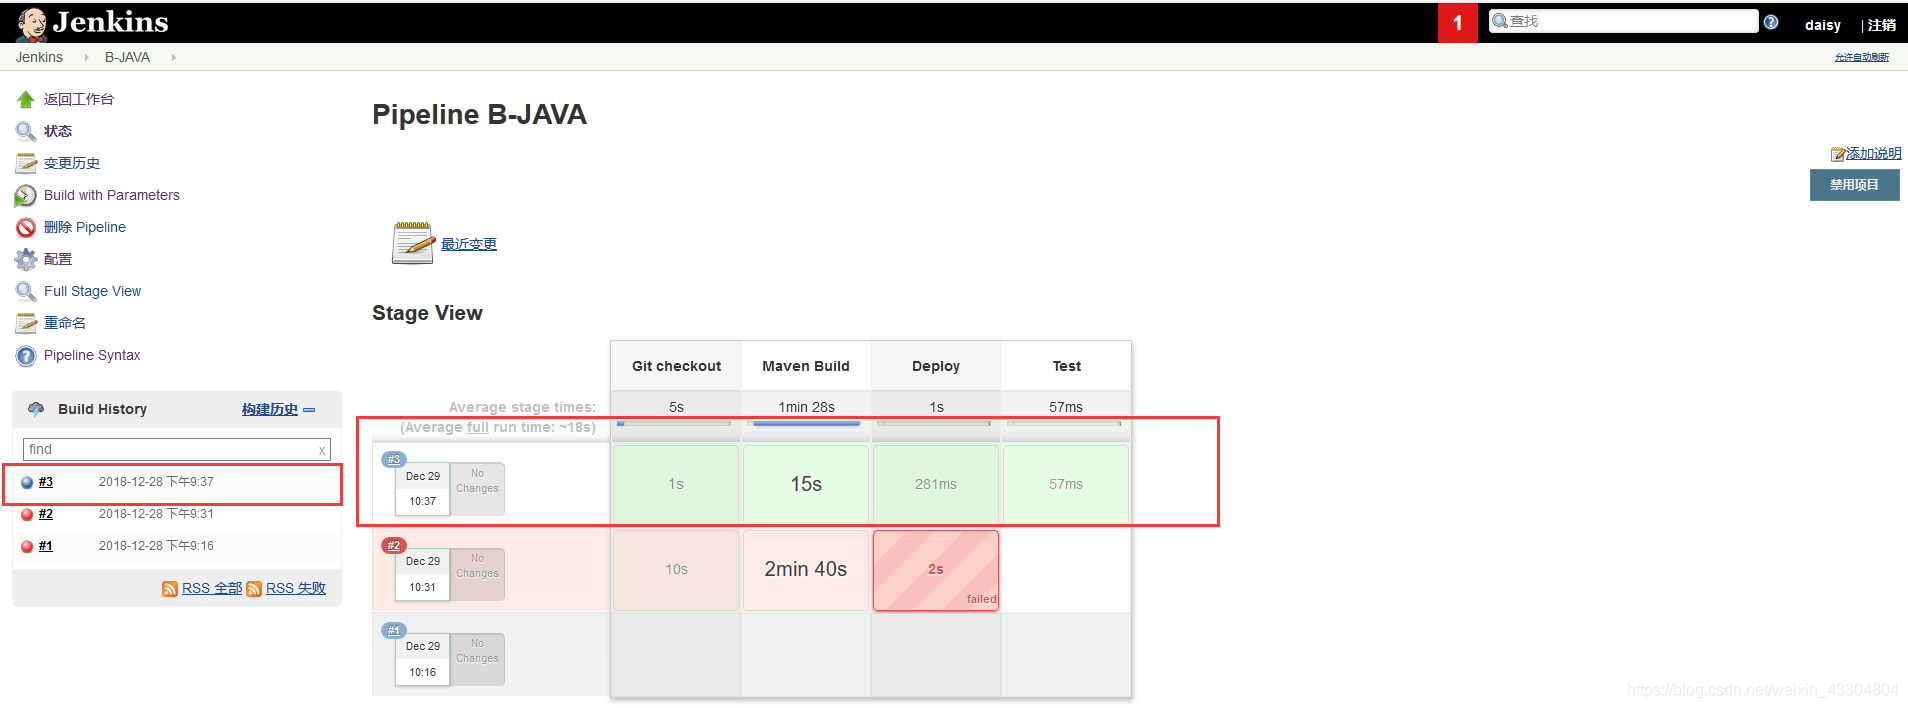
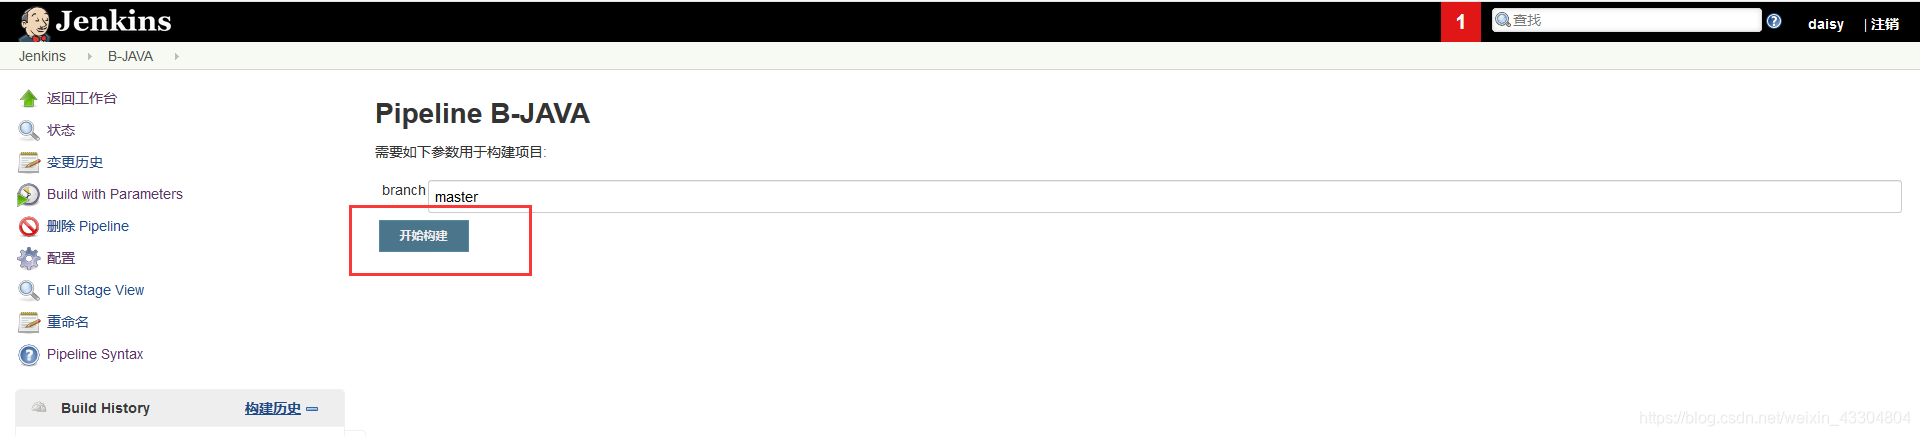
进行流水线的单slave从节点分布式构建测试
上面过程构建会失败在最后一步:tomcat进程未启动;Jenkins不能启动tomcat的socket进程,原因在于pipeline流水线在启动一个脚本程序的时候,这个脚本程序会运行在后台。但是当pipeline结束以后,Jenkins会自动kill掉所有pipeline有关的派生子进程;因此,我们需要在流水线脚本里加一个变量参数,不让pipeline杀掉才可以
JENKINS_NODE_COOKIE=dontkillme
#修改流水线脚本,添加参数,并提交远程仓库
[root@localhost itemB]# vim jenkinsfile-java-solo

node ("JAVA-slave1-192.168.146.141") {
   //def mvnHome
   stage('Git checkout') {
   checkout([$class: 'GitSCM',
   branches: [[name: '*/master']],
   doGenerateSubmoduleConfigurations: false,
   extensions: [], submoduleCfg: [],
   userRemoteConfigs: [[credentialsId: 'a240769e-ed1a-4456-90a8-f0e124024801',
   url: '[email protected]:/home/git/repos/solo.git']]])
   }
   stage('Maven Build') {
        sh '/usr/local/maven/bin/mvn clean package -Dmaven.test.skip=true'
   }
   stage('Deploy') {
        sh '''
        JENKINS_NODE_COOKIE=dontkillme 					#添加该参数
        WWWROOT=/usr/local/tomcat/webapps/ROOT
        [ -d /data/backup ] || mkdir -p /data/backup
        if [ -d $WWWROOT ];then
                mv $WWWROOT /data/backup/tomcat-$(date +%F_%T)
        fi
        unzip ${WORKSPACE}/target/*.war -d $WWWROOT
        PID=$(ps -ef | grep tomcat | egrep -v "grep|$$" | awk \'{print $2}\')
        [ -n "$PID" ] && kill -9 $PID
        /bin/bash /usr/local/tomcat/bin/startup.sh'''
   }
   stage('Test') {
       echo "success"
   }
}
[root@localhost itemB]# git add *
[root@localhost itemB]# git commit -m "s"
[master 9b7c4e5] s
 1 file changed, 3 insertions(+), 1 deletion(-)
[root@localhost itemB]# git push -u origin master
Counting objects: 4, done.
Compressing objects: 100% (3/3), done.
Writing objects: 100% (4/4), 376 bytes | 0 bytes/s, done.
Total 4 (delta 1), reused 0 (delta 0)
To 192.168.146.136:/home/git/repos/jenkinsfile
   4a82055..9b7c4e5  master -> master
Branch master set up to track remote branch master from origin.
#在tomcat端查看端口启动情况
[root@localhost target]# ss -antup | grep 8080
tcp    LISTEN     0      100      :::8080                 :::*                   users:(("java",pid=4136,fd=48))
tcp    TIME-WAIT  0      0        ::ffff:192.168.146.141:35032                ::ffff:192.168.146.141:8080
tcp    TIME-WAIT  0      0        ::ffff:192.168.146.141:35034                ::ffff:192.168.146.141:8080
进行流水线的单slave从节点SSH远程分布式构建测试
克隆一台tomcat服务器,进行SSH远程构建
| 主机名 | IP地址 | 备注 |
|---|---|---|
| Git | 192.168.146.136 | Git服务器 |
| Jenkins | 192.168.146.137 | Jenkins服务器 |
| TomcatA | 192.168.146.141 | Tomcat服务器(从节点) |
| TomcatB | 192.168.146.142 | Tomcat服务器 |
- 安装SSH Pipeline Steps

- 修改流水线脚本,并提交Git仓库
#修改流水线脚本,并提交Git仓库
[root@localhost itemB]# vim jenkinsfile-java-solo
node ("JAVA-slave1-192.168.146.141") {
   //def mvnHome
   def remote = [:]
   stage('Git checkout') {
   sh 'hostname -I'
   checkout([$class: 'GitSCM',
   branches: [[name: '*/master']],
   doGenerateSubmoduleConfigurations: false,
   extensions: [], submoduleCfg: [],
   userRemoteConfigs: [[credentialsId: 'a240769e-ed1a-4456-90a8-f0e124024801',
   url: '[email protected]:/home/git/repos/solo.git']]])
   }
   stage('Maven Build') {
        sh '/usr/local/maven/bin/mvn clean package -Dmaven.test.skip=true'
   }
   stage('Remote SSH 192.168.146.136') {
        remote.name = 'test'
        remote.host = '192.168.146.136'
        remote.user = 'root'
        remote.password = '123456'
        remote.allowAnyHosts = true
        writeFile file: 'ssh.sh', text: 'echo "`hostname -I`"'
        sshScript remote: remote, script: "ssh.sh"
   }
   stage('Remote SSH 192.168.146.142') {
        remote.name = 'test'
        remote.host = '192.168.146.142'
        remote.user = 'root'
        remote.password = '123456'
        remote.allowAnyHosts = true
        writeFile file: 'ssh.sh', text: 'echo "`hostname -I`"'
        sshScript remote: remote, script: "ssh.sh"
   }
}

#提交至远程仓库
[root@localhost itemB]# git add *
[root@localhost itemB]# git commit -m "s"
[master 7e3fd9e] s
 2 files changed, 50 insertions(+), 15 deletions(-)
 create mode 100644 itemB/jenkinsfile-java-solo.bak
[root@localhost itemB]# git push -u origin master
Counting objects: 4, done.
Compressing objects: 100% (4/4), done.
Writing objects: 100% (4/4), 821 bytes | 0 bytes/s, done.
Total 4 (delta 0), reused 0 (delta 0)
To 192.168.146.136:/home/git/repos/jenkinsfile
   9b7c4e5..7e3fd9e  master -> master
Branch master set up to track remote branch master from origin.
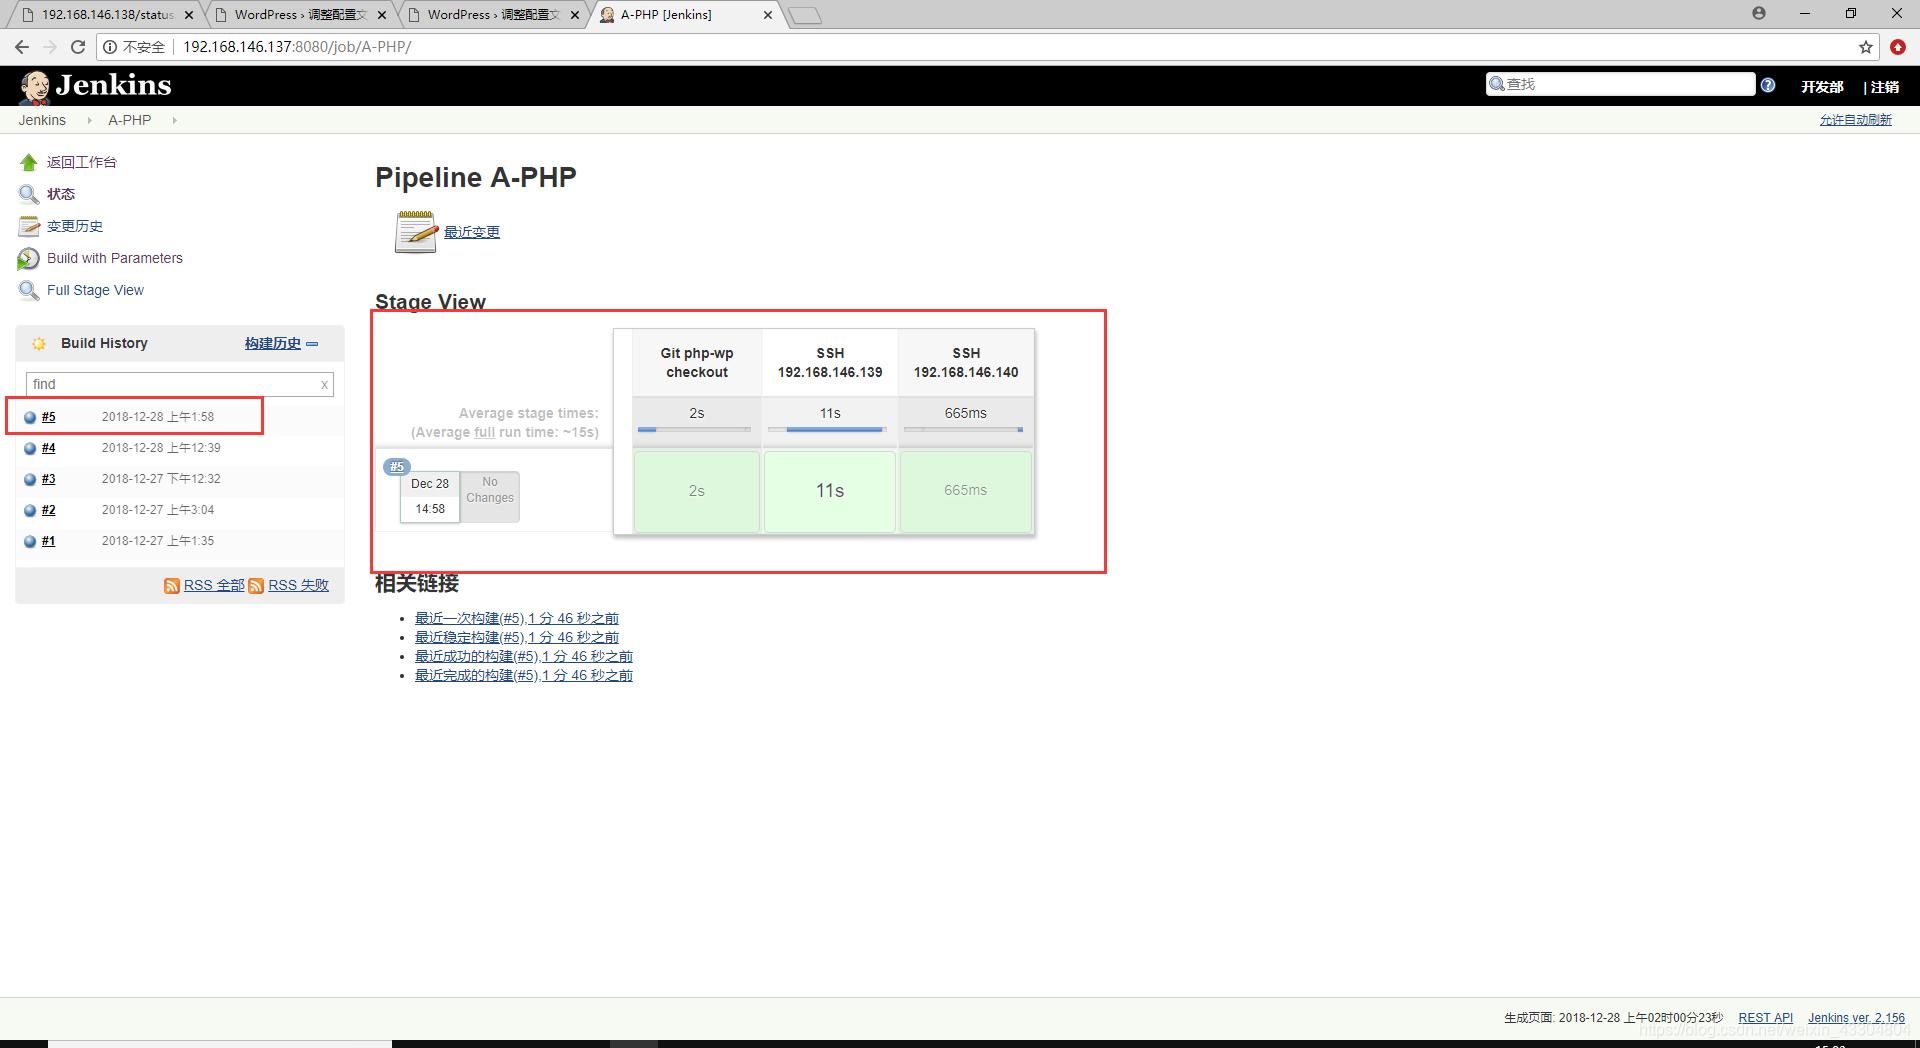
- 进行分布式构建
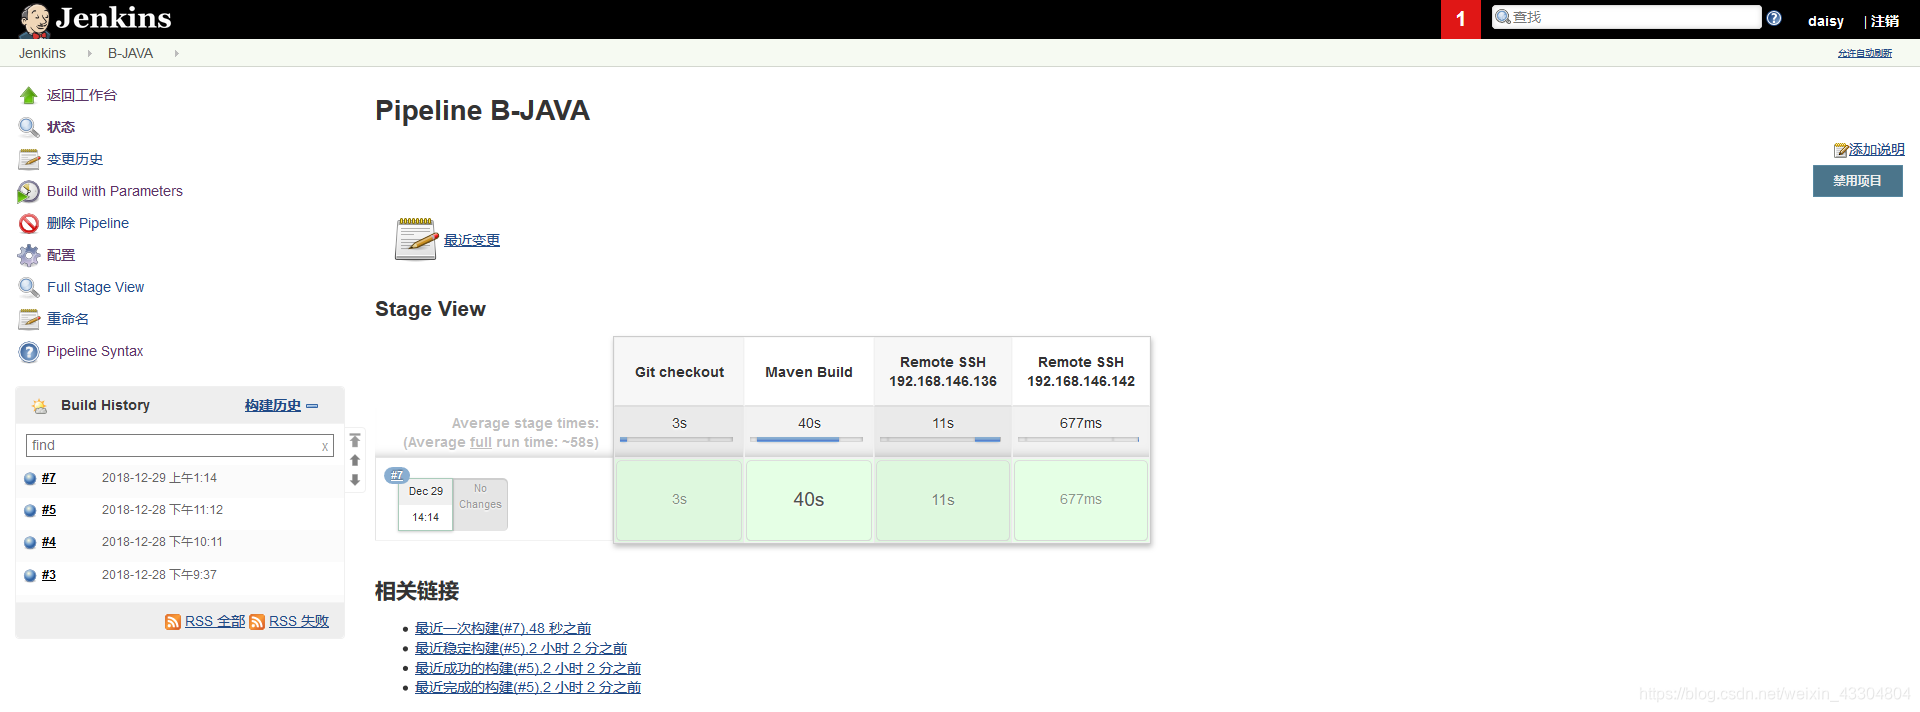
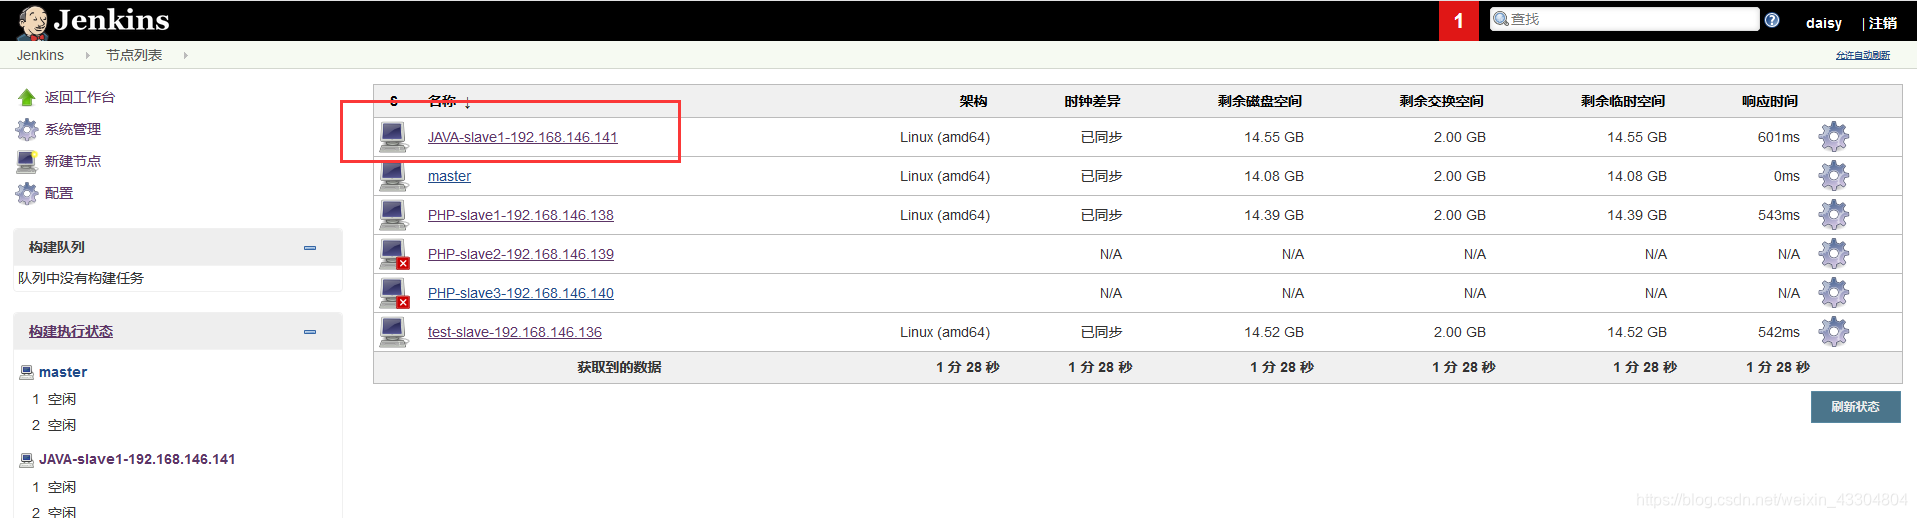
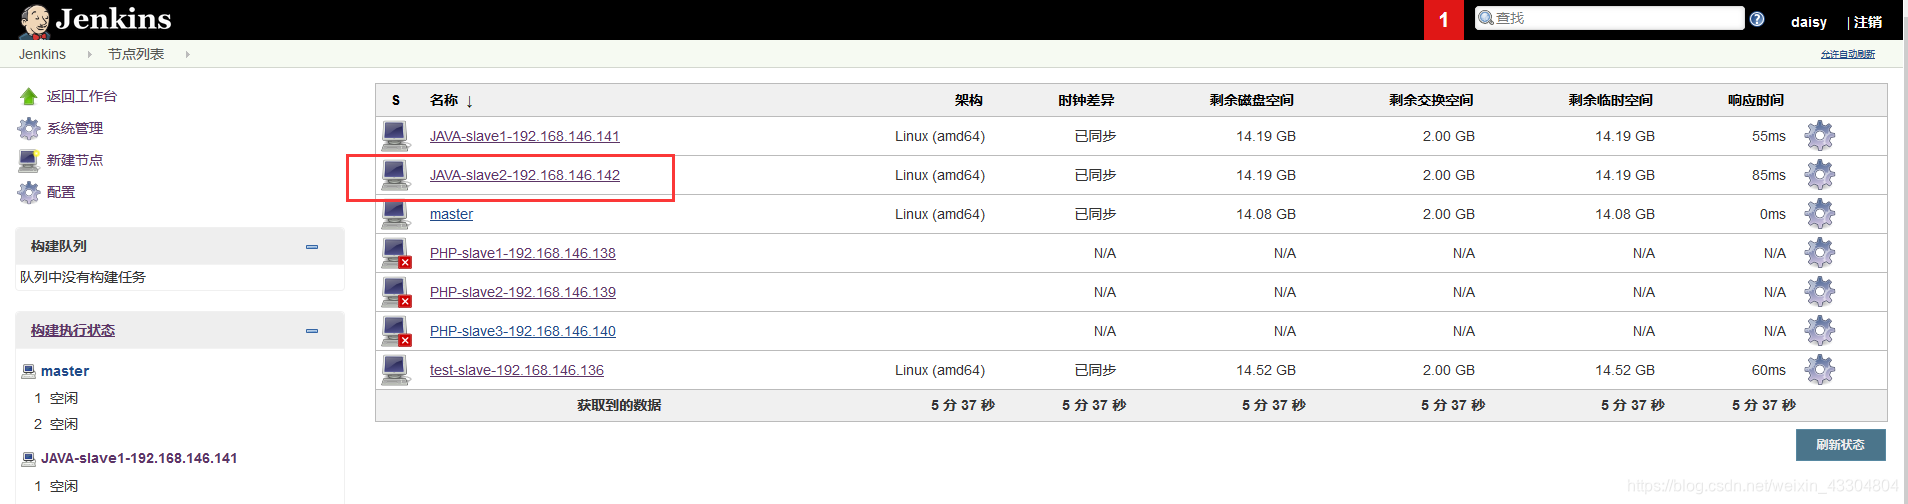
进行流水线的多slave从节点分布式构建测试
添加slave从节点,并进行多节点构建
[root@localhost itemB]# vim jenkinsfile-java-solo

node ("JAVA-slave1-192.168.146.141") {							#	tomcatA节点
   //def mvnHome
   stage('Git checkout') {
   checkout([$class: 'GitSCM',
   branches: [[name: '*/master']],
   doGenerateSubmoduleConfigurations: false,
   extensions: [], submoduleCfg: [],
   userRemoteConfigs: [[credentialsId: 'a240769e-ed1a-4456-90a8-f0e124024801',
   url: '[email protected]:/home/git/repos/solo.git']]])
   }
   stage('Maven Build') {
        sh '/usr/local/maven/bin/mvn clean package -Dmaven.test.skip=true'
   }
   stage('Deploy') {
        sh '''
        JENKINS_NODE_COOKIE=dontkillme
        WWWROOT=/usr/local/tomcat/webapps/ROOT
        [ -d /data/backup ] || mkdir -p /data/backup
        if [ -d $WWWROOT ];then
                mv $WWWROOT /data/backup/tomcat-$(date +%F_%T)
        fi
        unzip ${WORKSPACE}/target/*.war -d $WWWROOT
        PID=$(ps -ef | grep tomcat | egrep -v "grep|$$" | awk \'{print $2}\')
        [ -n "$PID" ] && kill -9 $PID
        /bin/bash /usr/local/tomcat/bin/startup.sh'''
   }
   stage('Test') {
       echo "success"
   }
}
node ("JAVA-slave1-192.168.146.142") {							#	tomcatB节点
   //def mvnHome
   stage('Git checkout') {
   checkout([$class: 'GitSCM',
   branches: [[name: '*/master']],
   doGenerateSubmoduleConfigurations: false,
   extensions: [], submoduleCfg: [],
   userRemoteConfigs: [[credentialsId: 'a240769e-ed1a-4456-90a8-f0e124024801',
   url: '[email protected]:/home/git/repos/solo.git']]])
   }
   stage('Maven Build') {
        sh '/usr/local/maven/bin/mvn clean package -Dmaven.test.skip=true'
   }
   stage('Deploy') {
        sh '''
        JENKINS_NODE_COOKIE=dontkillme
        WWWROOT=/usr/local/tomcat/webapps/ROOT
        [ -d /data/backup ] || mkdir -p /data/backup
        if [ -d $WWWROOT ];then
                mv $WWWROOT /data/backup/tomcat-$(date +%F_%T)
        fi
        unzip ${WORKSPACE}/target/*.war -d $WWWROOT
        PID=$(ps -ef | grep tomcat | egrep -v "grep|$$" | awk \'{print $2}\')
        [ -n "$PID" ] && kill -9 $PID
        /bin/bash /usr/local/tomcat/bin/startup.sh'''
   }
   stage('Test') {
       echo "success"
   }
}