OpenCV中使用Mask R-CNN进行基于深度学习的对象检测和实例分割(Python / C ++)
我觉得可以尝试一下
几个星期前,我们用YOLOv3写了一篇关于物体检测的文章。
对象检测器的输出是在图像或视频帧中检测到的对象周围的边界框阵列,但我们没有得到关于边界框内对象形状的任何线索。
如果我们能找到一个包含对象的二进制掩码而不仅仅是边界框,那会不会很酷?
在这篇文章中,我们将学习如何做到这一点。我们将展示如何使用称为Mask-RCNN(基于区域的卷积神经网络)的卷积神经网络(CNN)模型进行对象检测和分割。使用Mask-RCNN我们不仅检测对象,还获得包含该对象的灰度或二进制掩码。
本教程中的结果是使用Mac OS 2.5 GHz Intel Core i7 CPU获得的。CPU 的推理时间为每帧350 ms到2秒,具体取决于帧中对象的复杂程度和数量。
Mask-RCNN最初于2017年11月由Facebook的AI研究团队使用Python和Caffe2推出。
它后来被移植到Tensorflow,并且在物体检测模型动物园中共享了几个预先训练的模型,这些模型具有不同的骨干架构,如InceptionV2,ResNet50,ResNet101和Inception-ResnetV2 。它们还为您提供培训自己模型的工具。
在成立之初骨干是最快的四个。您甚至可以在合理的时间内在CPU上进行尝试,因此我们在本教程中选择了它。该模型在MSCOCO数据集上进行了训练。
我们将共享OpenCV代码以在C ++和Python中加载和使用该模型。
OpenCV的最低要求版本是3.4.3。
在我们深入研究代码之前,有必要了解一些术语,特别是如果您是初学者。
什么是图像分割?
在计算机视觉中,术语“图像分割”或简称“分割”意味着基于某些标准将图像分成像素组。您可以根据颜色,纹理或您已决定的其他一些条件进行此分组。这些组有时也称为超像素。
什么是实例细分?
在实例分割中,目标是检测图像中的特定对象并在感兴趣的对象周围创建掩模。实例分割也可以被认为是对象检测,其中输出是掩码而不仅仅是边界框。与试图对图像中的每个像素进行分类的语义分割不同,实例分割不旨在标记图像中的每个像素。
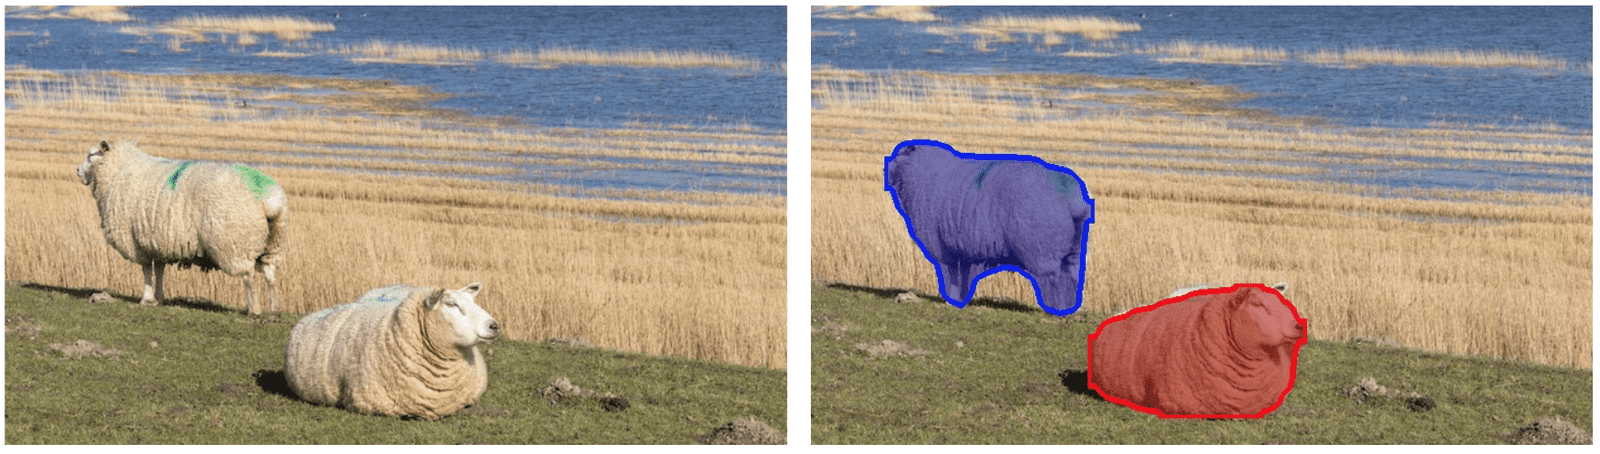
下面我们看一个非常相似的彩色背景上的两只绵羊的实例分割的例子。

图1:实例分段示例
Mask-RCNN如何工作?
Mask-RCNN是对原始R-CNN论文(R.Girshick等人,CVPR 2014)的一系列改进的结果,用于物体检测。R-CNN基于选择性搜索生成区域提议,然后使用卷积网络一次一个地处理每个提议的区域以输出对象标签及其边界框。
快速R-CNN(R。Girshik,ICCV 2015)通过使用ROIPool层在其CNN中一起处理所有提出的区域使得R-CNN算法更快。
更快的R-CNN(S. Run等人,PAMI,2017)通过使用称为区域提议网络(RPN)的ConvNet执行区域提议步骤进一步推动了它。RPN和分类和边界框预测网络都在共同的特征图上工作,从而使推理更快。在GPU上,更快的R-CNN可以以5 fps运行。
Mask R-CNN(He et al。,ICCV 2017)是对Faster RCNN的改进,它包括一个掩码预测与类标签和边界框预测分支平行的分支,如下图所示。它只为较快的R-CNN网络增加了一小部分开销,因此仍然可以在GPU上以5 fps运行。在本教程中,我们通过在Mac OS 2.5 GHz Intel Core i7 CPU上运行来显示结果,并且在CPU上每帧大约需要2秒,即使对于具有超过30个对象的帧也是如此。

图2:Mask-RCNN的架构(来源)
Mask-RCNN网络有两个主要部分。
第一个是区域提案网络,每个图像生成大约300个区域提案。在训练期间,这些提议(ROI)中的每一个都通过第二部分,即对象检测和掩模预测网络,如上所示。注意,由于掩模预测分支与标签和框预测分支并行运行,因此对于每个给定的ROI,网络预测属于所有类的掩模。
在推断期间,区域提议经历非最大抑制,并且掩模预测分支仅处理最高得分100检测框。因此,对于100个ROI和90个对象类,网络的掩模预测部分输出尺寸为100x90x15x15的4D张量,其中每个掩模的大小为15×15。
对于上面显示的绵羊图像,网络检测到两个对象。对于每个对象,它输出一个数组,该数组包含预测的类分数(表示对象属于预测类的概率),帧中检测到的对象的边界框的左,上,右和下位置。此数组中的类id用于从掩码预测分支的输出中提取相应的掩码。检测到的两个对象的掩码如下所示:
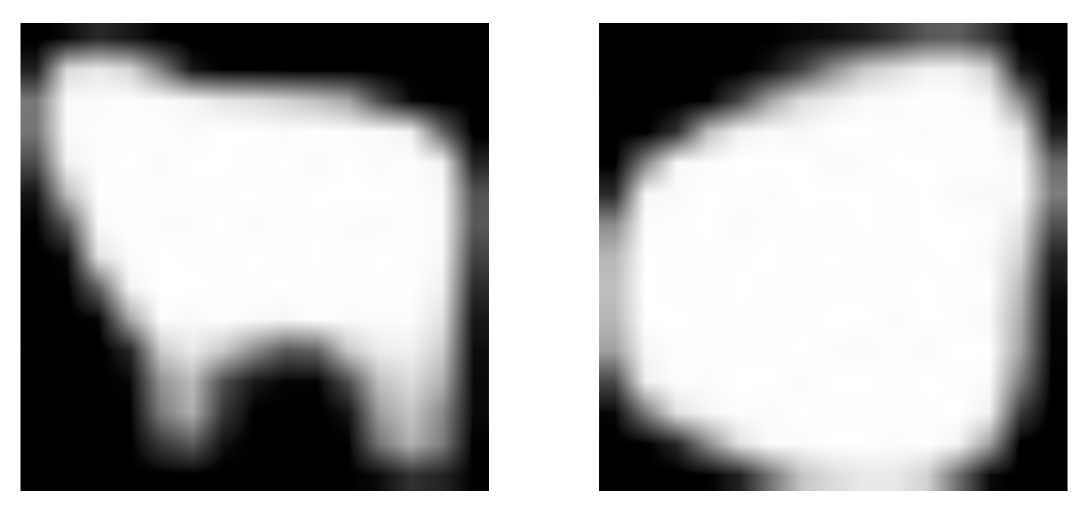
图3:Mask-RCNN生成的掩模
然后可以对这些掩模进行阈值处理以获得完全二元掩模。
与Faster-RCNN一样,骨干架构的选择也很灵活。我们之所以选择InceptionV2是因为速度更快,但是如ResneXt-101这样的更好的架构可以获得更好的结果,正如Mask R-CNN论文的作者指出的那样。
与其他物体探测器(如YOLOv3)相比,Mask-RCNN的网络在更大的图像上运行。网络调整输入图像的大小,使得较小的边是800像素。下面我们将详细介绍获取实例分段结果所需的步骤。为了简化和清晰可视化,我们使用相同的颜色来指示上述视频中同一类的对象,但我们还显示了一个次要的代码更改,以不同的方式为不同的实例着色。
OpenCV中使用Mask-RCNN进行对象检测和实例分割(C ++ / Python)
现在让我们看看如何使用OpenCV运行Mask-RCNN。
下载代码
要轻松学习本教程,请单击下面的按钮下载代码。免费!
下载代码
第1步:下载模型
我们将首先将tensorflow模型下载到当前的Mask-RCNN工作目录。下载完成后,我们提取模型文件。我们将使用冻结图形文件frozen_inference_graph.pb来获取模型权重。
| 1 2 |
wget http://download.tensorflow.org/models/object_detection/mask_rcnn_inception_v2_coco_2018_01_28.tar.gz
tar zxvf mask_rcnn_inception_v2_coco_2018_01_28.tar.gz
|
第2步:初始化参数
Mask-RCNN算法将预测的检测输出生成为边界框。每个边界框与置信度分数相关联。置信度阈值参数以下的所有框都将被忽略以进行进一步处理。
从网络输出的对象掩码是灰度图像。如果需要,可以直接将其用于alpha混合目的。由于我们在本教程中使用二进制掩码,因此我们使用maskThreshold参数来阈值灰色掩码图像。降低其值将导致更大的掩模。有时这有助于包括在边界附近错过的部分,但同时,它也可能包括更尖的边界区域的背景像素。
蟒蛇
| 1 2 3 |
# Initialize the parameters
confThreshold = 0.5 #Confidence threshold
maskThreshold = 0.3 # Mask threshold
|
C ++
| 1 2 3 |
// Initialize the parameters
float confThreshold = 0.5; // Confidence threshold
float maskThreshold = 0.3; // Mask threshold
|
第3步:加载模型和类
文件mscoco_labels.names包含训练模型的所有对象。我们读了班级名字。然后我们读取并加载colors.txt文件,其中包含用于屏蔽各种类对象的所有颜色。
接下来,我们使用这两个文件加载网络 -
- frozen_inference_graph.pb:预先训练的权重。
- mask_rcnn_inception_v2_coco_2018_01_28.pbtxt:由OpenCV的DNN支持组调整的文本图形文件,以便可以使用OpenCV加载网络。
我们在这里将DNN后端设置为OpenCV,将目标设置为CPU。您可以尝试将首选目标设置为cv.dnn.DNN_TARGET_OPENCL以在GPU上运行它。但请记住,当前OpenCV版本中的DNN模块仅使用英特尔的GPU进行测试。
蟒蛇
| 1 2 3 4 五 6 7 8 9 10 11 12 13 14 15 16 17 18 19 20 21 22 23 24 |
# Load names of classes
classesFile = "mscoco_labels.names";
classes = None
with open(classesFile, 'rt') as f:
classes = f.read().rstrip('\n').split('\n')
# Load the colors
colorsFile = "colors.txt";
with open(colorsFile, 'rt') as f:
colorsStr = f.read().rstrip('\n').split('\n')
colors = []
for i in range(len(colorsStr)):
rgb = colorsStr[i].split(' ')
color = np.array([float(rgb[0]), float(rgb[1]), float(rgb[2])])
colors.append(color)
# Give the textGraph and weight files for the model
textGraph = "./mask_rcnn_inception_v2_coco_2018_01_28.pbtxt";
modelWeights = "./mask_rcnn_inception_v2_coco_2018_01_28/frozen_inference_graph.pb";
# Load the network
net = cv.dnn.readNetFromTensorflow(modelWeights, textGraph);
net.setPreferableBackend(cv.dnn.DNN_BACKEND_OPENCV)
net.setPreferableTarget(cv.dnn.DNN_TARGET_CPU)
|
C ++
| 1 2 3 4 五 6 7 8 9 10 11 12 13 14 15 16 17 18 19 20 21 22 23 24 25 26 27 |
// Load names of classes
string classesFile = "mscoco_labels.names";
ifstream ifs(classesFile.c_str());
string line;
while (getline(ifs, line)) classes.push_back(line);
// Load the colors
vector<Scalar> colors;
string colorsFile = "colors.txt";
ifstream colorFptr(colorsFile.c_str());
while (getline(colorFptr, line)) {
char* pEnd;
double r, g, b;
r = strtod (line.c_str(), &pEnd);
g = strtod (pEnd, NULL);
b = strtod (pEnd, NULL);
colors.push_back(Scalar(r, g, b, 255.0));
}
// Give the configuration and weight files for the model
String textGraph = "./mask_rcnn_inception_v2_coco_2018_01_28.pbtxt";
String modelWeights = "./mask_rcnn_inception_v2_coco_2018_01_28/frozen_inference_graph.pb";
// Load the network
Net net = readNetFromTensorflow(modelWeights, textGraph);
net.setPreferableBackend(DNN_BACKEND_OPENCV);
net.setPreferableTarget(DNN_TARGET_CPU);
|
第4步:阅读输入
在此步骤中,我们将读取图像,视频流或网络摄像头。此外,我们还打开视频编写器以保存具有检测到的输出边界框的帧。
蟒蛇
| 1 2 3 4 五 6 7 8 9 10 11 12 13 14 15 16 17 18 19 20 21 22 |
outputFile = "mask_rcnn_out_py.avi"
if (args.image):
# Open the image file
if not os.path.isfile(args.image):
print("Input image file ", args.image, " doesn't exist")
sys.exit(1)
cap = cv.VideoCapture(args.image)
outputFile = args.image[:-4]+'_mask_rcnn_out_py.jpg'
elif (args.video):
# Open the video file
if not os.path.isfile(args.video):
print("Input video file ", args.video, " doesn't exist")
sys.exit(1)
cap = cv.VideoCapture(args.video)
outputFile = args.video[:-4]+'_mask_rcnn_out_py.avi'
else:
# Webcam input
cap = cv.VideoCapture(0)
# Get the video writer initialized to save the output video
if (not args.image):
vid_writer = cv.VideoWriter(outputFile, cv.VideoWriter_fourcc('M','J','P','G'), 28, (round(cap.get(cv.CAP_PROP_FRAME_WIDTH)),round(cap.get(cv.CAP_PROP_FRAME_HEIGHT))))
|
C ++
| 1 2 3 4 五 6 7 8 9 10 11 12 13 14 15 16 17 18 19 20 21 22 23 24 25 26 27 28 |
outputFile = "mask_rcnn_out_cpp.avi";
if (parser.has("image"))
{
// Open the image file
str = parser.get<String>("image");
ifstream ifile(str);
if (!ifile) throw("error");
cap.open(str);
str.replace(str.end()-4, str.end(), "_mask_rcnn_out.jpg");
outputFile = str;
}
else if (parser.has("video"))
{
// Open the video file
str = parser.get<String>("video");
ifstream ifile(str);
if (!ifile) throw("error");
cap.open(str);
str.replace(str.end()-4, str.end(), "_mask_rcnn_out.avi");
outputFile = str;
}
// Open the webcam
else cap.open(parser.get<int>("device"));
// Get the video writer initialized to save the output video
if (!parser.has("image")) {
video.open(outputFile, VideoWriter::fourcc('M','J','P','G'), 28, Size(cap.get(CAP_PROP_FRAME_WIDTH), cap.get(CAP_PROP_FRAME_HEIGHT)));
}
|
第4步:处理每个帧
神经网络的输入图像需要采用称为blob的特定格式。
从输入图像或视频流中读取帧后,将通过blobFromImage函数将其转换为神经网络的输入blob。在此过程中,它以原始大小接收输入图像帧,并将swapRGB参数设置为true。
然后将blob作为其输入传递到网络,并运行前向传递以获得预测的边界框列表以及来自网络中名为“ detection_out_final ”和“ detection_masks ” 的输出层的对象掩码。这些框经过后处理步骤,以滤除具有低置信度分数的那些。我们将在下一节中更详细地介绍后处理步骤。每个帧的推理时间打印在左上角。然后将具有最终边界框和相应的重叠掩模的图像保存到磁盘,作为图像输入的图像或使用视频编写器用于输入视频流或网络摄像头。
蟒蛇
| 1 2 3 4 五 6 7 8 9 10 11 12 13 14 15 16 17 18 19 20 21 22 23 24 25 26 27 28 29 三十 31 32 33 34 35 36 |
while cv.waitKey(1) < 0:
# Get frame from the video
hasFrame, frame = cap.read()
# Stop the program if reached end of video
if not hasFrame:
print("Done processing !!!")
print("Output file is stored as ", outputFile)
cv.waitKey(3000)
break
# Create a 4D blob from a frame.
blob = cv.dnn.blobFromImage(frame, swapRB=True, crop=False)
# Set the input to the network
net.setInput(blob)
# Run the forward pass to get output from the output layers
boxes, masks = net.forward(['detection_out_final', 'detection_masks'])
# Extract the bounding box and mask for each of the detected objects
postprocess(boxes, masks)
# Put efficiency information.
t, _ = net.getPerfProfile()
label = 'Mask-RCNN : Inference time: %.2f ms' % (t * 1000.0 / cv.getTickFrequency())
cv.putText(frame, label, (0, 15), cv.FONT_HERSHEY_SIMPLEX, 0.5, (0, 0, 0))
# Write the frame with the detection boxes
if (args.image):
cv.imwrite(outputFile, frame.astype(np.uint8));
else:
vid_writer.write(frame.astype(np.uint8))
cv.imshow(winName, frame)
|
C ++
| 1 2 3 4 五 6 7 8 9 10 11 12 13 14 15 16 17 18 19 20 21 22 23 24 25 26 27 28 29 三十 31 32 33 34 35 36 37 38 39 40 41 42 43 44 |
// Process frames.
while (waitKey(1) < 0)
{
// get frame from the video
cap >> frame;
// Stop the program if reached end of video
if (frame.empty()) {
cout << "Done processing !!!" << endl;
cout << "Output file is stored as " << outputFile << endl;
waitKey(3000);
break;
}
// Create a 4D blob from a frame.
blobFromImage(frame, blob, 1.0, Size(frame.cols, frame.rows), Scalar(), true, false);
//Sets the input to the network
net.setInput(blob);
// Runs the forward pass to get output from the output layers
std::vector<String> outNames(2);
outNames[0] = "detection_out_final";
outNames[1] = "detection_masks";
vector<Mat> outs;
net.forward(outs, outNames);
// Extract the bounding box and mask for each of the detected objects
postprocess(frame, outs);
// Put efficiency information. The function getPerfProfile returns the overall time for inference(t) and the timings for each of the layers(in layersTimes)
vector<double> layersTimes;
double freq = getTickFrequency() / 1000;
double t = net.getPerfProfile(layersTimes) / freq;
string label = format("Mask-RCNN : Inference time for a frame : %.2f ms", t);
putText(frame, label, Point(0, 15), FONT_HERSHEY_SIMPLEX, 0.5, Scalar(0, 0, 0));
// Write the frame with the detection boxes
Mat detectedFrame;
frame.convertTo(detectedFrame, CV_8U);
if (parser.has("image")) imwrite(outputFile, detectedFrame);
else video.write(detectedFrame);
imshow(kWinName, frame);
}
|
现在让我们详细介绍上面使用的一些后处理函数调用。
步骤4a:后处理网络的输出
网络的输出掩码对象是一个四维对象,其中第一维表示帧中检测到的框的数量,第二维表示模型中的类数,第三维和第四维表示掩模形状(15× 15)在我们的例子中。
如果框的置信度小于给定阈值,则删除边界框并且不考虑进行进一步处理。
蟒蛇
| 1 2 3 4 五 6 7 8 9 10 11 12 13 14 15 16 17 18 19 20 21 22 23 24 25 26 27 28 29 三十 31 32 33 34 35 |
# For each frame, extract the bounding box and mask for each detected object
def postprocess(boxes, masks):
# Output size of masks is NxCxHxW where
# N - number of detected boxes
# C - number of classes (excluding background)
# HxW - segmentation shape
numClasses = masks.shape[1]
numDetections = boxes.shape[2]
frameH = frame.shape[0]
frameW = frame.shape[1]
for i in range(numDetections):
box = boxes[0, 0, i]
mask = masks[i]
score = box[2]
if score > confThreshold:
classId = int(box[1])
# Extract the bounding box
left = int(frameW * box[3])
top = int(frameH * box[4])
right = int(frameW * box[5])
bottom = int(frameH * box[6])
left = max(0, min(left, frameW - 1))
top = max(0, min(top, frameH - 1))
right = max(0, min(right, frameW - 1))
bottom = max(0, min(bottom, frameH - 1))
# Extract the mask for the object
classMask = mask[classId]
# Draw bounding box, colorize and show the mask on the image
drawBox(frame, classId, score, left, top, right, bottom, classMask)
|
C ++
| 1 2 3 4 五 6 7 8 9 10 11 12 13 14 15 16 17 18 19 20 21 22 23 24 25 26 27 28 29 三十 31 32 33 34 35 36 37 38 39 40 41 |
// For each frame, extract the bounding box and mask for each detected object
void postprocess(Mat& frame, const vector<Mat>& outs)
{
Mat outDetections = outs[0];
Mat outMasks = outs[1];
// Output size of masks is NxCxHxW where
// N - number of detected boxes
// C - number of classes (excluding background)
// HxW - segmentation shape
const int numDetections = outDetections.size[2];
const int numClasses = outMasks.size[1];
outDetections = outDetections.reshape(1, outDetections.total() / 7);
for (int i = 0; i < numDetections; ++i)
{
float score = outDetections.at<float>(i, 2);
if (score > confThreshold)
{
// Extract the bounding box
int classId = static_cast<int>(outDetections.at<float>(i, 1));
int left = static_cast<int>(frame.cols * outDetections.at<float>(i, 3));
int top = static_cast<int>(frame.rows * outDetections.at<float>(i, 4));
int right = static_cast<int>(frame.cols * outDetections.at<float>(i, 5));
int bottom = static_cast<int>(frame.rows * outDetections.at<float>(i, 6));
left = max(0, min(left, frame.cols - 1));
top = max(0, min(top, frame.rows - 1));
right = max(0, min(right, frame.cols - 1));
bottom = max(0, min(bottom, frame.rows - 1));
Rect box = Rect(left, top, right - left + 1, bottom - top + 1);
// Extract the mask for the object
Mat objectMask(outMasks.size[2], outMasks.size[3],CV_32F, outMasks.ptr<float>(i,classId));
// Draw bounding box, colorize and show the mask on the image
drawBox(frame, classId, score, box, objectMask);
}
}
}
|
步骤4c:绘制预测的框
最后,我们在输入框架上绘制通过后处理步骤过滤的框,其中包含指定的类标签和置信度分数。我们还将彩色蒙版与其轮廓叠加在框内。在此代码中,我们对属于同一类的所有对象使用相同的颜色,但您也可以对不同的实例进行不同的着色。
蟒蛇
| 1 2 3 4 五 6 7 8 9 10 11 12 13 14 15 16 17 18 19 20 21 22 23 24 25 26 27 28 29 三十 31 32 33 |
# Draw the predicted bounding box, colorize and show the mask on the image
def drawBox(frame, classId, conf, left, top, right, bottom, classMask):
# Draw a bounding box.
cv.rectangle(frame, (left, top), (right, bottom), (255, 178, 50), 3)
# Print a label of class.
label = '%.2f' % conf
if classes:
assert(classId < len(classes))
label = '%s:%s' % (classes[classId], label)
# Display the label at the top of the bounding box
labelSize, baseLine = cv.getTextSize(label, cv.FONT_HERSHEY_SIMPLEX, 0.5, 1)
top = max(top, labelSize[1])
cv.rectangle(frame, (left, top - round(1.5*labelSize[1])), (left + round(1.5*labelSize[0]), top + baseLine), (255, 255, 255), cv.FILLED)
cv.putText(frame, label, (left, top), cv.FONT_HERSHEY_SIMPLEX, 0.75, (0,0,0), 1)
# Resize the mask, threshold, color and apply it on the image
classMask = cv.resize(classMask, (right - left + 1, bottom - top + 1))
mask = (classMask > maskThreshold)
roi = frame[top:bottom+1, left:right+1][mask]
color = colors[classId%len(colors)]
# Comment the above line and uncomment the two lines below to generate different instance colors
#colorIndex = random.randint(0, len(colors)-1)
#color = colors[colorIndex]
frame[top:bottom+1, left:right+1][mask] = ([0.3*color[0], 0.3*color[1], 0.3*color[2]] + 0.7 * roi).astype(np.uint8)
# Draw the contours on the image
mask = mask.astype(np.uint8)
im2, contours, hierarchy = cv.findContours(mask,cv.RETR_TREE,cv.CHAIN_APPROX_SIMPLE)
cv.drawContours(frame[top:bottom+1, left:right+1], contours, -1, color, 3, cv.LINE_8, hierarchy, 100)
|
C ++
| 1 2 3 4 五 6 7 8 9 10 11 12 13 14 15 16 17 18 19 20 21 22 23 24 25 26 27 28 29 三十 31 32 33 34 35 36 37 38 39 40 |
// Draw the predicted bounding box, colorize and show the mask on the image
void drawBox(Mat& frame, int classId, float conf, Rect box, Mat& objectMask)
{
//Draw a rectangle displaying the bounding box
rectangle(frame, Point(box.x, box.y), Point(box.x+box.width, box.y+box.height), Scalar(255, 178, 50), 3);
//Get the label for the class name and its confidence
string label = format("%.2f", conf);
if (!classes.empty())
{
CV_Assert(classId < (int)classes.size());
label = classes[classId] + ":" + label;
}
//Display the label at the top of the bounding box
int baseLine;
Size labelSize = getTextSize(label, FONT_HERSHEY_SIMPLEX, 0.5, 1, &baseLine);
box.y = max(box.y, labelSize.height);
rectangle(frame, Point(box.x, box.y - round(1.5*labelSize.height)), Point(box.x + round(1.5*labelSize.width), box.y + baseLine), Scalar(255, 255, 255), FILLED);
putText(frame, label, Point(box.x, box.y), FONT_HERSHEY_SIMPLEX, 0.75, Scalar(0,0,0),1);
Scalar color = colors[classId%colors.size()];
// Comment the above line and uncomment the two lines below to generate different instance colors
//int colorInd = rand() % colors.size();
//Scalar color = colors[colorInd];
// Resize the mask, threshold, color and apply it on the image
resize(objectMask, objectMask, Size(box.width, box.height));
Mat mask = (objectMask > maskThreshold);
Mat coloredRoi = (0.3 * color + 0.7 * frame(box));
coloredRoi.convertTo(coloredRoi, CV_8UC3);
// Draw the contours on the image
vector<Mat> contours;
Mat hierarchy;
mask.convertTo(mask, CV_8U);
findContours(mask, contours, hierarchy, RETR_CCOMP, CHAIN_APPROX_SIMPLE);
drawContours(coloredRoi, contours, -1, color, 5, LINE_8, hierarchy, 100);
coloredRoi.copyTo(frame(box), mask);
}
|
订阅和下载代码
如果您喜欢这篇文章并想下载此帖子中使用的代码(C ++和Python)和示例图片,请订阅我们的新闻通讯。您还将收到免费的计算机视觉资源指南。在我们的时事通讯中,我们分享了用C ++ / Python编写的OpenCV教程和示例,以及计算机视觉和机器学习算法和新闻。
原文地址:https://www.learnopencv.com/deep-learning-based-object-detection-and-instance-segmentation-using-mask-r-cnn-in-opencv-python-c/