SpringBoot之数据缓存Cache操作
一、前言
缓存要解决的问题:一个程序的瓶颈在于数据库,我们也知道内存的速度是大大快于硬盘的速度的。当我们需要重复地获取相同的数据的时候,我们一次又一次的请求数据库或者远程服务,导致大量的时间耗费在数据库查询或者远程方法调用上,导致程序性能的恶化,这便是数据缓存要解决的问题。
类似的缓存技术有:Redis、EhCache、Guava等,现在一般常用的为Redis。
Spring 3.1 引入了激动人心的基于注释(annotation)的缓存(cache)技术,它本质上不是一个具体的缓存实现方案(例如EHCache 或者 OSCache),而是一个对缓存使用的抽象,通过在既有代码中添加少量它定义的各种 annotation,即能够达到缓存方法的返回对象的效果。
Spring 的缓存技术还具备相当的灵活性,不仅能够使用 SpEL(Spring Expression Language)来定义缓存的 key 和各种 condition,还提供开箱即用的缓存临时存储方案,也支持和主流的专业缓存例如 EHCache 集成。
其特点总结如下:
1. 通过少量的配置 annotation 注释即可使得既有代码支持缓存
2. 支持开箱即用 Out-Of-The-Box,即不用安装和部署额外第三方组件即可使用缓存
3. 支持 Spring Express Language,能使用对象的任何属性或者方法来定义缓存的 key 和 condition
4. 支持 AspectJ,并通过其实现任何方法的缓存支持
5. 支持自定义 key 和自定义缓存管理者,具有相当的灵活性和扩展性
二、Spring缓存支持
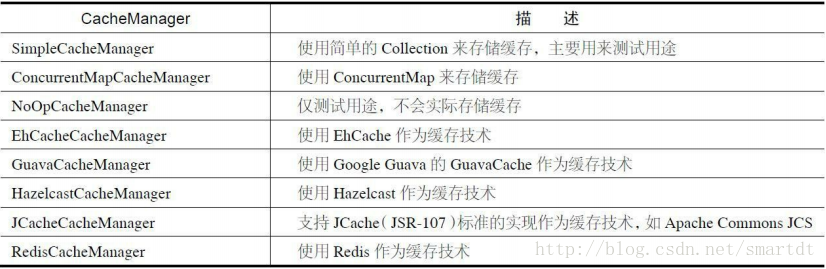
Spring定义了org.springframework.cache.CacheManager和org.springframework.cache.Cache接口用来统一不同的缓存的技术。其中,CacheManager是Spring提供的各种缓存技术抽象接口,Cache接口包含缓存的各种操作(增加、删除、获得缓存,我们一般不会直接和此接口打交道)。
1..Spring支持的CacheManager实现如下图:
在我们使用任意一个实现的CacheManager的时候,需注册实现的CacheManager的Bean,例如:
@Bean
public EhCacheCacheManager cacheManager(CacheManager ehCacheCacheManager) {
    return new EhCacheCacheManager(ehCacheCacheManager);
}
2.声名式缓存注解
Spring提供了4个注解来声明缓存规则(又是使用注解式的AOP的一个生动例子)。这四个注解如表8-6
所示。 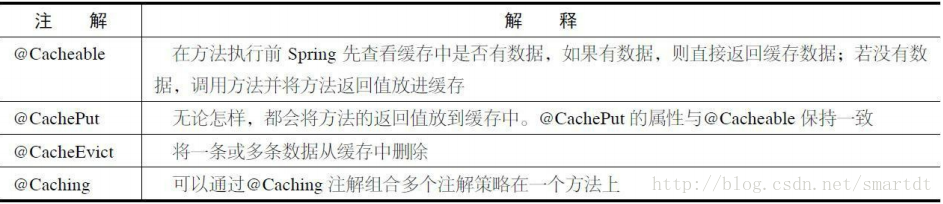
@Cacheable、@CachePut、@CacheEvit都有value属性,指定的是要使用的缓存名称;key属性指定的是
数据在缓存中的存储的键。
3.开启声名式缓存支持
开启声名式缓存支持十分简单,只需在配置类上使用@EnableCaching注解即可,例如:
@Configuration
@EnableCaching
public class AppConfig {
}- 1
- 2
- 3
- 4
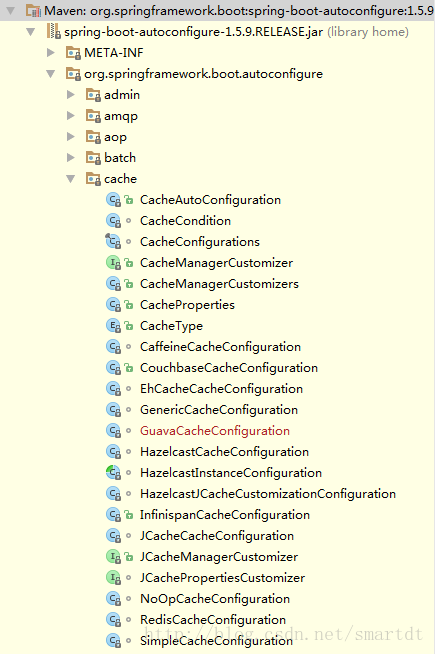
三、SpringBoot的支持
在springboot中,已经为cache做了自动配置,如图:
并且Spring Boot支持以“spring.cache”为前缀的属性来配置缓存。在SpringBoot Properties配置大全一文中已经罗列出来:
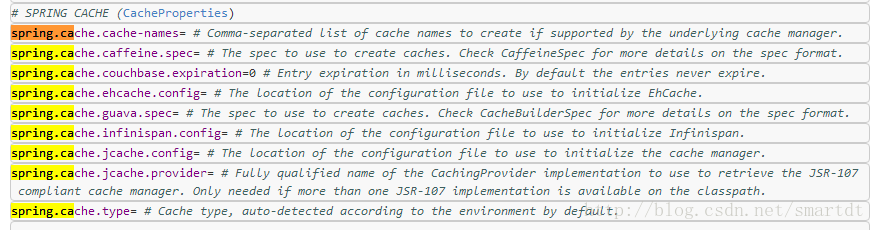
在Spring Boot环境下,使用缓存技术只需在项目中导入相关缓存技术的依赖包,并在配置类使用@EnableCaching开启缓存支持即可。
四、本例
将以Spring Boot默认的ConcurrentMapCacheManager作为缓存技术,演示@Cacheable、CachePut、@CacheEvit,最后使用EhCache、Guava来替换缓存技术。
1.pom.xml,主要是需要加入jpa和mysql。
        <dependency>
            <groupId>org.springframework.boot</groupId>
            <artifactId>spring-boot-starter-data-jpa</artifactId>
        </dependency>
        <dependency>
            <groupId>mysql</groupId>
            <artifactId>mysql-connector-java</artifactId>
            <scope>runtime</scope>
        </dependency>
2.application.yml,进行mysql配置和jpa配置,注意这里的show-sql: true
server:
  port: 5000

spring:
  datasource:
    driver-class-name: com.mysql.jdbc.Driver
    url: jdbc:mysql://localhost:3306/test?useUnicode=true&characterEncoding=utf8&characterSetResults=utf8
    username: root
    password: ******

  jpa:
    hibernate:
      ddl-auto: update
    show-sql: true
3.以userinfo为例进行配置
//UserInfo
@Entity
public class UserInfo {

    @Id
    @GeneratedValue
    private Long id;
    private String name;
    private int age;
    private String sex;
    private String address;
    省略get/set...
}

//UserInfoDao
public interface UserInfoDao extends JpaRepository<UserInfo, Long> {
    //
}

//UserInfoService
public interface UserInfoService {
    UserInfo save(UserInfo userInfo);
    void remove(Long id);
    UserInfo findOne(UserInfo userInfo);
}

//UserInfoServiceImpl
@Service
public class UserInfoServiceImpl implements UserInfoService  {
    private static Logger log = LoggerFactory.getLogger(UserInfoServiceImpl.class);
    @Autowired
    UserInfoDao userInfoDao;

    @Override
    @CachePut(value = "userinfocache",key="#userInfo.id") //@CachePut缓存新增的或更新的数据到缓存,其中缓存名称为people,数据的key是person的id。
    public UserInfo save(UserInfo userInfo) {
        UserInfo u = userInfoDao.save(userInfo);
        log.info("为userinfo的id(也是cache的key):" + u.getId() + "数据做了缓存");
        return u;
    }

    @Override
    @CacheEvict(value = "userinfocache") //@CacheEvict从缓存people中删除key为id的数据。
    public void remove(Long id) {
        log.info("删除了userinfo的id(也是cache的key):" + id + "数据缓存");
        userInfoDao.delete(id);
    }

    @Override
    @Cacheable(value = "userinfocache",key="#userInfo.id") //@Cacheable缓存key为person的id数据到缓存people中。
    public UserInfo findOne(UserInfo userInfo) {
        UserInfo u = userInfoDao.findOne(userInfo.getId());
        log.info("为userinfo的id(也是cache的key):" + u.getId() + "数据做了缓存");
        return u;
    }
}

//UserCacheController
@RestController
@RequestMapping("/userinfo")
public class UserCacheController {

    @Autowired
    UserInfoService userInfoService;

    @RequestMapping("/put")
    public UserInfo put(UserInfo userInfo){
        return userInfoService.save(userInfo);
    }

    @RequestMapping("/remove")
    public String remove(Long id){
        userInfoService.remove(id);
        return "success";
    }

    @RequestMapping("/cache")
    public UserInfo findone(UserInfo userInfo){
        return userInfoService.findOne(userInfo);
    }
}

//别忘了,启动类中加上@EnableCaching
@SpringBootApplication
@EnableCaching
public class SpringbootcacheApplication {
    public static void main(String[] args) {
        SpringApplication.run(SpringbootcacheApplication.class, args);
    }
}- 项目启动后,数据库中会自动生成user_info的表(表明可以自定义)
1.添加一条数据: 
日志: Hibernate: insert into user_info (address, age, name, sex) values (?, ?, ?, ?)
2017-12-06 17:29:09.054 INFO 9564 --- [nio-5000-exec-1] c.h.cache.userinfo.UserInfoServiceImpl : 为userinfo的id(也是cache的key):12数据做了缓存
2.再次访问http://127.0.0.1:5000/userinfo/cache?id=12则控制台没有输入。 
3.测试remove
我们刚才已经为id=12做了缓存,取id=12的值直接从缓存中读取。 
控制台输出: 2017-12-06 17:33:49.711 INFO 9564 --- [nio-5000-exec-9] c.h.cache.userinfo.UserInfoServiceImpl : 删除了userinfo的id(也是cache的key):12数据缓存
Hibernate: select userinfo0_.id as id1_0_0_, userinfo0_.address as address2_0_0_, userinfo0_.age as age3_0_0_, userinfo0_.name as name4_0_0_, userinfo0_.sex as sex5_0_0_ from user_info userinfo0_ where userinfo0_.id=?
Hibernate: delete from user_info where id=?
4.再次访问http://127.0.0.1:5000/userinfo/cache?id=12(提前是有值的情况下),会发现控制台重新给做了缓存。 Hibernate: select userinfo0_.id as id1_0_0_, userinfo0_.address as address2_0_0_, userinfo0_.age as age3_0_0_, userinfo0_.name as name4_0_0_, userinfo0_.sex as sex5_0_0_ from user_info userinfo0_ where userinfo0_.id=?
2017-12-06 17:36:34.252 INFO 9564 --- [nio-5000-exec-6] c.h.cache.userinfo.UserInfoServiceImpl : 为userinfo的id(也是cache的key):12数据做了缓存