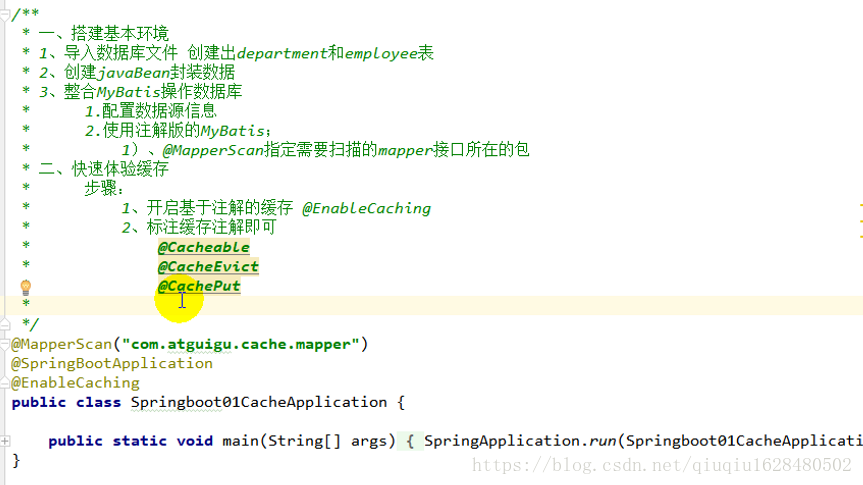
1.引入缓存
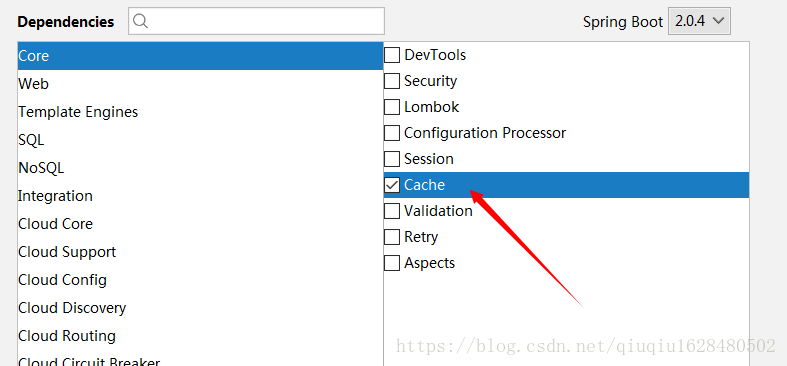
一开始创建项目的时候一定要把cache项目勾选上(前边是基本操作,选择spring Initializr,默认选项,然后勾选上cache,其他的按照项目需要进行勾选)
2.提前准备环境
整个目录如图所示:
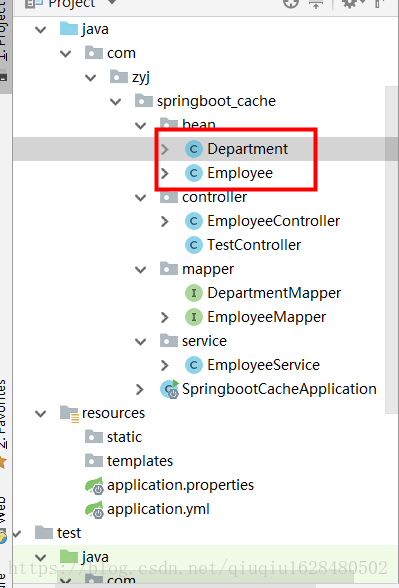
Department类
package com.zyj.springboot_cache.bean;

public class Department {


    private Integer id;
    private String departMentName;

    public Department(Integer id, String departMentName) {
        this.id = id;
        this.departMentName = departMentName;
    }

    public Department() {
    }

    @Override
    public String toString() {
        return "Department{" +
                "id=" + id +
                ", departMentName='" + departMentName + '\'' +
                '}';
    }

    public Integer getId() {
        return id;
    }

    public void setId(Integer id) {
        this.id = id;
    }

    public String getDepartMentName() {
        return departMentName;
    }

    public void setDepartMentName(String departMentName) {
        this.departMentName = departMentName;
    }
}
employee类
package com.zyj.springboot_cache.bean;

public class Employee {


    private Integer id;
    private String lastName;
    private String email;
    private Integer gender;
    private Integer dId;

    public Employee() {
    }

    @Override
    public String toString() {
        return "Employee{" +
                "id=" + id +
                ", lastName='" + lastName + '\'' +
                ", email='" + email + '\'' +
                ", gender=" + gender +
                ", dId=" + dId +
                '}';
    }

    public Integer getId() {
        return id;
    }

    public void setId(Integer id) {
        this.id = id;
    }

    public String getLastName() {
        return lastName;
    }

    public void setLastName(String lastName) {
        this.lastName = lastName;
    }

    public String getEmail() {
        return email;
    }

    public void setEmail(String email) {
        this.email = email;
    }

    public Integer getGender() {
        return gender;
    }

    public void setGender(Integer gender) {
        this.gender = gender;
    }

    public Integer getdId() {
        return dId;
    }

    public void setdId(Integer dId) {
        this.dId = dId;
    }

    public Employee(Integer id, String lastName, String email, Integer gender, Integer dId) {
        this.id = id;
        this.lastName = lastName;
        this.email = email;
        this.gender = gender;
        this.dId = dId;
    }
}
EmployeeController:
package com.zyj.springboot_cache.controller;

import com.zyj.springboot_cache.bean.Employee;
import com.zyj.springboot_cache.service.EmployeeService;
import org.springframework.beans.factory.annotation.Autowired;
import org.springframework.stereotype.Controller;
import org.springframework.web.bind.annotation.GetMapping;
import org.springframework.web.bind.annotation.PathVariable;
import org.springframework.web.bind.annotation.RequestMapping;
import org.springframework.web.bind.annotation.ResponseBody;

@Controller
public class EmployeeController {
    @Autowired
    EmployeeService employeeService;

    @GetMapping("/emp/{id}")
    @ResponseBody
    public Employee getEmpById(@PathVariable("id") Integer id) {
        Employee empById = employeeService.getEmpById(id);
        return empById;
    }

    @ResponseBody
    @GetMapping("/updateEmp")
    public Employee updateEmp(Employee employee) {
        System.out.println("方法执行。。。。");
        Employee employee1 = employeeService.updateEmp(employee);
        return employee1;
    }

    @RequestMapping("/delemp")
    public String delEmp(Integer id) {
        employeeService.del(id);
        return "success";
    }

    @RequestMapping("/emp/getEmpByLastName/{lastName}")
    @ResponseBody
    public Employee getEmpByLastName(@PathVariable(value = "lastName") String lastName) {
        System.out.println(lastName);
        return employeeService.getEmpByLastName(lastName);
    }
}
EmployeeMapper
package com.zyj.springboot_cache.mapper;

import com.zyj.springboot_cache.bean.Employee;
import org.apache.ibatis.annotations.*;

@Mapper
public interface EmployeeMapper {


    @Select("SELECT * FROM employee WHERE id = #{id}")
    public Employee getEmpById(Integer id);

    @Update("UPDATE employee SET lastName = #{lastName} ,email = #{email},gender = #{gender},dId = #{dId} where id=#{id}")
    public void updateEmp(Employee employee);

    @Delete("DELETE FROM employee WHERE id = #{id}")
    public void deleteEmp(Employee employee);

    @Insert("INSERT INTO employee (lastName,email,gender,dId) VALUES(#{lastName},#{email},#{gender},#{dId})")
    public void insertEmp(Employee employee);

    @Select("SELECT * FROM employee WHERE lastName = #{lastName}")
    Employee getEmpByLastName(String lastName);
}
举例:以上述练习为例:
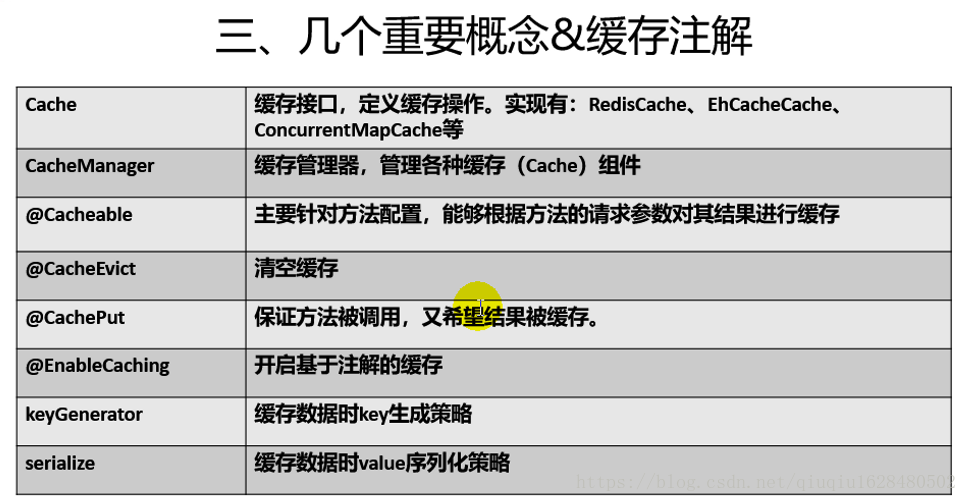
1.通过员工id获取员工信息(@Cacheable)
   @Cacheable(cacheNames = {

   "emp"})
    public Employee getEmpById(Integer id) {
        System.out.println("查询" + id + "号员工!");
        Employee empById = employeeMapper.getEmpById(id);
        return empById;
    }
查询一次之后,会看到控制台会有查询的输出,第二次再次查询,控制台没有进行查询的日志输出,说明这个是从缓存中取出来的,并没有查询数据库。
2.更新员工信息(@Cacheput)
 @CachePut(value = "emp", key = "#result.id")
    public Employee updateEmp(Employee employee) {
        System.out.println("updateEmployee:" + employee);
        employeeMapper.updateEmp(employee);
        System.out.println(employee);
        return employee;
}注意有key = “#result.id”,不添加的话他也会进行缓存,但是,与刚才我们存在缓存中的数据不是同一个key,所以当我们再次查询的时候查询的还是之前在缓存中的老数据,并没有得到更新,所以添加key制定与刚才存储的数据是一致的,保证数据与数据库中的数据是一样的。
3.清除缓存(@CacheEvict)
 @CacheEvict(value = "emp")
    public void del(Integer id) {
        System.out.println("删除id为" + id + "的员工");
   }
(1)首先进行查询员工号为1的数据,控制台打印查询信息,再次进行查询,控制台没有信息打印,说明已经进行缓存。
(2)此时进行数据的清除操作,删除员工(只是打印输出)
(3)再次进行查询,会看到又一次查询了数据库,证明刚才的数据已经被清除
4.@Caching
 @Caching(
            cacheable = {
                    @Cacheable(key = "#lastName")
            },
            put = {
                    @CachePut(key = "#result.id"),
                    @CachePut(key = "#result.email")
            }
    )
    public Employee getEmpByLastName(String lastName) {
        return employeeMapper.getEmpByLastName(lastName);
    }
(1)组合进行:发送请求
http://localhost:8080//emp/getEmpByLastName/zhangsan可以看到控制台进行输出
(2)此时已经进行了缓存,再次进行查询的操作
http://localhost:8080//emp/1(3)可以看到控制台并没有再次进行输出,说明这个时候已经被缓存起来了,再次进行:
http://localhost:8080//getEmpByEmail/123456(4)控制台也没有再次进行输出,说明cacheing缓存生效
感谢谷粒学院尚硅谷视频老师的讲解!!!