文章目录
1 mysql主从介绍
MySQL主从又叫做Replication、AB复制。简单讲就是A和B两台机器做主从后,在A上写数据,另外一台B也会跟着写数据,两者数据实时同步的
MySQL主从是基于binlog的,主上须开启binlog才能进行主从。
主从过程大致有3个步骤
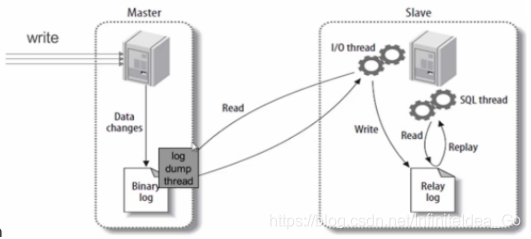
1)主将更改操作记录到binlog里
2)从将主的binlog事件(sql语句)同步到从本机上并记录在relaylog里
3)从根据relaylog里面的sql语句按顺序执行
主上有一个log dump线程,用来和从的I/O线程传递binlog
从上有两个线程,其中I/O线程用来同步主的binlog并生成relaylog,另外一个SQL线程用来把relaylog里面的sql语句落地
场景:数据备份(主机的数据库挂掉,从机提供服务),分担主机的数据库的压力,从机做读
原理图
2 准备工作
准备两台机器,都安装mysql
本实验以安装mysql5.6版本,以linux01机器为例安装
下载包:
[root@linux01 ~]cd /usr/local/src
[root@linux01 src]# wget http://mirrors.sohu.com/mysql/MySQL-5.6/mysql-5.6.39-linux-glibc2.5-x86_64.tar.gz
解压包:
[root@linux01 src]# tar zxvf mysql-5.6.39-linux-glibc2.5-x86_64.tar.gz
移动解压包到/usr/local/下
[root@linux01 src]# mv mysql-5.6.39-linux-glibc2.5-x86_64 /usr/local/mysql
[root@linux01 mysql]# cd /usr/local/mysql
创建mysql用户
[root@linux01 mysql]# useradd -M -s /sbin/nologin mysql //创建mysql不带家目录以及不登录
创建数据目录
[root@linux01 mysql]#mkdir /data/
初始化数据库
[root@linux01 mysql]#./scripts/mysql_install_db --user=mysql --datadir=/data/mysql
验证初始mysql是否成功
[root@linux01 mysql]# echo $?
0
[root@linux01 mysql]#cp support-files/my-default.cnf
/etc/my.cnf //进行修改my.cnf配置(只是简单配置做测试,系统默认在/etc/my.cnf这个配置文件,也可以直接使用)
[root@linux01 mysql]# vim /etc/my.cnf

# For advice on how to change settings please see
# http://dev.mysql.com/doc/refman/5.6/en/server-configuration-defaults.html
# *** DO NOT EDIT THIS FILE. It's a template which will be copied to the
# *** default location during install, and will be replaced if you
# *** upgrade to a newer version of MySQL.

[mysqld]

# Remove leading # and set to the amount of RAM for the most important data
# cache in MySQL. Start at 70% of total RAM for dedicated server, else 10%.
# innodb_buffer_pool_size = 128M

# Remove leading # to turn on a very important data integrity option: logging
# changes to the binary log between backups.
# log_bin

# These are commonly set, remove the # and set as required.
#basedir = .....
datadir = /data/mysql
port = 3306
# server_id = .....
socket = /tmp/mysql.sock

# Remove leading # to set options mainly useful for reporting servers.
# The server defaults are faster for transactions and fast SELECTs.
# Adjust sizes as needed, experiment to find the optimal values.
# join_buffer_size = 128M
# sort_buffer_size = 2M
# read_rnd_buffer_size = 2M

sql_mode=NO_ENGINE_SUBSTITUTION,STRICT_TRANS_TABLES
拷贝启动服务配置文件
[root@linux01 mysql]#cp support-files/mysql.server /etc/init.d/mysqld
[root@linux01 mysql]#vim /etc/init.d/mysqld
定义basedir和datadir
basedir=/usr/local/mysql
datadir=/data/mysql
启动mysql服务
[root@linux01 mysql]# /etc/init.d/mysqld start
Starting MySQL.Logging to '/data/mysql/linux01.err'.
SUCCESS!
[root@linux01 mysql]# netstat -lntp | grep 3306
tcp6       0      0 :::3306                 :::*                    LISTEN      1998/mysqld
这样就成功安装了
添加到开启启动:
[root@linux01 mysql]# chkconfig --add mysqld
[root@linux01 mysql]# chkconfig --level 345 mysqld on
[root@linux01 mysql]# service mysqld start
安装过程中出现的问题有:
1)[root@linux01 mysql]# ./scripts/mysql_install_db --user=mysql --datadir=/data/mysql --basedir=/usr/local/mysql
FATAL ERROR: please install the following Perl modules before executing ./scripts/mysql_install_db:
Data::Dumper
解决办法:
[root@linux01 mysql]# yum install -y perl-Data-Dumper
2)
[root@linux01 mysql]# ./scripts/mysql_install_db --user=mysql --datadir=/data/mysql --basedir=/usr/local/mysql
Installing MySQL system tables…/usr/local/mysql/bin/mysqld: error while loading shared libraries: libaio.so.1: cannot open shared object file: No such file or directory
解决办法:
[root@linux01 mysql]# yum install -y epel-release
[root@linux01 mysql]# yum install -y libaio-devel
3 配置主
修改my.cnf,增加server-id=111和log_bin=linux01
修改完配置文件后,启动或者重启mysqld服务
把mysql库备份并恢复成test库,作为测试数据
[root@linux01 src]# /usr/local/mysql/bin/mysql -uroot mysql > /tmp/mysql.sql
[root@linux01 src]# /usr/local/mysql/bin/mysql -uroot -e “create database test”
[root@linux01 src]# /usr/local/mysql/bin/mysql -uroot test
< /tmp/mysql.sql
如果存在已有的数据库,备份数据,准备导入到从机器,
mysqldump -uroot -p'password' databasename >/tmp/bak.sql
创建用作同步数据的用户
mysql>grant replication slave on *.* to 'repl'@slave_ip identified by 'password';
锁定主数据库服务
mysql>flush tables with read lock;
查看主数据库状态
mysql>show master status;
mysql> show master status;
+----------------+----------+--------------+------------------+-------------------+
| File           | Position | Binlog_Do_DB | Binlog_Ignore_DB | Executed_Gtid_Set |
+----------------+----------+--------------+------------------+-------------------+
| linux01.000005 |    17140 |              |                  |                   |
+----------------+----------+--------------+------------------+-------------------+
1 row in set (0.00 sec)
4 配置从
查看my.cnf,配置server-id=112,要求和主不一样
修改完配置文件后,启动或者重启mysqld服务
把主上test库同步到从上
可以先创建test库,然后把主上的/tmp/mysql.sql拷贝到从上,然后导入test库
[root@linux02 src]# /usr/local/mysql/bin/mysql -uroot
锁定从数据库服务
mysql>stop slave;
同步主数据库的状态和数据
mysql>change master to master_host='', master_user='repl', master_password='', master_log_file='', master_log_pos=xx,
例如:
mysql> change master to master_host='192.168.139.111', master_user='repl', master_password='123456', master_log_file='linux01.000005', master_log_pos=17140;
Query OK, 0 rows affected, 2 warnings (0.01 sec)

mysql>start slave;
Query OK, 0 rows affected (0.00 sec)
还要到主上执行 unlock tables
change master to master_host='192.168.139.100', master_user='repl', master_password='123456', master_log_file='worker1.000001', master_log_pos=574;
还可以指定通信端口,master_port=‘3306’
测试是否正常:
从上执行mysql -uroot
mysql> show slave stauts\G
看是否有
Slave_IO_Running: Yes
Slave_SQL_Running: Yes
还需关注
Seconds_Behind_Master: 0 //为主从延迟的时间
Last_IO_Errno: 0
Last_IO_Error:
Last_SQL_Errno: 0
Last_SQL_Error:
5 测试主从同步
主上 mysql -uroot test
mysql> select count(*) from db;

mysql> truncate table db;
到从上 mysql -uroot test
mysql> select count(*) from db;
主上继续drop table db;
从上查看db表