绝对布局
例如:
我们使用move()方法定位了每一个元素,使用x、y坐标。x、y坐标的原点是程序的左上角。
lbl1 = QLabel('Zetcode', self)
lbl1.move(15, 10)
盒布局
使用盒布局能让程序具有更强的适应性。这个才是布局一个应用的更合适的方式。QHBoxLayout和QVBoxLayout是基本的布局类,分别是水平布局和垂直布局。
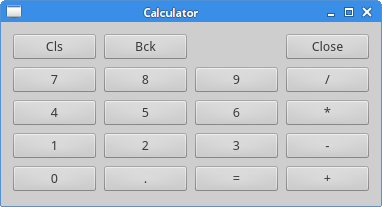
栅格布局
这种布局是把窗口分为行和列。创建和使用栅格布局,需要使用QGridLayout模块。
import sys
from PyQt5.QtWidgets import (QWidget, QGridLayout,
    QPushButton, QApplication)


class Example(QWidget): def __init__(self): super().__init__() self.initUI() def initUI(self): grid = QGridLayout() self.setLayout(grid) names = ['Cls', 'Bck', '', 'Close', '7', '8', '9', '/', '4', '5', '6', '*', '1', '2', '3', '-', '0', '.', '=', '+'] positions = [(i,j) for i in range(5) for j in range(4)] for position, name in zip(positions, names): if name == '': continue button = QPushButton(name) grid.addWidget(button, *position) self.move(300, 150) self.setWindowTitle('Calculator') self.show() if __name__ == '__main__': app = QApplication(sys.argv) ex = Example() sys.exit(app.exec_())
这个例子里,我们创建了栅格化的按钮。
grid = QGridLayout()
self.setLayout(grid)
创建一个QGridLayout实例,并把它放到程序窗口里。
names = ['Cls', 'Bck', '', 'Close',
        '7', '8', '9', '/',
        '4', '5', '6', '*',
        '1', '2', '3', '-',
        '0', '.', '=', '+']
这是我们将要使用的按钮的名称。
positions = [(i,j) for i in range(5) for j in range(4)]
创建按钮位置列表。
for position, name in zip(positions, names):

    if name == '':
        continue
    button = QPushButton(name)
    grid.addWidget(button, *position)
创建按钮,并使用addWidget()方法把按钮放到布局里面。
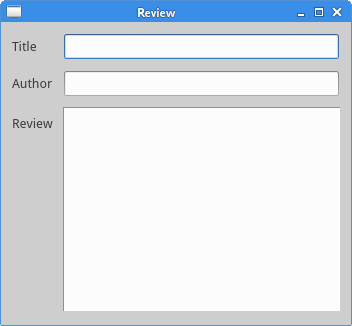
制作提交反馈信息的布局
import sys
from PyQt5.QtWidgets import (QWidget, QLabel, QLineEdit,
    QTextEdit, QGridLayout, QApplication)

class Example(QWidget): def __init__(self): super().__init__() self.initUI() def initUI(self): title = QLabel('Title') author = QLabel('Author') review = QLabel('Review') titleEdit = QLineEdit() authorEdit = QLineEdit() reviewEdit = QTextEdit() grid = QGridLayout() grid.setSpacing(10) grid.addWidget(title, 1, 0) grid.addWidget(titleEdit, 1, 1) grid.addWidget(author, 2, 0) grid.addWidget(authorEdit, 2, 1) grid.addWidget(review, 3, 0) grid.addWidget(reviewEdit, 3, 1, 5, 1) self.setLayout(grid) self.setGeometry(300, 300, 350, 300) self.setWindowTitle('Review') self.show() if __name__ == '__main__': app = QApplication(sys.argv) ex = Example() sys.exit(app.exec_()) 我们创建了一个有三个标签的窗口。两个行编辑和一个文版编辑,这是用QGridLayout模块搞定的。
grid = QGridLayout()
grid.setSpacing(10)
创建标签之间的空间。
grid.addWidget(reviewEdit, 3, 1, 5, 1)
我们可以指定组件的跨行和跨列的大小。这里我们指定这个元素跨5行显示。
程序预览: