临近考试,做一下简单的总结,巩固一下;
不能面面俱到,举的都是一些常用的基础例子;
二、常用控件篇
本文介绍了TextView,EditText,Button,RadioButton,CheckBox,ImageView,Dialog等常用交互控件;
TextView(文本框)
TextView文本框是个非常常用的控件,用于显示一些文本信息,继承于View;
常用属性
| 控件属性 | 功能描述 | 举例或取值 |
|---|---|---|
| android:text | 设置文本内容;推荐使用@string/取值; |
android:text=“demo” |
| android:textSize | 设置文本大小,推荐使用sp作为单位; |
android:textSize=“40sp” |
| android:textStyle | 设置文本的样式; | normal(普通)、bold(加粗)、italic(倾斜) |
| android:textColor | 设置文本颜色; | android:textStyle="#DECCDF" |
| android:gravity | 文本显示布局位置,可以使用|设置多个值; |
center、center_vertical、center_horizontal |
| android:maxLength | 设置文本最大长度; | android:maxLength=“10” |
| android:maxLines | 设置文本最大行数; | android:maxLines=“2” |
| … | … | … |
EditText(编辑框)
EditText文本编辑框用于接收用户输入信息,继承于TextView;
除了TextView的属性之外,还有一些常用属性如下表:
常用属性
| 控件属性 | 功能描述 | 举例或取值 |
|---|---|---|
| android:hint | 设置没有输入时的提示文本内容,当输入时提示文本消失; | android:hint=“请输入密码” |
| android:inputType | 限定输入格式; | none、textPassword、date |
| android:scrollHorizontally | 设置文本超出宽度后,是否出现横拉条 | true、false |
| android:singleLine | 设置单行显示 | true、false |
| … | … | … |
隐藏下划线
EditText默认是有输入的下划线,如果想要隐藏,可以设置
android:background="@null"即可;
Button(按钮)
Button按钮是开发中必不可少的一个控件,继承于TextView;
Button可以响应用户的点击事件,是程序更加流畅完整;
常用的Button点击事件监听响应有3种:

常用点击事件监听方法
1.onClick属性
在xml布局文件中定义Button的时候,可以设置android:onClick属性,它的值是一个字符串,对应Activity要定义相同名称的方法,否则找不到绑定的点击事件;
定义Button
<Button
    android:id="@+id/btn1"
    android:layout_width="wrap_content"
    android:layout_height="wrap_content"
    android:text="@string/btn1"
    android:onClick="btn1_click"
    />
定义方法
/**
 *	方法名一定要和对应Button按钮的android:onClick的值相同
 */
public void btn1_click(View view) {
    Toast.makeText(this,"btn1被点击",Toast.LENGTH_SHORT).show();
}
这样Android系统就会找到相应的按钮点击响应方法,触发点击事件;
2.匿名内部类
除了设置onClick属性,我们还可以使用匿名内部类的方法来作为监听器,实现对点击事件的监听;
定义Button
<Button
    android:id="@+id/btn2"
    android:layout_width="wrap_content"
    android:layout_height="wrap_content"
    android:text="@string/btn2"
    />
初始化Button,并点添加点击事件监听
在Activity里
/*
 * 定义一个Button
 */
private Button btn2;

@Override
protected void onCreate(Bundle savedInstanceState) {
    super.onCreate(savedInstanceState);
    setContentView(R.layout.demo_layout);
	/*
 	 * 与控件绑定
	 */
	btn2 = findViewById(R.id.btn2);
	/*
 	 * 使用匿名内部类实现点击事件
 	 */
	btn2.setOnClickListener(new View.OnClickListener() {
  	 	@Override
   		public void onClick(View v) {
        	Log.i(TAG, "onClick: btn2被点击");
    	}
	});
}
两种方式都适合按钮较少的情况,匿名内部类的方式更加常用;
但当按钮比较多的时候,为每个按钮都使用匿名内部类就显得麻烦了,为了解决这个问题,我们可以使用第三种点击事件;
3.当前Activity实现OnClickListener接口
定义Button
<Button
    android:id="@+id/btn1"
    android:layout_width="wrap_content"
    android:layout_height="wrap_content"
    android:text="@string/btn1"
    />
<Button
    android:id="@+id/btn2"
    android:layout_width="wrap_content"
    android:layout_height="wrap_content"
    android:layout_below="@id/btn1"
    android:text="@string/btn2"
    />
<Button
    android:id="@+id/btn3"
    android:layout_width="wrap_content"
    android:layout_height="wrap_content"
    android:layout_below="@id/btn2"
    android:text="@string/btn3"
    />
实现OnClickListener接口
public class MainActivity extends AppCompatActivity implements View.OnClickListener{

    @Override
    protected void onCreate(Bundle savedInstanceState) {
        super.onCreate(savedInstanceState);
        setContentView(R.layout.demo_layout);
    }

    /**
     * 重写OnClickListener的onClick方法
     * @param v
     */
    @Override
    public void onClick(View v) {

    }
}
初始化Button,并添加点击事件监听
public class MainActivity extends AppCompatActivity implements View.OnClickListener{
    private Button btn1;
    private Button btn2;
    private Button btn3;

    @Override
    protected void onCreate(Bundle savedInstanceState) {
        super.onCreate(savedInstanceState);
        setContentView(R.layout.demo_layout);
        init();
    }
    /*
     * 自定义初始化函数
     */
    private void init(){
        /*
         * 与控件绑定
         */
        btn1 = findViewById(R.id.btn1);
        btn2 = findViewById(R.id.btn2);
        btn3 = findViewById(R.id.btn3);
        /*
         * 设置监听器
         * 因为Activity实现了OnClickListener接口,所以这里this表示为OnClickListener的引用
         */
        btn1.setOnClickListener(this);
        btn2.setOnClickListener(this);
        btn3.setOnClickListener(this);
    }

    /**
     * 重写OnClickListener的onClick方法
     * @param v
     */
    @Override
    public void onClick(View v) {
        /*
         * switch case语句根据ID来判断哪个按钮被点击
         */
        switch (v.getId()){
            case R.id.btn1:
                Toast.makeText(this,"btn1被点击",Toast.LENGTH_SHORT).show();
                break;
            case R.id.btn2:
                Toast.makeText(this,"btn2被点击",Toast.LENGTH_SHORT).show();
                break;
            case R.id.btn3:
                Toast.makeText(this,"btn3被点击",Toast.LENGTH_SHORT).show();
                break;
        }
    }
}
三种方式各有优劣,比较常用的是匿名内部类和实现OnClickListener接口;
还有一种是创建内部类的方式,这个不太常用,有兴趣可以自行了解;
RadioButton(单选按钮)
在开发设计中,我们经常会用到单选选项,这时就要用到RadioButton了;
它是单选按钮,需要和RadioGroup配合使用,一个RadioButton组可以容纳多个RadioButton按钮,并把它们组合在一起,来实现单选状态;
定义一个性别单选框
<RadioGroup
    android:id="@+id/group1"
    android:layout_width="wrap_content"
    android:layout_height="wrap_content"
    >
    <RadioButton
        android:id="@+id/btn_man"
        android:layout_width="wrap_content"
        android:layout_height="wrap_content"
        android:text="@string/man"
        />
    <RadioButton
        android:id="@+id/btn_woman"
        android:layout_width="wrap_content"
        android:layout_height="wrap_content"
        android:text="@string/woman"
        />
</RadioGroup>
常用属性设置
1.排列方向
单选组默认是垂直排列的,如果想改变排列方向,可以设置android:orientation属性
水平排列:horizontal
垂直排列:vertical
<RadioGroup
    android:id="@+id/group1"
    android:layout_width="wrap_content"
    android:layout_height="wrap_content"
    android:layout_below="@id/relayout1"
    android:orientation="horizontal"
    >
2.默认选中
如果想添加默认选中状态,可以使用android:checked属性;
比如默认选中男,则可以将android:checked设置成true即可;
<RadioButton
    android:id="@+id/btn_man"
    android:layout_width="wrap_content"
    android:layout_height="wrap_content"
    android:checked="true"
    android:text="@string/man"
	/>
单选框点击事件的监听
有时候我们需要监听单选框的选择状态来响应不同的操作,那么就可以使用RadioGroup.OnCheckedChangeListener接口,使用方法类似于Button按钮;
这里我们也推荐使用匿名内部类的方式;
在Activity里
/*
 * 定义一个RadioGroup
 */
private RadioGroup radioGroup;

@Override
protected void onCreate(Bundle savedInstanceState) {
    super.onCreate(savedInstanceState);
    setContentView(R.layout.demo_layout);
	/*
 	 * 与控件绑定
	 */
	radioGroup = findViewById(R.id.group1);
	/*
 	 * 使用匿名内部类实现点击事件
 	 */
	radioGroup.setOnCheckedChangeListener(new RadioGroup.OnCheckedChangeListener() {
        @Override
        public void onCheckedChanged(RadioGroup group, int checkedId) {
            /*
             * 根据Id判断选择的结果
             */
            if (checkedId == R.id.btn_man) {
                textView.setText("选择结果是:男");
            } else {
                textView.setText("选择结果是:女");
            }
        }
    });
}
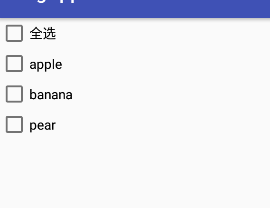
CheckBox(复选框)
说完了单选框,接下来就要说一说复选框了;
CheckBox复选框也是在我们开发时经常使用的一个控件,它继承于CompoundButton,而CompoundButton又继承Button;
举个简单例子,介绍CheckBox的基本的定义、属性以及点击事件的监听;
布局文件
<?xml version="1.0" encoding="utf-8"?>
<RelativeLayout xmlns:android="http://schemas.android.com/apk/res/android"
    android:layout_width="match_parent"
    android:layout_height="match_parent"
    >
    <CheckBox
        android:id="@+id/checkbox1"
        android:layout_width="wrap_content"
        android:layout_height="wrap_content"
        android:text="@string/all"
        />
    <RelativeLayout
        android:id="@+id/relayout1"
        android:layout_width="wrap_content"
        android:layout_height="wrap_content"
        android:layout_below="@id/checkbox1"
        >
        <CheckBox
            android:id="@+id/checkbox2"
            android:layout_width="wrap_content"
            android:layout_height="wrap_content"
            android:text="@string/apple"
            />
        <CheckBox
            android:id="@+id/checkbox3"
            android:layout_width="wrap_content"
            android:layout_height="wrap_content"
            android:layout_below="@id/checkbox2"
            android:text="@string/banana"
            />
        <CheckBox
            android:id="@+id/checkbox4"
            android:layout_width="wrap_content"
            android:layout_height="wrap_content"
            android:layout_below="@id/checkbox3"
            android:text="@string/pear"
            />
    </RelativeLayout>

</RelativeLayout>
效果如下
Activity文件
import android.support.v7.app.AppCompatActivity;
import android.os.Bundle;
import android.widget.CheckBox;
import android.widget.CompoundButton;
import android.widget.RelativeLayout;

/**
 * 实现CompoundButton.OnCheckedChangeListener接口
 */
public class MainActivity extends AppCompatActivity implements
        CompoundButton.OnCheckedChangeListener{

    private static final String TAG = "MainActivity";

    /*
     * 定义控件
     */
    private CheckBox checkBox1;
    private CheckBox checkBox2;
    private CheckBox checkBox3;
    private CheckBox checkBox4;
    private RelativeLayout relativeLayout;

    @Override
    protected void onCreate(Bundle savedInstanceState) {
        super.onCreate(savedInstanceState);
        setContentView(R.layout.demo_layout);
        init();
    }

    /*
     * 自定义初始化函数
     */
    private void init(){
        /*
         * 绑定控件
         */
        checkBox1 = findViewById(R.id.checkbox1);
        checkBox2 = findViewById(R.id.checkbox2);
        checkBox3 = findViewById(R.id.checkbox3);
        checkBox4 = findViewById(R.id.checkbox4);
        /**
          *	这个为包裹2、3、4复选框的父布局,方便后面遍历
          */
        relativeLayout = findViewById(R.id.relayout1);
        /*
         * 为复选框设置监听器
         */
        checkBox1.setOnCheckedChangeListener(this);
        checkBox2.setOnCheckedChangeListener(this);
        checkBox3.setOnCheckedChangeListener(this);
        checkBox4.setOnCheckedChangeListener(this);
    }


    /*
     * 重写onCheckedChanged方法
     * @param buttonView
     * @param isChecked
     */
    @Override
    public void onCheckedChanged(CompoundButton buttonView, boolean isChecked) {
        switch (buttonView.getId()){
            case R.id.checkbox1:
                if (isChecked) {
                    if (!isAllChecked()){
                        setAllCheck();
                    }
                } else {
                    if (isAllChecked()) {
                        removeAllChecked();
                    }
                }
                break;
            case R.id.checkbox2:
                if (isAllChecked() && !checkBox1.isChecked()){
                    checkBox1.setChecked(true);
                } else if(!isAllChecked() && checkBox1.isChecked()){
                    checkBox1.setChecked(false);
                }
                break;
            case R.id.checkbox3:
                if (isAllChecked() && !checkBox1.isChecked()){
                    checkBox1.setChecked(true);
                } else if(!isAllChecked() && checkBox1.isChecked()){
                    checkBox1.setChecked(false);
                }
                break;
            case R.id.checkbox4:
                if (isAllChecked() && !checkBox1.isChecked()){
                    checkBox1.setChecked(true);
                } else if(!isAllChecked() && checkBox1.isChecked()){
                    checkBox1.setChecked(false);
                }
                break;
            default:
                break;
        }
    }

    /*
     * 自定义函数,判断是否全被选中
     * @return
     */
    private boolean isAllChecked(){
        /**
          *	获得当前布局里所有子控件的个数
          */
        int n = relativeLayout.getChildCount();
        /**
          *	遍历这3个复选框,查看状态
          */
        for (int i = 0; i < n; i++) {
            CheckBox checkBox = (CheckBox)relativeLayout.getChildAt(i);
            if (!checkBox.isChecked()){
                return false;
            }
        }
        return true;
    }

    /*
     * 将所有复选框设置选中状态
     */
    private void setAllCheck(){
        int n = relativeLayout.getChildCount();
        for (int i = 0; i < n; i++) {
            CheckBox checkBox = (CheckBox)relativeLayout.getChildAt(i);
            if (!checkBox.isChecked()){
                checkBox.setChecked(true);
            }
        }
    }

    /*
     * 取消所有选中状态
     */
    private void removeAllChecked(){
        int n = relativeLayout.getChildCount();
        for (int i = 0; i < n; i++) {
            CheckBox checkBox = (CheckBox)relativeLayout.getChildAt(i);
            if (checkBox.isChecked()){
                checkBox.setChecked(false);
            }
        }
    }

}
代码解释
这里我们采用实现CompoundButton.OnCheckedChangeListener接口的方法,对每一个CheckBox的点击事件进行监听;
功能都有注释,实现逻辑请自行从代码中领悟啦;
ImageView(视图控件)
ImageView视图控件继承于View,用于显示图像;
它可以从各种来源加载图像,比如本地资源或者网络,并提供缩放、裁剪、渲染等功能;
其中使用
android:background来指定背景图片;
android:src来指定一张前景图片;
Dialog(对话框)
对话框是程序和用户交互的重要手段之一,接下来介绍几种常用的对话框;
注意:
导包:import android.support.v7.app.AlertDialog;
因为 Android 碎片化的原因,推荐使用V7包中的AlertDialog达到高低版本统一样式的效果。
普通对话框(setMessage)
void alertDialog1(){
    AlertDialog dialog;
    dialog = new AlertDialog.Builder(this).setTitle("提示")
            .setMessage("这是一个普通对话框")
            .setPositiveButton("确定",null)
            .setNegativeButton("取消",null)
            .setNeutralButton("这是哪一个",null)
            .create();
    dialog.show();
}
效果
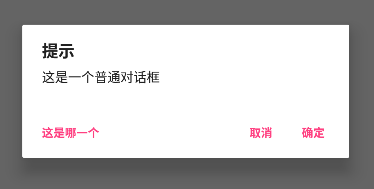
如果只想要一个或两个按钮,那么只需要将对应按钮的set方法去掉即可;
如果想要对按钮添加点击事件监听,可以在对应按钮的set方法第二个参数,设置一个DialogInterface.OnClickListener监听器接口,并重写onClick方法;
例如,添加对NeutralButton"这是哪一个"按钮的监听
void alertDialog1(){
    AlertDialog dialog;
    dialog = new AlertDialog.Builder(this).setTitle("提示")
            .setMessage("这是一个普通对话框")
            .setPositiveButton("确定",null)
            .setNegativeButton("取消",null)
            .setNeutralButton("这是哪一个", new DialogInterface.OnClickListener() {
                @Override
                public void onClick(DialogInterface dialog, int which) {
                    Log.i(TAG, "onClick: 这是哪一个被点击!");
                    dialog.dismiss();
                }
            })
            .create();
    //  不要忘记show来显示对话框
    dialog.show();
}
效果

单选对话框(setSingleChoiceItems)
单选框作用和RadioButton类似,这里通过调用setSingleChoiceItems方法实现;
而单选框的监听则也是通过 DialogInterface.OnClickListener监听器接口,重写onClick方法;
void alertDialog2(){
    AlertDialog alertDialog;
    //	如果不使用全局变量,则必须定义成final类型才能传参
    final String[] str =  {"apple", "banana","pear","orange"};
    alertDialog = new AlertDialog.Builder(this).setTitle("单项选择")
        	//	第一个参数是选项数组,第二个参数是默认被选中选项的下标值(-1表示不设置默认选中),第三个是监听器
            .setSingleChoiceItems(str, -1, new DialogInterface.OnClickListener() {
                @Override
                public void onClick(DialogInterface dialog, int which) {
                    //  全局变量index,记录被选中的单选按钮的下标值
                    index = which;
                }
            })
            .setPositiveButton("确定", new DialogInterface.OnClickListener() {
                @Override
                public void onClick(DialogInterface dialog, int which) {
                    Log.i(TAG, "onClick: 选择的结果是:"+str[index]);
                    dialog.dismiss();
                }
            })
            .setNegativeButton("取消",null)
            .create();
    alertDialog.show();
}
效果


多选对话框(setMultiChoiceItems)
多选对话框使用setMultiChoiceItems方法即可实现;
多选框的的监听通过使用DialogInterface.OnMultiChoiceClickListener接口监听状态改变,并重写onClick方法;
//	flags 为全局布尔类型数组变量,定义 private boolean[] flags ={false,false,false,false};
void alertDialog3(){
    AlertDialog alertDialog;
    final String[] str =  {"apple", "banana","pear","orange"};
    alertDialog = new AlertDialog.Builder(this).setTitle("多项选择")
        	//	第一个参数为选项,第二个参数为默认选中选项的选中状态数组(应该与选项数组长度一致),第三个参数为监听器
            .setMultiChoiceItems(str, flags, new DialogInterface.OnMultiChoiceClickListener() {
                @Override
                public void onClick(DialogInterface dialog, int which, boolean isChecked) {
                    //	第which个选项被点击,状态改为isChecked,使用全局数组flags记录
                    flags[which] = isChecked;
                }
            })
            .setPositiveButton("确定", new DialogInterface.OnClickListener() {
                @Override
                public void onClick(DialogInterface dialog, int which) {
                    //	拼接最终选项结果
                    StringBuilder res = new StringBuilder();
                    for (int i = 0; i < 4; i++) {
                        //	根据每一个选项的选中状态进行判断
                        if (flags[i]){
                            res.append(str[i]).append("  ");
                        }
                    }
                    Log.i(TAG, "onClick: 选择的结果是:"+res.toString());
                    dialog.dismiss();
                }
            }).create();
    alertDialog.show();
}
效果


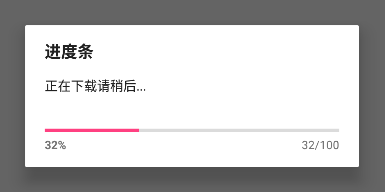
进度条对话框(ProgressDialog)
当我们进行一下载操作时,可以使用进度条对话框来让用户了解下载进度。
void alertDialog4(){
    final ProgressDialog progressDialog;
    progressDialog = new ProgressDialog(this);
    progressDialog.setTitle("进度条");
    progressDialog.setMessage("正在下载请稍后...");
    //	设置进度条的风格为水平进度条
    progressDialog.setProgressStyle(ProgressDialog.STYLE_HORIZONTAL);
    progressDialog.show();
    new Thread(new Runnable() {
        @Override
        public void run() {
            int i = 0;
            while (i < 100) {
                try {
                    Thread.sleep(200);
                    // 更新进度条的进度,可以在子线程中更新进度条进度
                    progressDialog.incrementProgressBy(1);
                    // progressDialog.incrementSecondaryProgressBy(10)//二级进度条更新方式
                    i++;
                } catch (Exception e) {
                }
            }
            // 在进度条走完时删除Dialog
            progressDialog.dismiss();
        }
    }).start();
}
效果
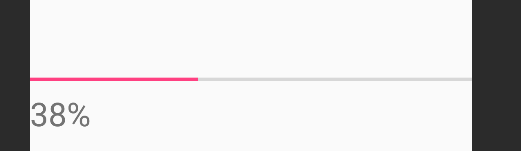
ProgressBar的使用
在API level 26 中,ProgressDialog被声明不赞成使用,应使用的替代方法是ProgressBar
ProgressBar是一个可以嵌入到应用程序的用户界面中的组件,实现进度显示;
xml文件
<?xml version="1.0" encoding="utf-8"?>
<RelativeLayout xmlns:android="http://schemas.android.com/apk/res/android"
    android:layout_width="match_parent"
    android:layout_height="match_parent"
    >
    <ProgressBar
        android:id="@+id/pBar1"
        android:layout_width="match_parent"
        android:layout_height="30dp"
        style="@style/Base.Widget.AppCompat.ProgressBar.Horizontal"
        android:layout_centerInParent="true"
        />
    <TextView
        android:id="@+id/bar_text"
        android:layout_width="wrap_content"
        android:layout_height="wrap_content"
        android:hint="@string/barText"
        android:layout_below="@id/pBar1"
        android:textSize="40sp"
        />
</RelativeLayout>
java文件
private void init2(){
    textView = findViewById(R.id.bar_text);
    progressBar = findViewById(R.id.pBar1);
    new Thread(new Runnable() {
        @Override
        public void run() {
            int i=0;
            while(i<100){
                i++;
                try {
                    Thread.sleep(80);
                } catch (InterruptedException e) {
                    e.printStackTrace();
                }
                final int j=i;
                progressBar.setProgress(i);
                /*
                 *	使用Activity.runOnUiThread(Runnable)把更新ui的代码创建在Runnable中,
                 *	然后在需要更新ui时,把这个Runnable对象传给Activity.runOnUiThread(Runnable)。
                 *	这样Runnable对像就能在ui程序中被调用。如果当前线程是UI线程,那么行动是立即执行。
                 *	如果当前线程不是UI线程,操作是发布到事件队列的UI线程
                 */
                runOnUiThread(new Runnable() {
                    @SuppressLint("SetTextI18n")
                    @Override
                    public void run() {
                        textView.setText(j+"%");
                        if (j==100){
                            //  下载完成后,进度条隐藏
                            progressBar.setVisibility(View.GONE);
                        }
                    }
                });
            }

        }
    }).start();
}
效果
后记
例子都举完啦,实现嘛还需要大家多动手试一试,熟能生巧;
另外,还有两个最常用、功能强大,但实现比较复杂的控件:ListView和RecyclerView,我准备下一篇单独总结;
有问题欢迎评论或者联系我,看到了会及时回复的;
邮箱:[email protected]