Redis-Cluster简介
什么是Redis-Cluster
为何要搭建Redis集群。Redis是在内存中保存数据的,而我们的电脑一般内存都不大,这也就意味着Redis不适合存储大数据,适合存储大数据的是Hadoop生态系统的Hbase或者是MogoDB。Redis更适合处理高并发,一台设备的存储能力是很有限的,但是多台设备协同合作,就可以让内存增大很多倍,这就需要用到集群。
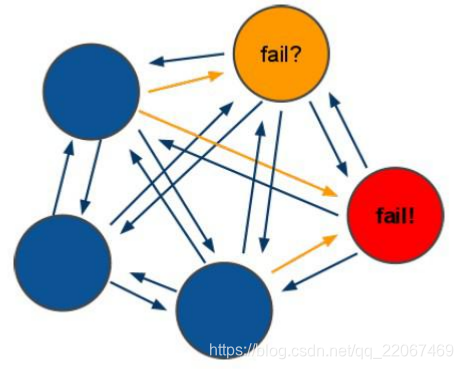
Redis集群搭建的方式有多种,例如使用客户端分片、Twemproxy、Codis等,但从redis 3.0之后版本支持redis-cluster集群,它是Redis官方提出的解决方案,Redis-Cluster采用无中心结构,每个节点保存数据和整个集群状态,每个节点都和其他所有节点连接。其redis-cluster架构图如下:

客户端与 redis 节点直连,不需要中间 proxy 层。客户端不需要连接集群所有节点连接集群中任何一个可用节点即可。
所有的 redis 节点彼此互联(PING-PONG 机制),内部使用二进制协议优化传输速度和带宽。
分布存储机制-槽
1、redis-cluster 把所有的物理节点映射到[0-16383]slot上,cluster 负责维护
node<->slot<->value
2、Redis 集群中内置了 16384 个哈希槽,当需要在 Redis 集群中放置一个 key-value 时,redis 先对 key 使用 crc16 算法算出一个结果,然后把结果对 16384 求余数,这样每个key 都会对应一个编号在 0-16383 之间的哈希槽,redis 会根据节点数量大致均等的将哈希槽映射到不同的节点。
例如三个节点:槽分布的值如下
- SERVER1:0-5460
- SERVER2:5461-10922
- SERVER3:10923-16383
容错机制-投票
1、选举过程是集群中所有master参与,如果半数以上master节点与故障节点通信超过(cluster-node-timeout),认为该节点故障,自动触发故障转移操作,故障节点对应的从节点自动升级为主节点。
2、什么时候整个集群不可用(cluster_state:fail)?
如果集群任意master挂掉,且当前master没有slave,集群进入fail状态,也可以理解成集群的slot映射[0-16383]不完成时进入fail状态。
搭建Redis-Cluster
搭建要求
- 需要 6 台 redis服务器。本次搭建同样是使用伪集群的方式。
- 需要 6 个 redis实例。
- 需要运行在不同的端口,本次端口为 7001-7006
准备工作
1、安装 gcc
因为安装reids需要通过源码安装的方式,redis是C言语开发的。redis需要C语言的编译环境。如果没有 gcc 需要在线安装。
yum install gcc-c++
2、使用yum命令安装 ruby
我们需要使用ruby脚本来实现集群搭建
yum install ruby
yum install rubygems
3、下载redis源码包
如果网络不好可以先下载好后,在上传到服务器。
wget http://download.redis.io/releases/redis-5.0.0.tar.gz
4、编译redis源码,进入redis源码文件夹。
tar -xvzf redis-5.0.0.tar.gz
cd redis-5.0.0
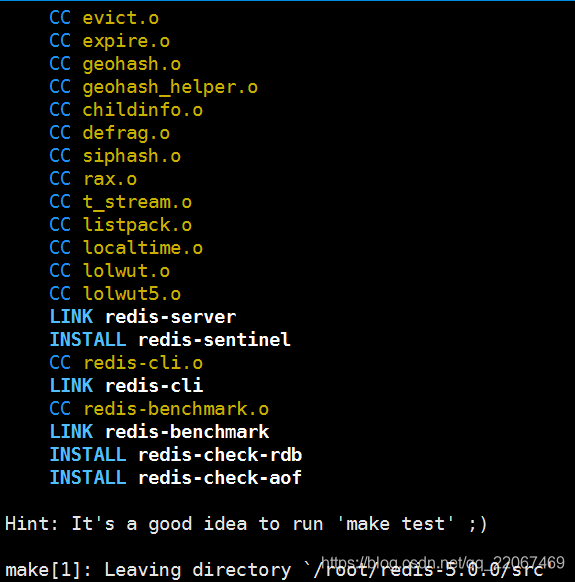
make
看到以下输出结果,表示编译成功
5、创建目录 /usr/local/redis-cluster,安装6个redis实例,分别安装在以下目录
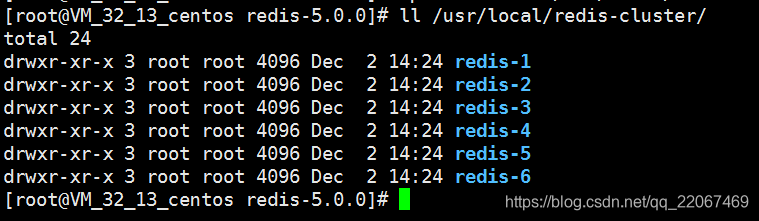
以第一个 redis 实例为例,命令如下
make install PREFIX=/usr/local/redis-cluster/redis-1

出现此提示表示安装成功,按此方法安装其余5个redis实例。
6、复制配置文件 将/redis-5.0.0/redis.conf复制到redis下的bin目录下。
cp redis.conf /usr/local/redis-cluster/redis-1/bin
cp redis.conf /usr/local/redis-cluster/redis-2/bin
cp redis.conf /usr/local/redis-cluster/redis-3/bin
cp redis.conf /usr/local/redis-cluster/redis-4/bin
cp redis.conf /usr/local/redis-cluster/redis-5/bin
cp redis.conf /usr/local/redis-cluster/redis-6/bin
配置集群
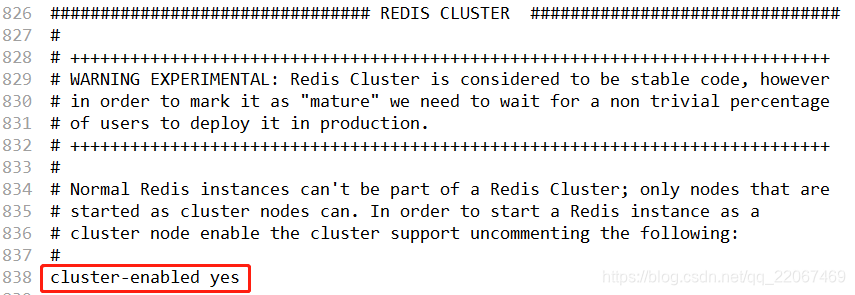
1、修改每个redis节点下的配置文件 redis.conf
- 把 bind 127.0.0.1注释掉(# bind 127.0.0.1)如果不注释则外部无法连接到redis,如果不注释掉只是本机可以访问
- 修改端口为 8001-8006
- 将cluster-enabled yes 前的注释去掉(我这边是在838行具体的根据实际情况查找)


2、启动每个redis实例
以第一个为例
cd /usr/local/redis-cluster/redis-1/bin/
./redis-server redis.conf
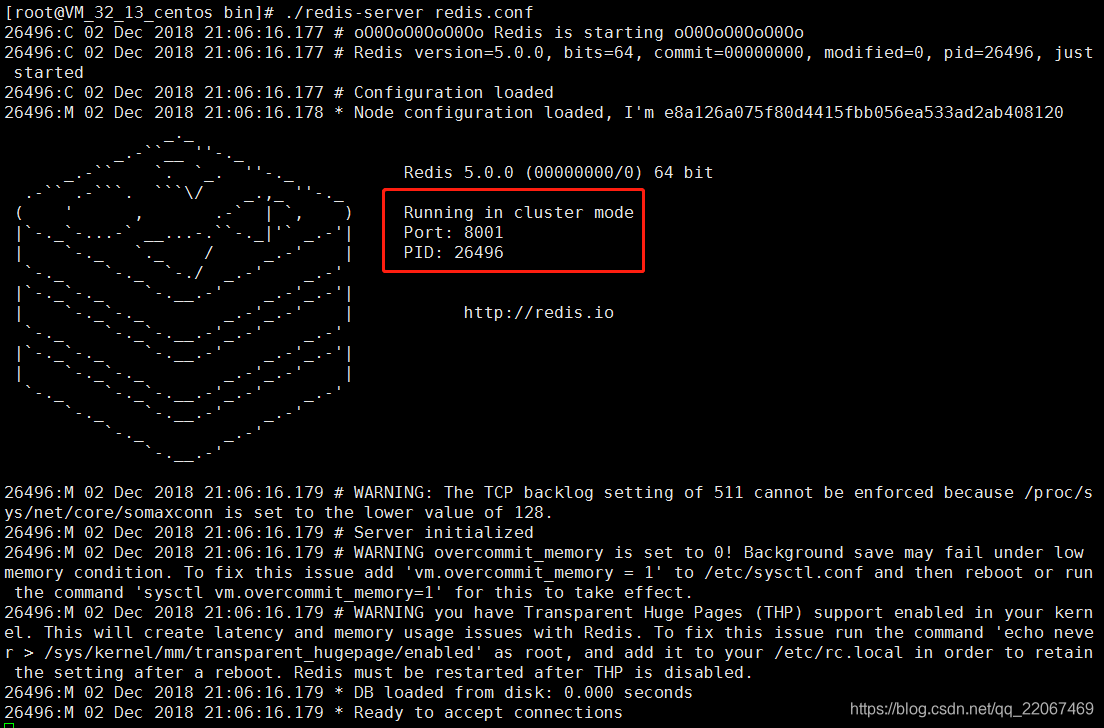
把其余5个启动好,检查是否成功启动了

3、上传 redis-3.0.0.gem,安装 ruby用于搭建redis集群的脚本。

如果提示command not found,请先安装gem,准备工作2有安装步骤
4、使用 ruby 脚本搭建集群
进入 redis源码目录中 redis5.0.0/src目录执行下面命令
./redis-trib.rb create --replicas 1 119.29.181.129:8001 119.29.181.129:8002 119.29.181.129:8003 119.29.181.129:8004 119.29.181.129:8005 119.29.181.129:8006
执行./redis-trib.rb出现错误
redis-trib.rb:6: odd number list for Hash
        white: 29,
              ^
redis-trib.rb:6: syntax error, unexpected ':', expecting '}'
        white: 29,
              ^
redis-trib.rb:7: syntax error, unexpected ',', expecting kEND
原因是因为我的gem版本太低了
[root@VM_32_13_centos src]# gem -v
1.3.7
直接用yum安装的话可以是由于源的原因,导致安装的版本太低了,这里到官网下载了一个 ruby-2.4.5.tar.gz的版本 ,上传到服务器,ruby-2.4.5.tar.gz下载地址
tar -xvzf ruby-2.4.5.tar.gz
cd ruby-2.4.5
./configure
make
make install
成功安装
ln -s /usr/local/bin/ruby /usr/bin/ruby
ruby -v
ruby 2.4.5p335 (2018-10-18 revision 65137) [x86_64-linux]
安装成功后再次执行命令
./redis-trib.rb create --replicas 1 119.29.181.129:8001 119.29.181.129:8002 119.29.181.129:8003 119.29.181.129:8004 119.29.181.129:8005 119.29.181.129:8006
再次提示警告
WARNING: redis-trib.rb is not longer available!
You should use redis-cli instead.

All commands and features belonging to redis-trib.rb have been moved
to redis-cli.
In order to use them you should call redis-cli with the --cluster
option followed by the subcommand name, arguments and options.

Use the following syntax:
redis-cli --cluster SUBCOMMAND [ARGUMENTS] [OPTIONS]

Example:
redis-cli --cluster create 119.29.181.129:8001 119.29.181.129:8002 119.29.181.129:8003 119.29.181.129:8004 119.29.181.129:8005 119.29.181.129:8006 --cluster-replicas 1

To get help about all subcommands, type:
redis-cli --cluster help
goole 翻译出
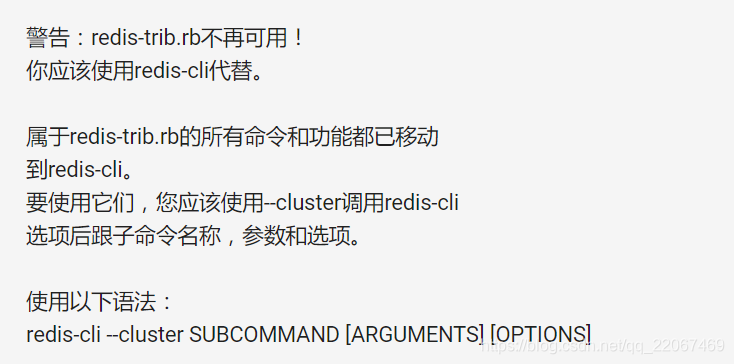
原因是因为 redis5.0.0版本的redis-trib.rb替换成了redis-cli。
提示的总没错照着再次执行命令
./redis-cli --cluster create 119.29.181.129:8001 119.29.181.129:8002 119.29.181.129:8003 119.29.181.129:8004 119.29.181.129:8005 119.29.181.129:8006 --cluster-replicas 1
结果又出现错误
[ERR] Node 119.29.181.129:8001 DENIED Redis is running in protected mode because protected mode is enabled, no bind address was specified, no authentication password is requested to clients. In this mode connections are only accepted from the loopback interface. If you want to connect from external computers to Redis you may adopt one of the following solutions: 1) Just disable protected mode sending the command 'CONFIG SET protected-mode no' from the loopback interface by connecting to Redis from the same host the server is running, however MAKE SURE Redis is not publicly accessible from internet if you do so. Use CONFIG REWRITE to make this change permanent. 2) Alternatively you can just disable the protected mode by editing the Redis configuration file, and setting the protected mode option to 'no', and then restarting the server. 3) If you started the server manually just for testing, restart it with the '--protected-mode no' option. 4) Setup a bind address or an authentication password. NOTE: You only need to do one of the above things in order for the server to start accepting connections from the outside.
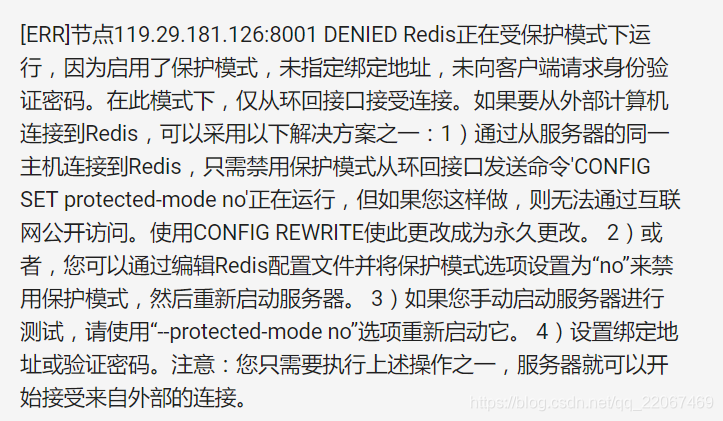
提示说叫我执行 config set protected-mode no ,由于现在是受保护状态,需要禁用保护模式。
没办法只能照做,执行下命令
./redis-cli -p 8001
config set protected-mode no
./redis-cli -p 8002
config set protected-mode no
./redis-cli -p 8003
config set protected-mode no
./redis-cli -p 8004
config set protected-mode no
./redis-cli -p 8005
config set protected-mode no
./redis-cli -p 8006
config set protected-mode no
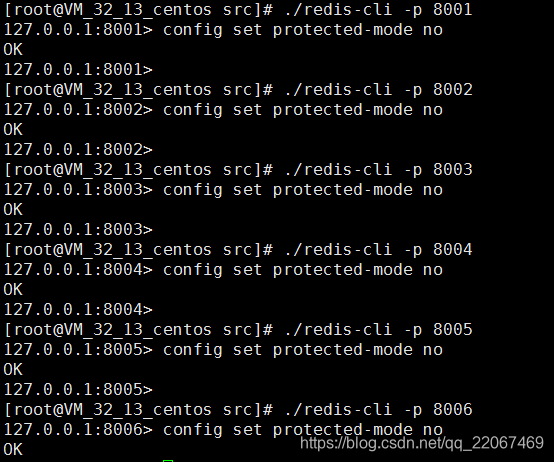
注意,这里修改之后只是暂时有效,重启之后保护模式以将开启,如果需要永久禁用保护模式,需要修改配置,protected-mode yes改为protected-mode no。(不建议)

经过一翻折腾继续执行命令
./redis-cli --cluster create 119.29.181.129:8001 119.29.181.129:8002 119.29.181.129:8003 119.29.181.129:8004 119.29.181.129:8005 119.29.181.129:8006 --cluster-replicas 1
这次终于执行成功
>>> Performing hash slots allocation on 6 nodes...
Master[0] -> Slots 0 - 5460
Master[1] -> Slots 5461 - 10922
Master[2] -> Slots 10923 - 16383
Adding replica 119.29.181.129:8004 to 119.29.181.129:8001
Adding replica 119.29.181.129:8005 to 119.29.181.129:8002
Adding replica 119.29.181.129:8006 to 119.29.181.129:8003
>>> Trying to optimize slaves allocation for anti-affinity
[WARNING] Some slaves are in the same host as their master
M: e8a126a075f80d4415fbb056ea533ad2ab408120 119.29.181.129:8001
   slots:[0-5460] (5461 slots) master
M: b6a692d9cc595ad3116227b236b4ead32286bc16 119.29.181.129:8002
   slots:[5461-10922] (5462 slots) master
M: f74e7cdc51ae957b2487d71feaf9b41c4a5f85b2 119.29.181.129:8003
   slots:[10923-16383] (5461 slots) master
S: 9721ff89484e5d860d72c47d9aee6e98993e7c10 119.29.181.129:8004
   replicates b6a692d9cc595ad3116227b236b4ead32286bc16
S: 2823bd01ac5a27853ad01a0a071776fd615d3c71 119.29.181.129:8005
   replicates f74e7cdc51ae957b2487d71feaf9b41c4a5f85b2
S: 00a78303e605bf9370f56e114a4def2b6d7196f3 119.29.181.129:8006
   replicates e8a126a075f80d4415fbb056ea533ad2ab408120
Can I set the above configuration? (type 'yes' to accept): yes
>>> Nodes configuration updated
>>> Assign a different config epoch to each node
>>> Sending CLUSTER MEET messages to join the cluster
Waiting for the cluster to join
.....
>>> Performing Cluster Check (using node 119.29.181.129:8001)
M: e8a126a075f80d4415fbb056ea533ad2ab408120 119.29.181.129:8001
   slots:[0-5460] (5461 slots) master
   1 additional replica(s)
S: 9721ff89484e5d860d72c47d9aee6e98993e7c10 119.29.181.129:8004
   slots: (0 slots) slave
   replicates b6a692d9cc595ad3116227b236b4ead32286bc16
S: 2823bd01ac5a27853ad01a0a071776fd615d3c71 119.29.181.129:8005
   slots: (0 slots) slave
   replicates f74e7cdc51ae957b2487d71feaf9b41c4a5f85b2
M: f74e7cdc51ae957b2487d71feaf9b41c4a5f85b2 119.29.181.129:8003
   slots:[10923-16383] (5461 slots) master
   1 additional replica(s)
S: 00a78303e605bf9370f56e114a4def2b6d7196f3 119.29.181.129:8006
   slots: (0 slots) slave
   replicates e8a126a075f80d4415fbb056ea533ad2ab408120
M: b6a692d9cc595ad3116227b236b4ead32286bc16 119.29.181.129:8002
   slots:[5461-10922] (5462 slots) master
   1 additional replica(s)
[OK] All nodes agree about slots configuration.
>>> Check for open slots...
>>> Check slots coverage...
[OK] All 16384 slots covered.
结果分析
Master[0] -> Slots 0 - 5460
Master[1] -> Slots 5461 - 10922
Master[2] -> Slots 10923 - 16383
Adding replica 119.29.181.129:8004 to 119.29.181.129:8001
Adding replica 119.29.181.129:8005 to 119.29.181.129:8002
Adding replica 119.29.181.129:8006 to 119.29.181.129:8003
可以看到每个主节点的槽分配,8001、8002、8003为主,分别对应8004、8005、8006为从。
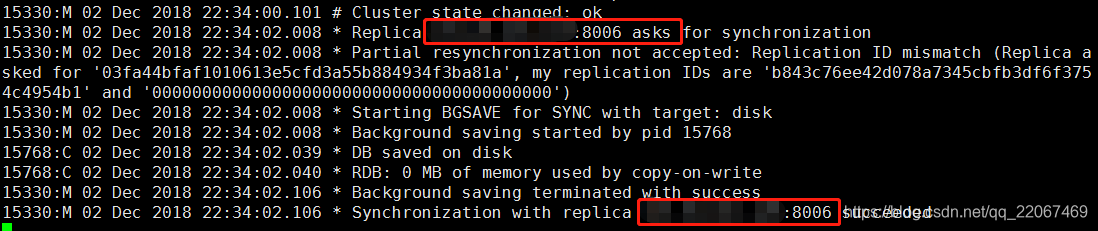
可以看到8006连接到8001
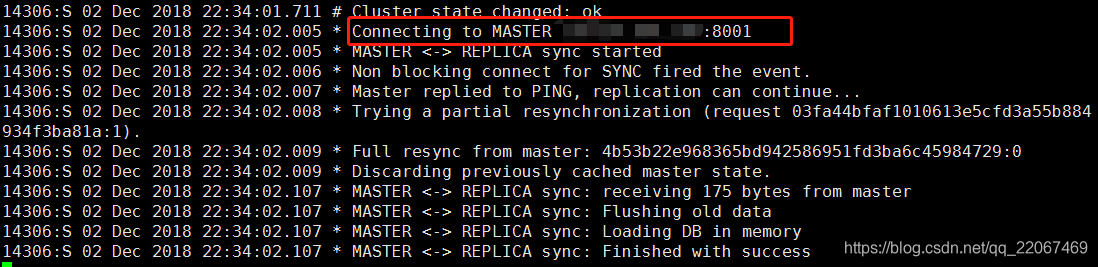
可以看到8001的从为8006
连接Redis-Cluster
本次使用客户端工具连接。
redis-cli 连接集群
redis-cli -h 主机IP -p 端口 (集群中任意端口) -c
redis-cli -h 119.29.181.129 -p 8001 -c
-c 代表连接的是redis集群
测试值的存取
1、从本地连接到集群redis  使用8001端口 加 -c 参数
redis-cli -h 119.29.181.129 -p 8001 -c
2、存入name值为kyrie ,系统提示此值被存入到了8002端口所在的redis (槽是5798)
-> Redirected to slot [5798] located at 119.29.181.129:8002
OK
3、提取name的值,可以提取
4、退出(quit)
5、再次以8001端口进入,不带C
6、查询name值,无法获取,因为值在8002端口的redis上
(error) MOVED 5798 119.29.181.129:8002
7、再以8002端口进入不带C的,获取name值发现是可以获取的,而以其它端口进入均不能获取
119.29.181.129:8002> get name
"kyrie"
SpringDataRedis连接Redis集群
工程添加配置文件,applicationContext-redis-cluster.xml
<?xml version="1.0" encoding="UTF-8"?>
<beans xmlns="http://www.springframework.org/schema/beans"
  xmlns:xsi="http://www.w3.org/2001/XMLSchema-instance" xmlns:p="http://www.springframework.org/schema/p"
  xmlns:context="http://www.springframework.org/schema/context"
  xsi:schemaLocation="http://www.springframework.org/schema/beans
            http://www.springframework.org/schema/beans/spring-beans.xsd
            http://www.springframework.org/schema/context
            http://www.springframework.org/schema/context/spring-context.xsd">

	<!-- 加载配置属性文件 按需加载 -->
	<context:property-placeholder ignore-unresolvable="true" location="classpath:properties/redis-cluster-config.properties" />
	<bean id="redisClusterConfiguration" class="org.springframework.data.redis.connection.RedisClusterConfiguration">
		<property name="maxRedirects" value="${redis.maxRedirects}"></property>
		<property name="clusterNodes">
			<set>
				<bean class="org.springframework.data.redis.connection.RedisClusterNode">
					<constructor-arg name="host" value="${redis.host1}"></constructor-arg>
					<constructor-arg name="port" value="${redis.port1}"></constructor-arg>
				</bean>
				<bean class="org.springframework.data.redis.connection.RedisClusterNode">
					<constructor-arg name="host" value="${redis.host2}"></constructor-arg>
					<constructor-arg name="port" value="${redis.port2}"></constructor-arg>
				</bean>
					<bean class="org.springframework.data.redis.connection.RedisClusterNode">
					<constructor-arg name="host" value="${redis.host3}"></constructor-arg>
					<constructor-arg name="port" value="${redis.port3}"></constructor-arg>
				</bean>
				<bean class="org.springframework.data.redis.connection.RedisClusterNode">
					<constructor-arg name="host" value="${redis.host4}"></constructor-arg>
					<constructor-arg name="port" value="${redis.port4}"></constructor-arg>
				</bean>
				<bean class="org.springframework.data.redis.connection.RedisClusterNode">
					<constructor-arg name="host" value="${redis.host5}"></constructor-arg>
					<constructor-arg name="port" value="${redis.port5}"></constructor-arg>
				</bean>
				<bean class="org.springframework.data.redis.connection.RedisClusterNode">
					<constructor-arg name="host" value="${redis.host6}"></constructor-arg>
					<constructor-arg name="port" value="${redis.port6}"></constructor-arg>
				</bean>
			</set>
		</property>
	</bean>
	<bean id="jedisPoolConfig"   class="redis.clients.jedis.JedisPoolConfig">
	        <property name="maxIdle" value="${redis.maxIdle}" />
			<property name="maxTotal" value="${redis.maxTotal}" />
	</bean>
	<bean id="jeidsConnectionFactory" class="org.springframework.data.redis.connection.jedis.JedisConnectionFactory"  >
		<constructor-arg ref="redisClusterConfiguration" />
		<constructor-arg ref="jedisPoolConfig" />
	</bean>
	<bean id="redisTemplate" class="org.springframework.data.redis.core.RedisTemplate">
		<property name="connectionFactory" ref="jeidsConnectionFactory" />
	</bean>
</beans>
添加属性文件 redis-cluster-config.properties
#cluster configuration
redis.host1=119.29.181.129
redis.port1=8001

redis.host2=119.29.181.129
redis.port2=8002

redis.host3=119.29.181.129
redis.port3=8003

redis.host4=119.29.181.129
redis.port4=8004

redis.host5=119.29.181.129
redis.port5=8005

redis.host6=119.29.181.129
redis.port6=8006

redis.maxRedirects=3
redis.maxIdle=100
redis.maxTotal=600
模拟集群异常测试
关闭节点命令
./redis-cli -h IP -p 端口 shutdown
以下面主从节点关系进行测试
8002(主)对应 8004(从)
8003(主)对应 8005(从)
8006(主)对应 8001(从)
1、测试关闭8006 和8001, 看看会发生什么。
各节点收到以下消息
- 8002(主)
4903:M 03 Dec 2018 21:19:51.747 * Marking node 00a78303e605bf9370f56e114a4def2b6d7196f3 as failing (quorum reached).
4903:M 03 Dec 2018 21:19:51.747 # Cluster state changed: fail
4903:M 03 Dec 2018 21:19:54.356 * Marking node e8a126a075f80d4415fbb056ea533ad2ab408120 as failing (quorum reached).
- 8003(主)
4912:M 03 Dec 2018 21:19:51.748 * Marking node 00a78303e605bf9370f56e114a4def2b6d7196f3 as failing (quorum reached).
4912:M 03 Dec 2018 21:19:51.748 # Cluster state changed: fail
4912:M 03 Dec 2018 21:19:54.354 * Marking node e8a126a075f80d4415fbb056ea533ad2ab408120 as failing (quorum reached).
- 8004(从)
6823:S 03 Dec 2018 21:19:51.748 * FAIL message received from b6a692d9cc595ad3116227b236b4ead32286bc16 about 00a78303e605bf9370f56e114a4def2b6d7196f3
6823:S 03 Dec 2018 21:19:51.748 # Cluster state changed: fail
6823:S 03 Dec 2018 21:19:54.355 * FAIL message received from f74e7cdc51ae957b2487d71feaf9b41c4a5f85b2 about e8a126a075f80d4415fbb056ea533ad2ab408120
- 8005(从)
4940:S 03 Dec 2018 21:19:51.748 * FAIL message received from b6a692d9cc595ad3116227b236b4ead32286bc16 about 00a78303e605bf9370f56e114a4def2b6d7196f3
4940:S 03 Dec 2018 21:19:51.749 # Cluster state changed: fail
4940:S 03 Dec 2018 21:19:54.355 * FAIL message received from f74e7cdc51ae957b2487d71feaf9b41c4a5f85b2 about e8a126a075f80d4415fbb056ea533ad2ab408120
得出结论
(1)主节点 8002、8003 判定 8001失联
(2)从节点 8004、8005 收到主节点8002和8003说8001失联
2、测试关闭8002、8003、8006 会发生什么。
上面关闭的是三个主节点,主节点关闭后,从节点会一直反复的尝试连接主节点
8001(从)
8336:S 03 Dec 2018 21:31:07.425 # Error condition on socket for SYNC: Connection refused
8336:S 03 Dec 2018 21:31:08.429 * Connecting to MASTER 119.29.181.126:8006
8336:S 03 Dec 2018 21:31:08.429 * MASTER <-> REPLICA sync started

8004(从)
6823:S 03 Dec 2018 21:31:06.074 # Error condition on socket for SYNC: Connection refused
6823:S 03 Dec 2018 21:31:07.079 * Connecting to MASTER 119.29.181.126:8002
6823:S 03 Dec 2018 21:31:07.079 * MASTER <-> REPLICA sync started

8005(从)
4940:S 03 Dec 2018 21:31:05.070 # Error condition on socket for SYNC: Connection refused
4940:S 03 Dec 2018 21:31:06.073 * Connecting to MASTER 119.29.181.126:8003
4940:S 03 Dec 2018 21:31:06.073 * MASTER <-> REPLICA sync started
得出结论
(1)当主节点被全部关闭时,从节点会连接不到从而导致整个集群崩溃掉。
总结
1、在搭建过程中需要细心一点做好每一步,一步步来。
2、yum源安装东西的版本比较低,安装一些软件需要更换源。
3、客户端连接reids需要在redis.conf将注释掉 # bind 127.0.0.1