接上篇文章…
一般的,一个扫描的文件是不可能完完全全摆正了的。它多多少少会有些倾斜。
现在有如下图片:

它逆时针进行了旋转,那么想要把多余的白边去掉且摆正应该怎么做呢?
步骤如下:
1、边缘检测
2、找出轮廓
3、找出最小外接矩形,获得旋转的角度
4、根据旋转的角度进行仿射变换
5、按切边的操作进行
代码(没有用到的已注释):
#include<opencv2/opencv.hpp>
#include<iostream>
#include<math.h>
using namespace cv;
using namespace std;
Mat src, dst, gray_src;
int current_level = 50;
int max_level = 255;
void cut_image(int, void*);
void rotating_image(int, void*);
const char* output_title = "rectminArea";
int main(int argc, char**argv)
{
src = imread("D:/test/切边测试图-旋转.png", 1);
if (src.empty())
{
cout << "图片未找到" << endl;
return -1;
}
//namedWindow(output_title,CV_WINDOW_AUTOSIZE);
//createTrackbar("Value", output_title, ¤t_level, max_level, cut_image);
//cut_image(0,0); //图像切边
rotating_image(0,0); // 将图像旋转成正的
imshow("input image", src);
waitKey(0);
return 0;
}
//将图像旋转成正的
void rotating_image(int, void*)
{
/*1、边缘检测
2、找出轮廓
3、找出最小外接矩形,获得旋转的角度
4、仿射变换
5、按切边的操作进行
*/
Mat canny_out;
Canny(src, canny_out, current_level, 2 * current_level, 3, false);
imshow("canny_out",canny_out);
float minw = 0;
float minh = 0;
double angle = 0;
vector<vector<Point>> contours;
vector<Vec4i> hierarchy;
findContours(canny_out, contours,hierarchy, RETR_TREE,CHAIN_APPROX_SIMPLE, Point(0, 0));
Mat showImg= Mat::zeros(src.size(), CV_8UC3);;
RNG rng(12345);
for (size_t t = 0; t < contours.size(); t++)
{
RotatedRect minrect = minAreaRect(contours[t]);
angle = minrect.angle;
if (angle != 0)
{
minh = max(minh,minrect.size.height);
minw = max(minw,minrect.size.width);
}
}
printf("minw:%f\n", minw);
printf("minh:%f\n", minh);
printf("angle:%f\n", angle);//值为负数,说明逆时针旋转,值为正数,说明顺时针旋转
for (size_t t = 0; t < contours.size(); t++)
{
RotatedRect minrect = minAreaRect(contours[t]);
if (minrect.size.height== minh && minrect.size.width == minw)
{
Point2f pts[4];
minrect.points(pts);
for (int i = 0; i < 4; i++)
{
Scalar color = Scalar(rng.uniform(0, 255), rng.uniform(0, 255), rng.uniform(0, 255));
line(showImg, pts[i], pts[(i + 1) % 4], color, 2, 8, 0);
}
}
}
imshow("showImg", showImg);
Mat dst;
	Point2f center(src.cols/2, src.rows/2);
	Mat rota = getRotationMatrix2D(center, angle, 1.0);
	warpAffine(src, dst, rota, src.size(), INTER_LINEAR,0,Scalar(255,255,255));
	imshow("correct image",dst);
//图像切边
}
//图像切边
void cut_image(int, void*)
{
Mat canyImg;
cvtColor(src, gray_src, CV_BGR2GRAY);
Canny(gray_src, canyImg, current_level, 2 * current_level, 3,false);
vector<vector<Point>> contours;
vector<Vec4i>hierachy;
Mat showImg = Mat::zeros(src.size(), CV_8UC3);
findContours(canyImg, contours, hierachy, RETR_TREE, CHAIN_APPROX_SIMPLE, Point(0, 0));
RNG rng(12345);
int minw = src.cols*0.75;
int minh = src.rows*0.75;
Rect box; //获取roi区域
Mat contoursimg= Mat::zeros(src.size(), CV_8UC3);
for (size_t t = 0; t < contours.size(); t++)
{
Scalar color = Scalar(rng.uniform(0, 255), rng.uniform(0, 255), rng.uniform(0, 255));
drawContours(contoursimg, contours, int(t), color, 1, 8, hierachy, 0, Point(0, 0));
RotatedRect minrect = minAreaRect(contours[t]); //获取轮廓的最小外接矩形
float angle = abs(minrect.angle);
if (minrect.size.height > minh && minrect.size.width > minw && minrect.size.width < (src.cols - 5))
{
Point2f pts[4];
minrect.points(pts); //获取最小外接矩形的四个顶点坐标
for(int i=0;i<4;i++)
{
line(showImg,pts[i], pts[(i + 1) % 4], color, 2, 8, 0);
cout << "X坐标:" << minrect.center.x <<" "<< "Y坐标:" << minrect.center.y << " "<<"偏移角度:" << angle << endl;
}
box = minrect.boundingRect();
}
if (box.width > 0 && box.height > 0)
{
Mat roiImg=src(box);//截取roi区域
imshow("roiImg", roiImg);
}
}
imshow(output_title, showImg);
imshow("contours image", contoursimg);
}
/* //做旋转图片的代码
int main() {
Mat src = imread("D:/test/切边测试图.png");
imshow("src", src);
double angle = 45;
Point2f center(src.cols / 2, src.rows / 2);
Mat rot = getRotationMatrix2D(center, angle, 1);
Rect bbox = RotatedRect(center, src.size(), angle).boundingRect();
rot.at<double>(0, 2) += bbox.width / 2.0 - center.x;
rot.at<double>(1, 2) += bbox.height / 2.0 - center.y;
Mat dst;
warpAffine(src, dst, rot, bbox.size(),1,0,Scalar(255,255,255));
imshow("dst", dst);
imwrite("D:/test/切边测试图-旋转.png",dst);
waitKey(0);
return 0;
}
*/
运行结果:


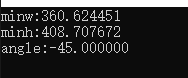
由此可以知道,该图片旋转的角度是-45度,也就是逆时针旋转了45度。
那么就可以进行仿射变换:
Mat dst;
Point2f center(src.cols/2, src.rows/2);
Mat rota = getRotationMatrix2D(center, angle, 1.0);
warpAffine(src, dst, rota, src.size(), INTER_LINEAR,0,Scalar(255,255,255));
imshow("correct image",dst);
最终的结果是:

接下来就是切边的操作了,这里参考上一篇文章:
https://blog.csdn.net/Daker_Huang/article/details/85033368