vue之路由以及默认路由跳转
之前我们将子组件挂载到根组件的时候都是手动挂载的,而路由就是自动的将子组件挂载到根组件中
在这里我们需要用到一个路由插件,就是 vue-router ,vue-router网址:https://router.vuejs.org/zh/guide/
既然要用插件了那肯定要先安装啦。
vue-router使用步骤:
1.安装vue-router 官网有说明
注意:安装时最好加上 --save ,让其加入到package.js包中,方便被人使用。也可以使用cnpm安装。

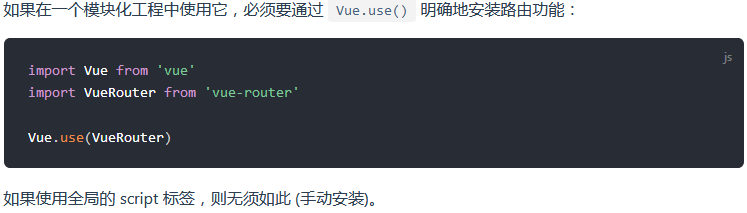
2.引入并 Vue.use(VueRouter),在main.js文件里操纵
3.配置路由
3.1 创建组件 引入组件
// 1. 定义 (路由) 组件。
// 可以从其他文件 import 进来
const Foo = { template: '<div>foo</div>' }
const Bar = { template: '<div>bar</div>' }
3.2 定义路由,建议复制,以免打错
// 2. 定义路由
// 每个路由应该映射一个组件。 其中"component" 可以是
// 通过 Vue.extend() 创建的组件构造器,
// 或者,只是一个组件配置对象。
// 我们晚点再讨论嵌套路由。
const routes = [
  { path: '/foo', component: Foo },
  { path: '/bar', component: Bar }
]
3.3 实例化VueRouter
// 3. 创建 router 实例,然后传 `routes` 配置
// 你还可以传别的配置参数, 不过先这么简单着吧。
const router = new VueRouter({
  routes // (缩写) 相当于 routes: routes
})
3.4 挂载
// 4. 创建和挂载根实例。
// 记得要通过 router 配置参数注入路由,
// 从而让整个应用都有路由功能
const app = new Vue({
  router
}).$mount('#app')
接下来就可以使用了
4. 演示一下
4.1首先在main.js中创建组件
// main.js

import Home from './components/Home.vue';
import News from './components/News.vue';
4.2配置路由
const routes = [
  { path:'/home',component:Home},
  { path:'/news',component:News},
];
4.3实例化VueRouter
const router = new VueRouter({
  routes
});
4.4 挂载
new Vue({
  el:'#app',
  router,
  render:h=>h(App),
});
4.5 在根组件的模板里加上 <router-view></router-view>这句话
<template>
  <div>
    <router-view></router-view>
  </div>
</template>
5.5 演示:我们在地址栏中

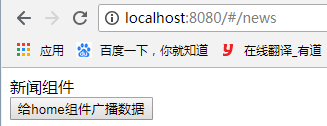
5.6 通过