App都少不了的一个需求,那就是Dialog弹窗,而且通常一个应用中都不止一个Dialog弹窗,多的时候可能达到六七个,那么你是否会为你的应用重复写六七个弹窗:ExitLoginDialog、DownDialog、UpdateDialog……如果是使用系统的Dialog还好,可以直接new一个就行了,但是如果有自定义的需求呢?比如这样:
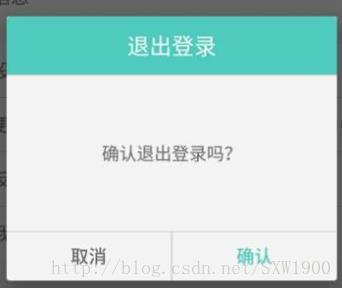
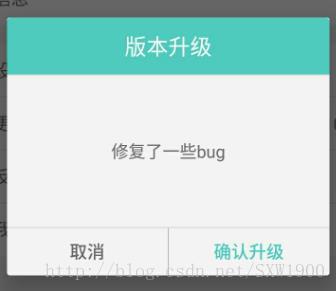
乍一看只用一点点文字的区别,可是如果不使用回调机制,那么你该如何控制弹窗的点击事件呢?很明显点击第一个弹窗(ExitLoginDialog)的事件对应为退出登录,而点击第二个弹窗(UpdateDialog)则会新建应用升级任务。最笨的方法是这样:分别写两个差不多的Dialog,找到各自的btnSure(确认按钮),然后各自设置为:
ExitLoginDialog中:
btnSure.setOnClickListener(new View.OnClickListener() {
            @Override
            public void onClick(View v) {
            //此处为执行退出登录代码
            }
});- 1
- 2
- 3
- 4
- 5
- 6
UpdateDialog中:
btnSure.setOnClickListener(new View.OnClickListener() {
            @Override
            public void onClick(View v) {
            //此处为执行升级app代码
            }
});- 1
- 2
- 3
- 4
- 5
- 6
实现没有问题,但从代码设计上肯定是有问题的,我们发现这两个类主要的逻辑中只有点击确认后执行的操作是不同的,其他逻辑几乎相同,所以我们就思考是不是可以将Dialog写成一个类,然后对外提供一个方法,当确认按钮点击onClick()执行的时候执行我们自己设置的方法。那么这就是事件回调的思想的了:当一个事件执行的时候,我们希望能自己定义一个函数来执行不同的操作,这个函数就是回调函数,它会在某个事件执行之后回调执行。
注意:Android系统本身的onClick(),onPause()等就是回调函数,当手指点击的时候回调onClick()函数,当Activity界面隐藏的时候回调onPause()函数。
下面我们以事件回调的方法实现以上逻辑。
事件回调设置三部曲:
1.定义回调事件的接口
2.声明回调事件
3.对外提供设置事件回调的接口
PS:我们新建了一个继承自Dialog的类,命名为BaseDialog,接口回调定义在该类中!
按照以上步骤,首先我们定义回调事件接口:
public interface OnDialogClickListener{
        void onSureClickListener();     //当点击了确认按钮之后执行
        void onCancelClickListener();   //当点击了取消按钮之后执行(取消操作通常都是弹窗消失)
}- 1
- 2
- 3
- 4
接口定义好了,我们很明显能看到里面两个函数的意思,那就是当点击了取消按钮后执行的操作和点击了确认按钮后执行的操作,哪里调用呢?当然是点击了相应按钮的时候了!但是我们还没有实例来调用,所以我们执行步骤2先声明一个:
private OnDialogClickListener onDialogClickListener;- 1
先不管初始化问题,反正我们是要调用的,所以就先调用,当然调用之前最好先判空一下,防止你一直都忘记初始化:
btnSure.setOnClickListener(new View.OnClickListener() {
            @Override
            public void onClick(View v) {
                if (onDialogClickListener != null) {
                    onDialogClickListener.onSureClickListener();
                }
            }
        });
btnCancel.setOnClickListener(new View.OnClickListener() {
            @Override
            public void onClick(View v) {
                if (onDialogClickListener != null) {
                    onDialogClickListener.onCancelClickListener();
                }
            }
});- 1
- 2
- 3
- 4
- 5
- 6
- 7
- 8
- 9
- 10
- 11
- 12
- 13
- 14
- 15
- 16
我们调用了这两个方法,由于是接口,方法没有实例化,先不管,继续按照步骤3,对外提供设置事件回调的接口,这一步也就是提供onDialogClickListener的初始化操作,执行完这一步,onDialogClickListener就不会为空了:
public void setOnDialogClickListener(OnDialogClickListener onDialogClickListener){
        this.onDialogClickListener = onDialogClickListener;
}- 1
- 2
- 3
到此整个函数回调的定义都已经完成了,那么怎么使用呢?
1.new 一个BaseDialog:
BaseDialog baseDialog = new BaseDialog(activity,"退出登录","确认退出登录吗?","确认");- 1
2.调用该Dialog对外提供的设置事件回调接口的方法:
baseDialog.setOnDialogClickListener(new BaseDialog.OnDialogClickListener() {
                @Override
                public void onSureClickListener() {
                    //执行对应操作,如退出登录,升级,下载等
                    loginout();
                    baseDialog.dismiss();
                }

                @Override
                public void onCancelClickListener() {
                    baseDialog.dismiss();
                }
});- 1
- 2
- 3
- 4
- 5
- 6
- 7
- 8
- 9
- 10
- 11
- 12
- 13
setOnDialogClickListener(OnBaseDialogClickListener onBaseDialogClickListener)方法需要接收一个OnBaseDialogClickListener 作为参数,我们new一个之后就需要重写该接口的两个未实例化的方法,所以当执行了onClick()之后调用onDialogClickListener.onSureClickListener();它会去回调真正的实现方法。
这种函数回调我们在自定义控件或者自定义控件点击事件的使用的非常多,可以看到这也是模仿了Android底层的事件方法调用机制,好好琢磨该实现机制,更加能够理解回调函数的设计思想,至少我是通过onClick()这个方法重写点击事件来理解回调函数的,最开始接触Android的时候不理解回调函数,在网上找了好多文章,虽然他们都以通俗易懂的例子来描述这种机制,比如打电话问问题什么的……但是恕本人愚钝,例子看懂了,但是对于回调函数的含义还是云里雾里,直到看了网上一篇类似于这种自定义控件然后自定义点击事件的文章之后才恍然大悟,原来这就是所谓的函数回调!
本文重点不在弹窗,而在回调函数的理解。这是本人对于回调函数的一些拙见,望读者不喜勿喷,欢迎留言讨论。
以下是该BaseDialog代码:
BaseDialog.java
package com.shixia.diudiuma.view;

import android.app.Dialog;
import android.content.Context;
import android.support.annotation.NonNull;
import android.support.annotation.StyleRes;
import android.view.LayoutInflater;
import android.view.View;
import android.widget.Button;
import android.widget.TextView;

import com.shixia.diudiuma.R;

/**
 * Created by ShiXiuwen on 2017/2/9.
 * <p>
 * Description:退出登录等的通用弹窗
 */

public class BaseDialog extends Dialog {

    private Context context;
    private String title;           //dialog标题
    private String content;         //dialog提示内容
    private String positiveBtnText; //dialog确认按钮文字

    private Button btnSure;
    private Button btnCancel;
    private TextView tvTitle;
    private TextView tvContent;

    public BaseDialog(@NonNull Context context, @StyleRes int themeResId) {
        super(context, themeResId);
    }

    public BaseDialog(@NonNull Context context, String title, String content, String positiveBtnText) {
        super(context, 0);
        this.context = context;
        this.title = title;
        this.content = content;
        this.positiveBtnText = positiveBtnText;
        initView();
        initSetting();
        initListener();
    }

    private void initSetting() {
        setCanceledOnTouchOutside(false);
        setCancelable(true);
    }

    private void initView() {
        View view = LayoutInflater.from(context).inflate(R.layout.view_dialog_base,null);
        setContentView(view);
        btnSure = (Button) view.findViewById(R.id.btn_sure);
        btnCancel = (Button) view.findViewById(R.id.btn_cancel);
        tvTitle = (TextView) view.findViewById(R.id.tv_title);
        tvContent = (TextView) view.findViewById(R.id.tv_content);

        tvTitle.setText(title);
        tvContent.setText(content);
        btnSure.setText(positiveBtnText);
    }

    private void initListener() {
        btnSure.setOnClickListener(new View.OnClickListener() {
            @Override
            public void onClick(View v) {
                if (onDialogClickListener != null) {
                    onDialogClickListener.onSureClickListener();
                }
            }
        });
        btnCancel.setOnClickListener(new View.OnClickListener() {
            @Override
            public void onClick(View v) {
                if (onDialogClickListener != null) {
                    onDialogClickListener.onCancelClickListener();
                }
            }
        });
    }

    /********************** 回调 ************************/

    private OnDialogClickListener onDialogClickListener;

    public void setOnDialogClickListener(OnDialogClickListener onDialogClickListener){
        this.onDialogClickListener = onDialogClickListener;
    }

    public interface OnDialogClickListener{
        void onSureClickListener();     //当点击了确认按钮之后执行
        void onCancelClickListener();   //当点击了取消按钮之后执行(取消操作通常都是弹窗消失)
    }
}- 1
- 2
- 3
- 4
- 5
- 6
- 7
- 8
- 9
- 10
- 11
- 12
- 13
- 14
- 15
- 16
- 17
- 18
- 19
- 20
- 21
- 22
- 23
- 24
- 25
- 26
- 27
- 28
- 29
- 30
- 31
- 32
- 33
- 34
- 35
- 36
- 37
- 38
- 39
- 40
- 41
- 42
- 43
- 44
- 45
- 46
- 47
- 48
- 49
- 50
- 51
- 52
- 53
- 54
- 55
- 56
- 57
- 58
- 59
- 60
- 61
- 62
- 63
- 64
- 65
- 66
- 67
- 68
- 69
- 70
- 71
- 72
- 73
- 74
- 75
- 76
- 77
- 78
- 79
- 80
- 81
- 82
- 83
- 84
- 85
- 86
- 87
- 88
- 89
- 90
- 91
- 92
- 93
- 94
- 95
- 96
view_dialog_base.xml
<?xml version="1.0" encoding="utf-8"?>
<RelativeLayout xmlns:android="http://schemas.android.com/apk/res/android"
    android:layout_width="match_parent"
    android:layout_height="match_parent"
    android:orientation="vertical">

    <LinearLayout
        android:layout_width="680px"
        android:layout_height="wrap_content"
        android:orientation="vertical">

        <TextView
            android:id="@+id/tv_title"
            android:layout_width="match_parent"
            android:layout_height="80px"
            android:background="@drawable/shape_fill_green_half_8_round"
            android:gravity="center"
            android:text="通用弹窗"
            android:textColor="@color/color_white_A"
            android:textSize="36px" />

        <View
            android:layout_width="match_parent"
            android:layout_height="2px"
            android:background="@color/grey_c" />

        <ScrollView
            android:layout_width="match_parent"
            android:layout_height="wrap_content">

            <TextView
                android:id="@+id/tv_content"
                android:layout_width="match_parent"
                android:layout_height="wrap_content"
                android:minHeight="320px"
                android:padding="24px"
                android:text="@string/test"
                android:textColor="@color/grey_a"
                android:textSize="36px"
                android:background="@color/page_bg_color"
                android:gravity="center"/>

        </ScrollView>

        <View
            android:layout_width="match_parent"
            android:layout_height="2px"
            android:background="@color/grey_c" />

        <LinearLayout
            android:layout_width="match_parent"
            android:layout_height="wrap_content"
            android:orientation="horizontal">

            <Button
                android:id="@+id/btn_cancel"
                android:layout_width="0dp"
                android:layout_height="100px"
                android:layout_weight="1"
                android:background="@drawable/selector_fill_gray_half_ld_8_round"
                android:text="@string/cancel"
                android:textColor="@color/grey_a" />

            <View
                android:layout_width="2px"
                android:layout_height="match_parent"
                android:background="@color/grey_c"/>

            <Button
                android:id="@+id/btn_sure"
                android:layout_width="0dp"
                android:layout_height="100px"
                android:layout_weight="1"
                android:background="@drawable/selector_fill_gray_half_rd_8_round"
                android:text="@string/sure"
                android:textColor="@color/color_green_boss" />

        </LinearLayout>

    </LinearLayout>

</RelativeLayout>