1.安装操作系统
系统版本CentOS release 6.5 (Final)mini安装
- 关闭SELinux
- 关闭防火墙功能
- 关闭SSH的UseDNS功能
- 配置IP地址
- 配置DNS服务器
- 配置NTP服务器
- 配置主机名
2. Pyenv安装方式
2.1 安装Git软件
- yum install git -y
2.2 安装Python依赖包
- yum -y install gcc make patch gdbm-devel openssl-devel sqlite-devel zlib-devel bzip2-devel
2.3 创建普通用户
- useradd python
- passwd python
2.4 使用python这个普通用户安装pyenv软件
2.4.1 添加yum更新源
- cd /etc/yum.repos.d/
- vim CentOS-Base.repo
- #添加更新源
- [updates]
- name=CentOS-Updates
- baseurl=https://mirrors.aliyun.com/centos/6.9/os/x86_64
- gpgcheck=0
- yum repolist
- yum update nss
- 输入“y”
- su - python
- curl -L https://github.com/pyenv/pyenv-installer/raw/master/bin/pyenv-installer | bash
- vi ~/.bash_profile
- #文件末尾添加
- export PATH="/home/python/.pyenv/bin:$PATH"
- eval "$(pyenv init -)"
- eval "$(pyenv virtualenv-init -)"
- source ~/.bash_profile
安装过程中注意的问题:
执行过程中报(35)SSL连接错误

解决方法:
(1)在https://github.com/pyenv/pyenv-installer 有安装文档
(2)如果curl出现curl: (35) SSL connect error,这是由于nss版本低的问题,需要更新它。
(3)通过root用户添加更新源,也就是按上述步骤操作。
2.4.2 pyenv的使用
(1)查看Python版本及path路径
- $python --version 查看Python版本信息
- $python -V 查看Python版本信息
- $echo $PATH 查看路径变量

(2)pyenv命令介绍
(2)install命令
- $pyenv help install 查看命令帮助
- $ pyenv install --list 列出所有可用版本
(3)在线安装执行版本
- $ pyenv install 3.6.6 使用pyenv安装Python 3.6.6软件包
- $ pyenv versions 查看当前环境Python运行版本
注:这样安装可能比较慢,为了提速,可以选用cashe方法。
(4)使用cache缓存方式安装
在~/.pyenv目录下,新建cache目录,放入下载好的待安装版本的所有压缩文件。安装时它是随机选择的,不确定选择哪一个压缩文件,把下载的2到3个不通类型压缩格式的文件都放进去。Python3.6.6 只有两个包,Python3.4版本可能有3个。

- $ pyenv install 3.6.6 -v 显示详细安装信息
为了方便演示,请用客户端再打开两个会话窗口。
提前安装备用
2.4.3 通过cache缓存方式安装Python软件
(1)上传Python软件包到cache目录
- mkdir -p /home/python/.pyenv/cache
通过FTP工具(例如:Xshell、SecureCRT)上传Python安装包到/home/python/.pyenv/cache目录下

(2)安装Python软件
- pyenv install 3.6.6

安装过程需要等待几分钟。
(3)验证Python是否安装成功
这里需要注意的是
- $python -V 查看当前Python的运行版本
- $pyenv version 显示当前的Python版本
- $pyenv versions 显示所有可用的Python版本,和当前版本。
这里CentOS6.5默认的Python版本为Python2.6.6 也就是* system表示的。
而3.6.6则是刚刚通过pyenv安装好的。

2.4.4 Pyenv的Python版本控制介绍
(1)version与versions的区别
- $pyenv version 显示当前的Python版本
- $pyenv versions 显示所有可用的Python版本,和当前版本。
(2)global全局设置
- $ pyenv global 3.6.6
可以看到所有受pyenv控制的窗口都是3.6.6的Python版本了。
这里用global是作用于非root用户Python用户上,如果是root用户安装,请不要使用global,否则影响太大。
比如:这里使用的Centos6.5就是Python2.6,使用了global就成了3.X,就会带来很不好的影响。
- $pyenv global system
(3)shell会话设置
影响只作用于当前会话
- $ pyenv shell 3.6.6
(4)local 本地设置
使用pyenv local设置从当前工作目录开始下上递归都继承这个设置。
- $ pyenv local 3.6.6
注意:
A. 不建议在root用户下安装Python和pyenv。
B. local本地设置的问题在于同一个Python指定的3.6.6,如果不同项目包混在一起,包的多版本混在一起,相互干扰。
C. global影响面比较大,后期建议不用。
(5)Virtualenv 虚拟环境设置
问题:为什么要使用虚拟环境?
因为刚才使用的Python环境都是一个公共的空间,如果多个项目使用不同Python版本开发,或者使用不同的Python版本部署运行,或者使用同样的版本开发的但不同项目使用了不同版本的库,等等。这些问题都会带来冲突。最好的解决方法就是每个项目独立运行自己的“独立小环境”中。
使用插件,在plugins/pyenv-virtualenv中
- $ pyenv virtualenv 3.6.6 ql366
使用Python3.6.6版本创建出一个独立的虚拟空间。
注意问题:虚拟环境下Python的库文件,与Python版本的隔离以及使用库的隔离。可不要混淆了。
例如:
虚拟Python库目录
/home/python/.pyenv/versions/3.6.6/envs/py366/lib/python3.6
Python版本库目录
/home/python/.pyenv/versions/3.6.6/lib/python3.6
2.4.5 使用Virtualenv 虚拟环境设置
- mkdir /home/python/cmdb
- cd /home/python/cmdb
- pyenv virtualenv 3.6.6 py366
- pyenv local py366
2.4.6 验证
使用pyenv virtualenv 3.6.6 py366命令后查看

使用pyenv local py366 命令后查看

3. pip、ipython和jupyter的安装和配置
3.1 简介
3.1.1 pip工具
pip是Python的包管理工具,3.X的版本直接带了,可以直接使用。
Linux系统配置:
- $ mkdir ~/.pip
- $ touch ~/.pip/pip.conf
编辑配置文件加入下面参数:
- #添加参数,目的在于和yum一样为了使用国内镜像。
- [global]
- index-url=https://mirrors.aliyun.com/pypi/simple/
- trusted-host=mirrors.aliyun.com
在不同的虚拟环境中,安装redis包,使用pip list命令看看效果
- $ pip -V 查看pip的版本信息,以及配置文件的路径。
- $ pip install pkgname 以后经常要使用的安装Python包的命令。
注意:Windows下 pip的配置文件在~/pip/pip.ini 文件中。
3.1.2 ipython工具
ipython是增强的交互式Python命令行工具。
- $pip install ipython 安装ipython工具
- $ipython 确认ipython工具是否安装好
3.1.3 jupyter工具
jupyter是基于WEB的交互式笔记本,其中可以非常方便的使用Python。
- $ pip install jupyter 安装jupyter工具
- $ jupyter notebook help 查看jupyter notebook命令帮助
- $ jupyter notebook --ip=0.0.0.0 --no-browser 配置默认IP
- $ jupyter notebook --ip=192.168.103.43 --port=8080 配置jupyter服务器IP地址与端口
- $ ss -tanl 查看jupyter notebook进程
3.2 pip配置
- mkdir -p /home/python/.pip
- cd /home/python/.pip/
- touch pip.conf
- vi pip.conf
- #添加参数,目的在于和yum一样为了使用国内镜像。
- [global]
- index-url=https://mirrors.aliyun.com/pypi/simple/
- trusted-host=mirrors.aliyun.com
注:这里输入pip命令发现命令找不到,是由于默认CentOS6.5的Python 2.6 是不支持pip命令的。但是在虚拟项目中发现Python3.6.6版本是支持的。
- cd /home/python/cmdb
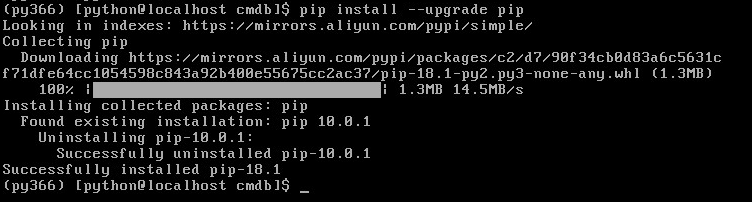
- pip install --upgrade pip
- pip install ipython
- pip install jupyter
- jupyter notebook password
- jupyter notebook --ip=192.168.103.43 --port 8080
3.3 验证
下图为更新pip包的过程,因为默认CentOS6.5是安装的pip 10.0.1版本的,接下来我们如果要安装ipython与jupyter工具则需要pip更新到pip 18.1版本 才行。
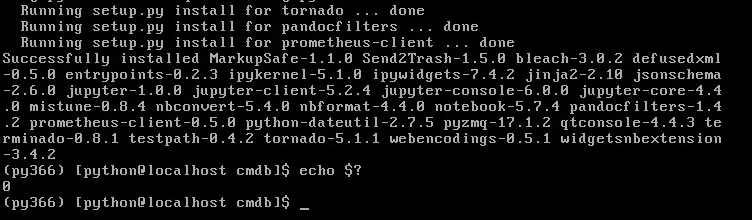
下图为安装ipython工具的过程,这里我们可以使用echo $? 命令来查看程序是否安装成功,一般“0”表示程序执行成功。

也可以如下图,直接在虚拟Python环境下使用ipython的命令查看,是否能够进入进行代码的编写与交互。

下图为安装jupyter的安装过程
下图为该Python虚拟环境下pip安装的软件包文件的存放地点。

下图为jupyter notebook创建一个密码

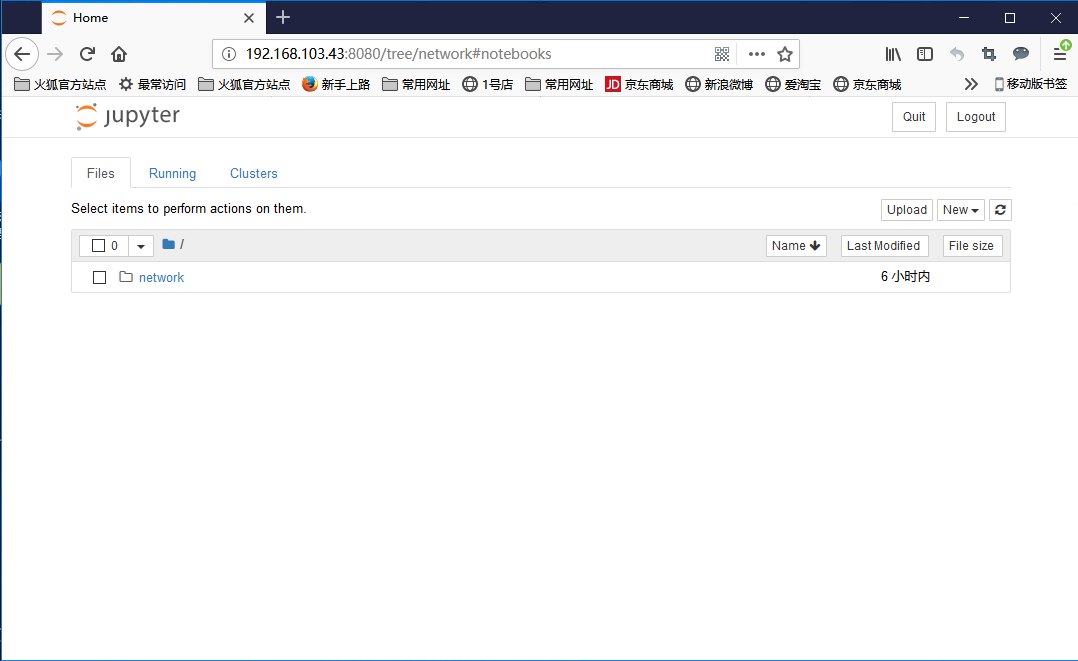
下图为jupyter工具登录后的web界面
3.4 导出包
虚拟环境的好处就在于和其他项目运行环境隔离。每一个独立的环境就可以使用pip命令导出已经安装的包,在另一个环境中安装这些包。
- (py366) [python@localhost cmdb]$ pip freeze > requirement #将cmdb目录下的Python虚拟环境的pip包冷冻压缩生成一个名为requirement的文件(这个名字随意)
- (py366) [python@localhost cmdb]$ mkdir ~/test/projects/pod1 #创建一个/home/python/test/projects/pod1的目录
- (py366) [python@localhost cmdb]$ cd ~/test/projects/ pod1 #切换到这个目录下
- [python@localhost pod1]$ pyenv install --list #查看pyenv的安装数据包的列表
- [python@localhost pod1]$ pyenv install 3.5.2 #使用pyenv工具安装Python 3.5.2
- [python@localhost pod1]$ pyenv virtualenv 3.5.2 py352 #制作Python的virtualenv虚拟环境
- [python@localhost pod1]$ pyenv local py352 #在这个/home/python/test/projects/pod1目录本地应用py352这个虚拟环境
- (py352)[python@localhost pod1]$ mv ~/cmdb/repuirement ./ #将之前/home/python/cmdb/requirement文件移动到/home/python/test/projects/pod1这个当前目录
- (py352)[python@localhost pod1]$ pip install -r requirement #使用pip命令安装这个冷冻的requirement的Python 3.6.6环境下的安装包。
4. 详细安装过程
4.1 安装Git软件包
[root@localhost ~]# yum install git -y
Loaded plugins: fastestmirror, security
base | 3.7 kB 00:00
http://mirrors.njupt.edu.cn/centos/6.10/os/x86_64/repodata/1aa8754bde2f3921d67cca4bb70d9f587fb858a24cc3d1f66d3315292a89fc20-primary.sqlite.bz2: [Errno 12] Timeout on http://10.10.254.10/cache/3/02/mirrors.njupt.edu.cn/cb1261e2fba3c41dba70da70f1451fcf/1aa8754bde2f3921d67cca4bb70d9f587fb858a24cc3d1f66d3315292a89fc20-primary.sqlite.bz2: (28, 'connect() timed out!')
Trying other mirror.
base/primary_db | 4.7 MB 00:00
省略。。。。。。
Updating : perl-Git-1.7.1-9.el6_9.noarch 1/4
Updating : git-1.7.1-9.el6_9.x86_64 2/4
Cleanup : perl-Git-1.7.1-3.el6_4.1.noarch 3/4
Cleanup : git-1.7.1-3.el6_4.1.x86_64 4/4
Verifying : git-1.7.1-9.el6_9.x86_64 1/4
Verifying : perl-Git-1.7.1-9.el6_9.noarch 2/4
Verifying : git-1.7.1-3.el6_4.1.x86_64 3/4
Verifying : perl-Git-1.7.1-3.el6_4.1.noarch 4/4
Updated:
git.x86_64 0:1.7.1-9.el6_9
Dependency Updated:
perl-Git.noarch 0:1.7.1-9.el6_9
Complete!
[root@localhost ~]#
4.2 安装Python依赖包
[root@localhost ~]# yum -y install gcc make patch gdbm-devel openssl-devel sqlite-devel zlib-devel bzip2-devel
Loaded plugins: fastestmirror, security
Determining fastest mirrors
* base: mirrors.cn99.com
* extras: mirrors.aliyun.com
* updates: mirrors.aliyun.com
Setting up Install Process
Resolving Dependencies
--> Running transaction check
---> Package bzip2-devel.x86_64 0:1.0.5-7.el6_0 will be installed
---> Package gcc.x86_64 0:4.4.7-4.el6 will be updated
--> Processing Dependency: gcc = 4.4.7-4.el6 for package: gcc-gfortran-4.4.7-4.el6.x86_64
省略。。。。。。
Dependency Updated:
cpp.x86_64 0:4.4.7-23.el6 e2fsprogs.x86_64 0:1.41.12-24.el6
e2fsprogs-libs.x86_64 0:1.41.12-24.el6 gcc-c++.x86_64 0:4.4.7-23.el6
gcc-gfortran.x86_64 0:4.4.7-23.el6 gdbm.x86_64 0:1.8.0-39.el6
keyutils-libs.x86_64 0:1.4-5.el6 krb5-libs.x86_64 0:1.10.3-65.el6
libcom_err.x86_64 0:1.41.12-24.el6 libgcc.i686 0:4.4.7-23.el6
libgcc.x86_64 0:4.4.7-23.el6 libgfortran.x86_64 0:4.4.7-23.el6
libgomp.x86_64 0:4.4.7-23.el6 libselinux.x86_64 0:2.0.94-7.el6
libselinux-utils.x86_64 0:2.0.94-7.el6 libss.x86_64 0:1.41.12-24.el6
libstdc++.x86_64 0:4.4.7-23.el6 libstdc++-devel.x86_64 0:4.4.7-23.el6
openssl.x86_64 0:1.0.1e-57.el6 sqlite.x86_64 0:3.6.20-1.el6_7.2
Complete!
[root@localhost ~]#
4.3 新建Python用户
[root@localhost ~]# useradd python
[root@localhost ~]# passwd python
Changing password for user python.
New password:
Retype new password:
passwd: all authentication tokens updated successfully.
4.4 添加yum更新源
[root@localhost ~]# cd /etc/yum.repos.d/
[root@localhost yum.repos.d]# vim CentOS-Base.repo
[updates]
name=CentOS-Updates
baseurl=https://mirrors.aliyun.com/centos/6.9/os/x86_64
gpgcheck=0
[root@localhost yum.repos.d]# yum repolist
Loaded plugins: fastestmirror, security
Loading mirror speeds from cached hostfile
* base: mirrors.aliyun.com
* extras: mirror.bit.edu.cn
* updates: mirrors.aliyun.com
base | 3.7 kB 00:00
extras | 3.4 kB 00:00
updates | 3.4 kB 00:00
repo id repo name status
base CentOS-6 - Base 6,713
extras CentOS-6 - Extras 35
updates CentOS-Updates 251
repolist: 6,999
[root@localhost yum.repos.d]# yum update nss
Loaded plugins: fastestmirror, security
Loading mirror speeds from cached hostfile
* base: mirrors.aliyun.com
* extras: mirror.bit.edu.cn
* updates: mirrors.aliyun.com
省略。。。。。。
Dependency Updated:
nspr.x86_64 0:4.19.0-1.el6
nss-softokn.x86_64 0:3.14.3-23.3.el6_8
nss-softokn-freebl.i686 0:3.14.3-23.3.el6_8
nss-softokn-freebl.x86_64 0:3.14.3-23.3.el6_8
nss-sysinit.x86_64 0:3.36.0-9.el6_10
nss-tools.x86_64 0:3.36.0-9.el6_10
nss-util.x86_64 0:3.36.0-1.el6
Complete!
4.5 安装pyenv
[root@localhost yum.repos.d]# su - python
[python@localhost ~]$ curl -L https://github.com/pyenv/pyenv-installer/raw/master/bin/pyenv-installer | bash
% Total % Received % Xferd Average Speed Time Time Time Current
Dload Upload Total Spent Left Speed
104 2188 104 2188 0 0 1709 0 0:00:01 0:00:01 --:--:-- 265k
Initialized empty Git repository in /home/python/.pyenv/.git/
省略。。。。。。
remote: Enumerating objects: 20, done.
remote: Counting objects: 100% (20/20), done.
remote: Compressing objects: 100% (11/11), done.
remote: Total 20 (delta 3), reused 16 (delta 2), pack-reused 0
Unpacking objects: 100% (20/20), done.
WARNING: seems you still have not added 'pyenv' to the load path.
# Load pyenv automatically by adding
# the following to ~/.bashrc:
export PATH="/home/python/.pyenv/bin:$PATH"
eval "$(pyenv init -)"
eval "$(pyenv virtualenv-init -)"
[python@localhost ~]$ vi ~/.bash_profile
export PATH="/home/python/.pyenv/bin:$PATH"
eval "$(pyenv init -)"
eval "$(pyenv virtualenv-init -)"
[python@localhost ~]$ source ~/.bash_profile
4.6 查看Python版本与验证pyenv命令
[python@localhost ~]$ python --version
Python 2.6.6
[python@localhost ~]$ python -V
Python 2.6.6
[python@localhost ~]$ echo $PATH
/home/python/.pyenv/plugins/pyenv-virtualenv/shims:/home/python/.pyenv/shims:/home/python/.pyenv/bin:/usr/local/bin:/bin:/usr/bin:/usr/local/sbin:/usr/sbin:/sbin:/home/python/bin:/home/python/bin
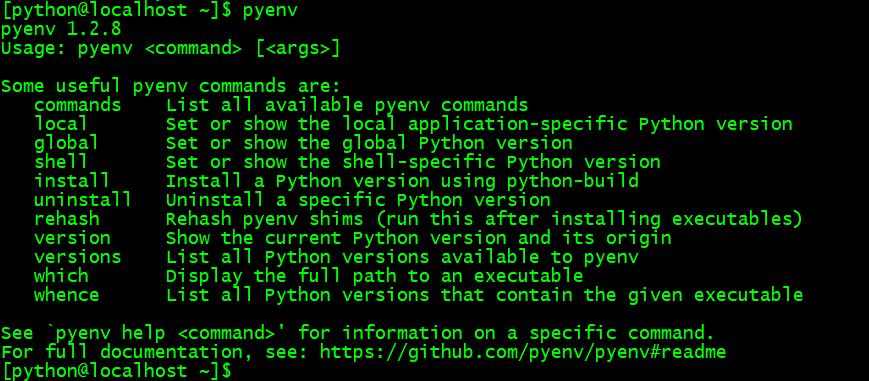
[python@localhost ~]$ pyenv
pyenv 1.2.8
Usage: pyenv <command> [<args>]
Some useful pyenv commands are:
commands List all available pyenv commands
local Set or show the local application-specific Python version
global Set or show the global Python version
shell Set or show the shell-specific Python version
install Install a Python version using python-build
uninstall Uninstall a specific Python version
rehash Rehash pyenv shims (run this after installing executables)
version Show the current Python version and its origin
versions List all Python versions available to pyenv
which Display the full path to an executable
whence List all Python versions that contain the given executable
See `pyenv help <command>' for information on a specific command.
For full documentation, see: https://github.com/pyenv/pyenv#readme
4.7 通过cache缓存方式安装Python软件
[python@localhost .pyenv]$ mkdir -p /home/python/.pyenv/cache
[python@localhost .pyenv]$ cd cache/
[python@localhost cache]$ pwd
/home/python/.pyenv/cache
[python@localhost cache]$ ls
Python-3.6.6.tar.xz Python-3.6.6.tgz
[python@localhost cache]$ pyenv install 3.6.6
Installing Python-3.6.6...
WARNING: The Python readline extension was not compiled. Missing the GNU readline lib?
Installed Python-3.6.6 to /home/python/.pyenv/versions/3.6.6
[python@localhost cache]$
验证
[python@localhost cache]$ python -V
Python 2.6.6
[python@localhost cache]$ pyenv version
system (set by /home/python/.pyenv/version)
[python@localhost cache]$ pyenv versions
* system (set by /home/python/.pyenv/version)
3.6.6
4.8 使用virtualenv 安装虚拟环境设置
[python@localhost ~]$ mkdir -p /home/python/cmdb
[python@localhost ~]$ cd /home/python/cmdb
[python@localhost cmdb]$ pyenv virtualenv 3.6.6 py366
Looking in links: /tmp/tmpw0yws0yu
Requirement already satisfied: setuptools in /home/python/.pyenv/versions/3.6.6/envs/py366/lib/python3.6/site-packages (39.0.1)
Requirement already satisfied: pip in /home/python/.pyenv/versions/3.6.6/envs/py366/lib/python3.6/site-packages (10.0.1)
[python@localhost cmdb]$
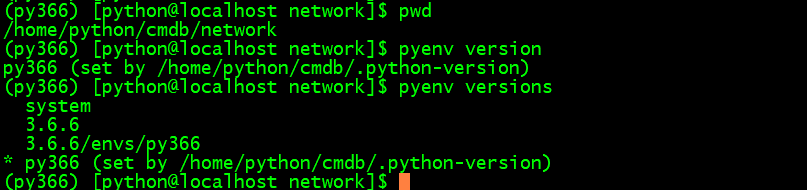
[python@localhost cmdb]$ pyenv local py366
验证:
(py366) [python@localhost cmdb]$ pyenv versions
system
3.6.6
3.6.6/envs/py366
* py366 (set by /home/python/cmdb/.python-version)
(py366) [python@localhost cmdb]$ pyenv version
py366 (set by /home/python/cmdb/.python-version)
(py366) [python@localhost cmdb]$
4.9 安装pip、ipython和jupyter的安装和配置
[python@localhost ~]$ mkdir -p /home/python/.pip
[python@localhost ~]$ cd /home/python/.pip/
[python@localhost .pip]$ touch pip.conf
[python@localhost .pip]$ vi pip.conf
[global]
index-url=https://mirrors.aliyun.com/pypi/simple/
trusted-host=mirrors.aliyun.com
验证pip命令
(py366) [python@localhost cmdb]$ pip
Usage:
pip <command> [options]
Commands:
install Install packages.
download Download packages.
uninstall Uninstall packages.
freeze Output installed packages in requirements format.
list List installed packages.
show Show information about installed packages.
check Verify installed packages have compatible dependencies.
config Manage local and global configuration.
search Search PyPI for packages.
wheel Build wheels from your requirements.
hash Compute hashes of package archives.
completion A helper command used for command completion.
help Show help for commands.
省略。。。。。。。
--no-color Suppress colored output
(py366) [python@localhost cmdb]$
(py366) [python@localhost cmdb]$cd /home/python/cmdb
(py366) [python@localhost cmdb]$pip install --upgrade pip
(py366) [python@localhost cmdb]$pip install ipython
(py366) [python@localhost cmdb]$pip install jupyter
(py366) [python@localhost cmdb]$jupyter notebook password
(py366) [python@localhost cmdb]$jupyter notebook --ip=192.168.103.43 --port 8080
