Flutter Thursday 01: App Dashboard
https://medium.com/@afegbua/flutter-thursday-app-dashboard-565df2aab12c
This is the first of our Flutter Thursday series. We will randomly pick designs or tasks from the internet every week and make flutter UI/apps.
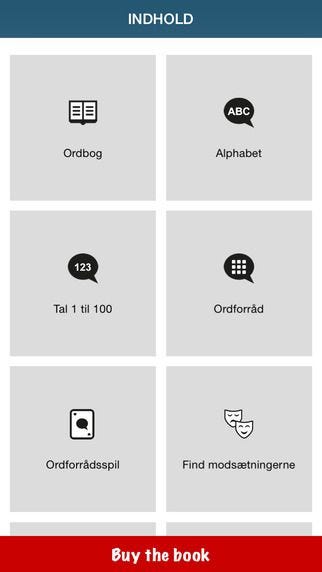
I assume you know Dart (the language for building Flutter applications) and you have your computer set up to code along. I will not cover Dart or Installing Flutter here, but I will explain some concepts and issues relating to them as we progress. We will start with a relatively simple task: a mobile app dashboard or home page (see image below):
https://www.pinterest.com/pin/309481805620652931/
Open your terminal and create a new application
$ flutter create dashboard
$ cd dashboard
Flutter gives you a nice and well documented main entry file inside the lib folder (lib/main.dart). Get rid of almost everything inside that file and also create a new file called dashboard.dart inside the same folder (this can be in another folder, it’s not the concern for now). Don’t be be deterred by the plenty boiler plate code , you can generate most of it using snippets like ‘stf’with Visual Studio code or Intellij IDE.
The modified main.dart looks like this now:
MyApp class is the root of your application. The runApp() functions inflates the MyApp widget and attaches it to the screen for display. Flutter supports material design and most of the widgets are wrapped within the MaterialAppclass. Hence you will always have to import the material package when creating your pages. Within MaterialApp you can define the title, theme and home route of your application.
Home defines the widget for the default route of the app which in this case was set to our newly created class: Dashboard(). So when you run this application for the first time, it loads the Dashboard widgets. ThemeDatadefines the team of your application.

Here is the dashboard.dart file:
Let’s review the code above. We created a class called Dashboard that extends a StatefulWidget. A StatefulWidget in Flutter simply means the widgets defined in this class can change, they are dynamic and mutable either through a user action or any form of state change. Take a quick glance at this write up to understand and know when to use Stateless or Stateful Widgets https://flutterdoc.com/stateful-or-stateless-widgets-42a132e529ed
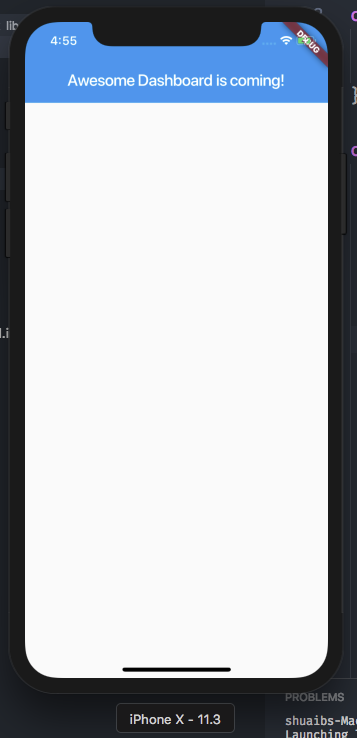
Scaffold defines the basic material design visual layout structure and gives the API s for drawers, AppBars, Floating buttons and sheets. We specified the title for the AppBar Widget as “Awesome Dashboard is coming!”.
Let’s test our app
# start a simulator
$ open -a Simulator
# run your app
$ flutter run
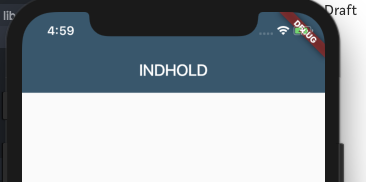
OK. Fair enough. Let’s make changes to our dashboard.dart. We will set the AppBar elevation to 0.1, change the title to the text on the design and the background colour as well
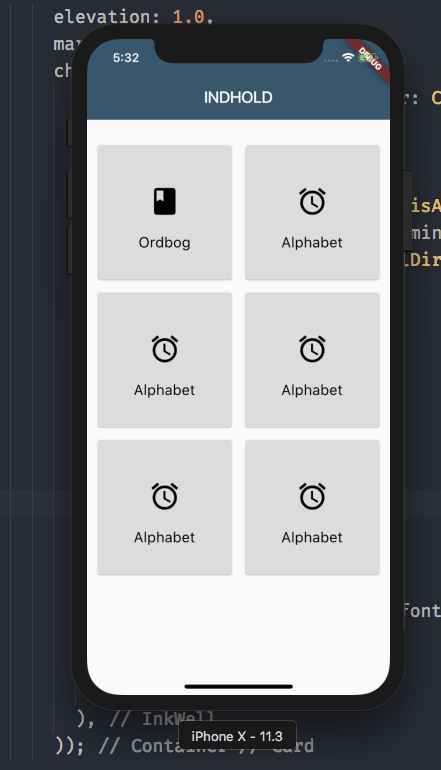
Next we will make a grid to display the dashboard items. So add the bodywidget and set it to a Container; set the padding and add a GridView.countwidget as a child. Here is the code:
We made the margins of the container to be 20 pixel and 8 pixel vertically and horizontally respectively. Then defined a two column grid using crossAxisCount: 2 and finally our GridView Widget requires children — children: <Widget>[], It takes a list of widgets. Next let’s make a function that will return Card widget of each item. So we will create a function makeDashboardItem(String title, IconData icon). It takes two arguments: a title and icon. This will represent each item on the dashboard
Set the elevation, define margins for the Card and add a Container child. Next the content of the Card widget. Our modified functions looks like this now:
Inside the container, set the colour using decoration: BoxDecoration(color: Color.fromRGBO(220, 220, 220, 1.0)). The container requires a child widget, in this case we will use the InkWell widget. Basically we what to be able to respond to touches and tap events on each of the item. We define a new Column widget as the child to InkWell, which itself takes a list of children: two Center widgets for the icon and text; and tow SizedBox to space them vertically.
Use the makeDashboardItem function to populate the children list of GridView.count
Save your changes and hit ‘r” or “ flutter run” if you have exited the app.
You should see your new shining dashboard. (Sorry I couldn’t get the exact icons used on the design)
Thank you. This was written in haste, please do notify me if you come across errors