最近公司要用到MT7688的内置wifi,查了许多资料终于调通,过程也比较坎坷,在这里整理一下。
1.先看官方文档:
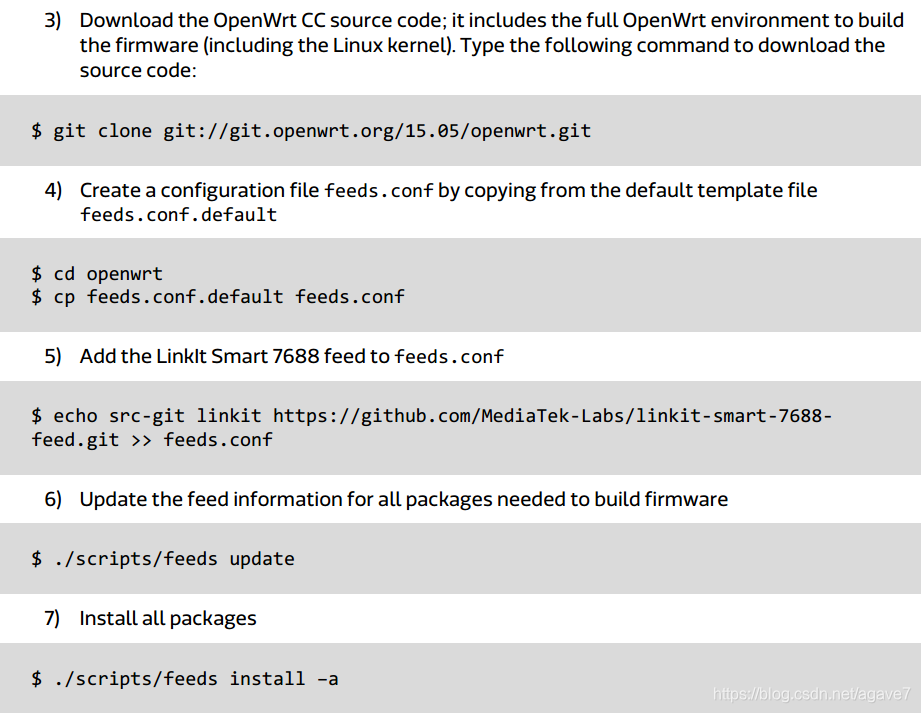
坑1:git://git.openwrt.org/15.05/openwrt.git 失效
root@localhost:~# git clone git://git.openwrt.org/15.05/openwrt.git
正克隆到 'openwrt'...
fatal: remote error: access denied or repository not exported: /15.05/openwrt.git
root@localhost:~#
问题原因:2018年 git://git.openwrt.org/15.05/openwrt.git 已经转移至 git://github.com/openwrt/chaos_calmer.git
解决办法:git clone git://github.com/openwrt/chaos_calmer.git
特别说明:这个代码一直在更新,要取得原始15.05版本的话需要 git checkout v15.05
2.继续按官方文档步骤
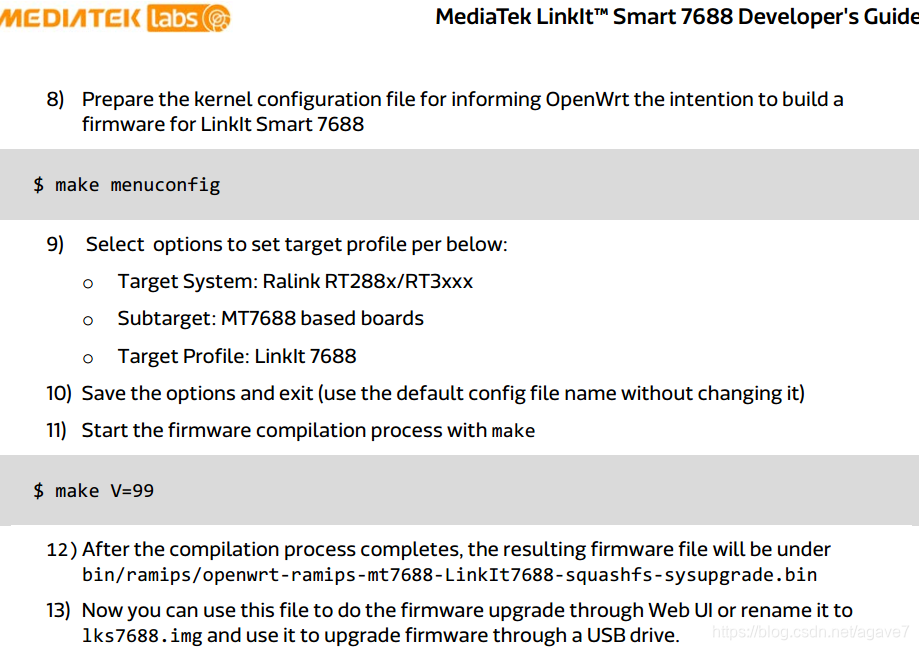
坑2:Subtarget 里没有MT7688 base boards这个选项。
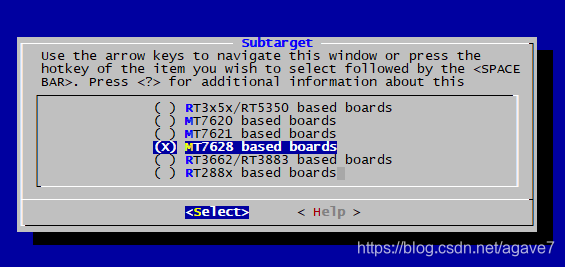
问题原因:缺少MT7688 相关target文件
解决办法1:git checkout v15.05.1 (更新到v15.05.1)
v15.05.1 版本里有MT7688支持项
解决办法2:从较新的版本合入mt7688 相关target (本人因基于v15.05已经打了一些内核(linux-3.18.20)补丁,如果切到v15.05.1版本,内核版本变更为linux-3.18.23,与3.18.20相比补丁冲突还是太大,所以我查看change log,找到内核变更为 linux-3.18.21 时的版本,再与之合并,这样只需修改极少数补丁就行了)
特别说明:这里内核版本必须是(3.18.21 ~ 3.18.44) ,feeds/linkit/README.md 里有说明,摘录如下:
LinkIt Smart 7688 uses the MediaTek proprietary Wi-Fi driver. While OpenWrt Chaos Calmer is evolving, only selected Linux kernel versions of it are supported by the Wi-Fi driver (3.18.21 ~ 3.18.44). If you are looking for a non-proprietary Wi-Fi driver, the mt76 project would be a reference of the choice.
3.编译 make V=s -j9
-j9 表示启用9个进程来编译,这样可以加快编译速度,不然那真的要四五个小时,网上一些资料说N = cpu个数+1时,效果最好,我的主机是8核(可通过cat /proc/cpuinfo 查看cpu个数),所以我这里用-j9.
编译过程中可能报错,出错时 make V=s -j1 可以查看出错具体原因。
其它说明:
make clean 用于删除 ./bin and ./build_dir 文件夹,删除后内核和所有包都要重编
make target/linux/clean clean内核
make target/linux/{clean,compile,install} 内核重新编译
make package/luci/clean 删除luci包,类似的替换成其它包名即可
参考:OpenWRT build usage
编译完后,得到sysupgrage.bin文件,使用web页面进行升级
4.wifi 验证
- ifconfig -a
ra0       Link encap:Ethernet  HWaddr 00:00:00:00:00:00
          BROADCAST MULTICAST  MTU:1500  Metric:1
          RX packets:11396 errors:0 dropped:0 overruns:0 frame:0
          TX packets:198 errors:0 dropped:0 overruns:0 carrier:0
          collisions:0 txqueuelen:1000
          RX bytes:2480013 (2.3 MiB)  TX bytes:1926 (1.8 KiB)
          Interrupt:6
有ra0 网卡说明驱动已经生效了
- ifconfig ra0 up
- iwlist ra0 scan
root@MiniTel:~# iwlist ra0 scan
[  572.630000] /openwrt/CC/build_dir/target-mipsel_24kec+dsp_uClibc-0.9.33.2/linux-ramips_mt7688/mt7628-4.0.1.3/mt_wifi_ap/../mt_wifi/embedded/os/linux/ap_ioctl.c:rt28xx_ap_ioctl[265]

ra0       Failed to read scan data : Operation not supported
坑3: iwlist ra0 scan 扫描wifi 失败
问题原因:驱动不兼容,不支持iwlist iwconfig 等wifi配置工具
解决办法1:mt_wifi.ko 这个驱动是闭源的,没有源码,没法更改,不支持就不支持,But ,还可以使用iwinfo
root@MiniTel:~# iwinfo ra0 scan
Cell 01 - Address: XX:XX:XX:XX:XX:XX
          ESSID: "TP-LINK_1101"
          Mode: Master  Channel: 1
          Signal: -256 dBm  Quality: 100/100
          Encryption: WPA2 PSK (AES-OCB)

Cell 02 - Address: XX:XX:XX:XX:XX:XX
          ESSID: "E-caretech-1"
          Mode: Master  Channel: 1
          Signal: -256 dBm  Quality: 20/100
          Encryption: WPA2 PSK (AES-OCB)

Cell 03 - Address: XX:XX:XX:XX:XX:XX
          ESSID: "MDR6A9A"
          Mode: Master  Channel: 1
          Signal: -256 dBm  Quality: 0/100
          Encryption: WPA2 PSK (AES-OCB)
解决办法2:这里还有另外一种方法,使用 iwpriv 命令
AP scanning
Use iwpriv ra0 set SiteSurvey=1 to enable access point scanning. Note that it takes a while to scan nearby APs.
Use iwpriv ra0 get_site_survey ra0 to collect the scan results.
root@MiniTel:~# iwpriv ra0 set SiteSurvey=1
root@MiniTel:~# iwpriv ra0 get_site_survey ra0
ra0       get_site_survey:
Ch  SSID                             BSSID               Security               Siganl(%)W-Mode  ExtCH  NT WPS DPID
1   TP-LINK_1101                    XX:XX:XX:XX:XX:XX   WPA1PSKWPA2PSK/AES     100      11b/g   NONE   In  NO
1   E-caretech-1                     XX:XX:XX:XX:XX:XX   WPA1PSKWPA2PSK/AES     18       11b/g/n ABOVE  In  NO
4   ChinaNet-iEWP                    XX:XX:XX:XX:XX:XX   WPA1PSKWPA2PSK/TKIPAES 57       11b/g/n NONE   In YES
- wifi 连接配置
前面说了,mt7688的官方驱动不支持iwconfig 命令配置,那wifi 要怎么使用呢?
我找到了一点资料,这里我梳理一下步骤:
4.1 启用radio0
uci set wireless.radio0.disabled=0
4,2 wan 口设置成 apcli0
uci set network.wan.ifname=apcli0
4.3 配置wifi
uci set wireless.sta.ssid=SampleAP
uci set wireless.sta.key=12345678
uci set wireless.sta.encryption=psk2
uci set wireless.sta.disabled=0
uci commit
/etc/init.d/network restart
这里是通过uci 命令进行配置,uci commit 是将配置保存,最终保存在 /etc/config/wireless , /etc/config/network 等文件里,也可以手动直接修改 /etc/config/wireless , /etc/config/network 文件,然后/etc/init.d/network restart 重启
4.5 查看wifi 连接情况
root@MiniTel:~# ifconfig -a
apcli0    Link encap:Ethernet  HWaddr 02:00:00:00:00:00
          inet addr:192.168.1.199  Bcast:192.168.1.255  Mask:255.255.255.0
          inet6 addr: fe80::ff:fe00:0/64 Scope:Link
          UP BROADCAST RUNNING MULTICAST  MTU:1500  Metric:1
          RX packets:0 errors:0 dropped:300 overruns:0 frame:0
          TX packets:0 errors:0 dropped:0 overruns:0 carrier:0
          collisions:0 txqueuelen:1000
          RX bytes:0 (0.0 B)  TX bytes:0 (0.0 B)
获取到 ip 说明已经连接上wifi.
root@MiniTel:~# route
Kernel IP routing table
Destination     Gateway         Genmask         Flags Metric Ref    Use Iface
default         192.168.1.1     0.0.0.0         UG    0      0        0 apcli0
192.168.1.0     *               255.255.255.0   U     0      0        0 apcli0
192.168.1.1     *               255.255.255.255 UH    0      0        0 apcli0
192.168.100.0   *               255.255.255.0   U     0      0        0 br-lan
root@MiniTel:~# ping baidu.com
PING baidu.com (123.125.115.110): 56 data bytes
64 bytes from 123.125.115.110: seq=0 ttl=50 time=47.667 ms
64 bytes from 123.125.115.110: seq=1 ttl=50 time=50.156 ms
64 bytes from 123.125.115.110: seq=2 ttl=50 time=48.550 ms
64 bytes from 123.125.115.110: seq=3 ttl=50 time=49.293 ms
64 bytes from 123.125.115.110: seq=4 ttl=50 time=48.932 ms
64 bytes from 123.125.115.110: seq=5 ttl=50 time=48.085 ms
64 bytes from 123.125.115.110: seq=6 ttl=50 time=49.235 ms
64 bytes from 123.125.115.110: seq=7 ttl=50 time=48.213 ms
^C
--- baidu.com ping statistics ---
8 packets transmitted, 8 packets received, 0% packet loss
round-trip min/avg/max = 47.667/48.766/50.156 ms
至此,mt7688内置wifi 调试成功。
参考资料:
1.MT7688 build-the-firmware-from-source-codes
2.MT7688 switch-to-station-mode
3.MT7688 iwpriv-commands