Java Web/Eclipse/Maven/Tomcat
最近有个新项目是java web项目,记录一下,可能比较乱。虽然没接触过Java,但是eclipse还是用过的
初识项目
同事说,项目是maven打包的,可以用maven开启服务,我就研究了一下,由于项目不能外露,我先创建一个demo的项目。
用eclipse 创建 Maven web项目
打开eclipse File->New->Maven Project。如果默认列表中没有Maven Project 选择 Other...
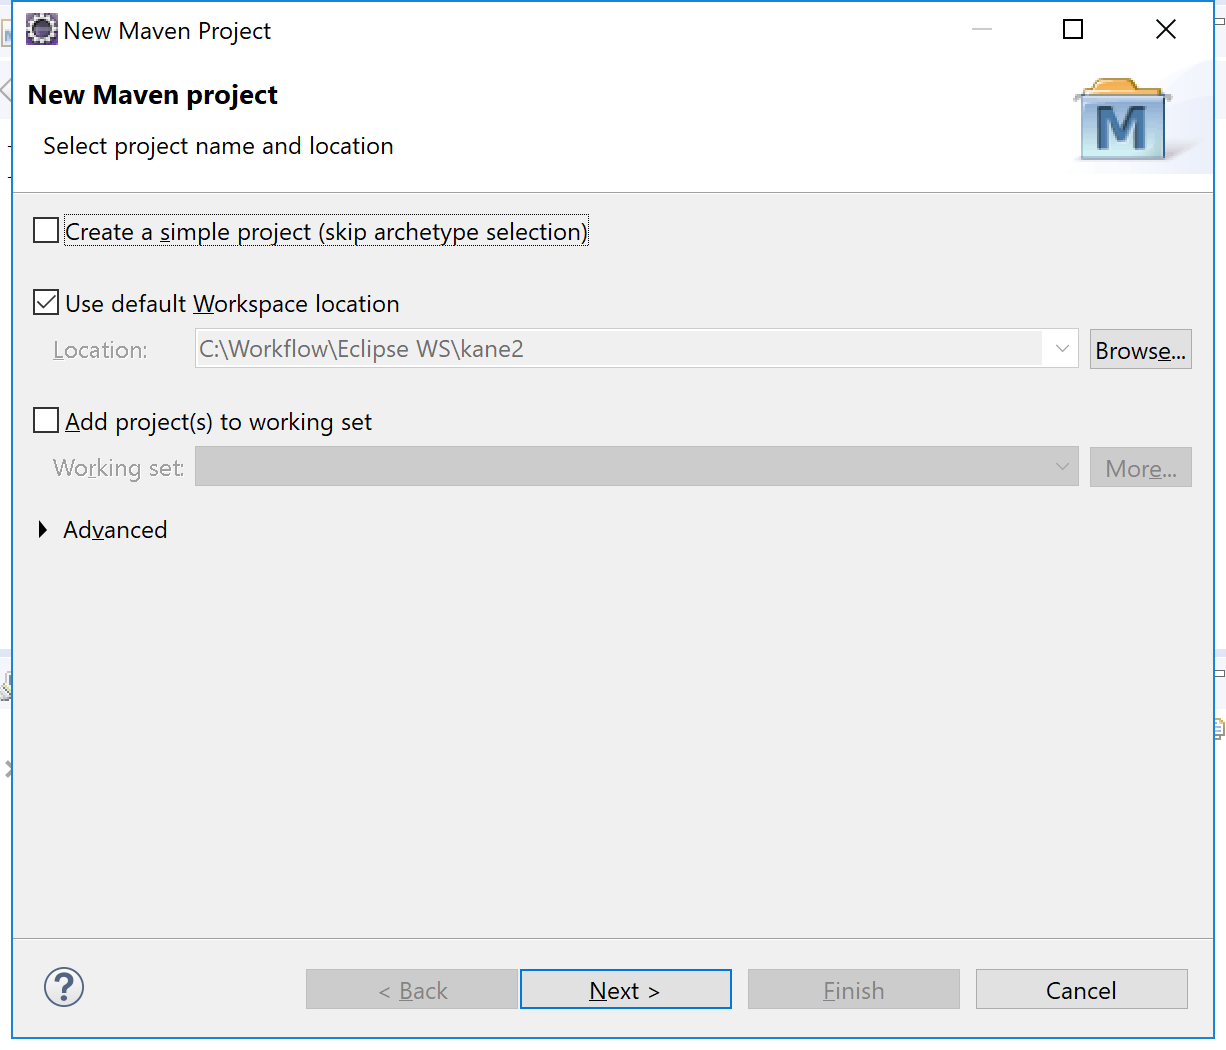
如下图,什么不用选择,直接Next
- 如下图,请选择 maven-archetype-webapp,因为我们要创建一个web项目

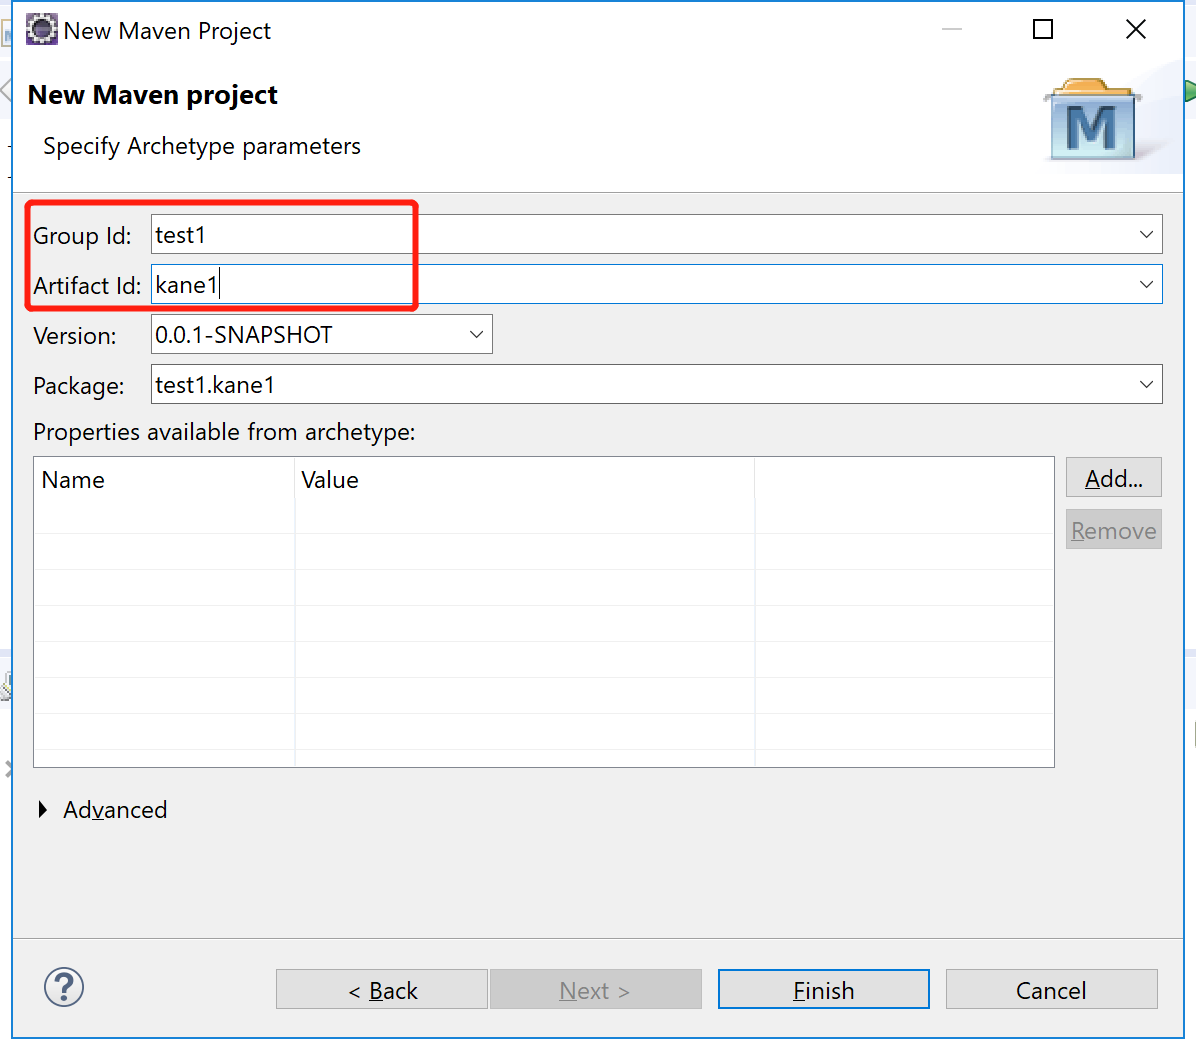
- 如下图输入 group id 与 artifact id 点击finish即可
- 下面配置一个Tomcat Apache 服务器
- 访问 tomcat 官网下载压缩包,并解压。
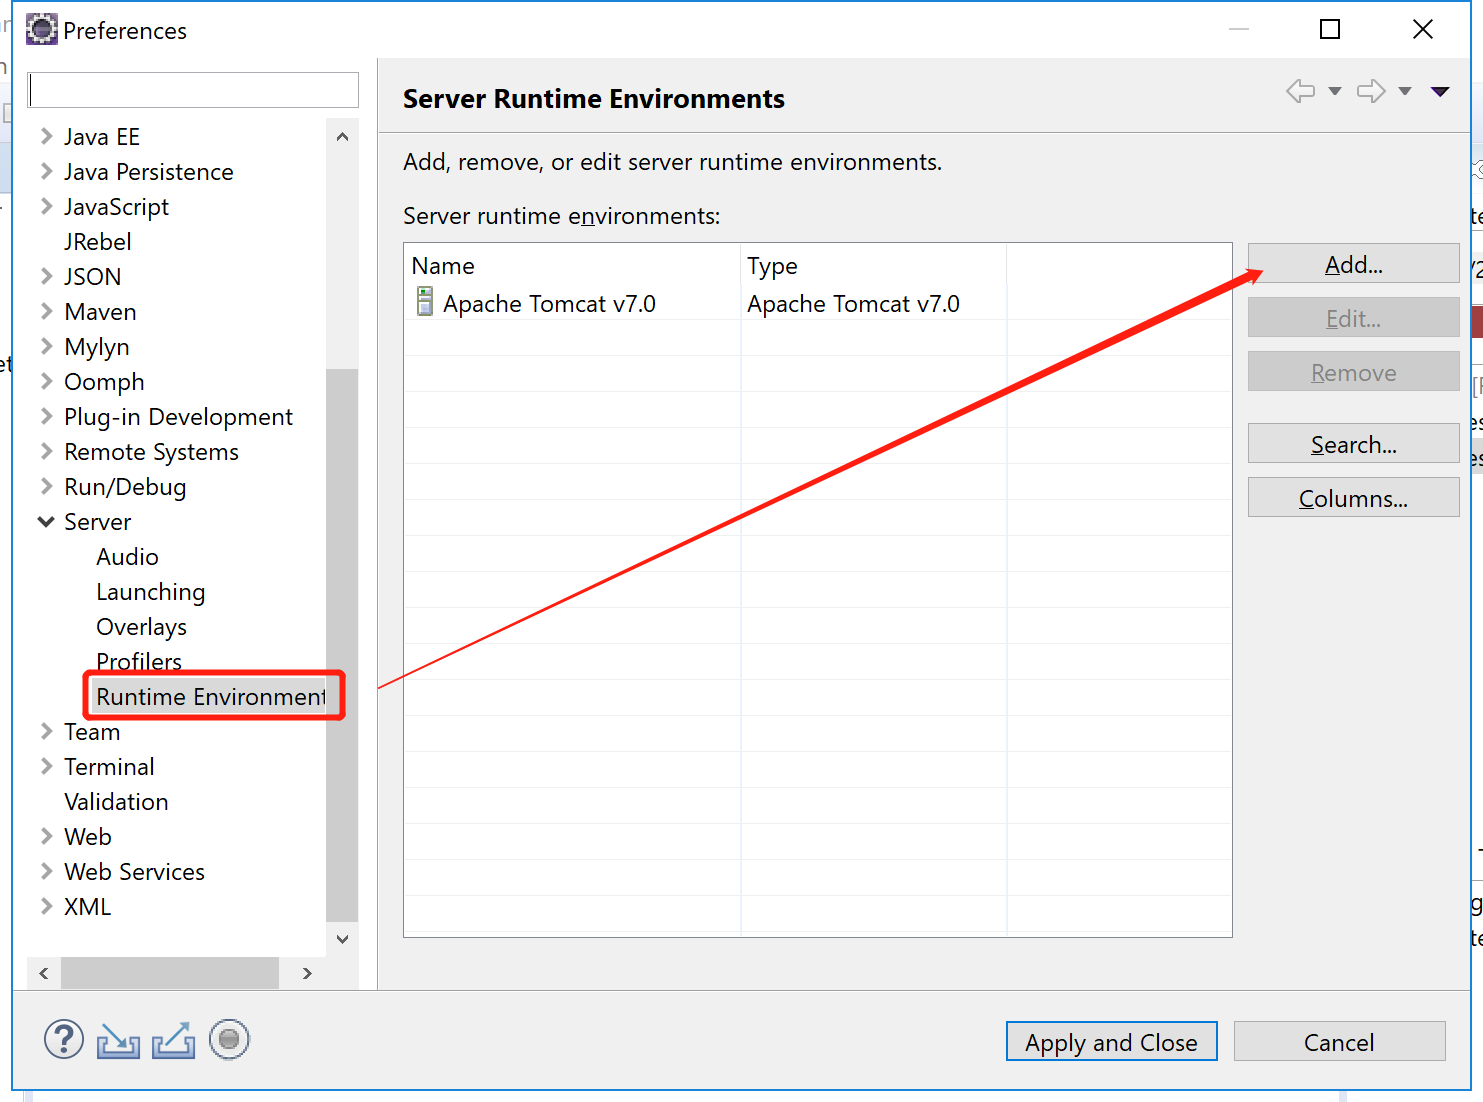
- 在 eclipse中依次打开 Window->Preferences
如图一次找到 Server->Runtime Environments 点击子面板上的 Add 按钮
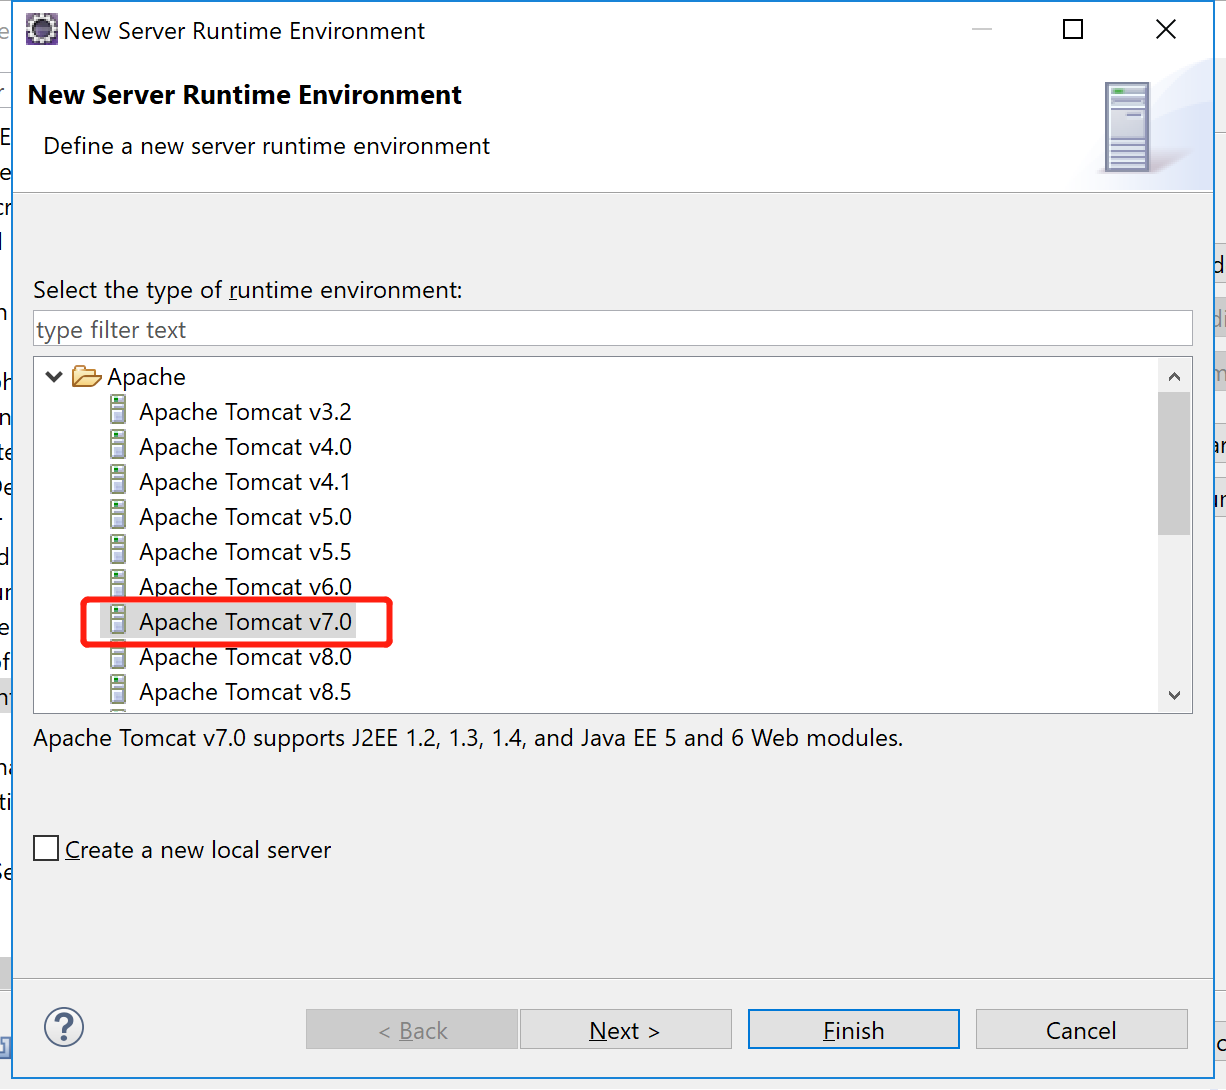
选择你自己的下载的tomcat 版本,我下载的是7,点击Next
找到刚才解压好的Tomcat路径,点击finish

- 下面直接将,刚才的Maven项目放到 Tomcat中运行。
项目上右键依次 Run As-> Run on Server,选择刚才添加的Tomcat,
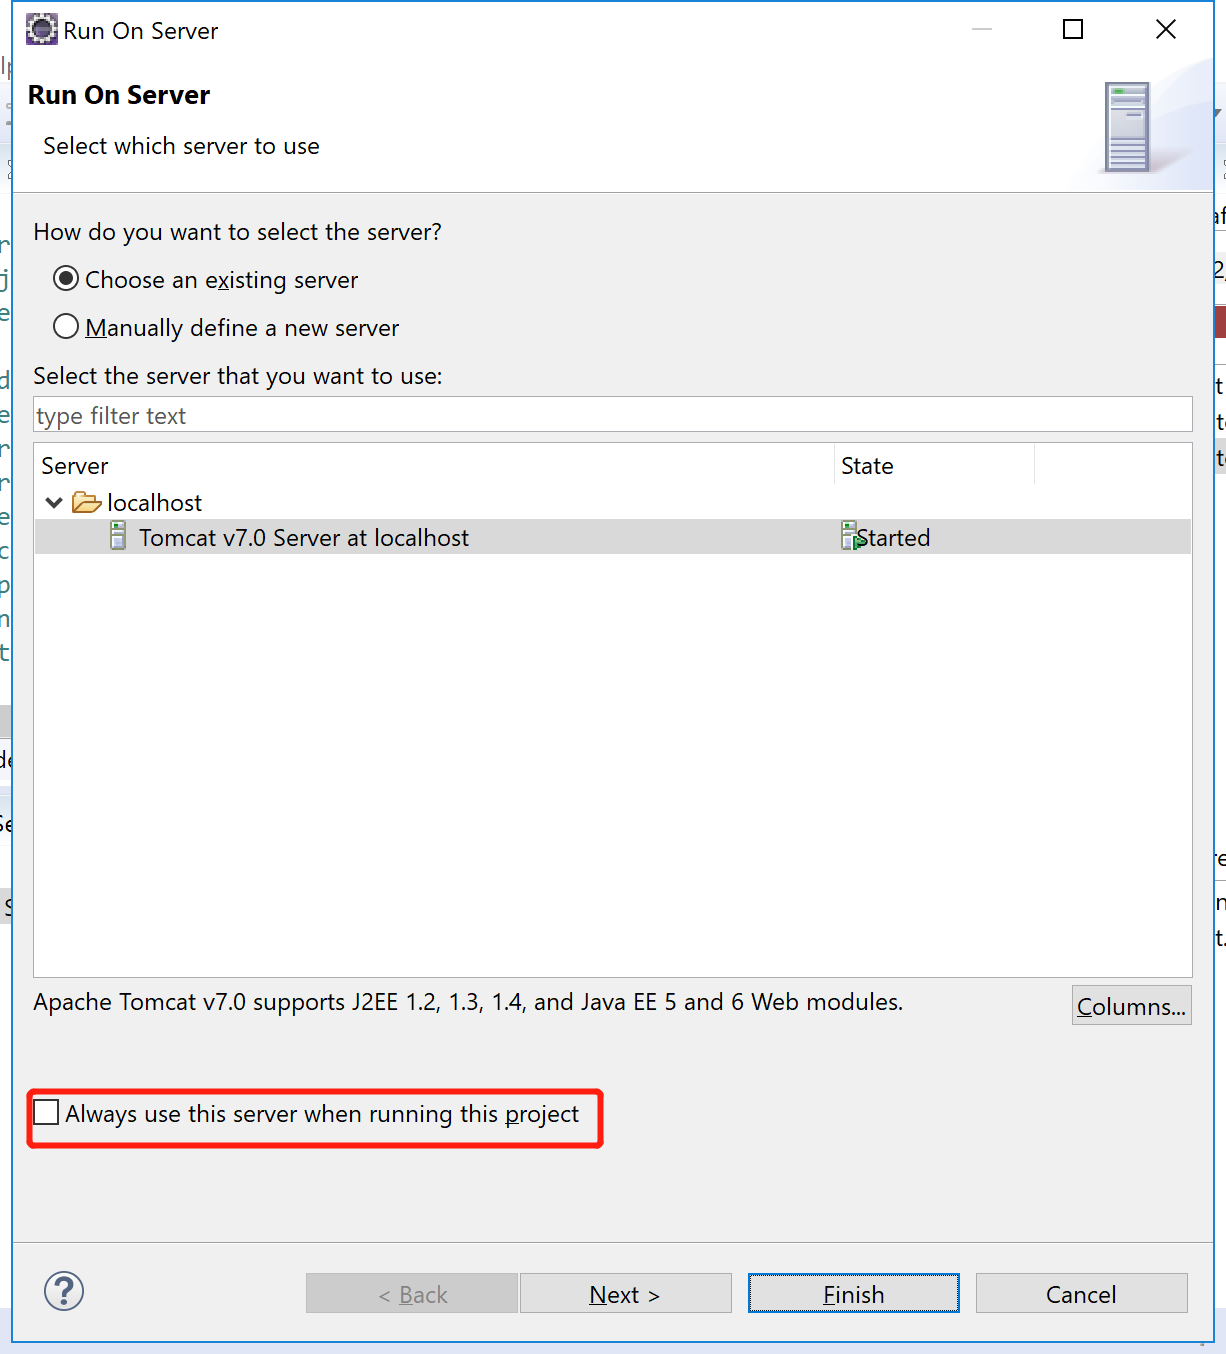
上图,成功开启WebApp
使用Maven自己创建Web项目
下面介绍如何用CMD,自己用maven 命令行创建web项目
- 到maven官网下载 maven,下载后解压
- 到环境变量去配置 maven 命令,将 [your maven path]/bin配置到path中
- 随意打开一个CMD 键入 mvn --version
# 打出版本信息
Apache Maven 3.6.0 (97c98ec64a1fdfee7767ce5ffb20918da4f719f3; 2018-10-25T02:41:47+08:00)
Maven home: C:\Workflow\apache-maven-3.6.0\bin\..
Java version: 1.8.0_172, vendor: Oracle Corporation, runtime: C:\Program Files (x86)\Java\jdk1.8.0_172\jre
Default locale: en_US, platform encoding: GBK
OS name: "windows 10", version: "10.0", arch: "x86", family: "windows"- CD 到你想要创建项目的目录下,键入如下命令:
mvn archetype:generate # 创建
    -DgroupId=packageName # 相当于 eclipse里面的groupid
    -DartifactId=webappName # 相当于 eclipse里面的artifactid
    -DarchetypeArtifactId=maven-archetype-webapp #相当于在eclipse中选择maven-archetype-webapp
# 命令请弄成一行,执行
mvn archetype:generate -DgroupId=packageName -DartifactId=webappName -DarchetypeArtifactId=maven-archetype-webapp
#这里说明一下,在之前的maven版本使用create,在3.0.5版本之后使用generate替代create了
#贴一下成功的结果
[INFO] Scanning for projects...
[INFO]
[INFO] ------------------< org.apache.maven:standalone-pom >-------------------
[INFO] Building Maven Stub Project (No POM) 1
[INFO] --------------------------------[ pom ]---------------------------------
[INFO]
[INFO] >>> maven-archetype-plugin:3.0.1:generate (default-cli) > generate-sources @ standalone-pom >>>
[INFO]
[INFO] <<< maven-archetype-plugin:3.0.1:generate (default-cli) < generate-sources @ standalone-pom <<<
[INFO]
[INFO]
[INFO] --- maven-archetype-plugin:3.0.1:generate (default-cli) @ standalone-pom ---
[INFO] Generating project in Interactive mode
Downloading from central: https://repo.maven.apache.org/maven2/org/apache/maven/archetypes/maven-archetype-bundles/2/maven-archetype-bundles-2.pom
Downloaded from central: https://repo.maven.apache.org/maven2/org/apache/maven/archetypes/maven-archetype-bundles/2/maven-archetype-bundles-2.pom (1.5 kB at 2.2 kB/s)
Downloading from central: https://repo.maven.apache.org/maven2/org/apache/maven/archetype/maven-archetype-parent/1/maven-archetype-parent-1.pom
Downloaded from central: https://repo.maven.apache.org/maven2/org/apache/maven/archetype/maven-archetype-parent/1/maven-archetype-parent-1.pom (1.3 kB at 1.9 kB/s)
Downloading from central: https://repo.maven.apache.org/maven2/org/apache/maven/maven-parent/4/maven-parent-4.pom
Downloaded from central: https://repo.maven.apache.org/maven2/org/apache/maven/maven-parent/4/maven-parent-4.pom (10.0 kB at 15 kB/s)
[INFO] Using property: groupId = packageName
[INFO] Using property: artifactId = webappName
Define value for property 'version' 1.0-SNAPSHOT: : test
[INFO] Using property: package = packageName
Confirm properties configuration:
groupId: packageName
artifactId: webappName
version: test
package: packageName
Y: :
[INFO] ----------------------------------------------------------------------------
[INFO] Using following parameters for creating project from Old (1.x) Archetype: maven-archetype-webapp:1.0
[INFO] ----------------------------------------------------------------------------
[INFO] Parameter: basedir, Value: C:\Workflow\Eclipse WS
[INFO] Parameter: package, Value: packageName
[INFO] Parameter: groupId, Value: packageName
[INFO] Parameter: artifactId, Value: webappName
[INFO] Parameter: packageName, Value: packageName
[INFO] Parameter: version, Value: test
[INFO] project created from Old (1.x) Archetype in dir: C:\Workflow\Eclipse WS\webappName
[INFO] ------------------------------------------------------------------------
[INFO] BUILD SUCCESS
[INFO] ------------------------------------------------------------------------
[INFO] Total time: 43.033 s
[INFO] Finished at: 2018-12-18T14:48:42+08:00
[INFO] ------------------------------------------------------------------------- 直接键入 mvn tomcat:run,经过maven一顿自动下载之后,会开启tomcat
C:\Workflow\Eclipse WS\webappName>mvn tomcat:run
[INFO] Scanning for projects...
[INFO]
[INFO] -----------------------< packageName:webappName >-----------------------
[INFO] Building webappName Maven Webapp test
[INFO] --------------------------------[ war ]---------------------------------
[INFO]
[INFO] >>> tomcat-maven-plugin:1.1:run (default-cli) > compile @ webappName >>>
[INFO]
[INFO] --- maven-resources-plugin:2.6:resources (default-resources) @ webappName ---
[WARNING] Using platform encoding (GBK actually) to copy filtered resources, i.e. build is platform dependent!
[INFO] Copying 0 resource
[INFO]
[INFO] --- maven-compiler-plugin:3.1:compile (default-compile) @ webappName ---
[INFO] No sources to compile
[INFO]
[INFO] <<< tomcat-maven-plugin:1.1:run (default-cli) < compile @ webappName <<<
[INFO]
[INFO]
[INFO] --- tomcat-maven-plugin:1.1:run (default-cli) @ webappName ---
[INFO] Running war on http://localhost:8080/webappName
[INFO] Using existing Tomcat server configuration at C:\Workflow\Eclipse WS\webappName\target\tomcat
十二月 18, 2018 3:07:41 下午 org.apache.catalina.startup.Embedded start
INFO: Starting tomcat server
十二月 18, 2018 3:07:41 下午 org.apache.catalina.core.StandardEngine start
INFO: Starting Servlet Engine: Apache Tomcat/6.0.29
十二月 18, 2018 3:07:41 下午 org.apache.coyote.http11.Http11Protocol init
INFO: Initializing Coyote HTTP/1.1 on http-8080
十二月 18, 2018 3:07:41 下午 org.apache.coyote.http11.Http11Protocol start
INFO: Starting Coyote HTTP/1.1 on http-8080
浏览器 访问上面提供的网址,发现报错了。如下图

- 调查之后发现是tomcat的版本与jdk版本不符合,我的本地是1.8这样我们需要tomcat7来运行,上面eclipse安装的恰好还是7
打开项目目录下的pom.xml文件,在build标签下增加如下内容
<plugins>
    <plugin>
        <groupId>org.apache.tomcat.maven</groupId>
            <artifactId>tomcat7-maven-plugin</artifactId>
            <version>2.2</version>
            <configuration>
                    <port>8080</port>
                    <uriEncoding>UTF-8</uriEncoding>
                    <url>http://localhost:8080</url>
                    <server>tomcat7</server>
            </configuration>
    </plugin>
</plugins>- 重新键入命令 mvn tomcat7:run,经过一顿下载之后开启tomcat7
C:\Workflow\Eclipse WS\webappName>mvn tomcat7:run
[INFO] Scanning for projects...
[INFO]
[INFO] -----------------------< packageName:webappName >-----------------------
[INFO] Building webappName Maven Webapp test
[INFO] --------------------------------[ war ]---------------------------------
[INFO]
[INFO] >>> tomcat7-maven-plugin:2.2:run (default-cli) > process-classes @ webappName >>>
[INFO]
[INFO] --- maven-resources-plugin:2.6:resources (default-resources) @ webappName ---
[WARNING] Using platform encoding (GBK actually) to copy filtered resources, i.e. build is platform dependent!
[INFO] Copying 0 resource
[INFO]
[INFO] --- maven-compiler-plugin:3.1:compile (default-compile) @ webappName ---
[INFO] No sources to compile
[INFO]
[INFO] <<< tomcat7-maven-plugin:2.2:run (default-cli) < process-classes @ webappName <<<
[INFO]
[INFO]
[INFO] --- tomcat7-maven-plugin:2.2:run (default-cli) @ webappName ---
[INFO] Running war on http://localhost:8080/webappName
[INFO] Using existing Tomcat server configuration at C:\Workflow\Eclipse WS\webappName\target\tomcat
[INFO] create webapp with contextPath: /webappName
十二月 18, 2018 3:26:14 下午 org.apache.coyote.AbstractProtocol init
INFO: Initializing ProtocolHandler ["http-bio-8080"]
十二月 18, 2018 3:26:14 下午 org.apache.catalina.core.StandardService startInternal
INFO: Starting service Tomcat
十二月 18, 2018 3:26:14 下午 org.apache.catalina.core.StandardEngine startInternal
INFO: Starting Servlet Engine: Apache Tomcat/7.0.47
十二月 18, 2018 3:26:16 下午 org.apache.coyote.AbstractProtocol start
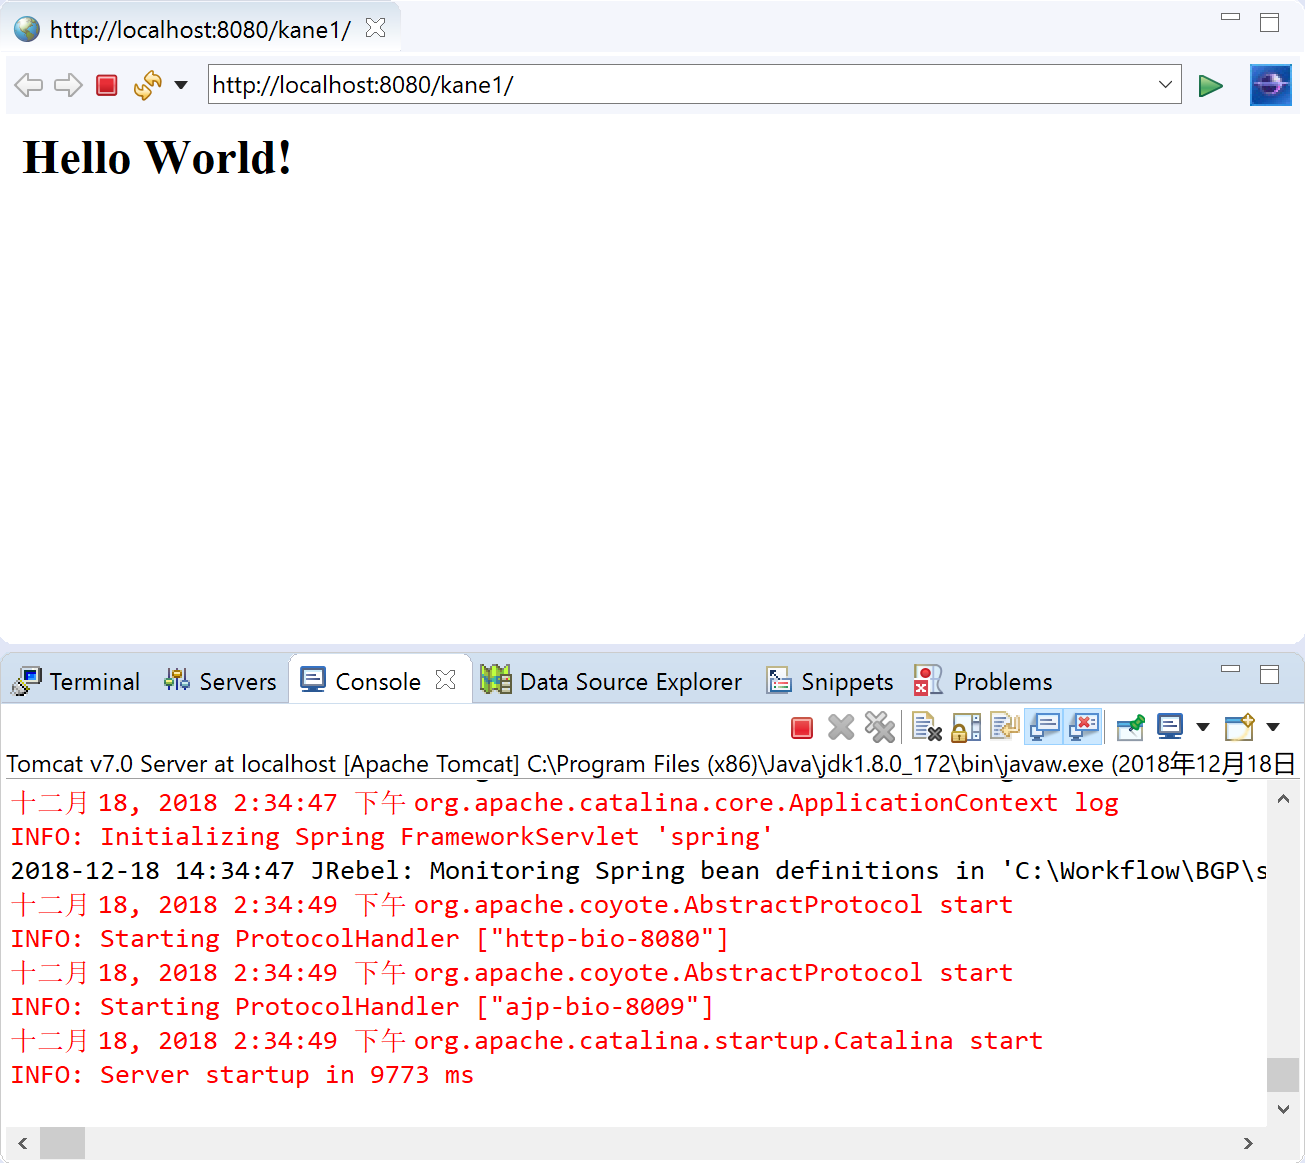
INFO: Starting ProtocolHandler ["http-bio-8080"]访问浏览器,发现可以正常显示Hello World

至此,使用maven 创建了一个web项目并运行起来
使用jetty运行Maven 项目
给我项目中,我是用jetty起来的,没有使用tomcat,介绍下jetty的使用方法
- 接着上面的项目来,我们直接更改pom.xml文件,放到
<plugin>
        <groupId>org.mortbay.jetty</groupId>
        <artifactId>maven-jetty-plugin</artifactId>
        <version>6.1.5</version>
        <configuration>
                <webAppSourceDirectory>src/main/webapp</webAppSourceDirectory>
                <scanIntervalSeconds>0</scanIntervalSeconds><!--这个是jetty支持的java热部署,但是不建议使用-->
                <contextPath>/webappName</contextPath>
                <connectors>
                        <connector implementation="org.mortbay.jetty.nio.SelectChannelConnector">
                                <port>8080</port>
                        </connector>
                </connectors>
        </configuration>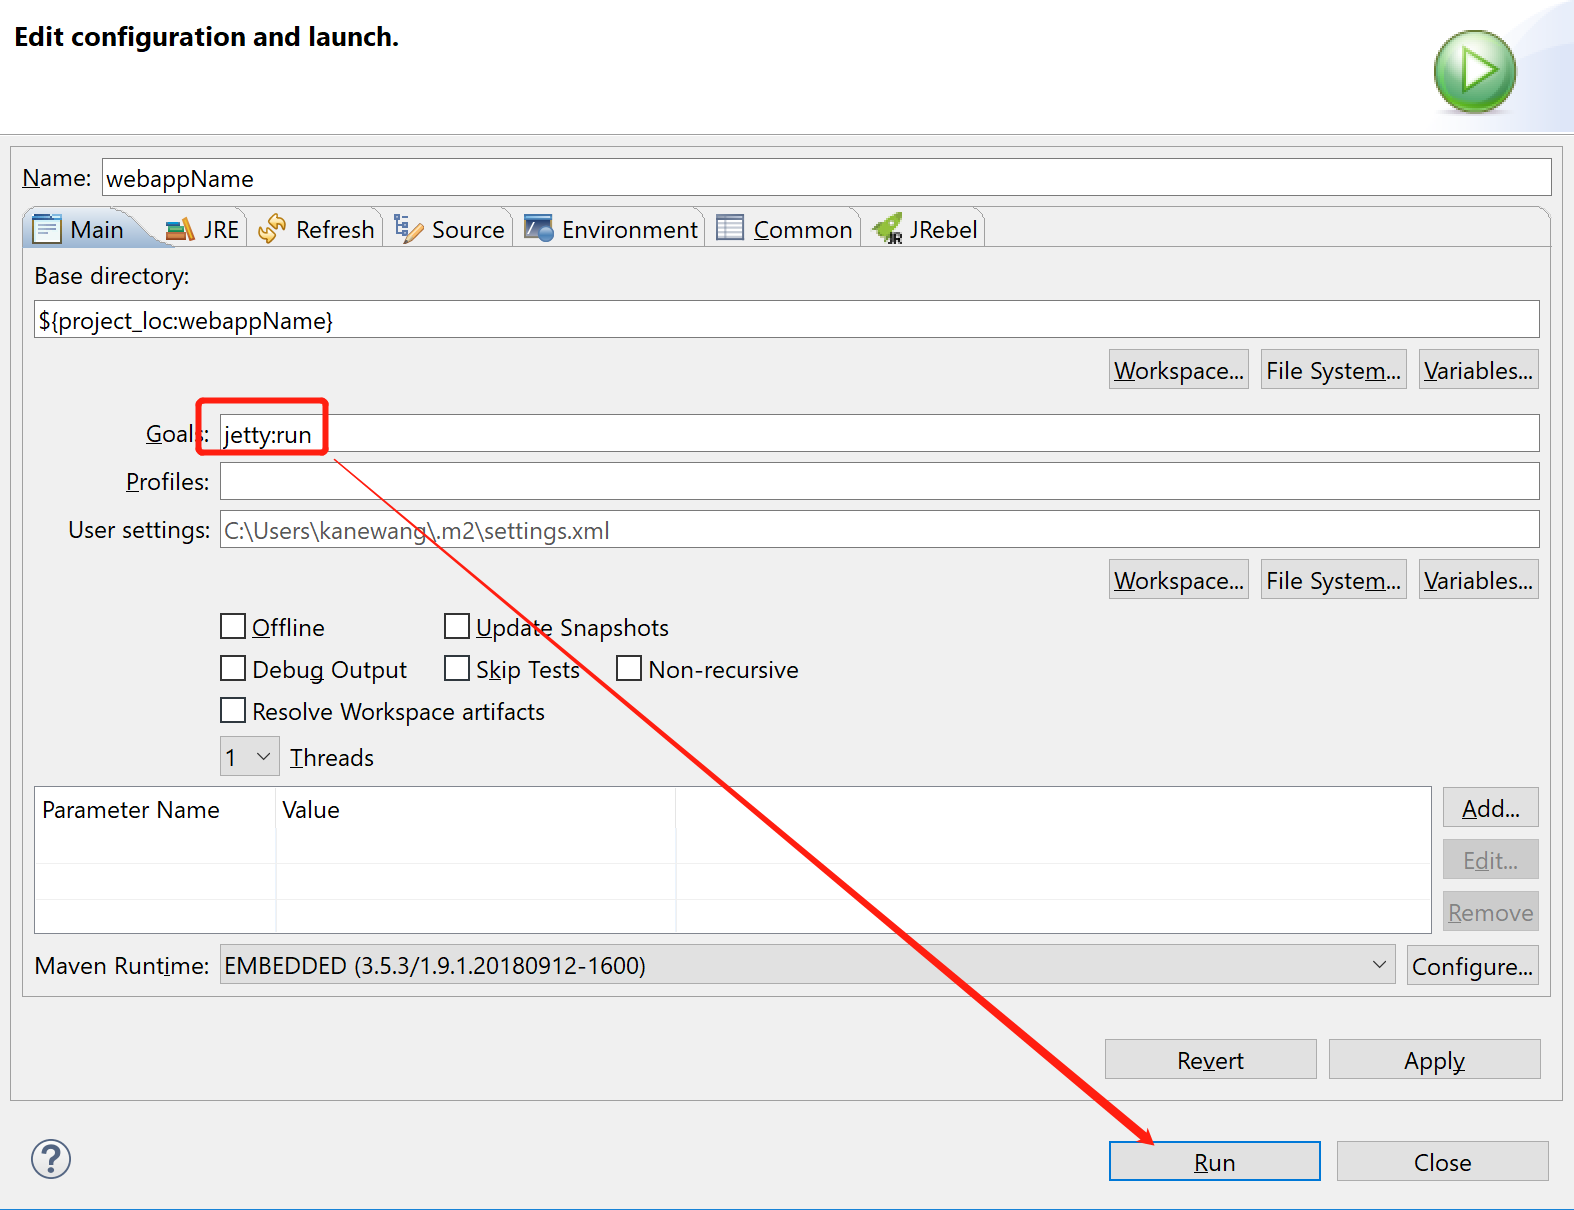
</plugin>- 关闭刚才开启的tomcat,键入 mvn jetty:run
# maven 一顿安装之后,输出如下,
[INFO] Configuring Jetty for project: webappName Maven Webapp
[INFO] Webapp source directory = C:\Workflow\Eclipse WS\webappName\src\main\webapp
[INFO] web.xml file = C:\Workflow\Eclipse WS\webappName\src\main\webapp\WEB-INF\web.xml
[INFO] Classes = C:\Workflow\Eclipse WS\webappName\target\classes
[INFO] Logging to org.slf4j.impl.MavenSimpleLogger(org.mortbay.log) via org.mortbay.log.Slf4jLog
[INFO] Context path = /webappName
[INFO] Tmp directory = C:\Workflow\Eclipse WS\webappName\target\work
[INFO] Web defaults = jetty default
[INFO] Web overrides = none
[INFO] Webapp directory = C:\Workflow\Eclipse WS\webappName\src\main\webapp
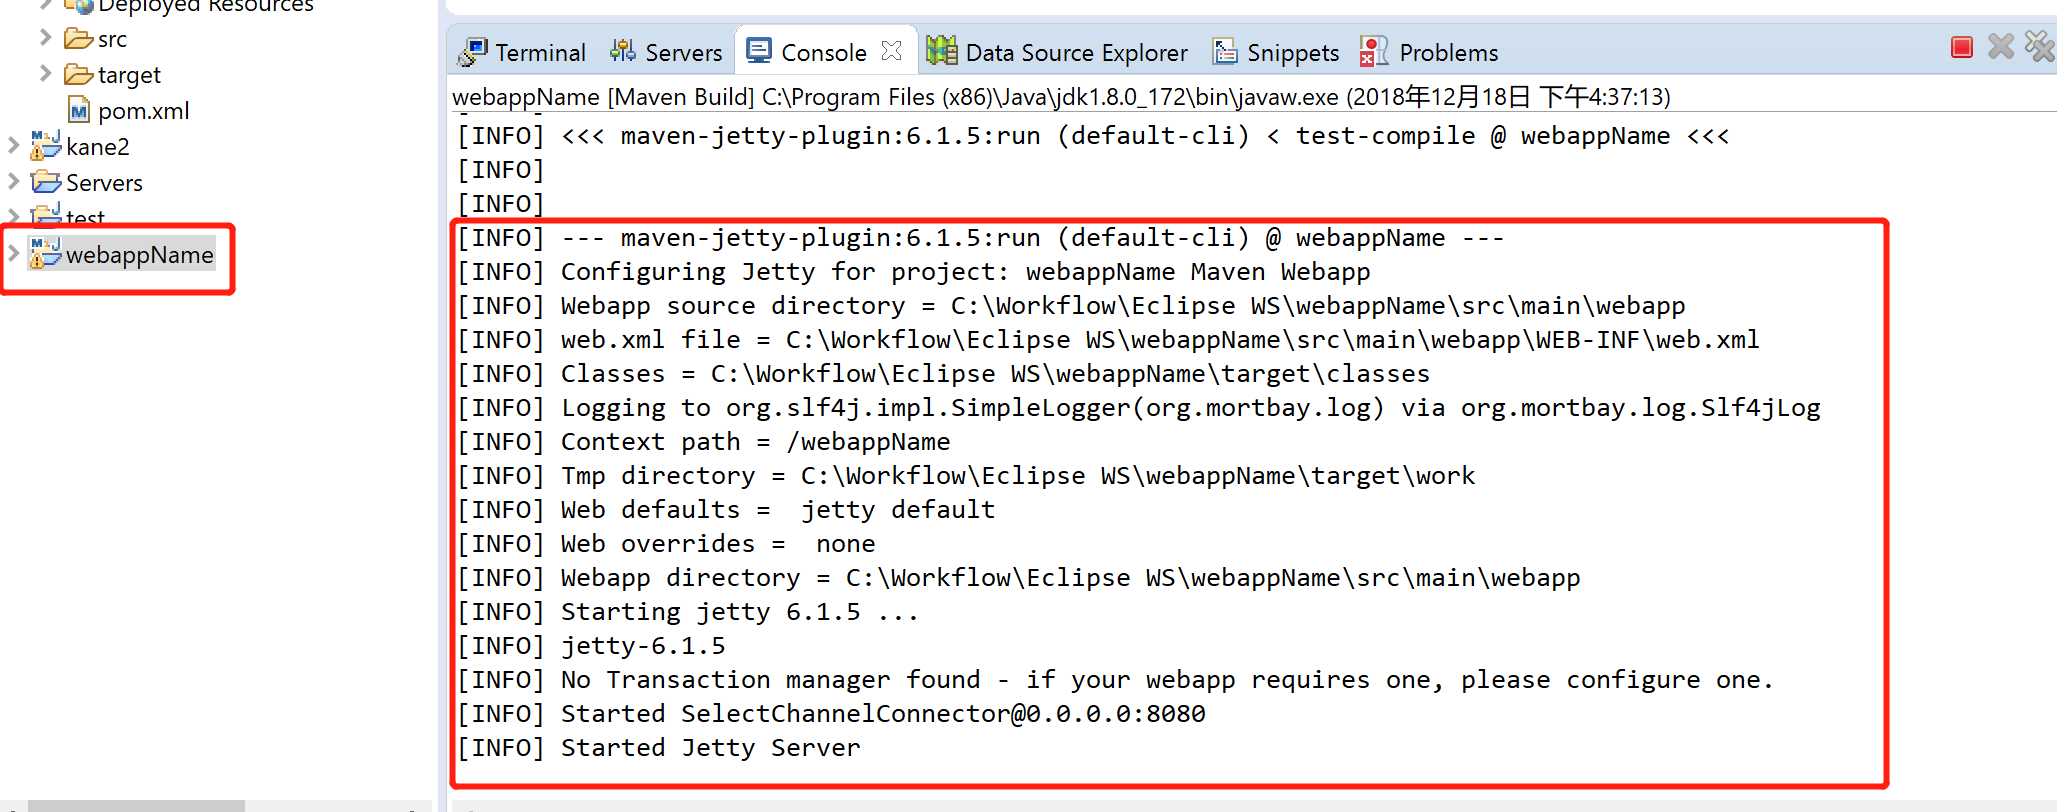
[INFO] Starting jetty 6.1.5 ...
[INFO] jetty-6.1.5
[INFO] No Transaction manager found - if your webapp requires one, please configure one.
[INFO] Started [email protected]:8080
[INFO] Started Jetty Server- 打开浏览器,重新输入localhost:8080,还是能够正常访问Hello World
在 eclipse中,使用maven build web项目
Eclipse中当然也可以使用上面的maven 命令进行项目build
- 打开Eclipse,将上面使用maven的项目Import到eclipse 工作目录中。一次选择 File->Import->,找到 Maven -> Existing Maven Project
- 打开项目后,在导入的项目上右键,依次找到 Run as -> Maven build...先配置下maven执行的命令,要选择带三个点的呦。
做如下的配置,
Console 输出
- 增加另一个配置,配置 tomcat7:run
访问浏览器会发现都可以访问Hello World
Eclipse的Java 热部署
改个java 代码就需要重新开服务器感觉太耽误效率了。最后了解到有一个叫Jrebel的插件,下面介绍一下
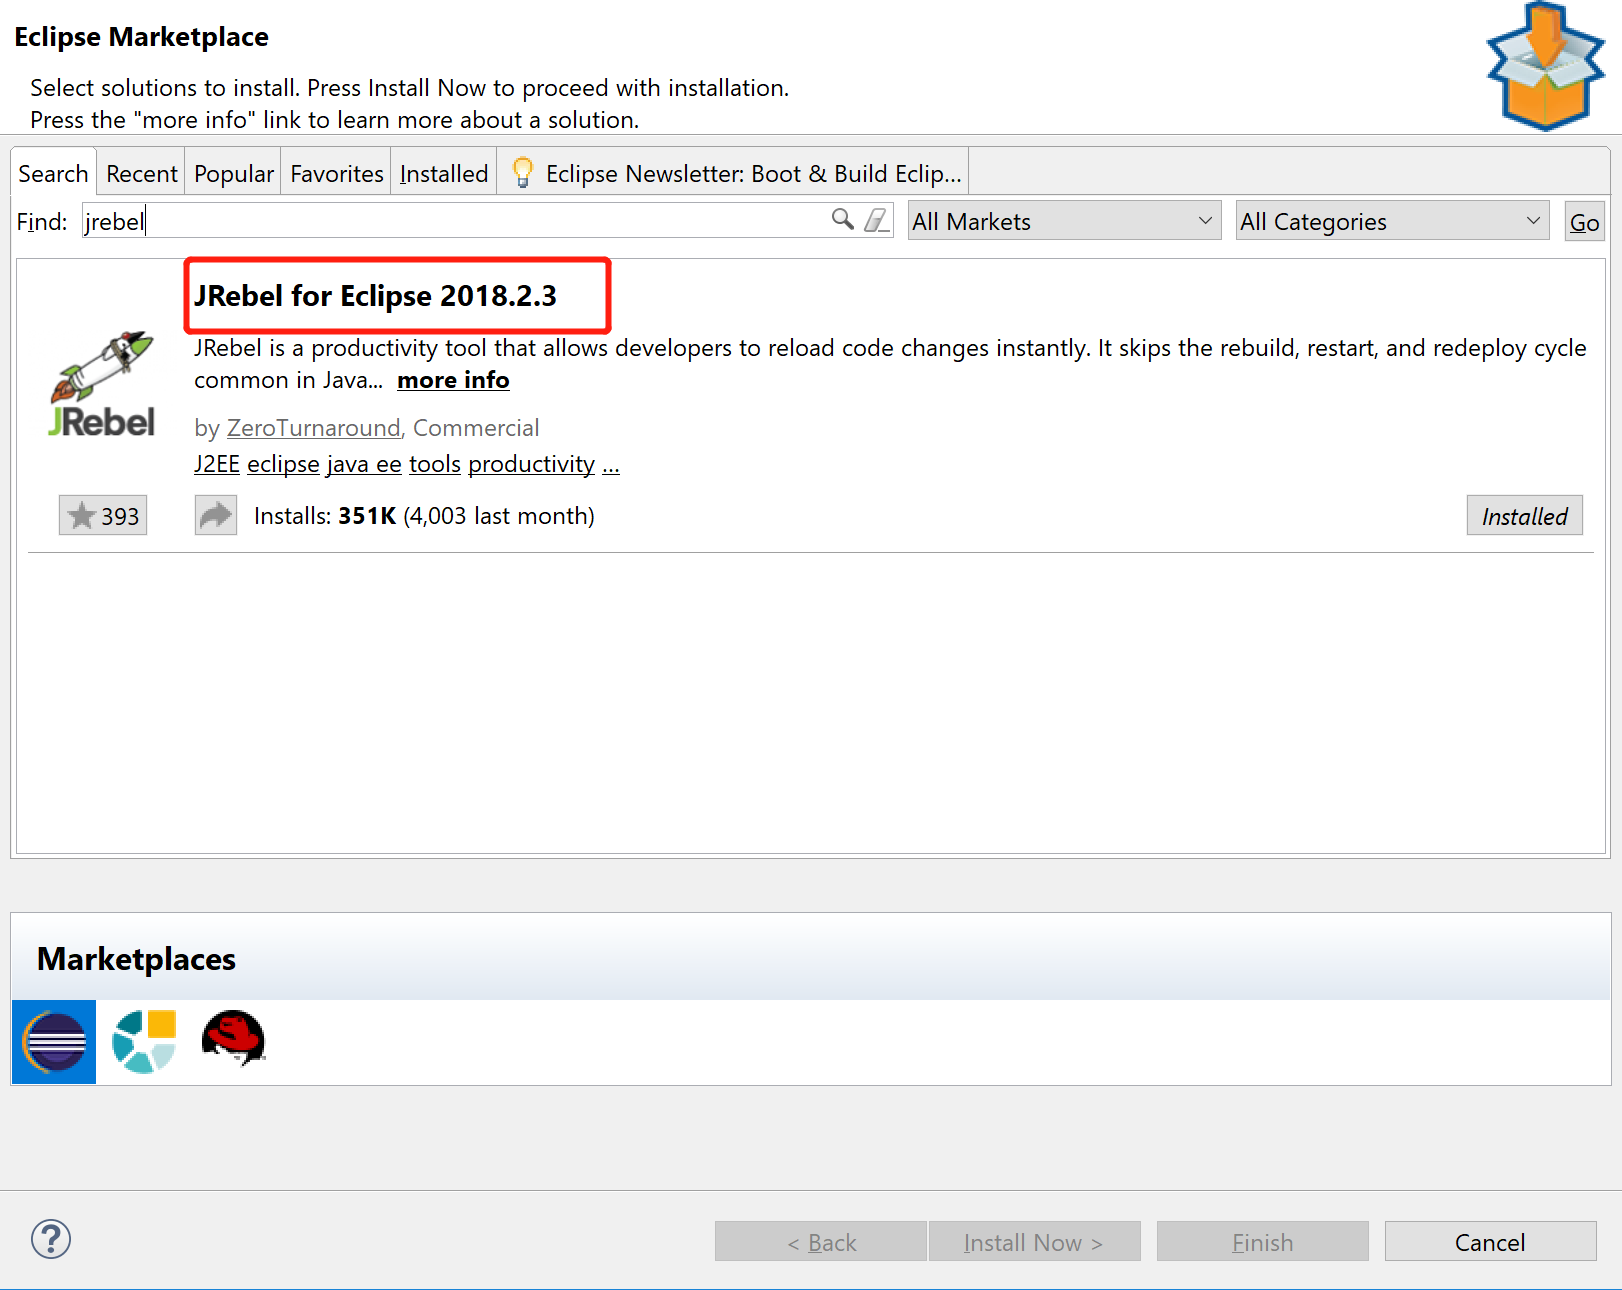
依次点击 Help -> Eclipse Marketplace搜索 Jrebel 插件,依次安装上,重启Eclipse。
- 插件需要激活,这边可以申请免费的有14天的免费试用时长。直接到官网注册一个账号就可以了。将license copy下来
依次打开 Help->JRebel->Configuration配置lincense,免费的话选择第三个Activation Code,将刚才注册账号时给的code复制进来就可以。在这里推荐一个永久免费的,是我在网上找到的一个server:http://139.199.89.239:1008/,邮箱随便输入就好了。

- 由于我们在Eclipse里面配置的,所以想要使用,Jrebel必须 Run on server使用Eclipse中的 tomcat
在你的Tomcat启动之前在Console里面看到如下输出,证明你成功了:
2018-12-18 17:14:49 JRebel:  Starting logging to file: C:\Users\kanewang\.jrebel\jrebel.log
2018-12-18 17:14:49 JRebel:
2018-12-18 17:14:49 JRebel:  #############################################################
2018-12-18 17:14:49 JRebel:
2018-12-18 17:14:49 JRebel:  JRebel Agent 2018.2.3 (201811261141)
2018-12-18 17:14:49 JRebel:  (c) Copyright ZeroTurnaround AS, Estonia, Tartu.
2018-12-18 17:14:49 JRebel:
2018-12-18 17:14:49 JRebel:  Over the last 2 days JRebel prevented
2018-12-18 17:14:49 JRebel:  at least 8 redeploys/restarts saving you about 0.3 hours.
2018-12-18 17:14:49 JRebel:
2018-12-18 17:14:49 JRebel:  License acquired from License Server: http://139.199.89.239:1008
2018-12-18 17:14:49 JRebel:
2018-12-18 17:14:49 JRebel:  Licensed to kanewang.
2018-12-18 17:14:49 JRebel:
2018-12-18 17:14:49 JRebel:
2018-12-18 17:14:49 JRebel:  #############################################################
2018-12-18 17:14:49 JRebel:
我们改一个java代码
- 这里会发现创建的maven项目中没有java代码,我们接下来介绍下,如何使用spring框架
- 我们首先在main文件夹下创建一个目录java
- 然后再java文件夹下床建一个package,找不到package选择 other搜索一下 package,我的包叫kane1
- 在kane1包下创建文件test1Controller.java,这个controller目前还不能被web访问到。
- 在 main/webapp/WEB_INF下创建一个xml,名字随意,我的是spring-servlet.xml,并写入如下内容
<?xml version="1.0" encoding="UTF-8"?> <beans xmlns="http://www.springframework.org/schema/beans" xmlns:xsi="http://www.w3.org/2001/XMLSchema-instance" xmlns:p="http://www.springframework.org/schema/p" xmlns:context="http://www.springframework.org/schema/context" xmlns:mvc="http://www.springframework.org/schema/mvc" xsi:schemaLocation="http://www.springframework.org/schema/beans http://www.springframework.org/schema/beans/spring-beans-3.0.xsd http://www.springframework.org/schema/context http://www.springframework.org/schema/context/spring-context-3.0.xsd http://www.springframework.org/schema/mvc http://www.springframework.org/schema/mvc/spring-mvc-3.0.xsd"> <mvc:default-servlet-handler/> <!-- Activates scanning of @Controller --> <!-- 这里是你刚才定义的包位置,我只有一层 这里是告诉spring kane1包下带@Controller annotation的方法都有映射到servlet里面去 --> <context:component-scan base-package="kane1" /> <mvc:annotation-driven/> </beans>- 下面更改pom.xml文件,增加两个包的依赖。
<dependency> <groupId>javax.servlet</groupId> <artifactId>javax.servlet-api</artifactId> <version>3.0.1</version> <scope>provided</scope> </dependency> <dependency> <groupId>org.springframework</groupId> <artifactId>spring-webmvc</artifactId> <version>4.0.3.RELEASE</version> </dependency>- 然后修改test1Controller.java,代码如下
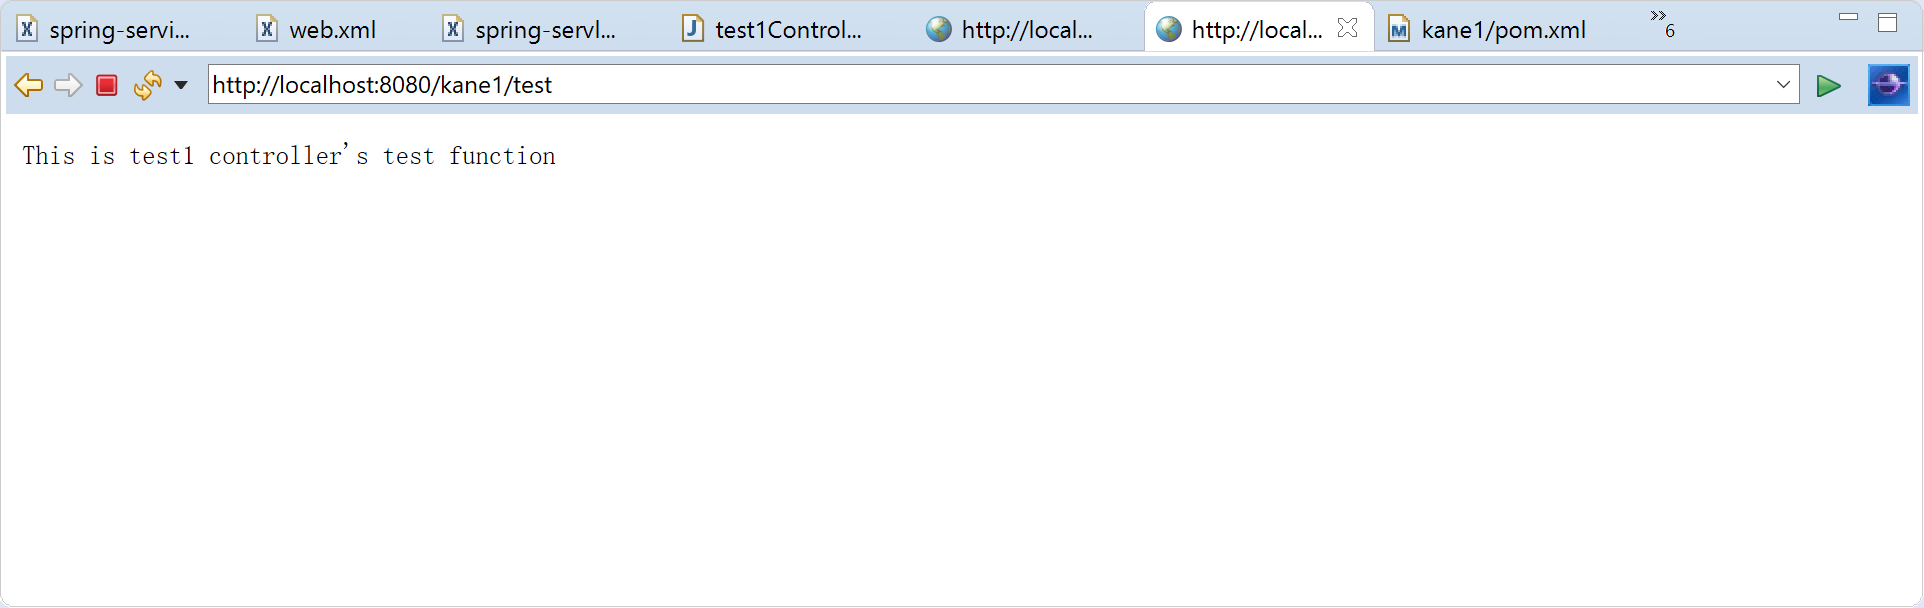
package kane1;
import javax.servlet.http.HttpServletRequest;
import javax.servlet.http.HttpServletResponse;
import org.springframework.stereotype.Controller;
import org.springframework.web.bind.annotation.RequestMapping;
import org.springframework.web.bind.annotation.RequestMethod;
import org.springframework.web.bind.annotation.ResponseBody;
@Controller
public class test1Controller {
  @RequestMapping(value = "test", method = RequestMethod.GET)//定义方法与url的映射关系
  public @ResponseBody String test(HttpServletRequest request,HttpServletResponse response) {
      return "This is test1 controller's test function";
  }
}
重新启动服务器,在url中输入 http://localhost:8080/kane1/test,上图:
我们这个时候更改一下test1.Controller.java,将输出更改为 "This is test1 controller's test function modify!",在console里面看到如下提示证明JRebel成功在检测java代码的变化
2018-12-19 10:01:06 JRebel: Reloading class 'kane1.test1Controller'.- 我们不重启tomcat,直接刷新刚才的页面,上图:发现热部署成功了。

- 最后再上一个,自动部署的截图吧

命令行中使用JRebel 热部署
Jrebel 本身支持很多种使用方式,下面我们再尝试一下,自己在使用命令行,如何进行热部署的配置。
- 到官网下载软件的压缩包,官网,然后解压。上一下目录结构
│  3rd-party-licenses-jrebel.txt
│  Changelog.txt
│  jrebel.ico
│  jrebel.jar
│  jrebel.png
│  License.txt
│  readme.txt
│  ZeroTurnaround.url
│
├─bin
│      activate-gui.cmd
│      activate-gui.sh
│      activate.cmd
│      activate.sh
│      go-offline.cmd
│      go-offline.sh
│      jrebel-activation.jar
│
└─lib
        jrebel32.dll
        jrebel64.dll
        libjrebel32.dylib
        libjrebel32.so
        libjrebel64.dylib
        libjrebel64.so
#我们直接使用lib下的文件,bin下的文件是登录激活使用的,因为在Eclipse里面已经激活了,是不需要再次激活的- 在 cmd中打开项目目录,键入如下命令,这次我们以jetty开启web 服务
set MAVEN_OPTS=-agentpath:[your extract path]\lib\jrebel32.dll
# 设置环境变量,后面是32还是64看你的jdk位数,错了会提醒你的- 确保一件事情,打开pom.xml,保证jetty的自动部署时间scanIntervalSeconds是0,也就是关闭掉
<plugin>
 <groupId>org.eclipse.jetty</groupId>
 <artifactId>jetty-maven-plugin</artifactId>
 <configuration>
   <scanIntervalSeconds>0</scanIntervalSeconds>
 </configuration>
</plugin>- CMD中键入 mvn jetty:run开启服务:
#看到如下输出,就证明成功了
2018-12-19 10:20:49 JRebel:  Starting logging to file: C:\Users\kanewang\.jrebel\jrebel.log
2018-12-19 10:20:49 JRebel:
2018-12-19 10:20:50 JRebel:  #############################################################
2018-12-19 10:20:50 JRebel:
2018-12-19 10:20:50 JRebel:  JRebel Agent 2018.2.3 (201811261141)
2018-12-19 10:20:50 JRebel:  (c) Copyright ZeroTurnaround AS, Estonia, Tartu.
2018-12-19 10:20:50 JRebel:
2018-12-19 10:20:50 JRebel:  Over the last 2 days JRebel prevented
2018-12-19 10:20:50 JRebel:  at least 12 redeploys/restarts saving you about 0.5 hours.
2018-12-19 10:20:50 JRebel:
2018-12-19 10:20:50 JRebel:  License acquired from License Server: http://139.199.89.239:1008
2018-12-19 10:20:50 JRebel:
2018-12-19 10:20:50 JRebel:  Licensed to kanewang.
2018-12-19 10:20:50 JRebel:
2018-12-19 10:20:50 JRebel:
2018-12-19 10:20:50 JRebel:  #############################################################
2018-12-19 10:20:50 JRebel:- 我们继续更改test1Controller.java,将test1输出改为 "This is test1 controller's test function modify again!"
#继续看cmd输出
[WARNING] !RequestLog
[INFO] Started [email protected]:8080
[INFO] Started Jetty Server
# 有下面这句
2018-12-19 10:22:49 JRebel: Reloading class 'kane1.test1Controller'.
上结果图,输出变化了。

给个官网的关于自己配置JRebel的链接 链接
总结
我们这个项目比较老,用的spring MVC框架,但是需要配置比较繁琐。所以上面的东西可能都已经没啥用了,本人也是初学者。目前应该都是使用Spring boot创建了,推荐一个在线创建项目的网址,很好用。Spring Boot 等再说了。本人真的是一点没学过java,有什么错误的地方望大神指出,好做学习。谢谢。