自己开发一个项目,建立的是dynamic web project,结果提交代码交付给运维人员时,他们要求用maven项目,说这样更好管理。苦于我以前maven用的太少了,那就学吧。
1.转换项目类型
右键项目,看到有Configure选项,直接Convert To Maven Project,整个项目目录会发生变化,如图
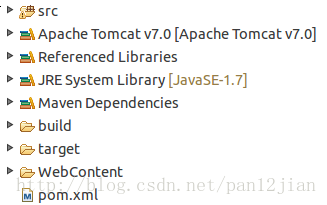
多了maven的标志性文件pom.xml,在编辑框弹出如下
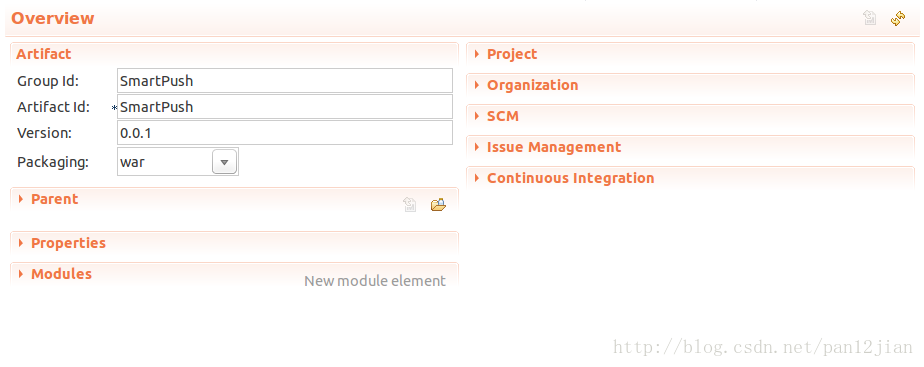
OK,已经转为了maven项目,这里可以编辑你的版本,Artifact Id等信息。
2.编辑pom.xml
点击下面的pom.xml,进入pom的编辑模式。

在普通的项目中我们只需要添加一些依赖项,我们可以到http://www.mvnrepository.com/去找相关的依赖包。
从项目的Referenced Libraries子目录可以看到自己的依赖包,比如我的项目需要mahout包,那么我去网站搜索mahout,根据自己需要的包及版本,进入到以下页面。
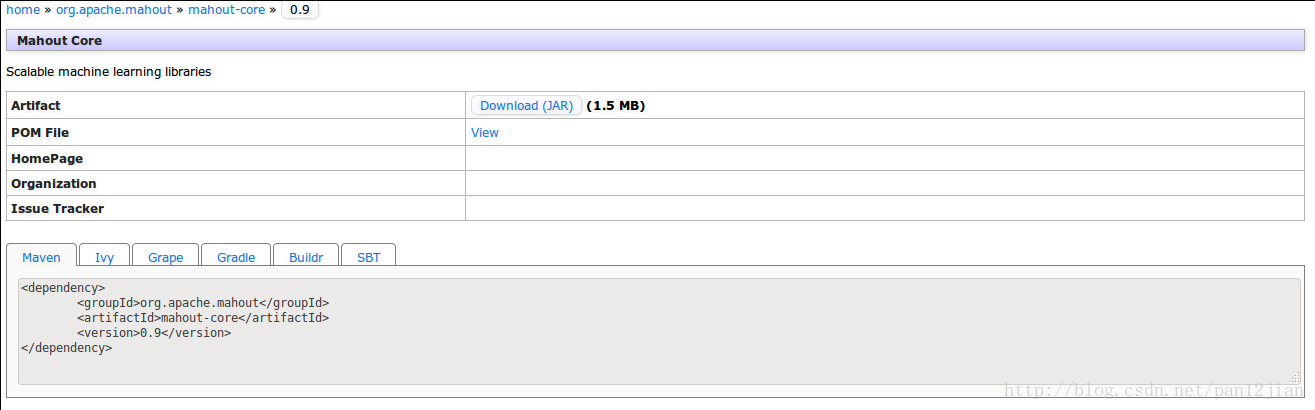
可以看到有个xml标记语言的dependency,把这个复制到自己的pom.xml中。下面是我的pom.xml部分代码。


- <project xmlns="http://maven.apache.org/POM/4.0.0" xmlns:xsi="http://www.w3.org/2001/XMLSchema-instance"
- xsi:schemaLocation="http://maven.apache.org/POM/4.0.0 http://maven.apache.org/xsd/maven-4.0.0.xsd">
- <modelVersion>4.0.0</modelVersion>
- <groupId>SmartPush</groupId>
- <artifactId>SmartPush</artifactId>
- <packaging>war</packaging>
- <dependencies>
- <dependency>
- <groupId>org.apache.mahout</groupId>
- <artifactId>mahout-core</artifactId>
- <version>0.9</version>
- </dependency>
- <dependency>
- <groupId>org.apache.mahout</groupId>
- <artifactId>mahout-math</artifactId>
- <version>0.9</version>
- </dependency>
- <dependency>
- <groupId>mysql</groupId>
- <artifactId>mysql-connector-java</artifactId>
- <version>5.1.30</version>
- </dependency>
- <dependency>
- <groupId>log4j</groupId>
- <artifactId>log4j</artifactId>
- <version>1.2.17</version>
- </dependency>
- </dependencies>
- <build>
- <sourceDirectory>src</sourceDirectory>
- <resources>
- <resource>
- <directory>src</directory>
- <excludes>
- <exclude>**/*.java</exclude>
- </excludes>
- </resource>
- </resources>
- <plugins>
- <plugin>
- <artifactId>maven-compiler-plugin</artifactId>
- <version>3.1</version>
- <configuration>
- <source>1.7</source>
- <target>1.7</target>
- </configuration>
- </plugin>
- <plugin>
- <artifactId>maven-war-plugin</artifactId>
- <version>2.3</version>
- <configuration>
- <warSourceDirectory>WebContent</warSourceDirectory>
- <failOnMissingWebXml>false</failOnMissingWebXml>
- </configuration>
- </plugin>
- </plugins>
- </build>
- <version>0.0.1</version>
- </project>
3.编译
进入到自己的项目目录,执行以下命令
- $mvn compile
- $mvn package