最近在学习Service,正好做一个记录,觉得远程Service还是有点意思的。
我用的开发工具是AS,我们需要一个服务端和一个客户端。
一、服务端
(1)创建AIDL文件
IPerson.aidl
// IPerson.aidl
package com.example.administrator.myapplication.aidl;

// Declare any non-default types here with import statements

interface IPerson {
    /**
     * Demonstrates some basic types that you can use as parameters
     * and return values in AIDL.
     */
    String queryPerson(int num);
}
看一下插入的位置
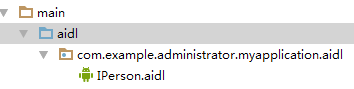
在main目录下新建一个aidl文件夹,然后定义一个 和aidl包名相同的包,最后创建一个aidl文件,接着按ctrl + f9重新编译就可以了,一定要重新编译!
(2)自定义一个Service
AIDLService.java
1 )继承Service类,同时也自定义了一个PersonQueryBinder类用来继承IPerson.Stub类 就是实现了IPerson接口和IBinder接口
2)实例化自定义的Stub类,并重写Service的onBind方法,返回一个binder对象!
package com.example.administrator.myapplication;

import android.app.Service;
import android.content.Intent;
import android.os.IBinder;
import android.os.RemoteException;
import android.support.annotation.Nullable;


import com.example.administrator.myapplication.aidl.IPerson;

/**
 * Created by Administrator on 2018/11/29.
 */

public class AIDLService extends Service {
    private IBinder binder = new PersonQueryBinder();
    private String[] names = {"1","2","3","4","5","6"};

    private String query(int num){
        if(num>0&&num<7) {
            return names[num - 1];
        }
        return null;
    }
    @Nullable
    @Override
    public IBinder onBind(Intent intent) {
        return binder;
    }

private final class PersonQueryBinder extends IPerson.Stub{

    @Override
    public String queryPerson(int num) throws RemoteException {
        return query(num);
    }
}
}
(3)在AndroidManifest.xml文件中注册Service
<service android:name=".AIDLService">
            <intent-filter>
                <action android:name="com.example.administrator.myapplication.AIDLService"/>
                <category android:name="android.intent.category.DEFAULT"/>
            </intent-filter>

        </service>
二、客户端
直接把服务端的那个aidl文件复制过来,什么都不要改,放在相同的地方,按Ctrl+F9重新编译,然后我们直接在MainActivity中完成,和绑定本地Service的操作
有点类似,流程如下:
1)自定义PersonConnection类实现ServiceConnection接口
2)以PersonConnection对象作为参数,调用bindService绑定远程Service
bindService(service,conn,BIND_AUTO_CREATE);
ps:第三个参数是设置如果服务没有启动的话,自动创建
3)和本地Service不同,绑定远程Service的ServiceConnection并不能直接获取Service的onBind( )方法
返回的IBinder对象,只能返回onBind( )方法所返回的代理对象,需要做如下处理:
iPerson = IPerson.Stub.asInterface(service);
再接着完成初始化,以及按钮事件等就可以了
package com.example.administrator.servicedemo1;

import android.content.ComponentName;
import android.content.Intent;
import android.content.ServiceConnection;
import android.os.IBinder;
import android.os.RemoteException;
import android.support.v7.app.AppCompatActivity;
import android.os.Bundle;
import android.util.Log;
import android.view.View;
import android.widget.Button;
import android.widget.EditText;
import android.widget.TextView;

import com.example.administrator.myapplication.aidl.IPerson;

public class MainActivity extends AppCompatActivity implements View.OnClickListener{
    private EditText num;
    private Button query;
    private TextView name;
    private IPerson iPerson;
    private PersonConnection personConnection = new PersonConnection();
    @Override
    protected void onCreate(Bundle savedInstanceState) {
        super.onCreate(savedInstanceState);
        setContentView(R.layout.activity_main);
        num = (EditText) findViewById(R.id.num);
        query = (Button) findViewById(R.id.research);
        name = (TextView) findViewById(R.id.name);
        Intent service = new Intent("com.example.administrator.myapplication.AIDLService");
        service.setPackage("com.example.administrator.myapplication");
        bindService(service,personConnection,BIND_AUTO_CREATE);
        query.setOnClickListener(this);
    }

    @Override
    public void onClick(View v) {
        String number = num.getText().toString();
        int number2 = Integer.valueOf(number);
        try {
            name.setText(iPerson.queryPerson(number2));
        } catch (RemoteException e) {
            e.printStackTrace();
        }
        num.setText("");

    }

    private class PersonConnection implements ServiceConnection {

        @Override
        public void onServiceConnected(ComponentName name, IBinder service) {
            iPerson = IPerson.Stub.asInterface(service);
        }

        @Override
        public void onServiceDisconnected(ComponentName name) {
            iPerson = null;
        }
    }
}
还有xml文件
<?xml version="1.0" encoding="utf-8"?>
<RelativeLayout xmlns:android="http://schemas.android.com/apk/res/android"
    xmlns:app="http://schemas.android.com/apk/res-auto"
    xmlns:tools="http://schemas.android.com/tools"
    android:layout_width="match_parent"
    android:layout_height="match_parent"
    tools:context="com.example.administrator.servicedemo1.MainActivity">

    <EditText
        android:id="@+id/num"
        android:layout_width="300dp"
        android:layout_height="wrap_content" />
    <Button
        android:id="@+id/research"
        android:layout_width="wrap_content"
        android:layout_height="wrap_content"
        android:text="查询"
        android:layout_below="@+id/num"/>
    <TextView
        android:id="@+id/name"
        android:layout_width="wrap_content"
        android:layout_height="wrap_content"
        android:layout_below="@+id/research"
        android:layout_margin="20dp"/>

</RelativeLayout>
接下来先启动AIDLServivce,然后再启动客户端,输入查询序号,即可获得对应数字! 当然也可以直接启动客户端,也会获得同样效果。
效果图凑合着看,没放动图


参考文章:http://www.runoob.com/w3cnote/android-tutorial-service-3.html