版权声明:本文为博主原创文章,未经博主允许不得转载。 https://blog.csdn.net/zxd1435513775/article/details/85013634
一、创建SpringBoot工程并配置RabbitMQ
1、创建SpringBoot工程,选择RabbitMQ


2、在application.properties文件中配置RabbitMQ
//RabbitMQ的url
spring.rabbitmq.addresses=192.168.1.108

//用户名和密码,默认为guest
spring.rabbitmq.username=guest
spring.rabbitmq.password=guest
RabbitProperties代码中片段

二、测试RabbitMQ
1、向RabbitMQ发送Map类型消息
	@RunWith(SpringRunner.class)
	@SpringBootTest
	public class SpringbootDataAmqpApplicationTests {

		@Autowired
		RabbitTemplate rabbitTemplate;

		@Test
		public void contextLoads() {
			Map<String,Object> map = new HashMap<>();
			map.put("msg","the first message from springboot");
			map.put("data","来自SpringBoot");
			////向交换器exchange.direct中路由键为scorpios,发送Map类型消息
			rabbitTemplate.convertAndSend("exchange.direct","scorpios",map);
		}
	}
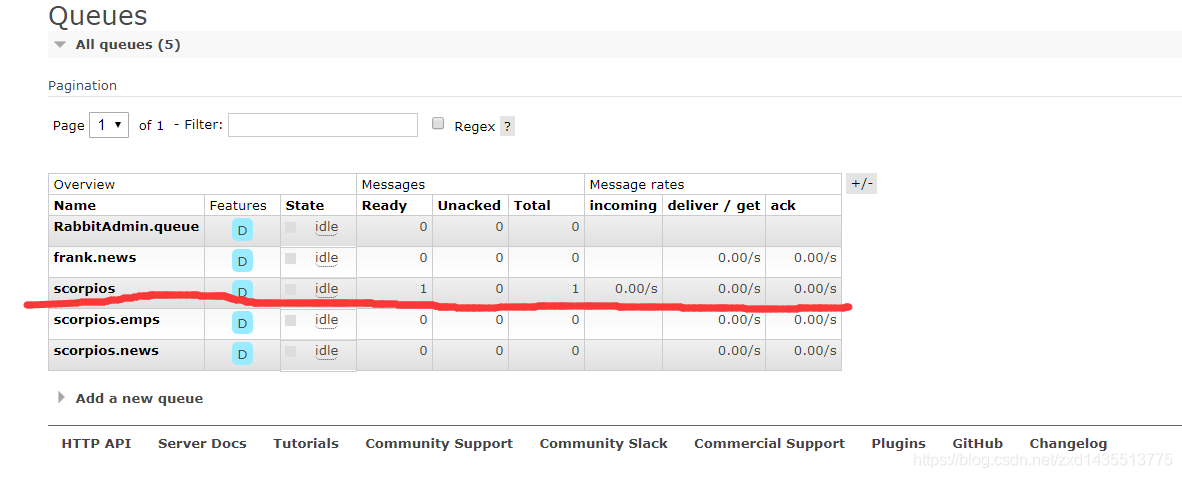
web控制台测试结果:


接收消息,看看消息的内容:
		//接收数据,如何将数据自动的转为json发送出去
	    @Test
	    public void receive(){

	        Object o = rabbitTemplate.receiveAndConvert("scorpios");
	        System.out.println(o.getClass());
	        System.out.println(o);

	    }
测试结果为正确消息内容:

在使用RabbitMQ发送消息时,默认会将对象序列化之后发出,所以看到上面类似乱码后的结果。但如何让数据自动转为Json,然后发送出去呢?我们需要改变默认的MessageConverter类型,默认使用的是:SimpleMessageConverter
下面是RabbitTemplate类的代码片段:

自定义配置MessageConverter
	@Configuration
	public class MyAMQPConfig {

	    @Bean
	    public MessageConverter messageConverter(){
	    //使用Jackson2JsonMessageConverter类型的MessageConverter
	       return new Jackson2JsonMessageConverter();
	    }
	}
重新运行上述发送消息的测试代码,,结果如下:


2、向RabbitMQ发送自定义类型(MyBook)消息
	@RunWith(SpringRunner.class)
	@SpringBootTest
	public class SpringbootDataAmqpApplicationTests {

		@Autowired
		RabbitTemplate rabbitTemplate;

		@Test
		public void contextLoads() {
		//向交换器exchange.direct中路由键为scorpios,发送MyBook类型消息
			rabbitTemplate.convertAndSend("exchange.direct","scorpios",new MyBook("西游记","吴承恩"));
		}
	}
web控制台测试结果:

三、消费消息
对于RabbitMQ队列中有消息后,我们希望立刻消费消息。比如在订单系统有消息后,库存系统就应该立即接收消息,并消费消息,把库存信息及时更新。下面来模拟消费消息的情况。
1、让项目开启EnableRabbit
	@EnableRabbit		//开启EnableRabbit
	@SpringBootApplication
	public class SpringbootDataAmqpApplication {

	    public static void main(String[] args) {
	        SpringApplication.run(SpringbootDataAmqpApplication.class, args);
	    }

	}
2、在服务方法上添加@RabbitListener注解,并标明接收哪个队列消息
	@Service
	public class bookService {

		//接收队列scorpios的消息,并消费它
	    @RabbitListener(queues = "scorpios")
	    public void receiveMessage(MyBook myBook){
	        System.out.println("收到消息为:"+myBook);
	    }
	}
3、测试:先发送消息,看看bookService服务能不能及时消费该消息
点击运行测试发送消息的代码后,可以发现bookService服务立刻消费了该消息

四、在SpringBoot中代码创建Exchange和Queue
在上面的所有例子中,exchange.direct和scorpios都是之前在RabbitMQ的web页面中创建的,下面我们在SpringBoot中用代码来创建exchange和queue。需要使用到RabbitAdmin类
1、创建exchange
	@RunWith(SpringRunner.class)
	@SpringBootTest
	public class SpringbootDataAmqpApplicationTests {

	    @Autowired
	    RabbitAdmin rabbitAdmin;

	    @Test
	    public void createExchange(){
			//使用RabbitAdmin来创建RabbitAdmin.exchange交换器
	        rabbitAdmin.declareExchange(new DirectExchange("RabbitAdmin.exchange"));
	        System.out.println("创建完成");
	    }
	}
运行上述代码,结果:

2、创建Queue
	@RunWith(SpringRunner.class)
	@SpringBootTest
	public class SpringbootDataAmqpApplicationTests {

	    @Autowired
	    RabbitAdmin rabbitAdmin;

	    @Test
	    public void createExchange(){
			//使用RabbitAdmin来创建RabbitAdmin.queue队列
	        rabbitAdmin.declareQueue(new Queue("RabbitAdmin.queue",true));
	        System.out.println("创建完成");
	    }
	}

3、exchange和队列绑定
	@RunWith(SpringRunner.class)
	@SpringBootTest
	public class SpringbootDataAmqpApplicationTests {

	    @Autowired
	    RabbitAdmin rabbitAdmin;

	    @Test
	    public void createExchange(){
			//将RabbitAdmin.exchange和RabbitAdmin.queue绑定,路由键为:RabbitAdmin.key
	        rabbitAdmin.declareBinding(new Binding("RabbitAdmin.queue",
	        		Binding.DestinationType.QUEUE,"RabbitAdmin.exchange","RabbitAdmin.key",null));
	    }
	}
绑定前

绑定后:

五、小结
本文在SpringBoot中整合了RabbitMQ,并给出了如何发送消息和修改消息默认的序列化规则。
模拟了bookService消费消息的场景,最后使用RabbitAdmin来创建exchange和queue。