之前,博主为了得到更好的车载视频目标检测效果(偏工程实际,非刷榜),使用SSD框架训练过KITTI数据集,几次训练下来,结果不太理想。自己分析,原因较多,其中很重要的一条就是KITTI数据集不够大(标注图片仅7000多张),而且还是fine-tune from reduced VGG model,精度自然不会太高。解决方法大约有两种:一是扩充数据集;二是fine-tune已经训练好的SSD model,这样数据集小一点也能接受。这里先介绍方法一,而方法二还在探索中。
PS.数据集标注貌似不如KITTI严谨,存在几处关键错误,请慎重使用,已知的错误已更新在文中。
关于Udacity数据集
既然觉得数据偏少,一是可以增加类似的道路标注图片,如果自己动手,可以参考之前博文中介绍的LabelImg工具;二是直接换一个更大的目标检测数据集。这里本文就介绍一下偶然发现的Udacity目标检测数据集 ,这是Udacity为其自动驾驶算法比赛专门准备的数据集,对连续视频图片进行了仔细的标注(2D坐标),主要有汽车、行人、大型车辆等类别。
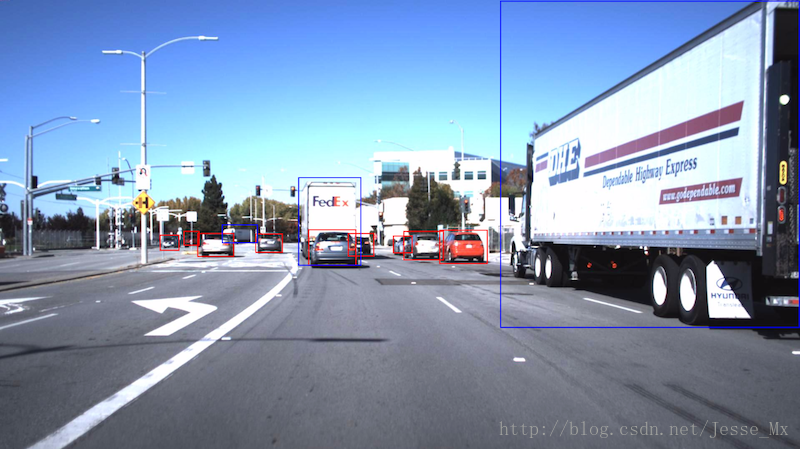
整个数据集分为两个子数据集,分别有9423和15000张图片,分辨率都是1920×1200,两个子数据集的标注文件稍有不同,不过接下来我会把他们合在一起,统一转换成Pascal VOC的格式。算下来Udacity数据集图片数量是KITTI的3倍多,在我看来训练SSD是差不多够用了。
制作数据集
首先要下载Dataset1 和Dataset2,一个是1.5GB,一个是3.3GB。如果常规方式下载太慢,建议使用EagleGet工具,用它下载国外链接就比较快了。
PS.找到了一个转换工具,还没测试过,感兴趣的可以试试:code to convert between KITTI, KITTI tracking, Pascal VOC, Udacity, CrowdAI and AUTTI
压缩图片
训练SSD300×300,原始图片分辨率可能偏高,个人感觉将图片大小压缩到原来的1/4,即960×600就比较合适。这里找到看图工具IrfanView,使用其批量转换功能来调整分辨率,得到新的同名压缩图片。
PS.这一步非必须,不做修改也是可用的!
生成标注txt文件
两个子数据集各有一个标注文件,名字应该都叫labels.csv,这是纯文本格式的文件,我们使用的话,直接把扩展名改为txt,方便python程序读取。由于标注信息都写在了一个文件内,我们需要将其按图片名分成若干个txt文件,最后再转化为xml文件。
PS.程序写的有点乱,具体路径还望各位自行修改。还有,两个标注文件中的已知错误如下,目前找出了6行标注有误,至于错误类型,相信看一眼就懂,然后可以直接修改或删除该行:
# 出错的标注语句
['912', '0', '951', '0', '1479498564477313399.jpg', 'car', 'http://crowdai.com/images/k-zz9yqpJIit7OuX/visualize']
['705', '0', '732', '0', '1479498820473341507.jpg', 'car', 'http://crowdai.com/images/Ng_nd_wBlqkgNDGb/visualize']
['721', '0', '751', '0', '1479499937073018706.jpg', 'car', 'http://crowdai.com/images/sbjD-93YWUi9hJ0c/visualize']
['763', '0', '793', '0', '1479505030914958665.jpg', 'pedestrian', 'http://crowdai.com/images/ONPwFZIwJ9yjwNQ1/visualize']

['1478020279199978858.jpg', '1614', '536', '1924', '668', '1', 'car']
['1478897138029169863.jpg', '1728', '570', '1922', '724', '1', 'car']
- 1
- 2
- 3
- 4
- 5
- 6
- 7
- 8
Part 1
先看1.5GB数据集的标注信息,复制几行如下:
xmin,xmax,ymin,ymax,Frame,Label,Preview URL
785,533,905,644,1479498371963069978.jpg,Car,http://crowdai.com/images/Wwj-gorOCisE7uxA/visualize
89,551,291,680,1479498371963069978.jpg,Car,http://crowdai.com/images/Wwj-gorOCisE7uxA/visualize
268,546,383,650,1479498371963069978.jpg,Car,http://crowdai.com/images/Wwj-gorOCisE7uxA/visualize
455,522,548,615,1479498371963069978.jpg,Truck,http://crowdai.com/images/Wwj-gorOCisE7uxA/visualize
- 1
- 2
- 3
- 4
- 5
可以看出,标注信息相对简单,分别是左上角和右下角坐标、图片名、类别(Car,Pedestrian,Truck)以及预览链接(现在已经打不开了)。
下面使用转换工具generate_label_1.py工具生成若干个txt标注文件,每个文件都和同名图片对应。
# generate_label_1.py
# encoding:utf-8
file=open('/home/mx/tempfile/labels.txt','r') # 原始labels.txt的地址
for eachline in file:
    data=eachline.strip().split(',')
    filename=data[4]
    filename=filename[:-4]
    txt_path='/home/mx/tempfile/label_txt/'+filename+'.txt' # 生成的txt标注文件地址
    txt=open(txt_path,'a')
    # new_line=data[5]+' '+data[0]+' '+data[1]+' '+data[2]+' '+data[3] 如使用原始图片尺寸,该句取消注释
    # new_line=data[5]+' '+str(int(data[0])/2)+' '+str(int(data[1])/2)+' '+str(int(data[2])/2)+' '+str(int(data[3])/2) 如使用1/4图片尺寸,该句取消注释
    txt.writelines(new_line)
    txt.write('\n')
    txt.close()
file.close()
print('generate label success')
- 1
- 2
- 3
- 4
- 5
- 6
- 7
- 8
- 9
- 10
- 11
- 12
- 13
- 14
- 15
- 16
执行程序,可在指定文件夹内生成若干个txt标注文件,其内容如下:
# 1478019954685370994.txt
Truck 320 280 347 307
Car 331 288 354 312
Car 388 289 415 312
Car 746 236 915 304
- 1
- 2
- 3
- 4
- 5
Part 2
再看3.3GB数据集的标注信息,这个稍有不同,仍复制几行如下:
1478019952686311006.jpg 950 574 1004 620 0 "car"
1478019952686311006.jpg 1748 482 1818 744 0 "pedestrian"
1478019953180167674.jpg 872 586 926 632 0 "car"
1478019953689774621.jpg 686 566 728 618 1 "truck"
1478019971185917857.jpg 822 468 846 506 0 "trafficLight" "Red"
1478019971686116476.jpg 546 516 568 550 0 "trafficLight" "RedLeft"
1478019971686116476.jpg 584 568 638 606 1 "biker"
- 1
- 2
- 3
- 4
- 5
- 6
- 7
标注信息中的0和1代表是否被遮挡,此处用不上,且注意到出现了新的类别:信号灯(trafficLight)和骑车人(biker)。这里首先需要对labels.txt作出一定的修改:首先把所有双引号去掉,然后使用替换功能,将car替换成Car,pedestrian换成Pedestrian,truck换成Truck,biker换成Cyclist(适应KITTI的风格),类别名首字母转为大写是为了保证整个数据集的统一,否则出错。接下来使用generate_label_2.py 工具生成若干个txt标注文件。
# generate_label_2.py
# encoding:utf-8
file=open('D:\\DataSet\\labels.txt','r') # 原始labels.txt的地址
for eachline in file:
    data=eachline.strip().split(' ')
    filename=data[0]
    filename=filename[:-4]
    txt_path='D:\\DataSet\\labels\\'+filename+'.txt' # 生成的txt标注文件地址
    txt=open(txt_path,'a')
    if data[6]!='trafficLight': # 忽略信号灯的标注信息
        new_line=data[6]+' '+str(int(data[1])/2)+' '+str(int(data[2])/2)+' '+str(int(data[3])/2)+' '+str(int(data[4])/2) # 使用了1/4图片尺寸,坐标均除以2
        txt.writelines(new_line)
        txt.write('\n')
        txt.close()
file.close()
print('generate label success')
- 1
- 2
- 3
- 4
- 5
- 6
- 7
- 8
- 9
- 10
- 11
- 12
- 13
- 14
- 15
- 16
去掉无标注的图片
上一步生成了若干标注txt文件,回头却发现和图片数量对应不上:子数据集1图片为9423,标注txt为9218;子数据集2图片为15000,标注txt为13063。原因是图片集是抽取视频而来,存在一些图片不含任何车辆行人目标,也就没有标注信息,而这些图片在SSD训练中是不能用的。因此需要用求补的方式,剔除无标注图片,参考使用remove_no_label_image.py 。
# remove_no_label_image.py
# encoding:utf-8

import os

cur_dir='C:\\Users\\Jesse Mx\\Desktop'
txt_dir=os.path.join(cur_dir,'labels') # 标注txt文件夹地址
pic_dir=os.path.join(cur_dir,'image-half') # 图片集文件夹地址
txtlist=[]
piclist=[]
for parent,dirnames,filenames in os.walk(txt_dir):
    for txt_name in filenames:
        txt_name=txt_name[:-4]
        txtlist.append(txt_name)
for parent,dirnames,filenames in os.walk(pic_dir):
    for pic_name in filenames:
        pic_name=pic_name[:-4]
        piclist.append(pic_name)
txt_set=set(txtlist)
pic_set=set(piclist)
comp=pic_set.difference(txt_set) # 求补集

print("ok")
print(len(comp)) # 无标注图片数量

for item in comp:
    file=pic_dir+'\\'+item+'.jpg'
    if os.path.exists(file):
        os.remove(file)
        print(file)
- 1
- 2
- 3
- 4
- 5
- 6
- 7
- 8
- 9
- 10
- 11
- 12
- 13
- 14
- 15
- 16
- 17
- 18
- 19
- 20
- 21
- 22
- 23
- 24
- 25
- 26
- 27
- 28
- 29
- 30
生成xml文件
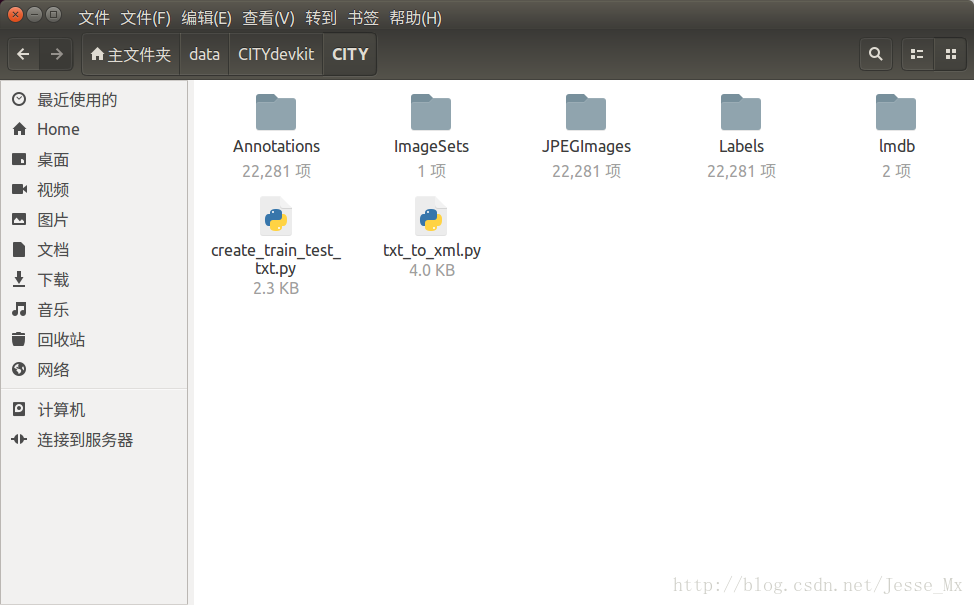
这一部分就需要参考我之前的博文了:SSD: Single Shot MultiBox Detector 训练KITTI数据集(1),按照VOC格式,在/home/mx/data之下新建CITYdevkit/CITY目录,然后CITY目录中新建四个文件夹:JPEGImages,Annotations,ImageSets,Labels。把22281张图片和22281个标注文件分别放入,转换xml的py文件也放在旁边备用,参考下图。
这里转换xml的工具代码需要稍作修改,一是修改类别,二是修改对应函数,避免读取错误。修改后的txt_to_xml.py代码如下:
# txt_to_xml.py
# txt_to_xml.py
# encoding:utf-8
# 根据一个给定的XML Schema,使用DOM树的形式从空白文件生成一个XML
from xml.dom.minidom import Document
import cv2
import os

def generate_xml(name,split_lines,img_size,class_ind):
    doc = Document()  # 创建DOM文档对象

    annotation = doc.createElement('annotation')
    doc.appendChild(annotation)

    title = doc.createElement('folder')
    title_text = doc.createTextNode('CITY')
    title.appendChild(title_text)
    annotation.appendChild(title)

    img_name=name+'.jpg'

    title = doc.createElement('filename')
    title_text = doc.createTextNode(img_name)
    title.appendChild(title_text)
    annotation.appendChild(title)

    source = doc.createElement('source')
    annotation.appendChild(source)

    title = doc.createElement('database')
    title_text = doc.createTextNode('The CITY Database')
    title.appendChild(title_text)
    source.appendChild(title)

    title = doc.createElement('annotation')
    title_text = doc.createTextNode('CITY')
    title.appendChild(title_text)
    source.appendChild(title)

    size = doc.createElement('size')
    annotation.appendChild(size)

    title = doc.createElement('width')
    title_text = doc.createTextNode(str(img_size[1]))
    title.appendChild(title_text)
    size.appendChild(title)

    title = doc.createElement('height')
    title_text = doc.createTextNode(str(img_size[0]))
    title.appendChild(title_text)
    size.appendChild(title)

    title = doc.createElement('depth')
    title_text = doc.createTextNode(str(img_size[2]))
    title.appendChild(title_text)
    size.appendChild(title)

    for split_line in split_lines:
        line=split_line.strip().split()
        if line[0] in class_ind:
            object = doc.createElement('object')
            annotation.appendChild(object)

            title = doc.createElement('name')
            title_text = doc.createTextNode(line[0])
            title.appendChild(title_text)
            object.appendChild(title)

            bndbox = doc.createElement('bndbox')
            object.appendChild(bndbox)
            title = doc.createElement('xmin')
            title_text = doc.createTextNode(str(int(float(line[1]))))
            title.appendChild(title_text)
            bndbox.appendChild(title)
            title = doc.createElement('ymin')
            title_text = doc.createTextNode(str(int(float(line[2]))))
            title.appendChild(title_text)
            bndbox.appendChild(title)
            title = doc.createElement('xmax')
            title_text = doc.createTextNode(str(int(float(line[3]))))
            title.appendChild(title_text)
            bndbox.appendChild(title)
            title = doc.createElement('ymax')
            title_text = doc.createTextNode(str(int(float(line[4]))))
            title.appendChild(title_text)
            bndbox.appendChild(title)

    # 将DOM对象doc写入文件
    f = open('Annotations/'+name+'.xml','w')
    f.write(doc.toprettyxml(indent = ''))
    f.close()

if __name__ == '__main__':
    class_ind=('Pedestrian', 'Car', 'Truck','Cyclist')
    cur_dir=os.getcwd()
    labels_dir=os.path.join(cur_dir,'Labels')
    for parent, dirnames, filenames in os.walk(labels_dir): # 分别得到根目录,子目录和根目录下文件
        for file_name in filenames:
            full_path=os.path.join(parent, file_name) # 获取文件全路径
            f=open(full_path)
            split_lines = f.readlines()
            name= file_name[:-4] # 后四位是扩展名.txt,只取前面的文件名
            img_name=name+'.jpg'
            img_path=os.path.join('/home/its/data/CITYdevkit/CITY/JPEGImages/',img_name) # 路径需要自行修改
            img_size=cv2.imread(img_path).shape
            generate_xml(name,split_lines,img_size,class_ind)
print('all txts has converted into xmls')
- 1
- 2
- 3
- 4
- 5
- 6
- 7
- 8
- 9
- 10
- 11
- 12
- 13
- 14
- 15
- 16
- 17
- 18
- 19
- 20
- 21
- 22
- 23
- 24
- 25
- 26
- 27
- 28
- 29
- 30
- 31
- 32
- 33
- 34
- 35
- 36
- 37
- 38
- 39
- 40
- 41
- 42
- 43
- 44
- 45
- 46
- 47
- 48
- 49
- 50
- 51
- 52
- 53
- 54
- 55
- 56
- 57
- 58
- 59
- 60
- 61
- 62
- 63
- 64
- 65
- 66
- 67
- 68
- 69
- 70
- 71
- 72
- 73
- 74
- 75
- 76
- 77
- 78
- 79
- 80
- 81
- 82
- 83
- 84
- 85
- 86
- 87
- 88
- 89
- 90
- 91
- 92
- 93
- 94
- 95
- 96
- 97
- 98
- 99
- 100
- 101
- 102
- 103
- 104
- 105
- 106
- 107
- 108
生成训练集和测试集列表
现在完成最后一个关键步骤,生成trainval.txt,test.txt等列表文件,均存放于ImageSets/Main文件夹下。所用工具为create_train_test_txt.py,注意,该文件需要使用python3执行。
# create_train_test_txt.py
# create_train_test_txt.py
# encoding:utf-8
import pdb
import glob
import os
import random
import math

def get_sample_value(txt_name, category_name):
    label_path = './Labels/'
    txt_path = label_path + txt_name+'.txt'
    try:
        with open(txt_path) as r_tdf:
            if category_name in r_tdf.read():
                return ' 1'
            else:
                return '-1'
    except IOError as ioerr:
        print('File error:'+str(ioerr))

txt_list_path = glob.glob('./Labels/*.txt')
txt_list = []

for item in txt_list_path:
    temp1,temp2 = os.path.splitext(os.path.basename(item))
    txt_list.append(temp1)
txt_list.sort()
print(txt_list, end = '\n\n')

num_trainval = random.sample(txt_list, math.floor(len(txt_list)*9/10.0)) # 可修改百分比
num_trainval.sort()
print(num_trainval, end = '\n\n')

num_train = random.sample(num_trainval,math.floor(len(num_trainval)*8/9.0)) # 可修改百分比
num_train.sort()
print(num_train, end = '\n\n')

num_val = list(set(num_trainval).difference(set(num_train)))
num_val.sort()
print(num_val, end = '\n\n')

num_test = list(set(txt_list).difference(set(num_trainval)))
num_test.sort()
print(num_test, end = '\n\n')

pdb.set_trace()

Main_path = './ImageSets/Main/'
train_test_name = ['trainval','train','val','test']
category_name = ['Car','Pedestrian','Truck','Cyclist']

# 循环写trainvl train val test
for item_train_test_name in train_test_name:
    list_name = 'num_'
    list_name += item_train_test_name
    train_test_txt_name = Main_path + item_train_test_name + '.txt'
    try:
        # 写单个文件
        with open(train_test_txt_name, 'w') as w_tdf:
            # 一行一行写
            for item in eval(list_name):
                w_tdf.write(item+'\n')
        # 循环写Car Pedestrian Cyclist Truck
#        for item_category_name in category_name:
#            category_txt_name = Main_path + item_category_name + '_' + item_train_test_name + '.txt'
#            with open(category_txt_name, 'w') as w_tdf:
                # 一行一行写
#                for item in eval(list_name):
#                    w_tdf.write(item+' '+ get_sample_value(item, item_category_name)+'\n')
    except IOError as ioerr:
        print('File error:'+str(ioerr))
- 1
- 2
- 3
- 4
- 5
- 6
- 7
- 8
- 9
- 10
- 11
- 12
- 13
- 14
- 15
- 16
- 17
- 18
- 19
- 20
- 21
- 22
- 23
- 24
- 25
- 26
- 27
- 28
- 29
- 30
- 31
- 32
- 33
- 34
- 35
- 36
- 37
- 38
- 39
- 40
- 41
- 42
- 43
- 44
- 45
- 46
- 47
- 48
- 49
- 50
- 51
- 52
- 53
- 54
- 55
- 56
- 57
- 58
- 59
- 60
- 61
- 62
- 63
- 64
- 65
- 66
- 67
- 68
- 69
- 70
- 71
- 72
- 73
接下来,博主将会使用该数据集进行训练,至于效果如何,且看下回分解。