版权声明:本文为博主原创文章,未经博主允许不得转载。 https://blog.csdn.net/kururunga/article/details/82117022
商城项目图片需要加密上传,先看下接口:
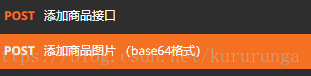
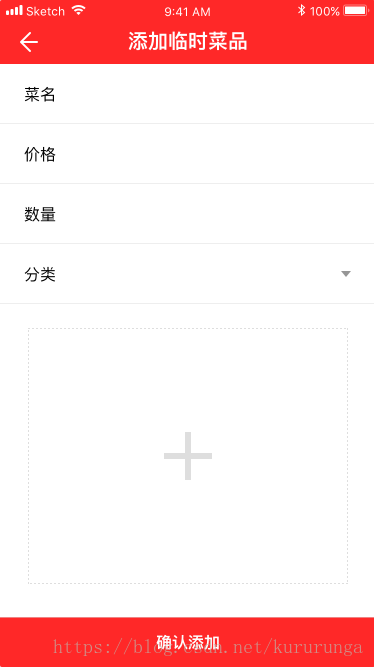
界面图如下:
1.两个接口(加密和上传接口):
    @FormUrlEncoded
    @POST("XXX")/**添加商品图片(base64格式)*/
    Flowable<AddGoodsBean> addGoodsImg(@Field("img") String img, @Field("shopid") String shopid, @Field("uid") String uid);

    @FormUrlEncoded
    @POST("XXX")/**添加商品接口*/
    Flowable<CommonBean> addShopping(@Field("uid") String uid,@Field("shopid") String shopid,@Field("name")String name,
    @Field("typeid") String typeid,@Field("count") String count,@Field("cost") String cost,@Field("goods_type") String goods_type,
                                     @Field("img") String img);
2.从相册选择图片,这里我用的是第三方框架 PhotoPicker,注意权限别忘记加了
        iv_add.setOnClickListener(new View.OnClickListener() {
            @Override
            public void onClick(View v) {
                PhotoPicker.builder()
                        .setPhotoCount(1)
                        .setShowCamera(false)
                        .setShowGif(false)
                        .setPreviewEnabled(false)
                        .start(TemporaryDishActivity.this, PhotoPicker.REQUEST_CODE);

            }
        });
3.由于是单张图片,所以得到的集合直接取第一个就行
   @Override
    protected void onActivityResult(int requestCode, int resultCode, Intent data) {
        super.onActivityResult(requestCode, resultCode, data);

        if (resultCode == RESULT_OK && requestCode == PhotoPicker.REQUEST_CODE) {
            if (data != null) {
                int width = (int) TypedValue.applyDimension(TypedValue.COMPLEX_UNIT_DIP, 200,
                        TemporaryDishActivity.this.getResources().getDisplayMetrics());
                int height = (int) TypedValue.applyDimension(TypedValue.COMPLEX_UNIT_DIP, 200f,
                        TemporaryDishActivity.this.getResources().getDisplayMetrics());
                ArrayList<String> photos =
                        data.getStringArrayListExtra(PhotoPicker.KEY_SELECTED_PHOTOS);
                img = photos.get(0);
                //base64加密图片上传
                String s = ImageUtils.bitmapToString(img);
                mPresenter.addGoodImg(s, String.valueOf(shopid), String.valueOf(uid));
                Log.d("lwp", "s:" + s.toString() + " ;img:" + img.toString());
                iv_add.setImageBitmap(BitmapFactory.decodeFile(img));
            }
        }
    }
4.工具类:
public class ImageUtils {

    // 根据路径获得图片并压缩,返回bitmap用于显示
    public static Bitmap getSmallBitmap(String filePath) {
        final BitmapFactory.Options options = new BitmapFactory.Options();
        options.inJustDecodeBounds = true;
        BitmapFactory.decodeFile(filePath, options);

        // Calculate inSampleSize
        options.inSampleSize = calculateInSampleSize(options, 480, 800);

        // Decode bitmap with inSampleSize set
        options.inJustDecodeBounds = false;

        return BitmapFactory.decodeFile(filePath, options);
    }

    //计算图片的缩放值
    public static int calculateInSampleSize(BitmapFactory.Options options,int reqWidth, int reqHeight) {
        final int height = options.outHeight;
        final int width = options.outWidth;
        int inSampleSize = 1;

        if (height > reqHeight || width > reqWidth) {
            final int heightRatio = Math.round((float) height/ (float) reqHeight);
            final int widthRatio = Math.round((float) width / (float) reqWidth);
            inSampleSize = heightRatio < widthRatio ? heightRatio : widthRatio;
        }
        return inSampleSize;
    }

    //把bitmap转换成String
    public static String bitmapToString(String filePath) {
        Bitmap bm = getSmallBitmap(filePath);
        ByteArrayOutputStream baos = new ByteArrayOutputStream();

        //1.5M的压缩后在100Kb以内,测试得值,压缩后的大小=94486字节,压缩后的大小=74473字节
        //这里的JPEG 如果换成PNG,那么压缩的就有600kB这样
        bm.compress(Bitmap.CompressFormat.JPEG, 40, baos);
        byte[] b = baos.toByteArray();
        Log.d("d", "压缩后的大小=" + b.length);
        return Base64.encodeToString(b, Base64.DEFAULT);
    }


}
5.最后上传成功后结束当前页面,并且发送一个Eventbus黏性事件让之前的页面刷新数据
    @Override
    public void onAddGoodsSuccess() {
  //      showTip("上传成功");
        EventBus.getDefault().postSticky(new AddTemoporaryDishEvent(true));
        finish();
    }
@Subscribe(threadMode = ThreadMode.MAIN,sticky = true)
public void onAddEvent(AddTemoporaryDishEvent event){
if (event.getAdd()){
mPresenter = new ProductsPresenter(this);
mPresenter.get_goodstype(String.valueOf(MyApplication.getInstance().shopid));
showLoadingDialog();
}
}下面的代码和主题就扯远了.