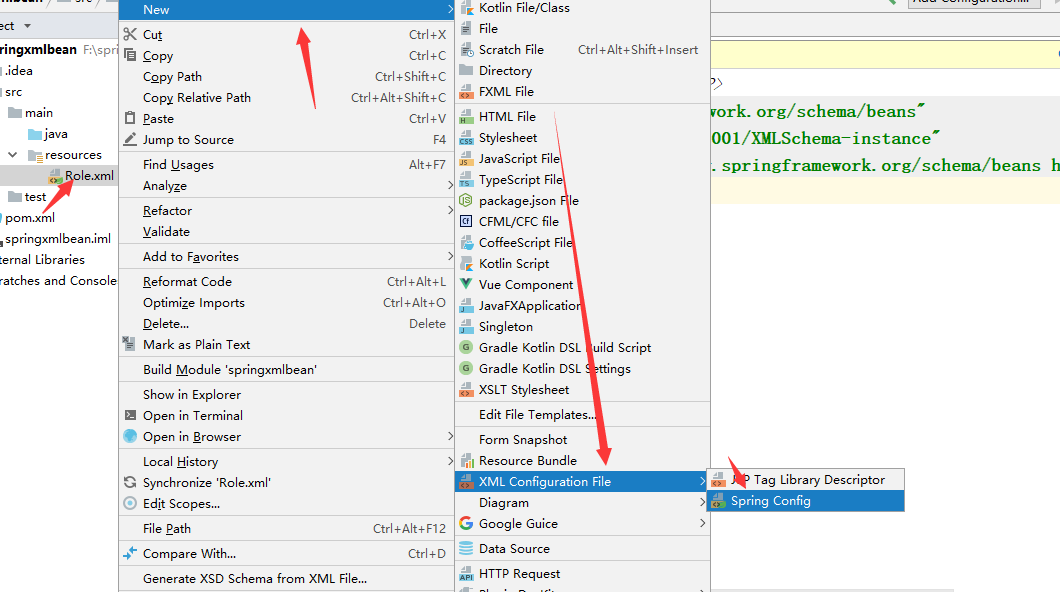
使用XML装配Bean需要定义对于的XML,需要引入对应的XML模式(XSD)文件,这些文件会定义配置Spring Bean的一些元素,简单的配置如下:
<?xml version="1.0" encoding="UTF-8"?>
<beans xmlns="http://www.springframework.org/schema/beans"
       xmlns:xsi="http://www.w3.org/2001/XMLSchema-instance"
       xsi:schemaLocation="http://www.springframework.org/schema/beans http://www.springframework.org/schema/beans/spring-beans.xsd">

</beans>
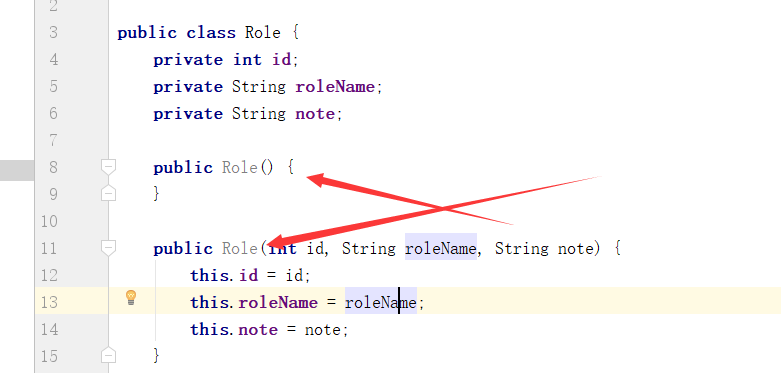
创建角色类Role
类构造器有参与无参
代码:
Role:


package com.wbg.springxmlbean.entity;

public class Role {
    private int id;
    private String roleName;
    private String note;

    @Override
    public String toString() {
        return "Role{" +
                "id=" + id +
                ", roleName='" + roleName + '\'' +
                ", note='" + note + '\'' +
                '}';
    }

    public Role() {
    }

    public Role(int id, String roleName, String note) {
        this.id = id;
        this.roleName = roleName;
        this.note = note;
    }

    public int getId() {
        return id;
    }

    public void setId(int id) {
        this.id = id;
    }

    public String getRoleName() {
        return roleName;
    }

    public void setRoleName(String roleName) {
        this.roleName = roleName;
    }

    public String getNote() {
        return note;
    }

    public void setNote(String note) {
        this.note = note;
    }
}
User:
package com.wbg.springxmlbean.entity;

public class User {
    private int id;

    private Role role;

    @Override
    public String toString() {
        return "User{" +
                "id=" + id +
                ", role=" + role +
                ", name='" + name + '\'' +
                ", age=" + age +
                '}';
    }

    public Role getRole() {
        return role;
    }

    public void setRole(Role role) {
        this.role = role;
    }

    public int getId() {
        return id;
    }

    public void setId(int id) {
        this.id = id;
    }

    public String getName() {
        return name;
    }

    public void setName(String name) {
        this.name = name;
    }

    public int getAge() {
        return age;
    }

    public void setAge(int age) {
        this.age = age;
    }

    private String name;
    private int age;
}
xml进行配置:
1、装备简易值
  <!--
    id:属性是Spring找到的这个Bean的编号,不是必须的,如果没有Spring会采用:
        "全限定名#{number}"的格式生成编号
        列如: <bean class="com.wbg.springxmlbean.entity.Role">
         Spring会生成编号为:"com.wbg.springxmlbean.entity.Role#1"
    class:是一个类的全限定名
         -->
    <bean id="role1" class="com.wbg.springxmlbean.entity.Role">
       <!-- property元素是定义类的属性,name属性定义的是属性名称 value是值
        相当于:
        Role role=new Role();
        role.setId(1);
        role.setRoleName("高级工程师");
        role.setNote("重要人员");-->
        <property name="id" value="1"/>
        <property name="roleName" value="高级工程师"/>
        <property name="note" value="重要人员"/>
    </bean>
    <bean id="rolew" class="com.wbg.springxmlbean.entity.Role">
     <!--   constructor-arg元素,index代表参数索引, value是值
         相当于:
        Role role=new Role(1,"高级工程师","重要人员");-->
       <constructor-arg index="0" value="1"/>
        <constructor-arg index="1" value="高级工程师"/>
        <constructor-arg index="2" value="重要人员"/>
    </bean>
<bean id="user" class="com.wbg.springxmlbean.entity.User">
        <property name="id" value="1"/>
        <property name="age" value="18"/>
        <property name="name" value="韦邦杠"/>
        <!--name是属性名称 ref是对应的Bean-->
        <property name="role" ref="role1"/>
    </bean>
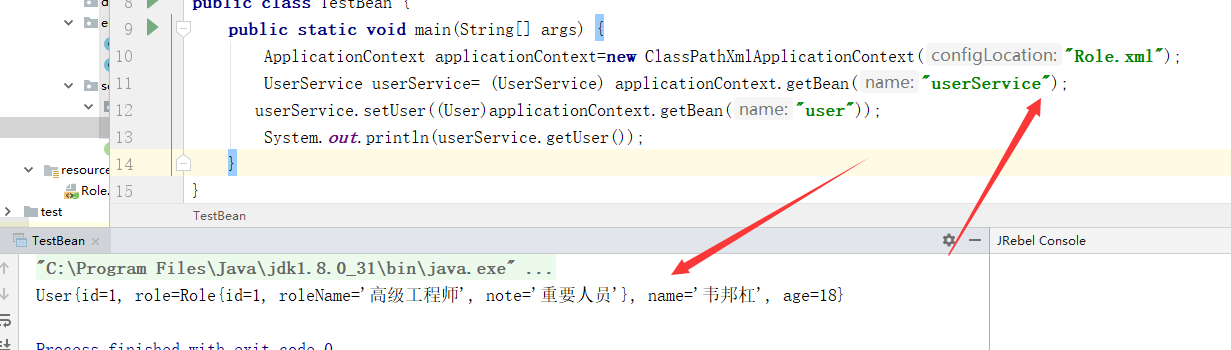
测试:
public static void main(String[] args) {
        ApplicationContext applicationContext=new ClassPathXmlApplicationContext("Role.xml");
        UserService userService= (UserService) applicationContext.getBean("userService");
       userService.setUser((User)applicationContext.getBean("user"));
        System.out.println(userService.getUser());
    }
2、装配集合
定义类:
package com.wbg.springxmlbean.entity;

import java.util.*;

public class ComplexAssembly {
    private Long id;
    private List<String> list;
    private Map<String,String> map;
    private Properties properties;
    private Set<String> set;
    private String[] array;

    @Override
    public String toString() {
        return "ComplexAssembly{" +
                "id=" + id +
                ", list=" + list +
                ", map=" + map +
                ", properties=" + properties +
                ", set=" + set +
                ", array=" + Arrays.toString(array) +
                '}';
    }

    public Long getId() {
        return id;
    }

    public void setId(Long id) {
        this.id = id;
    }

    public List<String> getList() {
        return list;
    }

    public void setList(List<String> list) {
        this.list = list;
    }

    public Map<String, String> getMap() {
        return map;
    }

    public void setMap(Map<String, String> map) {
        this.map = map;
    }

    public Properties getProperties() {
        return properties;
    }

    public void setProperties(Properties properties) {
        this.properties = properties;
    }

    public Set<String> getSet() {
        return set;
    }

    public void setSet(Set<String> set) {
        this.set = set;
    }

    public String[] getArray() {
        return array;
    }

    public void setArray(String[] array) {
        this.array = array;
    }
}
xml:
<bean id="complexAssembly" class="com.wbg.springxmlbean.entity.ComplexAssembly">
        <property name="id" value="1"/>
        <property name="list">
            <!--List属性对应list元素进行装配,然后通过多个value设值-->
            <list>
                <value>value-list-1</value>
                <value>value-list-2</value>
                <value>value-list-3</value>
                <value>value-list-4</value>
            </list>
        </property>
        <property name="map">
            <!--Map属性对应map元素进行装配,然后通过多个entry设值,只是entry包含有key和value值设值-->
            <map>
                <entry key="key1" value="value1"/>
                <entry key="key2" value="value2"/>
                <entry key="key3" value="value3"/>
                <entry key="key4" value="value4"/>
            </map>
        </property>
        <property name="properties">
            <!--Properties属性,对应props进行装配,然后通过prop元素数值,只是prop有一个必填的key,然后设值-->
            <props>
                <prop key="prop1">value-prop-1</prop>
                <prop key="prop2">value-prop-2</prop>
                <prop key="prop3">value-prop-3</prop>
                <prop key="prop4">value-prop-4</prop>
            </props>
        </property>
        <property name="set">
            <!--Set属性对应set元素进行装配,然后通过多个value设值-->
            <set>
                <value>value-set-1</value>
                <value>value-set-2</value>
                <value>value-set-3</value>
                <value>value-set-4</value>
            </set>
        </property>
        <property name="array">
            <!--Array属性对应array元素进行装配,然后通过多个value设值-->
            <array>
                <value>value-array-1</value>
                <value>value-array-2</value>
                <value>value-array-3</value>
                <value>value-array-4</value>
            </array>
        </property>
    </bean>
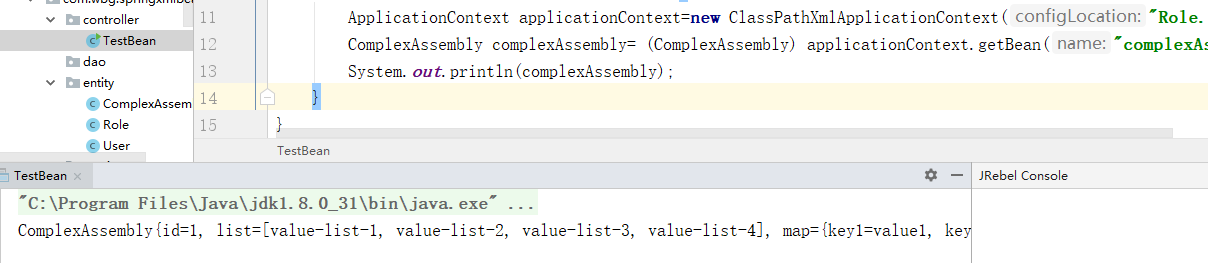
测试:
  ApplicationContext applicationContext=new ClassPathXmlApplicationContext("Role.xml");
        ComplexAssembly complexAssembly= (ComplexAssembly) applicationContext.getBean("complexAssembly");
        System.out.println(complexAssembly);
装配用户和角色
类:MapUserRole
package com.wbg.springxmlbean.entity;

import java.util.Map;

public class MapUserRole {
    private Map<User,Role> map;

    @Override
    public String toString() {
        return "MapUserRole{" +
                "map=" + map +
                '}';
    }

    public Map<User, Role> getMap() {
        return map;
    }

    public void setMap(Map<User, Role> map) {
        this.map = map;
    }
}
xml:
 <bean id="u2" class="com.wbg.springxmlbean.entity.User">
        <property name="id" value="1"/>
        <property name="name" value="小邦哥"/>
        <property name="age" value="20"/>
    </bean>
    <bean id="u1" class="com.wbg.springxmlbean.entity.User">
        <property name="id" value="2"/>
        <property name="name" value="邦杠"/>
        <property name="age" value="21"/>
    </bean>
    <bean id="r1" class="com.wbg.springxmlbean.entity.Role">
        <constructor-arg index="0" value="1"/>
        <constructor-arg index="1" value="中级工程师"/>
        <constructor-arg index="2" value="普通人员"/>
    </bean>
    <bean id="r2" class="com.wbg.springxmlbean.entity.Role">
        <constructor-arg index="0" value="2"/>
        <constructor-arg index="1" value="高级工程师"/>
        <constructor-arg index="2" value="重要人员"/>
    </bean>
    <bean id="mapUserRole" class="com.wbg.springxmlbean.entity.MapUserRole">
        <property name="map">
            <map>
                <entry key-ref="u1" value-ref="r1"/>
                <entry key-ref="u2" value-ref="r2"/>
            </map>
        </property>
    </bean>
测试:
