新的raspberry pi,刷了RetroPi,但是无法识别usb hub下的键盘,直接插键盘就可以,但是用hub就不行,试了很多方法无果。
于是先尝试ssh登录到系统。但是没有网卡所以网线无法直连,而板载wifi没初始化配置过,所以也连接不了,只有通过硬件串口来。
参照网上方法,GPIO40pin排针,左上角,前两个为5v。从第三个开始,顺延三个pin,分别接到usb-ttl串口工具(CH340,CP2102,FT232)的GND,TXD,RXD脚。
因为我板子已经供电,所以只接三根线到usb棒到笔记本电脑即可通信。另外还需要拔下micro sd卡,用读卡器修改config.txt文件,在最后加一句enable_uart=1,并且配置相关视频尺寸设置。
retropie启动后,需要蛮久的,才能看到登录pi信息,不管,先打开putty慢慢等。COM10,115200波特率。
SSH登录进入后raspi-config指令可以进系统设置界面。但里面并没有网卡设置,所以怀疑Retropi 4.3镜像的raspbian固件很旧,并不支持zero W的无线wifi和蓝牙外设。
于是只能手动配置。
ifconfig先查看wlan0,找到wlan0存在,但是没有数据收发。说明这就是wifi板载。
nano/etc/network/interfaces
修改内容,加入这三句话:
auto wlan0
allow-hotplug wlan0
iface wlan0 inet dhcp
保存退出,再去修改密码配置文件:
nano/etc/wpa_supplicant/wpa_supplicant.conf
然后内容 ,改家里网络ssid和密码配置:
“里面的内容需要你自己对照着修改,如果WiFi是WEP加密的或者没密码的,就按照如下形式表示:
network={
ssid=”你的WiFi的SSID”
key_mgmt=NONE
priority=4
}
如果WiFi是WPA/WPA2加密的,就按照如下形式表示:
network={
    ssid="你的WiFi的SSID"
    key_mgmt=WPA-PSK
    psk="你的密码"
    priority=5
}- 1
- 2
- 3
- 4
- 5
- 6
其中ssid表示WiFi的SSID号,key_mgmt表示加密类型,key_mgmt=NONE表示没有密码或者WEP,key_mgmt=WPA-PSK表示WPA/WPA2加密,psk表示密码,没有密码就不用写,priority表示优先级,大的优先连接,一般这两种就够了。”
最后reboot重启,就成功了,wifi OK,可以连网,有数据。
尝试升级系统后,依然识别不了键盘。
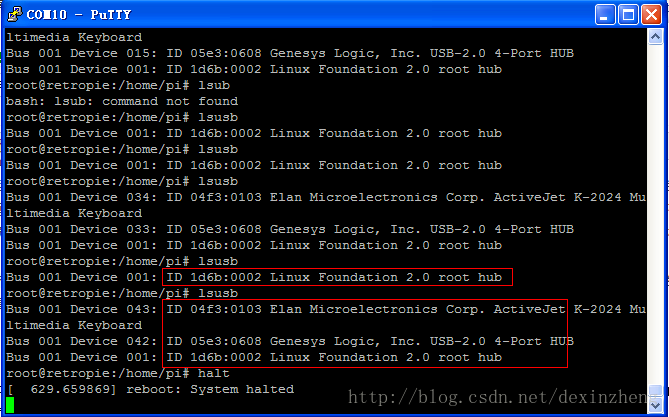
用lsusb和dmesg发现,识别并挂载了usb hub,四口,但是读写通信有问题,枚举失败。
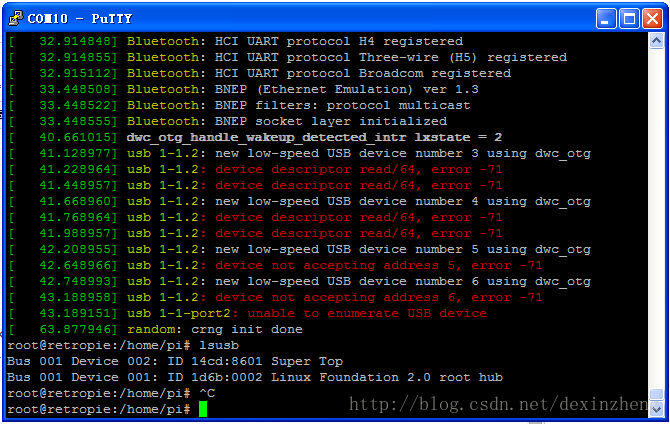
分析上述错误信息,感觉像是插入键盘后发生的。于是重启系统,不带键盘启动,先用dmesg查日志发现没有上述红色的错误信息。
然后再热插接入usb键盘到hub,再dmesg就发现出现了上述红色信息。说明该键盘跟hub某种程度上不兼容。证实了想法。
但是换了一个鼠标后,还是一样的错误信息。
于是上网搜了搜,发现有高手遇到类似的问题:
http://blog.163.com/jetwu_uestc@126/blog/static/1320681162010101804218436/
“
今天调试USB HOST ,当插入U盘的时候发现了以下的错误
device descriptor read/64, error -71
源代码中的-71(/include/asm-generic/erro.h)代表的是协议的错误,百思不得其解
晚上睡觉的时候,想到,协议的错误应该就是时序的错误,时序的错误就代表了硬件走线应该是有问题,
把到USB端口的线做的很短,发现问题解决了。
”https://community.nxp.com/thread/294381
In my case, it was a non-required resistors on the data lines, which were attenuating signal and causing USB to work/fail intermittently.
Once they were removed, all was well.
--Rohith
My problem occurred because one of the power rails was not connected properly on our own hardware. Once that was fixed, devices enumerated correctly. In our case, no devices worked at all. As Make suggested, it seems that your problem is not the same as ours.
看样子。跟供电和硬件的关系很大。hub的下口5v上并10uF电容也没有用。后来用u盘测试,发现插U盘是可以成功识别的。看来真是兼容性问题。
问题依然待解决。。。。。
hub
http://www.guyrutenberg.com/2008/06/26/usb-1-4-device-descriptor-read64-error-71/
usb 1-4: device descriptor read/64, error -71
When I try to connect my Sansa Clip MP3 player to the linux box I see the following error indmesg:
usb 1-4: device descriptor read/64, error -71
and the device recognition fails. The player’s battery gets reloaded but I can’t mount it and transfer songs.
The solution that worked for me was runnig as root
echo Y > /sys/module/usbcore/parameters/old_scheme_first
The general idea behind the solution is that there are two way to enumerate USB devices according to the standard. The method that is currently used by default in the usbcore module is similar to the one found in Windows. Apparently There are devices, and the Sansa Clip is among them, that require the other method to function properly. See Linux USB FAQ for more info.
http://blog.csdn.net/huangxiaohu_coder/article/details/13267525
设备名:中兴MF190
Linux Kernel版本:3.4
错误名:usb 1-1: device descriptor read/64, error -110
usb 1-1: device not accepting address 33, error -110
usb 1-1: device not accepting address 34, error -110
症状:我的3G USB dongle在平台上第一次插拔(不管是开机插拔还是热插拔)都能正常运行,不过当我拔掉后,再插上,便会出现以上所示的错误,我用lsusb命令也看不到有任何的新设备被识别出来,之后我插上USB鼠标也是同样的被识别不出来
解决方式:1.这里的error-110,实际上式连接超时的错误,至于为什么会出现这个错误,还不明所以,后来搜索到资料说USB2.0的驱动有些问题,会导致这样的问题,和USB相关的模块是ehci_hcd模块,你可以通过lsmod命令查看你当前的kernel是否加载ehci_hcd模块,若加载了你可以使用modeprobe -r ehci_hcd把该模块卸载掉,之后你再试试看设备能否被发现;如果还是不行,你找到系统的开机脚本在开机的时候不加载ehci_hcd模块,我便是这样在在开机的时候不加载ehci_hcd的模块,以后热插拔便恢复了正常。
不过这样之后对USB的传输速度应该有一定的影响,这里只是暂时使用此方法解决,后续若有新发现,继续更新,若有同学有新的线索,恳请交流哦。
---
我这两天一直在分析原因,感觉应该是走线的问题,D+D-的查分数据问题眼图波型。原来的四口hub裸板,能识别到usb hub,但是hub下级的键盘和按钮板都识别不了,插上U盘勉强可以识别,但是用lsusb和dmesg查看详细信息发现依然有识别错误的条目。说明类似接触不良似好非好的状态。
又怀疑是5V供电的问题,怀疑是充电器Adapter的5V干扰,但是换了干净的线性直流电源DC 5V供电,问题依旧,所以排除电源因素。
尝试在hub输出的口加电容,10uF贴片到100uF电解,都试过了,无果。
今天尝试了一个全新的usb hub后,终于可以确认问题所在,hub到pi zero的USB OTG走线我用的一段5cm排线,所以也出现了偶尔能识别偶尔不能识别的问题。一旦我理下线的摆放,在lsusb下确认hub都识别成功后,我在hub下级再随便挂接什么键盘U盘都没问题了,说明hub下级信号OK,OTG口给的5V供电也完全也OK不存在不足,可以确认就是屏蔽线不能用排线随便乱替代的问题了。
所以根本不是什么没有驱动程序的锅。linux的Rasbian的系统很完善好吗,usb HID设备都能自动枚举识别出来的,根本不要装驱动。
--------------
又试了下,安装一个按钮来关机。关机按钮,一个按钮串100欧保护电阻然后直接挂接到gpio7和GND,正好是40pin header的25,26脚,相邻两个,测试关机成功了。
这样再也不担心关机时直接热拔电源损害闪存卡的问题了:
http://shumeipai.nxez.com/2014/09/01/add-raspberry-pi-sent-to-reboot-off-button.html
#!/usr/bin/env python
# coding=utf-8
# author:ksc

import RPi.GPIO as GPIO
import time
import os,sys
import signal

GPIO.setmode(GPIO.BCM)

#define GPIO pin
pin_btn=7

GPIO.setup(pin_btn, GPIO.IN, pull_up_down=GPIO.PUD_UP)

press_time=0
count_down=10

def cleanup():
    '''释放资源,不然下次运行是可能会收到警告
    '''
    print('clean up')
    GPIO.cleanup()

def handleSIGTERM(signum, frame):
    #cleanup()
    sys.exit()#raise an exception of type SystemExit

def onPress(channel):
    global press_time,count_down
    print('pressed')
    press_time+=1
    if press_time >3:
        press_time=1
    if press_time==1:
        print('system will restart in %s'%(count_down))
    elif press_time==2:
        print('system will halt in %s'%(count_down))
    elif press_time==3:
        print 'cancel '
        count_down=10

GPIO.add_event_detect(pin_btn, GPIO.FALLING, callback= onPress,bouncetime=500)

#signal.signal(signal.SIGTERM, handleSIGTERM)
try:
    while True:
        if press_time==1:
            if count_down==0:
                print "start restart"
                os.system("shutdown -r -t 5 now")
                sys.exit()
        if press_time==2 and count_down==0:
            print "start shutdown"
            os.system("halt")
            sys.exit()

        if press_time==1 or press_time==2:
            count_down-=1
            print "%s second"%(count_down)
        time.sleep(1)
except KeyboardInterrupt:
    print('User press Ctrl+c ,exit;')
finally:
cleanup()#创建程序,把代码粘贴进去保存
root@mypi:~
# nano reboot.py
#修改可执行
root@mypi:~
# chmod 775 reboot.py
#测试下
root@mypi:~
# ./reboot.py
然后设定为开机自动运行:
编辑这个文件
root@retropie:/etc# nano rc.local
在exit 0上一行输入:
python /home/pi/reboot.py
保存退出。
新建启动脚本为/etc/init.d/buttonboot文件
#!/bin/bash
# /etc/init.d/buttonboot

### BEGIN INIT INFO
# Provides: embbnux
# Required-Start: $remote_fs $syslog
# Required-Stop: $remote_fs $syslog
# Default-Start: 2 3 4 5
# Default-Stop: 0 1 6
# Short-Description: ledblink initscript
# Description: This service is used to manage a led
### END INIT INFO

case "$1" in
    start)
        echo "Starting button boot"
        /home/pi/reboot.py &
        ;;
    stop)
        echo "Stopping button boot"
        #killall reboot.py
        kill $(ps aux | grep -m 1 'python /home/pi/reboot.py' | awk '{ print $2 }')
        ;;
    *)
        echo "Usage: service button boot start|stop"
        exit 1
        ;;
esac
exit 0
设置python脚本开机启动
chmod +x buttonboot
最后设置开机启动就好了
update-rc.d buttonboot defaults
系统启动后,按两次按钮,等大约2秒,就可以安全关机啦。
以后随时可用service 命令来启动或者停止:
sudo service buttonboot start#启动
sudo service buttonboot stop#停止
重启测试即可。