oauth2其实就是在security上在加一层
一。系统页登录
导入security包
        <dependency>
            <groupId>org.springframework.cloud</groupId>
            <artifactId>spring-cloud-starter-security</artifactId>
        </dependency>
properties
server.port=9002
配置config
@Configuration
@EnableWebSecurity
public class SecurityConfiguration extends WebSecurityConfigurerAdapter {
    @Autowired
    private UserDetailService userDetailService;


    @Autowired
    public void configureGlobal(AuthenticationManagerBuilder auth) throws Exception {
         auth.userDetailsService(userDetailService);
    }
}
配置UserServer用于验证账号 loadUserByUsername这里是直接写死的返回个User 可以直接替换成redis 或者数据库 看个人需求
@Service(value = "userDetailService")
public class UserDetailService implements UserDetailsService {
    @Autowired
    private PasswordEncoder passwordEncode;

    public UserDetails loadUserByUsername(String username) throws UsernameNotFoundException {
        System.out.println("username=" + username);
        List<GrantedAuthority> list = new ArrayList<GrantedAuthority>();
        list.add(new SimpleGrantedAuthority("ROLE_USER"));
        User auth_user = new User("test", passwordEncode.encode("123456"), list);
        return auth_user;
    }

    @Bean
    PasswordEncoder passwordEncoder() {
        return PasswordEncoderFactories.createDelegatingPasswordEncoder();

    }
}
配置个Controller用于跳转
@RestController
public class OAuthController {

      @RequestMapping("/")
      String home(HttpServletRequest req,HttpServletResponse res) {return "hello world";
      }


}
默认使用的是自带的登录页面
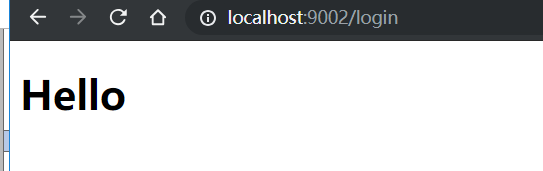
访问地址http://localhost:9002/login
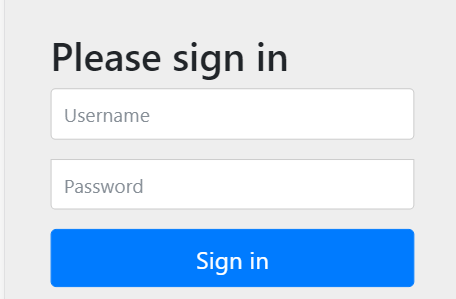
输入上面的账号 test 密码 123456
登录成功
二。自定也登录页面
@Configuration
@EnableWebSecurity
public class SecurityConfiguration extends WebSecurityConfigurerAdapter {
    @Autowired
    private UserDetailService userDetailService;


    @Autowired
    public void configureGlobal(AuthenticationManagerBuilder auth) throws Exception {
         auth.userDetailsService(userDetailService);
    }


    @Override
    protected void configure(HttpSecurity http) throws Exception {
        http.authorizeRequests().antMatchers("/","/hello","/login2","/aouth").permitAll() //指定不需要验证的页面,其他的默认会跳转到登录页
                .anyRequest()
                .authenticated()
                .and()
                .formLogin()  //支持表单提交
                .loginPage("/login2").permitAll()  //自定义登录页面
                .failureForwardUrl("/error")   //自定也错误
                .loginProcessingUrl("/login")  //提交action  也就是form表单中的action  login会调用security的登录不用自己实现
                .successForwardUrl("/hello")  //登录成功页面
                .and().logout()
                .permitAll();

//        System.out.println(http.toString());
    }
}
前端登录页面
_csrf.token 这个非常重要 不然源码拦截器中默认会把response的response.isCommitted() 设为true 导致无限返回错误页面
isCommitted 在数据输出前是false 数据输出完成为true
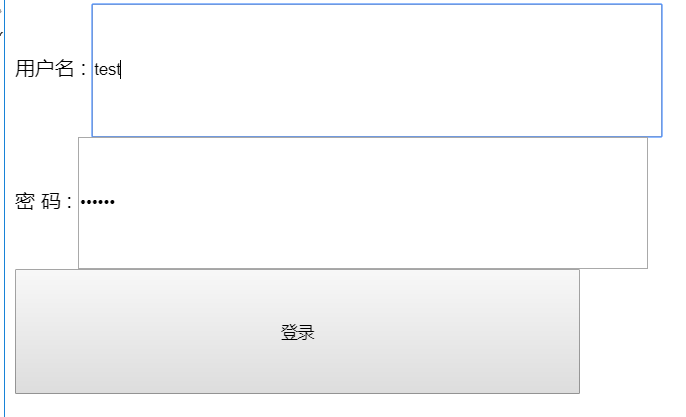
login.ftl 放在templete下面
<!DOCTYPE html>
<html xmlns="http://www.w3.org/1999/xhtml"
      xmlns:th="http://www.thymeleaf.org"
      xmlns:sec="http://www.thymeleaf.org/thymeleaf-extras-springsecurity3">
    <head>
        <title>Spring Security Example </title>
    </head>
    <body>
        <form action="login" method="post">
            <div><label> 用户名 : <input type="text" name="username" style="width:30%;height:100px;" value="dikeboy"/> </label></div>
            <div><label> 密  码 : <input type="password" name="password" style="width:30%;height:100px;" value="123456"/> </label></div>
            <input type="hidden" name="${_csrf.parameterName}" value="${_csrf.token}">
            <div><input type="submit" value="登录" style="width:30%;height:100px;"/></div>
        </form>
    </body>
</html>
定义个Controller
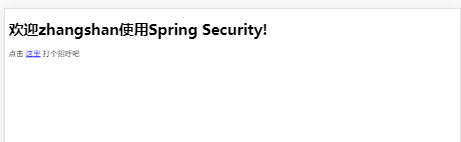
@Controller
public class WebController {

     @RequestMapping("/")
        public ModelAndView Add(HttpServletRequest request,HttpServletResponse response){
             Map<String,String> map =new HashMap<String,String>();
             map.put("name", "zhangshan");
             map.put("link","/login");
            ModelAndView mv = new ModelAndView();
            mv.setViewName("index");
            mv.addObject("user",map);
            return mv;
        }

    @RequestMapping("/hello")
    public String hello() {
        System.out.println("hello");
        return "hello";
    }

     @RequestMapping("/login2")
        public String login() {
         System.out.println("login");
            return "mlogin";
        }


}
其它几个WEB页面都比较简单 随便弄就行 测试
localhost:9092
登录成功