Spring 5 设计模式 - Dependency Injection
依赖注入模式
Spring使用依赖注入,解决不同层的不同组件之间的组装问题。
先看下面的类图:
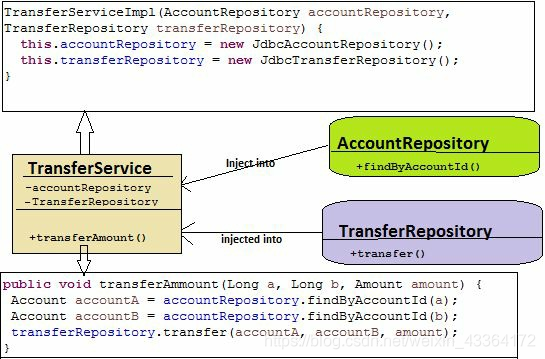
TransferService有两个成员变量,AccountRepository和TransferRepository。他们在TransferService的构造器中初始化。TransferService通过硬编码方式,决定使用repositories的哪个实现:
public interface TransferService {
	void transferAmmount(Long a, Long b, Amount amount);
}

public class TransferServiceImpl implements TransferService {
    AccountRepository accountRepository;
    TransferRepository transferRepository;
    public TransferServiceImpl(AccountRepository accountRepository,
                               TransferRepository transferRepository) {
        super();

        this.accountRepository = new JdbcAccountRepository();
        this.transferRepository = new JdbcTransferRepository();
    }

    @Override
    public void transferAmmount(Long a, Long b, Amount amount) {
        Account accountA = accountRepository.findByAccountId(a);
        Account accountB = accountRepository.findByAccountId(b);
        transferRepository.transfer(accountA, accountB, amount);
    }
}
这样,TransferServiceImpl和JdbcAccountRepository、JdbcTransferRepository紧耦合在一起。如果你想把JDBC实现改为JPA实现,你需要修改TransferServiceImpl类。
根据SOLID(Single Responsibility-单一责任、Open Closed-开放封闭、Liskov’s Substitution-里氏替换、Interface Segregation-接口分离、Dependency Inversion-依赖倒置)原则,程序中的一个类只有一个责任。但是,前面的例子,TransferServiceImpl还承担了JdbcAccountRepository和JdbcTransferRepository的构造责任。我们不应该在这个类里直接实例化其他对象。
要避免在TransferServiceImpl类里直接生成其他实例,可以使用工厂类增加它的实例。这样,TransferServiceImpl最小化了对AccountRepository和TransferRepository的依赖-以前和实现紧耦合,现在只引用接口:
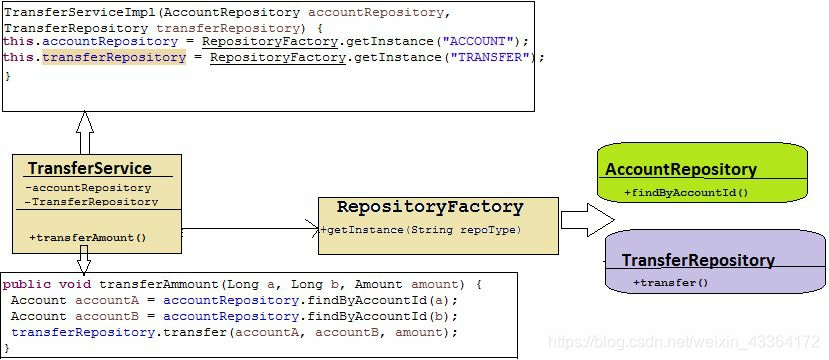
现在,TransferServiceImpl类和RepositoryFactory紧耦合了。如果有更多的依赖,这样做就更不合适了-不论是增加工厂类还是工厂类的组合。
看一下使用了工厂的TransferServiceImpl类的代码:
public class TransferServiceImpl implements TransferService {
    AccountRepository accountRepository;
    TransferRepository transferRepository;

    public TransferServiceImpl() {
        this.accountRepository = RepositoryFactory.getAccountRepositoryInstance();
        this.transferRepository = RepositoryFactory.getTransferRepositoryInstance();
    }

    @Override
    public void transferAmount(Long a, Long b, Amount amount) {
        Account accountA = accountRepository.findByAccountId(a);
        Account accountB = accountRepository.findByAccountId(b);
        transferRepository.transfer(accountA, accountB, amount);
    }
}
依赖注入基于Inversion of Control模式。通过IoC,容器负责对象实例化,解决程序中类之间的依赖问题。
看下图,我们使用依赖注入模式解决TransferServiceImpl类的依赖问题:
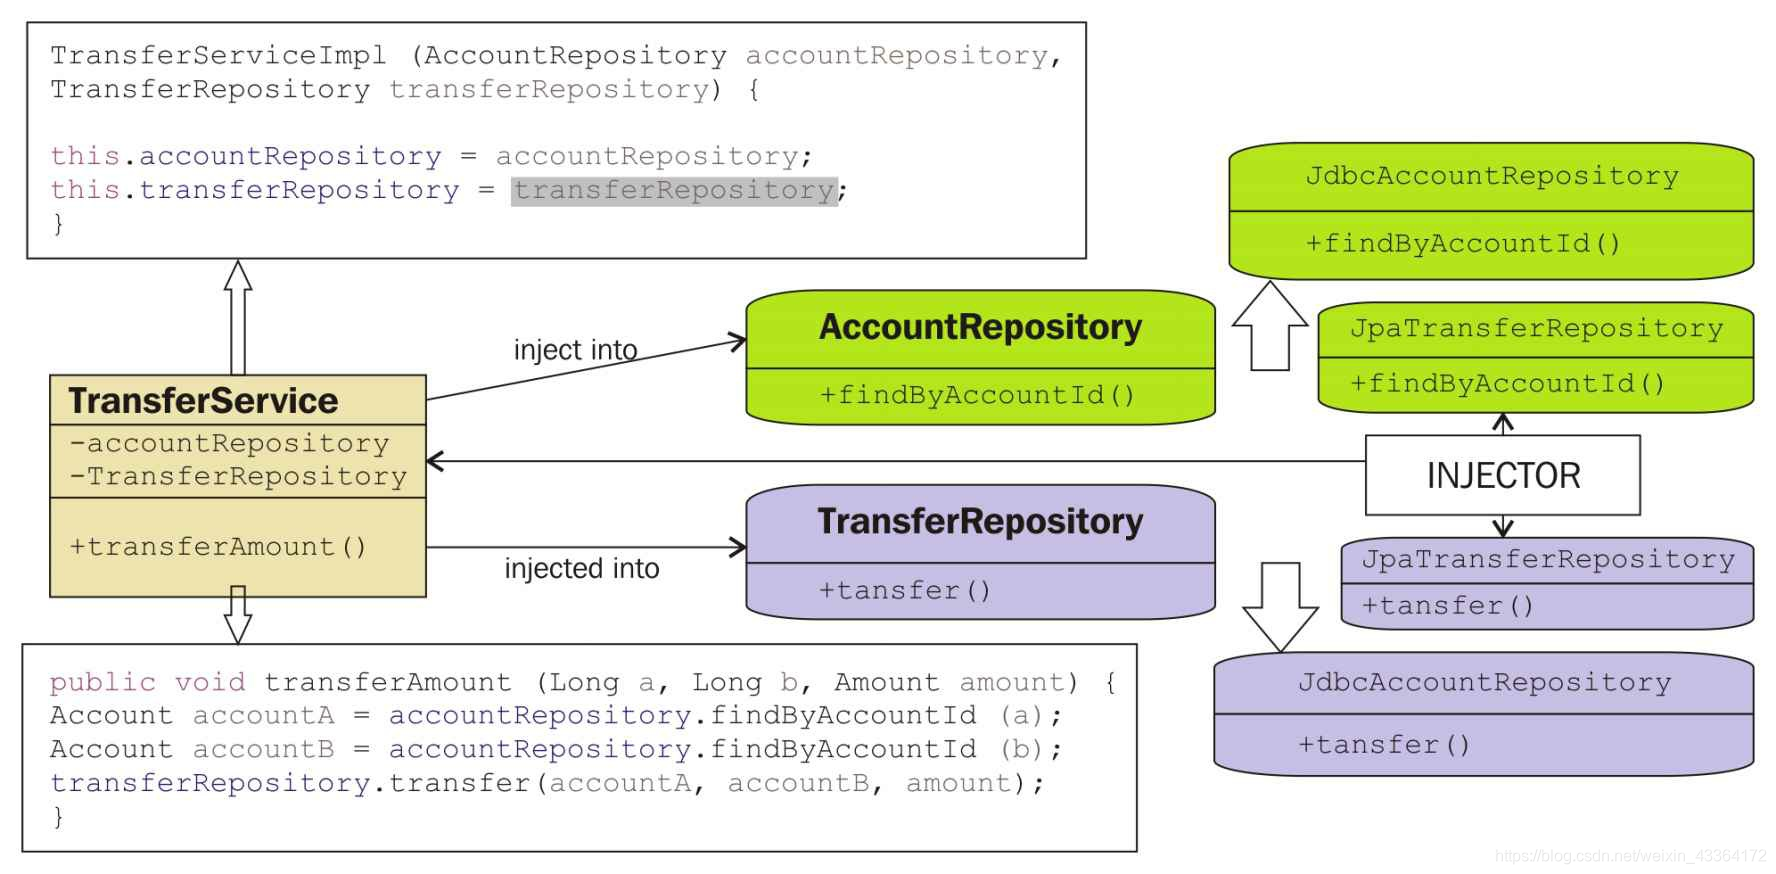
它的代码是这样的:
public class TransferServiceImpl implements TransferService {
    AccountRepository accountRepository;
    TransferRepository transferRepository;
    public TransferServiceImpl(AccountRepository accountRepository,
                               TransferRepository transferRepository) {
        this.accountRepository = accountRepository;
        this.transferRepository = transferRepository;
    }
    @Override
    public void transferAmmount(Long a, Long b, Amount amount) {
        Account accountA = accountRepository.findByAccountId(a);
        Account accountB = accountRepository.findByAccountId(b);

        transferRepository.transfer(accountA, accountB, amount);
    }
}
这样,TransferServiceImpl类的构造器传入的是AccountRepository和TransferRepository接口的引用。TransferServiceImpl和repository的实现松耦合了(可以是JDBC实现,也可以是JPA实现),框架把类和他依赖的其他类连接起来。松耦合带来了更好的可重用性、可维护性和可测试性。
Spring通过依赖注入模式解决类之间的依赖关系。Spring DI基于IoC-Spring有一个容器,用来增加、管理和销毁对象。
依赖Spring容器的对象叫Spring bean。下来,我们看最常用的三种配置Spring容器的方法。
依赖注入模式的类型
- Constructor-based
- Setter-based
基于构造器的
构造器注入在对象实例化的时候设置对象的属性。一个对象有public构造器,接受依赖的类当作构造器参数,并注入依赖。
你可以声明多个构造器。
构造器注入容易带来循环依赖(比如A依赖B,B也依赖A)。
前面的TransferServiceImpl类就是使用了构造器注入的方式。
repositories也可以由Spring容器管理,比如,把数据源注入JdbcAccountRepository:
public class JdbcAccountRepository implements AccountRepository {
    JdbcTemplate jdbcTemplate;
    public JdbcAccountRepository(DataSource dataSource) {
        this.jdbcTemplate = new JdbcTemplate(dataSource);
    }
    // ...
}
基于Setter方法的
setter注入使用setter方法设置依赖。对象有public setter方法,接受依赖类作为方法参数注入依赖。此时,不需要构造器。
优点:
- 可读性更好
- 解决了循环依赖问题
- 允许比较费时的资源晚一点增加-在需要的时候增加
- 不用修改构造器就可以修改依赖关系
缺点:
- 不够安全,因为setter方法可以被覆盖
- 代码结构不紧凑
- 使用的时候要小心,因为它不是必须的依赖项(比如可以为空)
下面的TransferServiceImpl就使用了setter方法注入:
public class TransferServiceImpl implements TransferService {
    AccountRepository accountRepository;
    TransferRepository transferRepository;
    public void setAccountRepository(AccountRepository accountRepository) {
        this.accountRepository = accountRepository;
    }
    public void setTransferRepository(TransferRepository transferRepository) {
        this.transferRepository = transferRepository;
    }
    // ...
}
二者的比较
| 构造器注入 | Setter注入 |
|---|---|
| 使用构造器接受参数;有时候很紧凑,知道自己增加了什么 | 不知道属性是否被初始化了 |
| 如果必须有这个依赖,是很好的选择 | 适合用于不是必须的依赖 |
| 允许隐藏对象的属性,确保不被修改 | 不能保证不可变性 |
| 循环依赖 | 解决循环依赖 |
| 不适合标量值依赖 | 如果有字符串或者整数这样的简单的参数,适合使用setter注入 |
使用Spring配置依赖注入模式
主流的注入有Google Guice、Spring和Weld。
我们先看下图,一个关于Spring如何工作的高级视图:
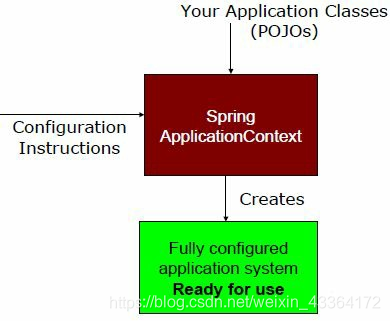
Configuration Instruction是程序的元配置。在这里,我们定义程序类的依赖,初始化Spring容器,解决依赖关系。
Spring容器在程序中增加beans,通过DI模式组装它们。Spring容器基于配置增加bean。
主要有三种配置办法:
- Java-based:使用Java代码做明确地配置
- Annotation-based:隐式的bean发现,和自动连线
- XML-based:在XML文件中明确地配置
Spring可以混合处理。
Java-based
Spring 3.0开始,支持Java-based的Spring 配置。它功能强大且类型安全。
import org.springframework.context.annotation.Bean;
import org.springframework.context.annotation.Configuration;

@Configuration
public class AppConfig {
    @Bean
    public TransferService transferService() {
        return new TransferServiceImpl(accountRepository(), transferRepository());
    }
    @Bean
    public AccountRepository accountRepository() {
        return new JdbcAccountRepository();
    }
    @Bean
    public TransferRepository transferRepository() {
        return new JdbcTransferRepository();
    }
}
@Bean注解指示实例化、配置和初始化一个Spring IoC容器管理的对象。每个bean有唯一ID。默认地,bean的ID就是所注解的方法名。
可以这样指定bean的ID:
@Bean(name="service")
public TransferService transferService(){
    return new TransferServiceImpl();
}
最好使用下面的方法:
    @Bean
    public TransferService transferService(AccountRepository accountRepository, TransferRepository transferRepository){
        return new TransferServiceImpl(accountRepository, transferRepository);
    }
这是因为,accountRepository()、transferRepository()可能和transferService()方法不在一个类中。
Annotation-based
什么是Stereotype注解
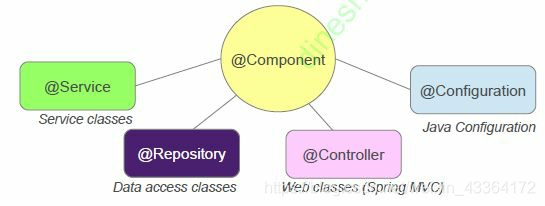
Spring提供了一些特定的注解。这些注解被用来在程序上下文中自动增加Springbean。其中一个是@Component,通过使用这个注解,Spring提供了更多的Stereotype元注解,比如@Service,用来在Service层增加Spring bean;@Repository用来增加DAO层的bean;@Controller用来增加controller层的bean:
通过使用这些注解,Spring有两个办法自动增加连线:
- Component scanning:Spring自动在IoC容器中寻找bean
- Autowiring:Spring自动在IoC容器中寻找bean依赖
看TransferService:
public interface TransferService {
    void transferAmmount(Long a, Long b, Amount amount);
}

@Service
public class TransferServiceImpl implements TransferService {
    @Override
    public void transferAmmount(Long a, Long b, Amount amount) {
        //business code here
    }
}
再看JdbcAccountRepository:
public interface AccountRepository {
	Account findByAccountId(Long accountId);
}

@Repository
public class JdbcAccountRepository implements AccountRepository {

	@Override
	public Account findByAccountId(Long accountId) {
		return new Account(accountId, "Arnav Rajput", new Amount(3000.0));
	}

}
使用组件扫描搜索bean
你需要打开组件扫描功能,因为它没有默认打开。你不得不增加一个配置类,使用@Configuration和@ComponentScan注解。此类用于搜索使用@Component注释的类,并从中创建bean。
@Configuration
@ComponentScan
public class AppConfig {
}
可以指定包名
@Configuration
@ComponentScan("test")
public class AppConfig {
}
也可以指定多个包名
@Configuration
@ComponentScan(basePackages = {"test.repository.jdbc", "test..service"})
public class AppConfig {
}
也可以指定类名
@Configuration
@ComponentScan(basePackageClasses = {TransferService.class,AccountRepository.class})
public class AppConfig {
}
autowiring
@Service
public class TransferServiceImpl implements TransferService {
    AccountRepository accountRepository;
    TransferRepository transferRepository;
    @Autowired
    public TransferServiceImpl(AccountRepository accountRepository,
                               TransferRepository transferRepository) {
        super();
        this.accountRepository = accountRepository;
        this.transferRepository = transferRepository;
    }
    @Override
    public void transferAmmount(Long a, Long b, Amount amount) {
        Account accountA = accountRepository.findByAccountId(a);
        Account accountB = accountRepository.findByAccountId(b);
        transferRepository.transfer(accountA, accountB, amount);
    }
}
从Spring 4.3开始,如果类里只有一个带参数的构造器,可以不需要@Autowired注解。
@Autowired注解可用于构造器、setter方法、甚至属性。
public class TransferServiceImpl implements TransferService {
    //...
    @Autowired
    public void setAccountRepository(AccountRepository accountRepository) {
        this.accountRepository = accountRepository;
    }
    @Autowired
    public void setTransferRepository(TransferRepository transferRepository) {
        this.transferRepository = transferRepository;
    }
    //...
}
或者
public class TransferServiceImpl implements TransferService {
    @Autowired
    AccountRepository accountRepository;
    @Autowired
    TransferRepository transferRepository;
    //...
}
默认地,@Autowired依赖是一个必须依赖-如果依赖不能解析,会抛异常。
消除歧义
如果有两个AccountRepository:
@Repository
public class JdbcAccountRepository implements AccountRepository {
    //
}
@Repository
public class JpaAccountRepository implements AccountRepository {
    //
}
Spring容器会在启动时抛异常:
At startup: NoSuchBeanDefinitionException, no unique bean of type [AccountRepository] is defined: expected single bean but found 2...
解决
@Service
public class TransferServiceImpl implements TransferService {
    @Autowired
    public TransferServiceImpl( @Qualifier("jdbcAccountRepository") AccountRepository accountRepository) {
        //
    }
}

@Repository("jdbcAccountRepository")
public class JdbcAccountRepository implements AccountRepository {
    //
}
@Repository("JpaAccountRepository")
public class JpaAccountRepository implements AccountRepository {
    //
}
使用抽象工厂解决
Spring提供了FactoryBean接口,实现抽象工厂模式。可以用它定制IoC容器的实例化逻辑。你可以实现该接口,实现了该接口的bwan是自定探测的。
public interface FactoryBean<T> {
    T getObject() throws Exception;
    Class<T> getObjectType();
    boolean isSingleton();
}
加入你有一个TransferService类:
public class TransferService {
    IAccountRepository accountRepository;
    public TransferService(IAccountRepository accountRepository) {
        this.accountRepository = accountRepository;
    }
    public void transfer(String accountA, String accountB, Double amount){
        System.out.println("Amount has been tranferred");
    }
}
然后实现FactoryBean:
public class AccountRepositoryFactoryBean implements FactoryBean<IAccountRepository> {
    @Override
    public IAccountRepository getObject() throws Exception {
        return new AccountRepository();
    }
    @Override
    public Class<?> getObjectType() {
        return IAccountRepository.class;
    }
    @Override
    public boolean isSingleton() {
        return false;
    }
}
这样写配置类:
@Configuration
public class AppConfig {
    public TransferService transferService() throws Exception {
        return new TransferService(accountRepository().getObject());
    }
    @Bean
    public AccountRepositoryFactoryBean accountRepository() {
        return new AccountRepositoryFactoryBean();
    }
}