Spring 5 设计模式 - bean生命周期和使用的模式
Spring容器管理的每个bean都有自己的生命周期和scope。
生命周期和阶段
Spring加载bean以后,Spring容器处理bean的生成和实例化。可以把生命周期分成三个阶段:
- 初始化阶段
- 使用阶段
- 销毁阶段

Spring管理的bean在每个阶段执行的操作,都是依赖于配置的。
初始化阶段
首先,从XML文件、注解和Java配置加载全部配置。本阶段完成以后,程序才可以使用。在本阶段,生成bean,并为bean分配资源。Spring使用ApplicationContext加载bean配置,程序上下文增加完成,本阶段也就执行完了。
Spring提供了ApplicationContext的多个实现,以加载配置文件:
ApplicationContext context = new AnnotationConfigApplicationContext(AppConfig.class);
或者
ApplicationContext context = new ClassPathXmlApplicationContext("applicationContext.xml");
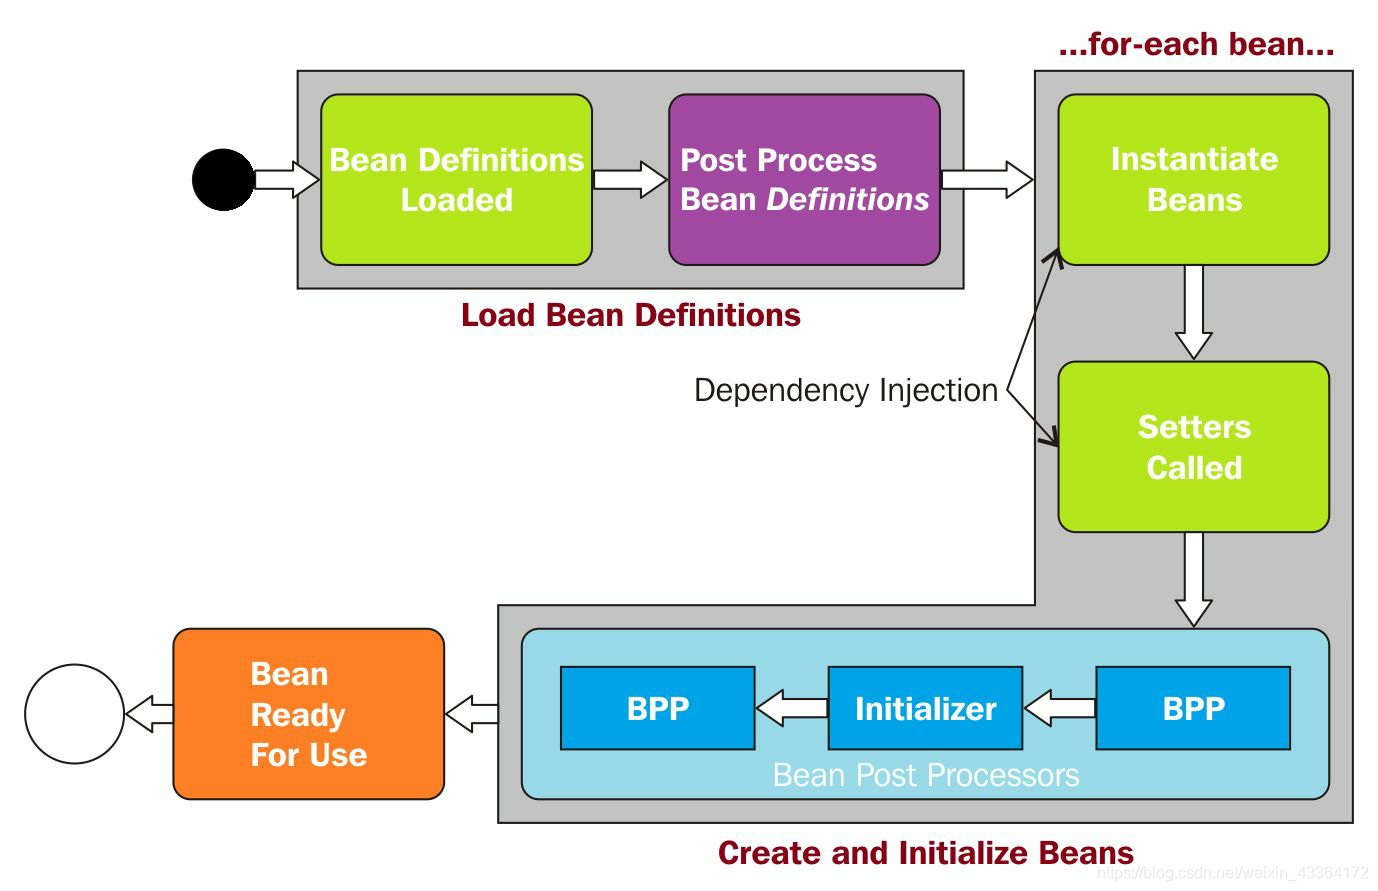
初始化阶段又可分成两步:
- 加载bean定义
- 初始化bean实例
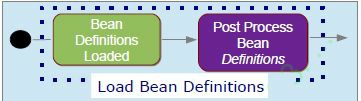
加载bean定义
在这一步,所有的配置文件 - 带@Configuration注解的类和XML文件 - 都被处理了。对于基于注解的配置,所有使用@Components注解的类都被扫描,来加载bean定义。所有的XML文件被合并,bean的定义被加到BeanFactory。每个bean都用它的ID做索引。Spring提供了多个BeanFactoryPostProcessor,它被调用以解决运行时依赖(比如从外部属性文件读值)。Spring程序里的BeanFactoryPostProcessor可以修改任何bean的定义。
可以看到,首先加载bean定义,然后调用BeanFactoryProcessor修改某些bean的定义。让我们看一个例子:
@Configuration
public class AppConfig {
    @Bean
    public TransferService transferService() {
        //
    }
    @Bean
    public AccountRepository accountRepository(DataSource dataSource) {
        //
    }
}


@Configuration
public class InfraConfig {
    @Bean
    public DataSource dataSource () {
        //
    }
}
这些Java配置由ApplicationContext加载到容器,使用他们的ID做索引,如下图所示:
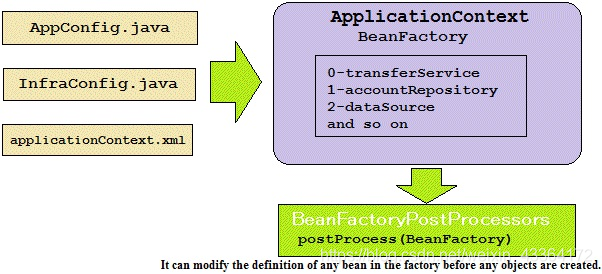
Spring bean被索引之后放进BeanFactory,然后,BeanFactory被当作一个参数传入BeanFactoryPostProcessor的postProcess()方法。BeanFactoryPostProcessor能修改一些bean的定义;这依赖于bean的配置。我们看看BeanFactoryPostProcessor是如何工作的“
- 在实际增加bean之前,BeanFactoryPostProcessor处理bean的定义或者配置元数据
- BeanFactoryPostProcessor有几个实现,比如读属性文件、注册自定义scope
- 可以实现自己的BeanFactoryPostProcessor
- 如果你在一个容器内定义BeanFactoryPostProcessor,它就只作用于这个容器内的bean定义
public interface BeanFactoryPostProcessor {
    void postProcessBeanFactory(ConfigurableListableBeanFactory beanFactory);
}
我们看看它怎么读属性文件database.properties:
jdbc.driver = org.hsqldb.jdbcDriver
jdbc.url = jdbc:hsqldb:hsql://production:9002
jdbc.username = dojjdbc.password=doj@123
对应的配置类:
@Configuration
@PropertySource("classpath:/config/database.properties")
public class InfraConfig {
    @Bean
    public DataSource dataSource(
            @Value("${jdbc.driver}") String driver,
            @Value("${jdbc.url}") String url,
            @Value("${jdbc.user}") String user,
            @Value("${jdbc.password}") String pwd) {
        DataSource ds = new BasicDataSource();
        ds.setDriverClassName(driver);
        ds.setUrl(url);
        ds.setUser(user);
        ds.setPassword(pwd);
        return ds;
    }
}
对于@Value,使用PropertySourcesPlaceholderConfigurer处理,它是一个BeanFactoryPostProcessor。
初始化bean实例
把bean的定义加载到BeanFactory之后,Spring IoC容器实例化bean。见下图:
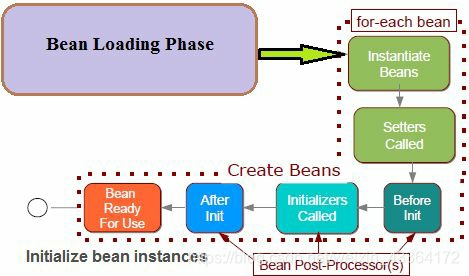
- bean以正确的顺序和它的依赖注入被生成,除非它是延迟的
- 有多个BeanPostProcessor,可以修改bean实例
- 执行完本阶段,bean已经初始化完毕,准备使用了。除了prototype bean,都通过ID跟踪,直到被销毁
使用BeanPostProcessor自定义bean
BeanPostProcessor是个重要的扩展点。可以用来修改bean的视力。可以写自己的BeanPostProcessor来增加自定义的post-processor。Spring提供了它的几个实现。我们先看看BeanPostProcessor接口的定义:
public interface BeanPostProcessor {
    Object postProcessBeforeInitialization(Object bean, String beanName) throws BeansException;
    Object postProcessAfterInitialization(Object bean, String beanName) throws BeansException;
}
可以实现这两个方法实现自定义逻辑。可以在Spring容器里增加多个BeanPostProcessor的实现,来增加自定义逻辑。也可以管理这些BeanPostProcessor的执行顺序。BeanPostProcessor在bean已经在Spring容器中实例化之后工作。
Spring容器在容器初始化方法(Initializing Bean的afterPropertiesSet()和bean的init方法)执行之前调用postProcessBeforeInitialization()方法。并在bean初始化之后调用postProcessAfterInitialization()方法。Spring AOP使用post-processor提供proxy-wrapping逻辑(代理设计模式)。Spring的ApplicationContext自动探测实现了BeanPostProcessor接口的bean,注册成post-processors。这些bean在其他任何增加的时候被调用。
我们自定义一个post-processor bean:
@Component
public class MyBeanPostProcessor implements BeanPostProcessor {
    @Override
    public Object postProcessBeforeInitialization(Object bean, String beanName) throws BeansException {
        System.out.println("In After bean Initialization method.Bean name is" + beanName);
        return bean;
    }
    @Override
    public Object postProcessAfterInitialization(Object bean, String beanName) throws BeansException {
        System.out.println("In Before bean Initialization method. Bean name is" + beanName);
        return bean;
    }
}
初始化扩展点

Spring使用post-processor bean(BPPs)调用init方法(@PostConstruct)。上图是初始化和BPPs之间的关系图。
使用Java配置,可以这样写:
    @Bean(initMethod = "populateCache")
    public AccountRepository accountRepository(){
        return new JdbcAccountRepository();
    }
使用JSR-250注解,可以这样写:
    @PostConstruct
    void populateCache(){
        System.out.println("Called populateCache() method");
    }
第一阶段的概览图是这样的:
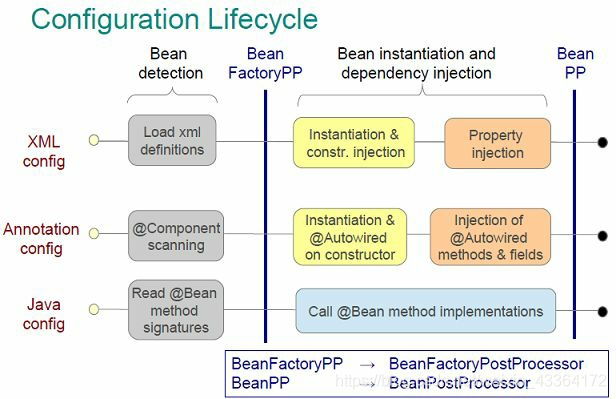
bean的使用阶段
Spring程序的bean,大部分时间都在本阶段。我们先看看如何从上下文获取bean:
    ApplicationContext applicationContext = new AnnotationConfigApplicationContext(AppConfig.class);

    TransferService transferService = context.getBean(TransferService.class);
    transferService.transfer("A", "B", 3000.1);
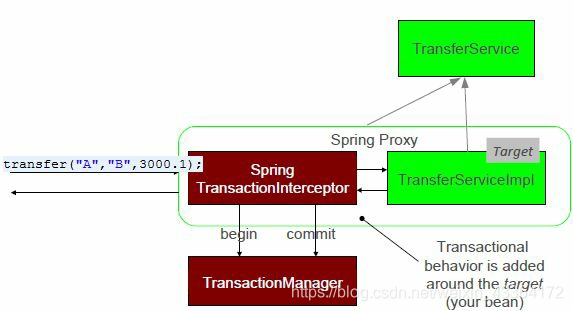
可以看到,在初始化阶段,bean被包装进一个动态代理。给bean透明地增加行为。这是一个Decorator和Proxy模式的实现。
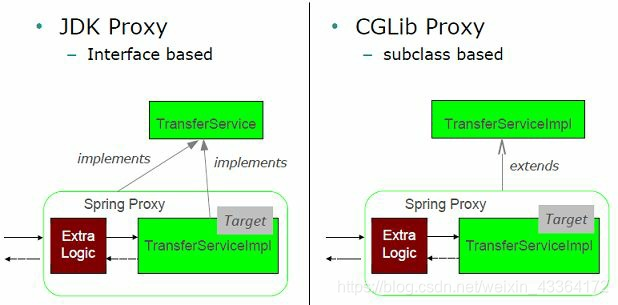
Spring 使用两种类型的代理:
- JDK:由JDK实现,被代理的类需要实现一个接口
- CGLib:不实现接口的时候时候。它不能用于final类和方法。
销毁阶段
在本阶段,Spring释放资源。关闭上下文的时候,销毁阶段完成。
我们看看,调用applicationContext.close()发生了什么:
- 任何实现了DisposableBean的bean被回调,bean实例被销毁
- 上下文销毁自己,该上下文不能被重新使用
- GC实际上销毁对象和记忆
比如一个JdbcAccountRepository类:
public class JdbcAccountRepository implements AccountRepository {
    @Override
    public Account findByAccountId(Long accountId) {
        return new Account(accountId, "Arnav Rajput", new Amount(3000.0));
    }
    void clearCache(){
        System.out.println("Called clearCache() method");
    }
}
这样配置destroy方法:
    @Bean (destroyMethod="clearCache")
    public AccountRepository accountRepository() {
        return new JdbcAccountRepository();
    }
更简单地,也可以使用一个注解:
public class JdbcAccountRepository {
    @PreDestroy
    void clearCache() {
        // close files, connections...
        // remove external resources...
    }
}
理解bean scopes
在Spring容器里,每个bean都有一个scope。
Spring的程序上下文总是使用singleton scope增加bean。
有时候,需要在对象里保存状态。比如这样一个需求,声明bean的scope为singleton是不安全的,因为以后重用的时候可能导致不期望的问题。Spring为了解决这样的需求,提供了prototype scope。
singleton

看上图,一个IoC容器内,同一个实例accountRepository,被注入其他合作bean。Spring使用缓存保存所有的singleton bean实例,通过该缓存,所有的合作bean获取依赖的对象。
prototype
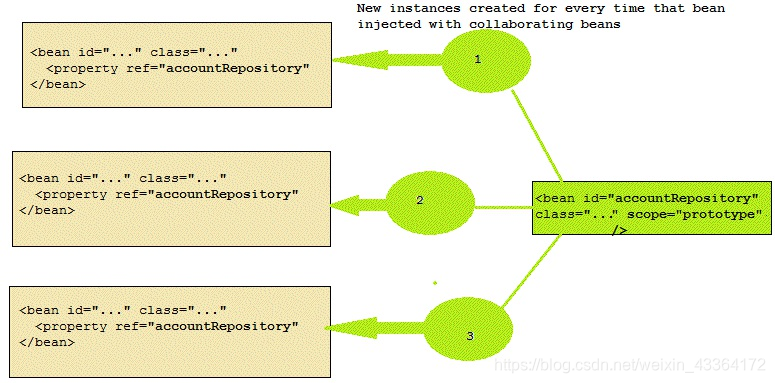
Spring的任何定义为prototype scope的bean,每当注入合作bean的时候都生成新的实例。看上图,accountRepository有多个实例。
session
在web环境中使用,每个用户session增加一个实例。
request
在web环境中使用,每个请求增加一个实例。
其他scopes
- WebSocket
- Refresh
- Thread
Spring也支持自定义scope。
自定义
先实现Scope接口,增加一个类:
import java.util.HashMap;
import java.util.Map;
import org.springframework.beans.factory.ObjectFactory;
import org.springframework.beans.factory.config.Scope;

public class MyThreadScope implements Scope {
    private final ThreadLocal<Object> myThreadScope =
            new ThreadLocal<Object>() {
                protected Map<String, Object> initialValue() {
                    System.out.println("initialize ThreadLocal");
                    return new HashMap<String, Object>();
                }
            };

    @Override
    public Object get(String name, ObjectFactory<?> objectFactory) {
        Map<String, Object> scope = (Map<String, Object>) myThreadScope.get();
        System.out.println("getting object from scope.");
        Object object = scope.get(name);
        if (object == null) {
            object = objectFactory.getObject();
            scope.put(name, object);
        }
        return object;
    }

    @Override
    public String getConversationId() {
        return null;
    }

    @Override
    public void registerDestructionCallback(String name, Runnable callback) {
    }

    @Override
    public Object remove(String name) {
        System.out.println("removing object from scope.");
        @SuppressWarnings("unchecked")
        Map<String, Object> scope = (Map<String, Object>) myThreadScope.get();
        return scope.remove(name);
    }

    @Override
    public Object resolveContextualObject(String name) {
        return null;
    }
}
然后
    @Bean
    public CustomScopeConfigurer configurer() {
        CustomScopeConfigurer csConfigurer = new CustomScopeConfigurer();
        csConfigurer.addScope("MyThreadScope", new MyThreadScope());
        return csConfigurer;
    }