版权声明:本文为博主原创文章,欢迎转载,转载请注明作者、原文超链接 ,博主地址:https://blog.csdn.net/mr_chenjie_c。 https://blog.csdn.net/Mr_Chenjie_C/article/details/84874715
Spring支持声明式事务,即使用注解来选择需要使用事务的方法,它使用@Transactional注解在方法上表明该方法需要事务支持。当然,Spring Boot开启事务也只需要一个注解@Transactional 就可以了。
准备阶段
在pom文件中引入mybatis启动依赖:
 <dependency>
   <groupId>org.mybatis.spring.boot</groupId>
   <artifactId>mybatis-spring-boot-starter</artifactId>
   <version>1.3.2</version>
</dependency>
引入mysql 依赖
<dependency>
    <groupId>mysql</groupId>
    <artifactId>mysql-connector-java</artifactId>
    <scope>runtime</scope>
</dependency>
<dependency>
    <groupId>com.alibaba</groupId>
    <artifactId>druid</artifactId>
    <version>1.0.29</version>
</dependency>
初始化数据库脚本
-- 导出 springboot_test 的数据库结构
CREATE DATABASE IF NOT EXISTS `springboot_test`
USE `springboot_test`;

-- 导出  表 springboot_test.user 结构
CREATE TABLE IF NOT EXISTS `user` (
  `id` int(11) NOT NULL,
  `name` varchar(50) COLLATE utf8_bin DEFAULT NULL,
  `age` int(3) DEFAULT NULL,
  PRIMARY KEY (`id`)
) ENGINE=InnoDB DEFAULT CHARSET=utf8 COLLATE=utf8_bin;

-- 正在导出表  springboot_test.user 的数据:~0 rows (大约)

INSERT INTO `user` (`id`, `name`, `age`) VALUES
	(1, 'chenjay', 22),
	(2, 'lucy', 19),
	(3, 'mary', 35);
配置数据源
spring:
  datasource:
    type: com.alibaba.druid.pool.DruidDataSource
    driver-class-name: com.mysql.jdbc.Driver
    url: jdbc:mysql://localhost:3306/springboot_test?useUnicode=true&characterEncoding=UTF-8
    username: root
    password: root
创建实体类
public class User {
    private int id;
    private String name;
    private int age;
    //getter.. setter..
  }
dao层
@Mapper
public interface UserDao {

    @Update("update user set age = #{age} where id = #{id}")
    int update(User user);

    @Select("select id, name, age from user where id = #{id}")
    User findUser(@Param("id") int id);
}
service层
@Service
public class UserService {

    @Autowired
    private UserDao userDao;

    @Transactional
    public void rollback() throws Exception {
        User user = userDao.findUser(1);
        ddAge(user);
        User user1 = userDao.findUser(3);
        ddAge(user1);

        userDao.update(user);
        int i = 1 / 0;
        userDao.update(user1);
    }

    public void withoutRollback() throws Exception {
        User user = userDao.findUser(1);
        ddAge(user);
        User user1 = userDao.findUser(3);
        ddAge(user1);

        userDao.update(user);
        int i = 1 / 0;
        userDao.update(user1);
    }
    private void ddAge(User user) {
        user.setAge(user.getAge() + 1);
    }
}
Controller层
@RestController
@RequestMapping("/user")
public class UserController {

    @Autowired
    private UserService userService;

    @GetMapping(value = "/rollback")
    public String rollback() {
        try {
            userService.rollback();
        } catch (Exception e) {
            e.printStackTrace();
        }
        return "rollback";
    }

    @GetMapping(value = "/withoutRollback")
    public String withoutRollback() {
        try {
            userService.withoutRollback();
        } catch (Exception e) {
            e.printStackTrace();
        }
        return "withoutRollback";
    }

}
运行测试
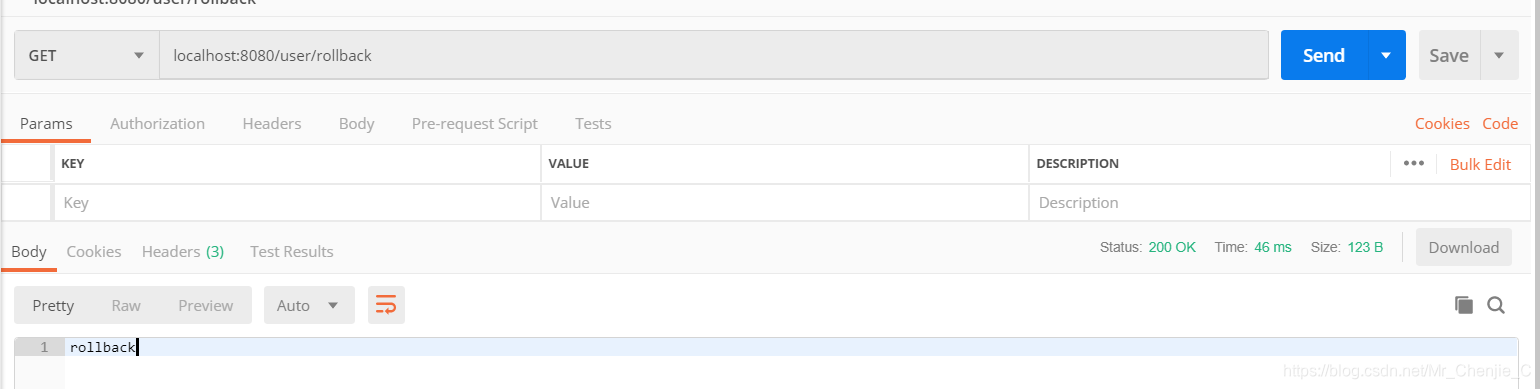
- 回滚测试
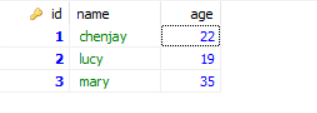
此时查看数据库数据是否有变化
可以从上图看出数据库数据没有发生改变,说明 rollback方法遇到异常之后回滚了数据。
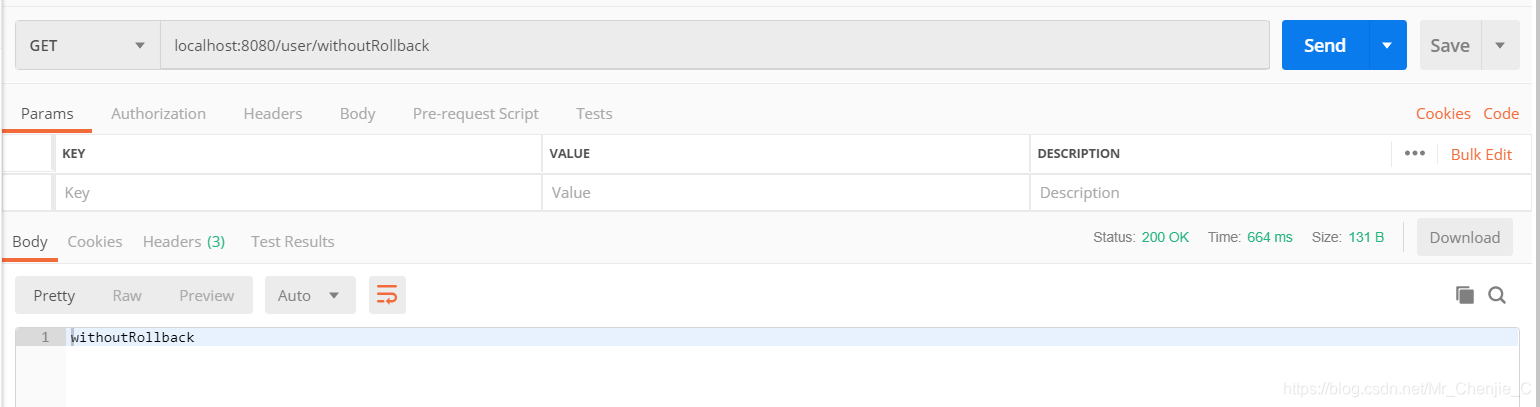
- 不回滚测试
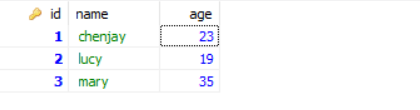
此时查看数据库数据是否有变化
可以从上图看出数据库数据没有发生改变,说明 withoutRollback方法遇到异常之后没有回滚数据。
总结
Spring Boot 开启事物很简单,只需要加一行注解就可以了,前提你用的是JdbcTemplate, JPA, MyBatis等这些常见的orm框架。