点击新增增加一行,有删除操作,点击保存将表格内容插入数据库。
html 页面和js如下:
<table id="mytable">
	<thead>
		<tr align="center">
				       <td width="120px" height="30px"><span style="font-size: 18px;">序号</span></td>
                                    <td width="120px" height="30px"><span style="font-size: 18px;">开始时间</span></td>
				    <td width="120px" height="30px"><span style="font-size: 18px;">结束时间</span></td>
				     <td width="120px" height="30px"><span style="font-size: 18px;">说明</span>
				      <td width="120px" height="30px"><span style="font-size: 18px;">状态</span></td>
 	               </tr>
		<button type="button" class="btn btn-info"style="float: right; margin-right:  25px;"onclick="add();" >新增</button>
											</thead>
											<tbody></tbody>
										</table>

									<div style="display: none;">
										<table id="trHidden">
											<tbody>
												<tr myindex="12">
												<td width="120px" height="30px" class="order" style="text-align: center;"></td>
													<td width="120px" height="30px" class="begin"><input
														id="startDate" name="startDate"
														class="Wdate form-control"
														onfocus="WdatePicker({lang:'zh-cn',dateFmt:'yyyy-MM-dd',readOnly:true})" /></td>
													<td width="120px" height="30px" class="end"><input
														id="endDate" name="endDate" class="Wdate form-control"
														onfocus="WdatePicker({lang:'zh-cn',dateFmt:'yyyy-MM-dd',readOnly:true})" /></td>
													<td width="120px" height="30px" class="remark"><input
														id="remark" name="remark" type="text" placeholder="" /></td>
													<td width="120px" height="30px" class="status"><input
														id="status" name="status" type="text" placeholder="" /></td>
													<td><button type="button" class="btn btn-info"
															style="float: right; margin-right: 25px; margin-left: 50px;"
															onclick="deleteRow(this);">删除</button></td>
												</tr>
											</tbody>
										</table>
									</div>
									<button class="btn btn-success" type="button"
										style="float: right; margin-right: 25px; margin-left: 50px;"
										onclick="save()">保存</button>

<hr />

<!--  base js start -->
<script th:src="@{{path}/js/base/jquery.min.js(path=${contextPath})}"></script>
<script type="text/javascript"
	th:src="@{{path}/js/My97DatePicker/WdatePicker.js(path=${contextPath})}"></script>
相关js如下:
			function deleteRow(obj) {
		var theIndex=$(obj).parent().parent().attr("myindex");
		$("#mytable >tbody >tr[myindex="+theIndex+"]").remove();
		sorttable();
	}

	function add() {
		var tableSize = $("#mytable >tbody >tr").size();
		var trHidden = $("#trHidden >tbody").clone();
		var cLen=eval(tableSize);
		$(trHidden).children("tr").attr("myindex", cLen);
		$(trHidden).children("tr").attr("myindex");
		$(trHidden).children("tr").children(".order").text(cLen+1);
		$(trHidden).children("tr").children(".begin");
		$(trHidden).children("tr").children(".end");
		$(trHidden).children("tr").children(".remark");
		$(trHidden).children("tr").children(".status");
		console.log($(trHidden).text());
		$("#mytable >tbody").append($(trHidden).html());
	}


	function sorttable(){
		var tableSize = $("#mytable >tbody >tr").size();
		$("#mytable >tbody >tr").each(function(index,element){
			$(element).attr("myindex", index);
		})
	}

	function save(){
		var str1= " input ";
		var s = 0;
		var m = new Map();
		$(str1).each(function() {
			var str=$(this).val();
			s++;
			m.set(s%4 ,str);
			if(s%4 == 0){
				console.log(m.get(1)+" ---  "+ m.get(2)+" ---  "+ m.get(3)+" ---  "+m.get(0));

				fnSaveAjax(m.get(1),m.get(2),m.get(3),m.get(0)) ;
			}
		})
	}

	function fnSaveAjax(startDate,endDate,remark,status){
		$.ajax({
			url:"/jgly/test/te",
			type:"get",
			data:{	"startDate" : startDate,
					"endDate" : endDate,
					"remark" : remark,
					"status" : status
			},
			contentType : 'application/json',
	        success: function (data) {

	        }

		});
	}
Controller层操作如下:
package com.lyjgse.oa.test.controller;
import javax.servlet.http.HttpServletRequest;
import javax.servlet.http.HttpServletResponse;
import org.apache.commons.lang3.StringUtils;
import org.apache.log4j.Logger;
import org.springframework.beans.factory.annotation.Autowired;
import org.springframework.stereotype.Controller;
import org.springframework.web.bind.annotation.RequestMapping;
import org.springframework.web.bind.annotation.RequestMethod;
import com.lyjgse.oa.test.model.TestDemo;
import com.lyjgse.oa.test.service.TestService;
@Controller
@RequestMapping(“test”)
public class testcontroller {
Logger logger = Logger.getLogger(testcontroller.class);
@Autowired
private TestService ts;
int init =  0;
@RequestMapping("demo")
public String demo(){

	return "test";
}

@RequestMapping(value="te",method=RequestMethod.GET)
public String test(HttpServletRequest request,HttpServletResponse response) throws Exception{

	String startDate = request.getParameter("startDate");
	String endDate = request.getParameter("endDate");
	String remark = request.getParameter("remark");
	String status = request.getParameter("status");
	if (StringUtils.isEmpty(startDate)||StringUtils.isEmpty(endDate)) {
		response.sendRedirect(request.getContextPath()+"/test/demo");
	}else{
   String year=StringUtils.substring(startDate, 0, 4);
   String startDate1=StringUtils.substring(startDate, 5, 11);
   String endDate1=StringUtils.substring(endDate, 5, 11);
   TestDemo td=new TestDemo();
   td.setYear(year);
   td.setBeginTime(startDate1);
   td.setEndTime(endDate1);
   td.setRemark(remark);
   td.setStatus(status);
  ts.addmodel(td);
	};

	System.out.println(" =======================第  "+(++init)+" 条 , "+startDate+"  , "+endDate+"  , "+remark+"  , "+status);
	return "test";
}
}
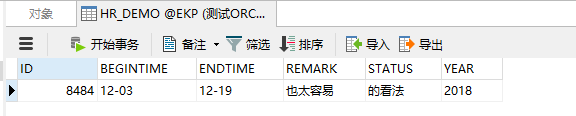
效果如下:
新人一个,亲测可用,请各位大神多多指教!