https://www.cnblogs.com/Zed-H/p/8651882.html
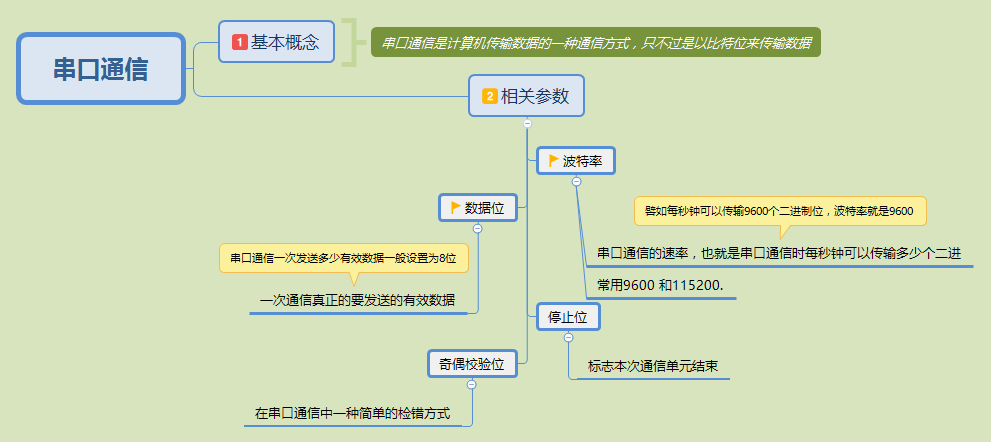
1.基本概念
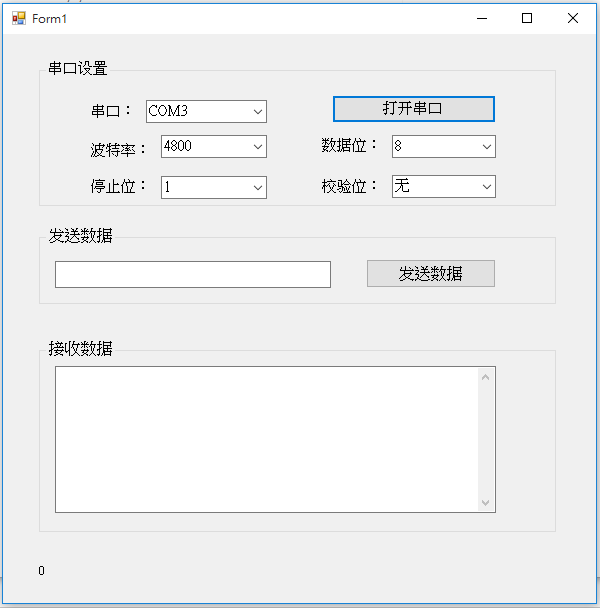
2.前端winForm布局如下(仅仅为了实现功能,布局略丑)
3.代码实现如下

  1 namespace SerialPortTest
  2 {
  3     public partial class Form1 : Form
  4     {
  5         SerialPort sp1 = new SerialPort();
  6         public Form1()
  7         {
  8             InitializeComponent();
  9         }
 10
 11         private void Form1_Load(object sender, EventArgs e)
 12         {
          //分别对应前端的波特率、数字位、校验位、停止位
 13             cbBaudRate.SelectedIndex = 0;
 14             cbDataBits.SelectedIndex = 0;
 15             cbCheck.SelectedIndex = 0;
 16             cbStop.SelectedIndex = 0;
 17
 18             string[] strCom = SerialPort.GetPortNames();
 19             if (strCom == null)
 20             {
 21                 MessageBox.Show("本机没有串口!", "Error");
 22                 return;
 23             }
 24             //GetPortNames()方法:获取当前计算机的串行端口名的数组
 25             foreach (string com in System.IO.Ports.SerialPort.GetPortNames())
 26             {
 27                 cbCom.Items.Add(com);
 28             }
 29
 30             cbCom.SelectedIndex = 0;
 31             sp1.BaudRate = 9600;
 32             Control.CheckForIllegalCrossThreadCalls = false;
 33             sp1.DataReceived += Sp1_DataReceived;
 34
 35             sp1.DtrEnable = true;//获取或设置一个值,该值在串行通信过程中启用数据终端就绪 (DTR) 信号。
 36             sp1.RtsEnable = true;//获取或设置一个值,该值指示在串行通信中是否启用请求发送 (RTS) 信号
 37             //设置数据读取超时为1秒
 38             sp1.ReadTimeout = 1000;
 39
 40             sp1.Close();
 41         }
 42
 43         private void Sp1_DataReceived(object sender, SerialDataReceivedEventArgs e)
 44         {
 45             if (sp1.IsOpen)     //判断是否打开串口
 46             {
 47                 //输出当前时间
 48                 DateTime dt = DateTime.Now;
 49                 txtReceived.Text += dt.GetDateTimeFormats('f')[0].ToString() + "\r\n";
 50                 try
 51                 {
 52                     Byte[] receivedData = new Byte[sp1.BytesToRead];        //创建接收字节数组
 53                     sp1.Read(receivedData, 0, receivedData.Length);         //读取数据
 54                     AddContent(new UTF8Encoding().GetString(receivedData));//用万能的UTF8可以传输中文不会乱码
 55                 }
 56                 catch (System.Exception ex)
 57                 {
 58                     MessageBox.Show(ex.Message, "出错提示!!!!!");
 59                     txtSendStr.Text = "";
 60                 }
 61             }
 62             else
 63             {
 64                 MessageBox.Show("请打开某个串口", "错误提示");
 65             }
 66         }
 67
 68         //将接受到的内容显示出来
 69         private void AddContent(string content)
 70         {
 71             this.BeginInvoke(new MethodInvoker(delegate
 72             {
 73                 txtReceived.AppendText(content);
 74                 txtReceived.AppendText("\r\n");
 75                 //记录收到的字符个数
 76                 lblRevCount.Text = (int.Parse(lblRevCount.Text) + content.Length).ToString();
 77             }));
 78         }
 79
 80         private void btnOpen_Click(object sender, EventArgs e)
 81         {
 82             //serialPort1.IsOpen
 83             if (!sp1.IsOpen)
 84             {
 85                 try
 86                 {
 87                     //设置串口号
 88                     string serialName = cbCom.SelectedItem.ToString();
 89                     sp1.PortName = serialName;
 90
 91                     //设置各“串口设置”
 92                     string strBaudRate = cbBaudRate.Text;
 93                     string strDateBits = cbDataBits.Text;
 94                     string strStopBits = cbStop.Text;
 95                     Int32 iBaudRate = Convert.ToInt32(strBaudRate);
 96                     Int32 iDateBits = Convert.ToInt32(strDateBits);
 97
 98                     sp1.BaudRate = iBaudRate;       //波特率
 99                     sp1.DataBits = iDateBits;       //数据位
100                     switch (cbStop.Text)            //停止位
101                     {
102                         case "1":
103                             sp1.StopBits = StopBits.One;
104                             break;
105                         case "1.5":
106                             sp1.StopBits = StopBits.OnePointFive;
107                             break;
108                         case "2":
109                             sp1.StopBits = StopBits.Two;
110                             break;
111                         default:
112                             MessageBox.Show("Error:参数不正确!", "Error");
113                             break;
114                     }
115                     switch (cbCheck.Text)             //校验位
116                     {
117                         case "无":
118                             sp1.Parity = Parity.None;
119                             break;
120                         case "奇校验":
121                             sp1.Parity = Parity.Odd;
122                             break;
123                         case "偶校验":
124                             sp1.Parity = Parity.Even;
125                             break;
126                         default:
127                             MessageBox.Show("Error:参数不正确!", "Error");
128                             break;
129                     }
130
131                     if (sp1.IsOpen == true)//如果打开状态,则先关闭一下
132                     {
133                         sp1.Close();
134                     }
135
136                     //设置必要控件不可用
137                     cbCom.Enabled = false;
138                     cbBaudRate.Enabled = false;
139                     cbDataBits.Enabled = false;
140                     cbStop.Enabled = false;
141                     cbCheck.Enabled = false;
142                     sp1.Open();     //打开串口
143                     btnOpen.Text = "关闭串口";
144                 }
145                 catch (System.Exception ex)
146                 {
147                     MessageBox.Show("Error:" + ex.Message, "Error");
148                     return;
149                 }
150             }
151             else
152             {
153                 //恢复控件功能
154                 //设置必要控件不可用
155                 cbCom.Enabled = true;
156                 cbBaudRate.Enabled = true;
157                 cbDataBits.Enabled = true;
158                 cbStop.Enabled = true;
159                 cbCheck.Enabled = true;
160                 sp1.Close();                    //关闭串口
161                 btnOpen.Text = "打开串口";
162             }
163         }
164
165         private void btnSend_Click(object sender, EventArgs e)
166         {
167             byte[] sendData = null;
168             if (!sp1.IsOpen) //如果没打开
169             {
170                 MessageBox.Show("请先打开串口!", "Error");
171                 return;
172             }
173             String strSend = txtSendStr.Text;
174             try
175             {
176                 sendData = Encoding.UTF8.GetBytes(txtSendStr.Text.Trim());
177                 //sp1.WriteLine(txtSendStr.Text);    //写入数据
178                 sp1.Write(sendData, 0, sendData.Length);
179             }
180             catch (Exception ex)
181             {
182                 MessageBox.Show("Error:" + ex.Message, "Error");
183             }
184
185         }
186
187     }
188 }
4.测试运行结果如下
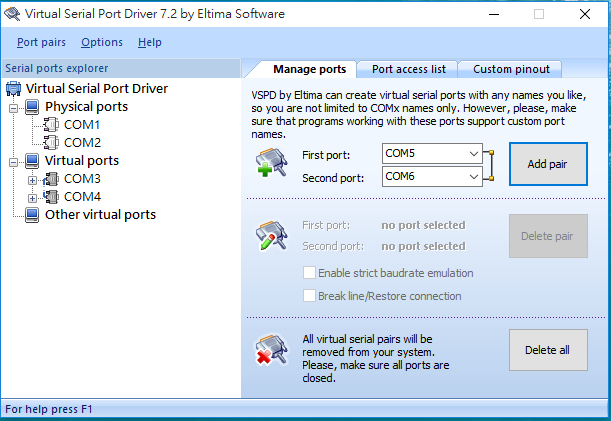
在自己同一台电脑上测试,需要先用Configure Virtual Serial Port Driver建立两个虚拟串口,如下
串口运行结果如下:
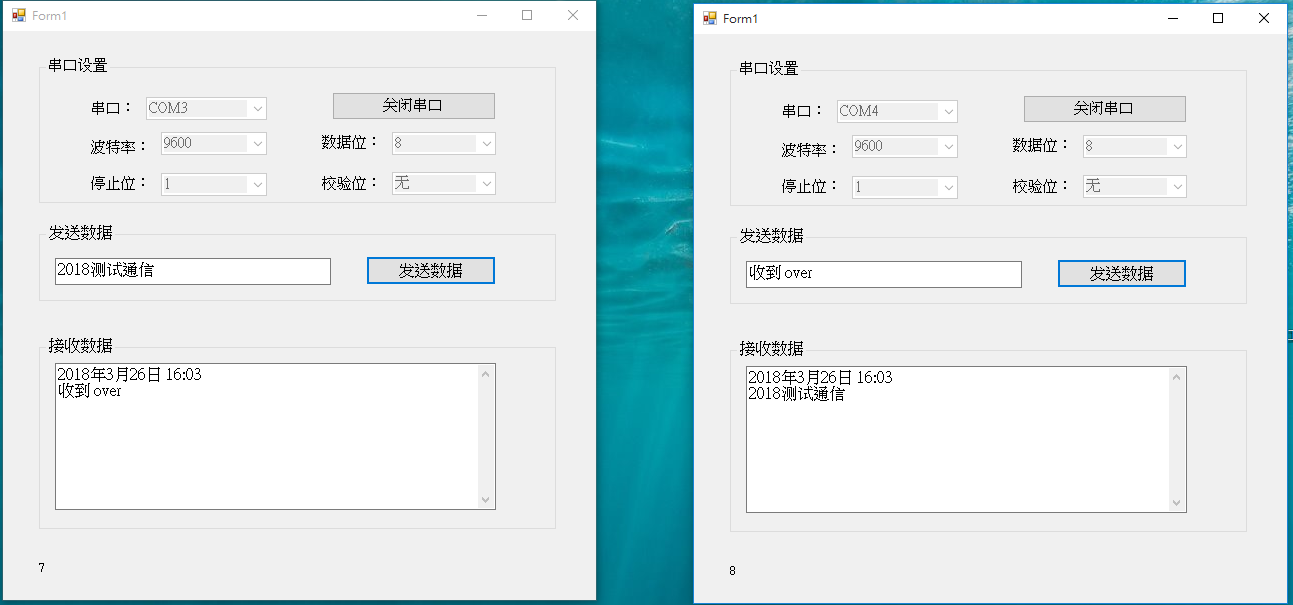
上述两窗体通信时要选择同一波特率,不然收发数据会失败
关于C# serialport的一些说明:
SerialPort() :如果未指定,则此构造函数使用默认属性值。 例如, DataBits 属性默认值为 8, Parity 属性默认为 None 枚举值,
StopBits 属性默认值为 1,默认端口名为 COM1。public static string[] GetPortNames() :获取当前计算机的串行端口名的数组
SerialPort.Read 方法 (Byte[], Int32, Int32) :从 SerialPort 输入缓冲区读取一些字节并将那些字节写入字节数组中指定的偏移量处
SerialPort.ReadLine 方法 () :一直读取到输入缓冲区中的 NewLine 值
SerialPort.Write 方法 (Byte[], Int32, Int32) : 使用缓冲区中的数据将指定数量的字节写入串行端口
SerialPort.WriteLine 方法 (String) : 将指定的字符串和 NewLine 值写入输出缓冲区。