文档结构如下:
一、环境说明:
| 作用 |
IP地址 |
端口 |
操作系统版本 |
安装目录 |
| 主库 |
172.16.10.80 |
6379
扫描二维码关注公众号,回复:
4426879 查看本文章

|
Redhat 6.7 |
/redis5.0/redis-5.0.0 |
| slave1 |
172.16.10.81 |
6380 |
Redhat 6.7 |
/redis5.0/redis-5.0.0 |
| slave2 |
172.16.10.82 |
6381 |
Redhat 6.7 |
/redis5.0/redis-5.0.0 |
Redis一主二从主要是用于读写分离和容灾,配置是配从不配主。
二、安装
Redis 一主二从的安装其实跟单机的安装区别不大,本次安装我们可以先修改参数文件后在安装,可以参考我的单机的安装博客:
https://www.cnblogs.com/hmwh/p/9831091.html
2.1. 配置yum
a) 关闭防火墙
vi /etc/selinux/config
# This file controls the state of SELinux on the system.
# SELINUX= can take one of these three values:
# enforcing - SELinux security policy is enforced.
# permissive - SELinux prints warnings instead of enforcing.
# disabled - No SELinux policy is loaded.
SELINUX=disabled
# SELINUXTYPE= can take one of these two values:
# targeted - Targeted processes are protected,
# mls - Multi Level Security protection.
SELINUXTYPE=targeted
setenforce 0
service iptables stop
chkconfig iptables off
b) 三台服务器配置好yum
mount /dev/sr0 /mnt/
cd /etc/yum.repos.d/
mv redhat.repo redhat.repo.bak
mv rhel-source.repo rhel-source.repo.bak
vi /etc/yum.repos.d/rhel-debuginfo.repo
[rhel-debuginfo]
name=Red Hat Enterprise Linux $releasever - $basearch - Debug
baseurl=file:///mnt/
enabled=1
gpgcheck=0
yum -y install make gcc*
2.2. 参数配置
mkdir -p /redis5.0
把解压包上传到/redis5.0
tar -zxvf redis-5.0.0.tar.gz
需要修改以及注释的参数如下:
Master:
cd /redis5.0/redis-5.0.0
save 900 1
#save 300 10
#save 60 10000
bind 172.6.10.80
daemonize yes
loglevel warning
timeout 60
logfile "6379.log"
dbfilename dump6379.rdb
maxmemory-policy volatile-ttl
auto-aof-rewrite-min-size 10GB
masterauth redis --主库的密码(本机可以不配置)
Slave1:
cd /redis5.0/redis-5.0.0
save 900 1
#save 300 10
#save 60 10000
bind 172.6.10.81
daemonize yes
loglevel warning
logfile "6380.log"
dbfilename dump6380.rdb
pidfile /var/run/redis_6380.pid
port 6380
timeout 60
maxmemory-policy volatile-ttl
auto-aof-rewrite-min-size 10GB
slaveof 172.16.10.80 6379
masterauth redis --主库的密码
Salve2:
cd /redis5.0/redis-5.0.0
save 900 1
#save 300 10
#save 60 10000
bind 172.6.10.82
daemonize yes
loglevel warning
port 6381
timeout 60
dbfilename dump6381.rdb
logfile "6381.log"
pidfile /var/run/redis_6381.pid
maxmemory-policy volatile-ttl
auto-aof-rewrite-min-size 10GB
slaveof 172.16.10.80 6379
masterauth redis --主库的密码
2.3. 安装
cd /redis5.0/redis-5.0.0
make
make install

安装完成。
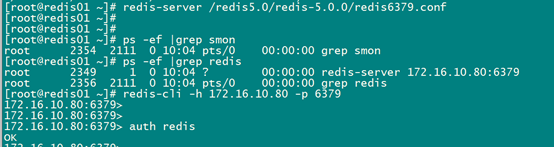
启动如下:
redis-server /redis5.0/redis-5.0.0/redis6379.conf
redis-server /redis5.0/redis-5.0.0/redis6380.conf
redis-server /redis5.0/redis-5.0.0/redis6381.conf


由于参数已经修改完了,后面修改密码:
config set requirepass "redis"

并且写入配置文件:
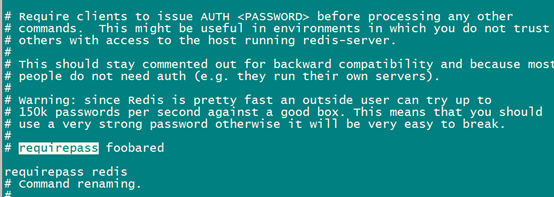
例如关闭提示需要密码就说明修改成功。
同理修改下面两台服务器:


主从复制的密码配置:

查看主机角色信息:

查看从机一配置:
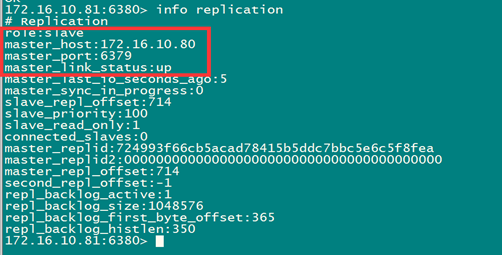
查看从机二配置:

可以看出同步状态正常。
三、测试


3.1. 注意
1、如果没有把slaveof 参数配置到参数文件中,从库重启后需要重新slaveof;即从库会变成主库(没有配置slaveof参数文件)
2、在主从搭建完成后,后面添加的从库slaveof后,会自动把数据从主库同步过来,生产上会有一定的性能影响。
3、从机只有读的权限,主机才能够写操作。