1.使用 vue-cli
npm install -g vue-cli

vue init webpack projectname
注意:ESLint 是否选择,根据个人需要。
2. 进入project,安装mint-ui
cd projectname

npm i mint-ui -S
至此,已经完成安装。
3. 使用babel,安装 babel-plugin-component
npm install babel-plugin-component -D4. 使用IDE打开项目(推荐IDEA)
5.将 .babelrc 修改为如下内容,全部替换即可。(其中, ["es2015", { "modules": false }], 语句可以删除,删除后,步骤6可跳过)
{
  "presets": [
    ["es2015", { "modules": false }],
    ["env", {
      "modules": false,
      "targets": {
        "browsers": ["> 1%", "last 2 versions", "not ie <= 8"]
      }
    }],
    "stage-2"
  ],
  "plugins": [
    "transform-vue-jsx",
    "transform-runtime",
    ["component", [
      {
        "libraryName": "mint-ui",
        "style": true
      }
    ]]
  ]
}
6.安装 babel-preset-es2015
npm install babel-preset-es20157.在src目录下,创建mint-ui文件夹,并添加index.js文件,内容示例如下:(本步骤目的是将所有mint的引入写在index.js中,非必须步骤,如不执行本步骤,则可将引入写在main.js中)
import Vue from 'vue'
import { Button, Actionsheet } from 'mint-ui'
Vue.component(Button.name, Button)
Vue.component(Actionsheet.name, Actionsheet)
8.在main.js中,添加如下语句:(如步骤7未执行,则跳过本步骤)
import './mint-ui/index.js'9.写一个测试的vue页面,测试即可。示例代码如下:
<template>
  <div class="hello">
    <mt-button @click.native="sheetVisible = true" type="primary" size="large">primary</mt-button>
    <mt-actionsheet
      :actions="actions"
      v-model="sheetVisible">
    </mt-actionsheet>
  </div>
</template>

<script>
  export default {
    name: 'HelloWorld',
    data() {
      return {
        actions: [],
        // 设置为 true 默认就自动弹出 actionSheet
        sheetVisible: false
      }
    },
    created() {
      this.actions = [
        {name: '拍照'},
        {name: '打开相册'}
      ]
    }
  }
</script>

<style scoped>

</style>
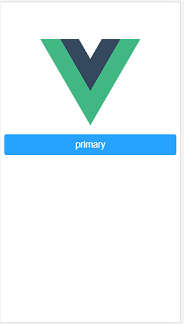
最终,运行页面如下图。