一、前言:Shiro框架提供了记住我(RememerMe)的功能,比如我们访问一些网站,关闭了浏览器,下次再打开还是能记住你是谁,下次访问的时候无需登录即可访问,本文将实现记住我的功能。
项目git地址:https://github.com/gitcaiqing/SSM_DEMO.git
二、大概流程:
1.首先在登录页面中选中RememerMe,然后登录成功,如果是浏览器登录,会把RememberMe的Cookie写到客户端保存下来;
2.关闭浏览器重新打开时;会发现浏览器仍然能记住;
3.访问一般的网页服务,服务端知道你是谁,且能够正常访问;
4.但如果我们访问一些特殊的敏感信息,如查看订单或者订单支付之类的操作,还是需要再次进行身份认证的,以保证当前用户还是你。
三、了解下登录认证和记住我的区别
在上一篇文章中,讲解了登录认证的简单实现,博客地址:https://blog.csdn.net/caiqing116/article/details/84637699 我们使用了如 subject.isAuthenticated()来验证用户是否进行了身份验证,然后使用Subject.login进行登录,而subject.isRemembered()表示用户是通过记住我登录的,此时可能并不真正的你(可能是别人使用了你的电脑,或者你的cookie被窃取等等)在访问。需要注意的是登录认证和记住我只能二选一,即subject.isAuthenticated() 和 subject.isRemembered()互斥。
四、具体实现
整个项目是基于之前的文章,请参考其他文章搭建整体项目,这里不重新搭建了
(1)登录页面和主页简单修改
修改内容:
①登录页如果是登录认证或记住我为真,直接跳转到主页,
②登录页添加记住我checkbox,如果选中传值true
③主页添加登录认证进入还是记住我进入的展示
login.jsp
<%@page import="com.ssm.entity.BasicUser"%>
<%@page import="org.apache.shiro.SecurityUtils"%>
<%@page import="org.apache.shiro.subject.Subject"%>
<%@ page language="java" contentType="text/html; charset=UTF-8"
pageEncoding="UTF-8"%>
<!DOCTYPE html PUBLIC "-//W3C//DTD HTML 4.01 Transitional//EN" "http://www.w3.org/TR/html4/loose.dtd">
<%@ include file="/WEB-INF/common/taglib.jsp"%>
<%
//如果登录认证或记住我,则直接跳转到主页
Subject subject = SecurityUtils.getSubject();
if(subject.isAuthenticated() || subject.isRemembered()){
response.sendRedirect(request.getContextPath()+"/ssm/home");
}
%>
<html>
<head>
<title>登陆</title>
<meta name="viewport" content="width=device-width, initial-scale=1">
<meta http-equiv="Content-Type" content="text/html; charset=utf-8" />
<meta name="keywords" content="" />
<script type="application/x-javascript"> addEventListener("load", function() { setTimeout(hideURLbar, 0); }, false); function hideURLbar(){ window.scrollTo(0,1); } </script>
<!-- Bootstrap Core CSS -->
<link href="${base }/static/css/bootstrap.min.css" rel='stylesheet' type='text/css' />
<!-- Custom CSS -->
<link href="${base }/static/css/style.css" rel='stylesheet' type='text/css' />
<link rel="stylesheet" href="${base }/static/css/morris.css" type="text/css"/>
<!-- Graph CSS -->
<link href="${base }/static/css/font-awesome.css" rel="stylesheet">
<link rel="stylesheet" href="${base }/static/css/jquery-ui.css">
<!-- jQuery -->
<script src="${base }/static/js/jquery-2.1.4.min.js"></script>
<!-- //jQuery -->
<link href='http://fonts.googleapis.com/css?family=Roboto:700,500,300,100italic,100,400' rel='stylesheet' type='text/css'/>
<link href='http://fonts.googleapis.com/css?family=Montserrat:400,700' rel='stylesheet' type='text/css'>
<!-- lined-icons -->
<link rel="stylesheet" href="${base }/static/css/icon-font.min.css" type='text/css' />
<!-- //lined-icons -->
</head>
<body>
<div class="main-wthree">
<div class="container">
<div class="sin-w3-agile">
<h2>Sign In</h2>
<form id="form" action="#" method="post">
<div class="username">
<span class="username">账号:</span>
<input type="text" name="username" class="name" placeholder="" required="">
<div class="clearfix"></div>
</div>
<div class="password-agileits">
<span class="username">密码:</span>
<input type="password" name="password" class="password" placeholder="" required="">
<div class="clearfix"></div>
</div>
<div class="rem-for-agile">
<input type="checkbox" name="rememberMe" class="remember" value="true">记住我<br>
<!-- <a href="#">忘记密码</a><br> -->
</div>
<div class="login-w3">
<input type="button" class="login" value="登陆" onclick="login()">
</div>
<div class="clearfix"></div>
</form>
<div class="back">
<a href="https://blog.csdn.net/caiqing116" target="_blank">去主人博客</a>
</div>
<div class="footer">
<p>© 2018 Design by <a href="https://blog.csdn.net/caiqing116" target="_blank">https://blog.csdn.net/caiqing116</a></p>
</div>
</div>
</div>
</div>
</body>
<script type="text/javascript">
function login(){
$.post("${base}/ssm/shirologin",$("#form").serialize(),function(data){
if(data.resultCode == 0){
window.location.href = "${base}/ssm/home";
}else{
alert(data.msg);
}
})
}
</script>
</html>
views/home.jsp
<%@page import="org.apache.shiro.SecurityUtils"%>
<%@page import="org.apache.shiro.subject.Subject"%>
<%@ page language="java" contentType="text/html; charset=UTF-8"
    pageEncoding="UTF-8"%>
<!DOCTYPE html PUBLIC "-//W3C//DTD HTML 4.01 Transitional//EN" "http://www.w3.org/TR/html4/loose.dtd">
<%@ include file="/WEB-INF/common/taglib.jsp"%>
<%
	//如果登陆成功,则直接跳转到主页
	Subject subject = SecurityUtils.getSubject();
%>
<html>
<head>
<meta http-equiv="Content-Type" content="text/html; charset=UTF-8">
<title>Insert title here</title>
</head>
<body>
	<h1>登陆成功</h1>
	<h2>
		<input type="button" value="退出" onclick='window.location.href="${base}/ssm/shirologout"'>
	</h2>
	<h2>是否【登陆认证】访问:<%=subject.isAuthenticated() %></h2>
	<h2>是否【记住我】访问:<%=subject.isRemembered() %></h2>
</body>
</html>
(2)登录认证实现
我们在登录的方法中接收rememberMe参数,如果为true,则说明选中了记住我,我们就可以设置usernamePasswordToken.setRememberMe(rememberMe) 这里我们对src/main/java/com/ssm/security/LoginHandler.java的方法shirologin进行修改
@RequestMapping("/shirologin")
	@ResponseBody
	public ResultModel shirologin(String username, String password, boolean rememberMe) {

		try {
			Subject currentUser = SecurityUtils.getSubject();
			//未认证登录
			if(!currentUser.isAuthenticated()) {
				//密码进行MD5加密
				UsernamePasswordToken usernamePasswordToken = new UsernamePasswordToken(username, EncryptKit.MD5(password));
				//是否记住我
				usernamePasswordToken.setRememberMe(rememberMe);
				//认证登陆
				currentUser.login(usernamePasswordToken);
			}
		} catch (AuthenticationException e) {
			if(e instanceof AccountException) {
				return new ResultModel(1, "账号或密码错误");
			}
		}
		return new ResultModel(0, "登陆成功");
	}
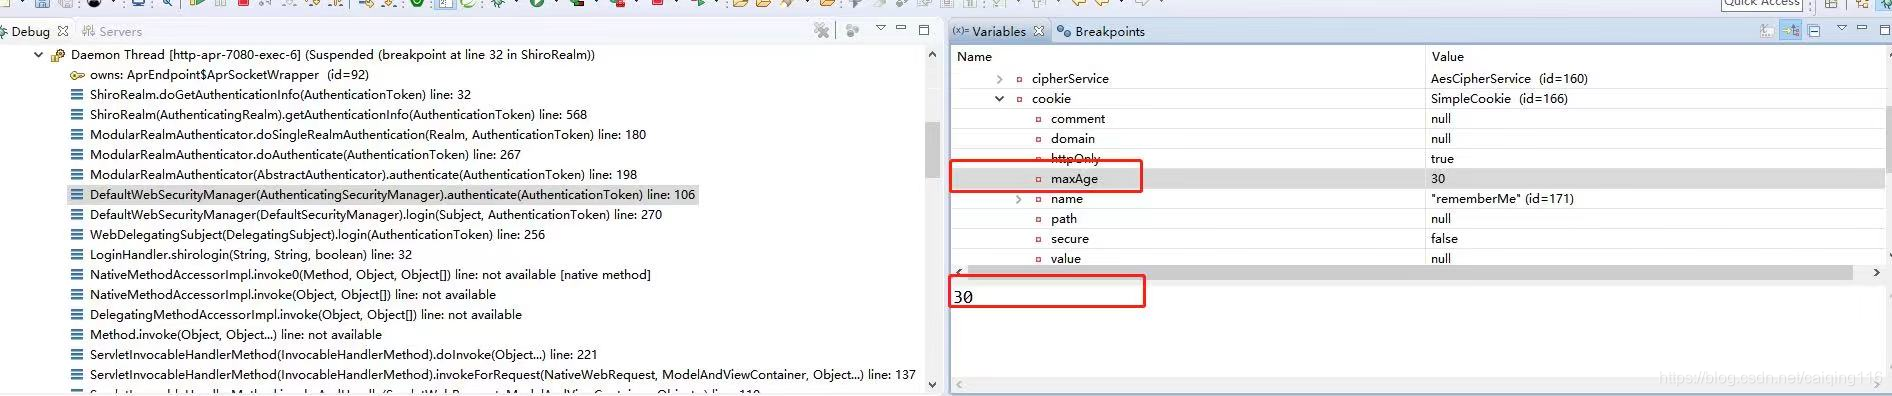
(3)修改maxAge记住我的有效时间,单位为秒
在上面我们只是设置了记住我的功能,我们猜测记住我的时长肯定有个默认值,但是我们想要修改这个时间,该如何操作,首先我们来看下设置有效时长的源码
public class CookieRememberMeManager extends AbstractRememberMeManager {

    //TODO - complete JavaDoc

    private static transient final Logger log = LoggerFactory.getLogger(CookieRememberMeManager.class);

    /**
     * The default name of the underlying rememberMe cookie which is {@code rememberMe}.
     */
    public static final String DEFAULT_REMEMBER_ME_COOKIE_NAME = "rememberMe";

    private Cookie cookie;

    /**
     * Constructs a new {@code CookieRememberMeManager} with a default {@code rememberMe} cookie template.
     */
    public CookieRememberMeManager() {
        Cookie cookie = new SimpleCookie(DEFAULT_REMEMBER_ME_COOKIE_NAME);
        cookie.setHttpOnly(true);
        //One year should be long enough - most sites won't object to requiring a user to log in if they haven't visited
        //in a year:
        cookie.setMaxAge(Cookie.ONE_YEAR);
        this.cookie = cookie;
    }
    ....
}
从中我们可以知道默认时长为一年:
public static final int ONE_YEAR = 60 * 60 * 24 * 365;
cookie.setMaxAge(Cookie.ONE_YEAR);
我们来手动配置修改这个值为30s,如下
<?xml version="1.0" encoding="UTF-8"?>
<beans xmlns="http://www.springframework.org/schema/beans"
	   xmlns:xsi="http://www.w3.org/2001/XMLSchema-instance"
	   xmlns:context="http://www.springframework.org/schema/context"
	   xmlns:util="http://www.springframework.org/schema/util"
	   xsi:schemaLocation="
		http://www.springframework.org/schema/beans http://www.springframework.org/schema/beans/spring-beans-4.1.xsd
		http://www.springframework.org/schema/context  http://www.springframework.org/schema/context/spring-context-4.1.xsd
		http://www.springframework.org/schema/util http://www.springframework.org/schema/util/spring-util-4.1.xsd"
	default-lazy-init="true">

	<description>Spring Shiro整合配置文件</description>

    <!--1. 配置securityManager安全管理器 -->
    <!--
    	SecurityManager:安全管理器;即所有与安全有关的操作都会与SecurityManager交互;
		且它管理着所有Subject;可以看出它是Shiro 的核心,它负责与后边介绍的其他组件进行交互
     -->
 	<bean id="securityManager" class="org.apache.shiro.web.mgt.DefaultWebSecurityManager">
        <property name="realm" ref="shiroDbRealm" />
        <property name="rememberMeManager.cookie.maxAge" value="30"/>
    </bean>

    <!--2. 配置 CacheManager. 2.1需要加入 ehcache 的 jar 包及配置文件. -->
    <bean id="cacheManager" class="org.apache.shiro.cache.MemoryConstrainedCacheManager"> </bean>

	<!--3.配置realm 自定义的Realm-->
    <!--
    	Shiro 从Realm获取安全数据(如用户、角色、权限),就是说SecurityManager要验证用户身份,
    	那么它需要从Realm获取相应的用户进行比较以确定用户身份是否合法;
		也需要从Realm得到用户相应的角色/权限进行验证用户是否能进行操作;
		可以把Realm看成DataSource , 即安全数据源
	-->
    <bean id="shiroDbRealm" class="com.ssm.security.ShiroRealm"></bean>

    <!--4.配置lifecycleBeanPostProcessor,可以自动调用spring ioc 容器中的shiro bean 的生命周期方法  -->
    <!-- 开启Shiro注解的Spring配置方式的beans。在lifecycleBeanPostProcessor之后运行 -->
    <bean id="lifecycleBeanPostProcessor" class="org.apache.shiro.spring.LifecycleBeanPostProcessor" />

    <!--5. 启用 IOC 容器中使用 shiro 的注解. 但必须在配置了 LifecycleBeanPostProcessor 之后才可以使用. -->
    <bean class="org.springframework.aop.framework.autoproxy.DefaultAdvisorAutoProxyCreator"
          depends-on="lifecycleBeanPostProcessor">
          <property name="proxyTargetClass" value="true" />
    </bean>

    <!-- Shiro Filter id值和web.xml文件配置的过滤器名称相同 -->
    <bean id="shiroFilter"
        class="org.apache.shiro.spring.web.ShiroFilterFactoryBean">
        <property name="securityManager" ref="securityManager" />
        <!-- 登录页面 -->
        <property name="loginUrl" value="/login.jsp" />
        <!-- 登录成功页面 -->
        <property name="successUrl" value="/WEB-INF/views/home.jsp"/>
        <!-- 没有权限的页面 -->
        <!-- <property name="unauthorizedUrl" value="/unauthorized.jsp"/> -->
        <property name="filters">
            <map>
                <entry key="user" value-ref="sysUserFilter"/>
            </map>
        </property>
      	<!--
        	配置哪些页面需要受保护.
        	以及访问这些页面需要的权限.
        	1). anon 可以被匿名访问
        	2). authc 必须认证(即登录)后才可能访问的页面.
        	3). logout 登出.
        	4). roles 角色过滤器
        -->
        <property name="filterChainDefinitions">
            <value>
            	<!-- 登录可匿名访问 -->
            	/static/**= anon
            	/ssm/shirologin/** = anon
            	/ssm/logout = logout
            	/ssm/home = user
                <!-- 其他的需要授权访问authc -->
                /* = authc
            </value>
        </property>
    </bean>

  	<!-- 开启Shiro注解的Spring配置方式的beans。在lifecycleBeanPostProcessor之后运行 -->
    <bean
        class="org.apache.shiro.spring.security.interceptor.AuthorizationAttributeSourceAdvisor">
        <property name="securityManager" ref="securityManager" />
    </bean>

    <!-- shiro为集成spring -->
    <bean class="org.springframework.web.servlet.handler.SimpleMappingExceptionResolver">
        <property name="exceptionMappings">
            <props>
            	<!-- 无权限跳转到登陆页,可自行定义 -->
                <prop key="org.apache.shiro.authz.UnauthorizedException">/ssm/home</prop>
            </props>
        </property>
    </bean>
</beans>
需要注意一个地方就是,我们让[记住我]也有权限访问ssm/home,配置了过滤器链:/ssm/home = user
我们添加一个UserFilter的子类com/ssm/security/SysUserFilter.java
package com.ssm.security;

import javax.servlet.ServletRequest;
import javax.servlet.ServletResponse;

import org.apache.shiro.web.filter.authc.UserFilter;
import org.springframework.stereotype.Service;

@Service
public class SysUserFilter extends UserFilter{

	@Override
	protected boolean isAccessAllowed(ServletRequest request, ServletResponse response, Object mappedValue) {
		// TODO Auto-generated method stub
		return super.isAccessAllowed(request, response, mappedValue);
	}

}
(4)登录测试
后台debug我们可以看到时长设置生效,如下图:
通过浏览器访问我们的登录页登录

30秒内再次访问登录页或主页
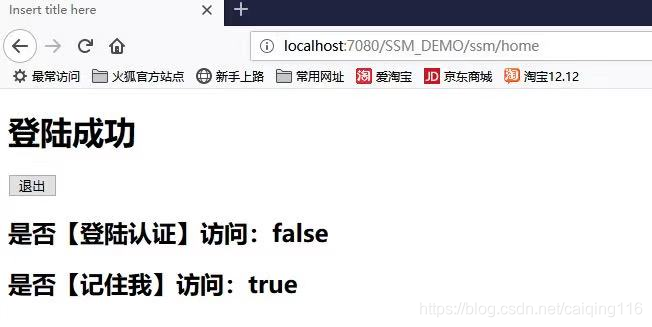
上面两张截图充分说明了首次是登录认证,第二次进入是通过RememberMe,30秒杀后再次访问主页将跳转到登录页。
五、简单介绍退出
实现subject.logout()即可,很简单就不详细介绍了,请客观自己实现吧。
Subject subject = SecurityUtils.getSubject();
subject.logout();