Debug authentication 实际上就是通过设置core,需要通过认证才能使jlink attach core。
1. operation flow
a. generate signed image and configure FFR( CMPA and CFPA)
gen_signed_image.exe secure_boot.json ffr.yml
secure_boot.json file是用于生成signed image的
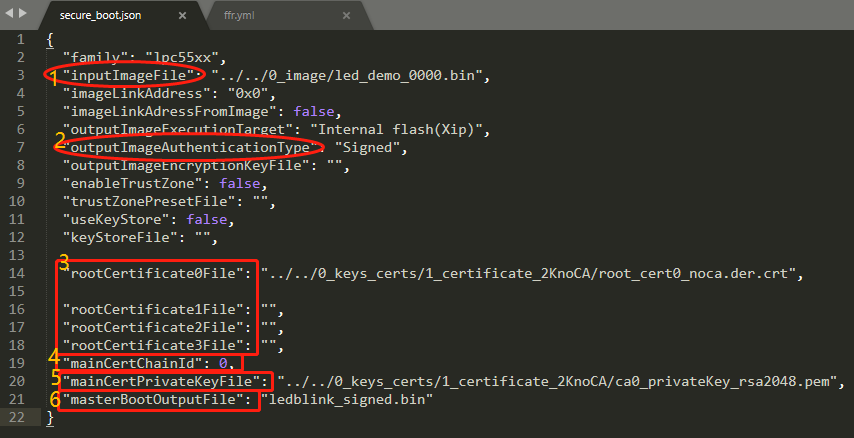
需要配置如图所示的的5项
ffr.yml 用于配置FFR(CFPA and CMPA)
按下图需要注意这七项的更改。
1. 
2. enable ROTKH in CFPA
 bit[0:7]两位控制一个ROTKH
00-invalid 01-enable 10 or 11 - key revoke, 如果只enable ROTKH0:0x000000fd(11110101) enable all ROTKH 0x00000055(01010101)
3.4.5.6是用于配置debug authentication 的FFR,详情见 https://www.cnblogs.com/linansimida/p/10072310.html
7.需要选择 key length 2048 - c0 4096 - c1 https://www.cnblogs.com/linansimida/p/10072310.html
另外VENDOR_USAGE in CFPA 和 DAP_VENDOR_USAGE_FIXED in CMPA 分别是VU配置中的bit[15:0]和bit[31:16] 位这个与debug authentication 用到的配置文件debug_auth.yml中的UV要完全相同。

b.将生成好的signed image和 配置CPFA及CMPA的文件写到target上,并 reset target,即开启了debug authentication 功能。
%blhost% %peripheral% -- flash-erase-region 0x0 0x20000
%blhost% %peripheral% -- write-memory 0x0 ledblink_signed.bin
%blhost% %peripheral% -- write-memory 0x9de00 CFPA_0x9de00.bin
%blhost% %peripheral% -- write-memory 0x9e400 CMPA_0x9e400.bin
%blhost% %peripheral% -- reset
c. 首先尝试在没有配置debug authentication的情况下连接JLINK,此时应该连接失败,然后进行debug authentication 配置后连接JLINK。
使用如下命令验证debug authentication 能否验证通过。
.tool.exe -i jlink -p 1.0 auth -c debug_auth.yml
tool.exe -i jlink -p 1.0 exit \\ 1.0 代表2048 key length, 1.1代表4096 key length
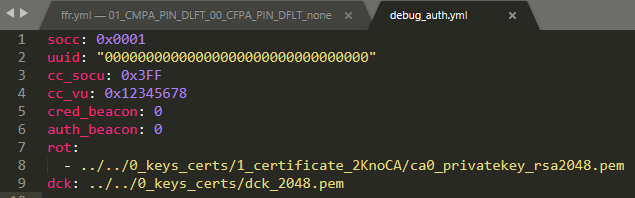
debug_auth.yml文件配置如下:
socc是固定的
cc_vu和ffr.yml文件的ENDOR_USAGE[31:16] ,DAP_VENDOR_USAGE_FIXED[15:0]必须相同。
cred_beacon和auth_beacon必须是0,除非有指定的boot demo。
rot和生成signed image的私钥相同
dck是一个私钥。