版权声明:本文为博主原创文章,未经博主允许不得转载。 https://blog.csdn.net/qq_36556893/article/details/84633619
这是针对于博客vs2017安装和使用教程(详细)的深度学习例子——MNIST数据集项目新建示例
目录
一、新建项目
1.项目创建参照博主文章:vs2017 开始自己的第一个Python程序
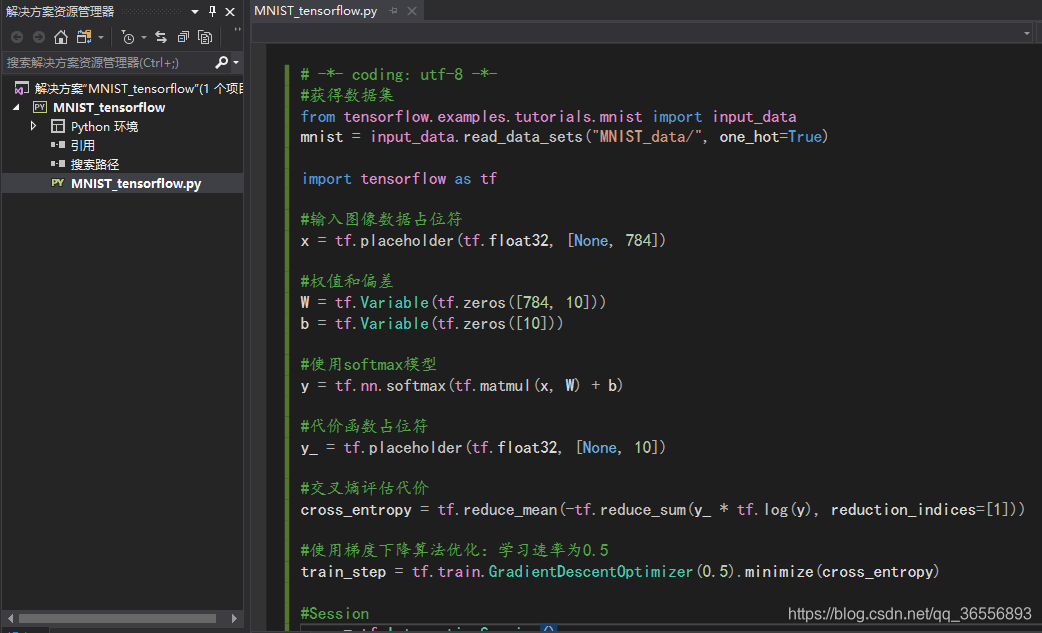
2.输入代码:
# -*- coding: utf-8 -*-
#获得数据集
from tensorflow.examples.tutorials.mnist import input_data
mnist = input_data.read_data_sets("MNIST_data/", one_hot=True)

import tensorflow as tf

#输入图像数据占位符
x = tf.placeholder(tf.float32, [None, 784])

#权值和偏差
W = tf.Variable(tf.zeros([784, 10]))
b = tf.Variable(tf.zeros([10]))

#使用softmax模型
y = tf.nn.softmax(tf.matmul(x, W) + b)

#代价函数占位符
y_ = tf.placeholder(tf.float32, [None, 10])

#交叉熵评估代价
cross_entropy = tf.reduce_mean(-tf.reduce_sum(y_ * tf.log(y), reduction_indices=[1]))

#使用梯度下降算法优化:学习速率为0.5
train_step = tf.train.GradientDescentOptimizer(0.5).minimize(cross_entropy)

#Session
sess = tf.InteractiveSession()

#初始化变量
tf.global_variables_initializer().run()

#训练模型,训练1000次
for _ in range(1000):
  batch_xs, batch_ys = mnist.train.next_batch(100)
  sess.run(train_step, feed_dict={x: batch_xs, y_: batch_ys})

#计算正确率
correct_prediction = tf.equal(tf.argmax(y,1), tf.argmax(y_,1))

accuracy = tf.reduce_mean(tf.cast(correct_prediction, tf.float32))

print(sess.run(accuracy, feed_dict={x: mnist.test.images, y_: mnist.test.labels}))
print("Training data:",mnist.train.num_examples)
print("Validating data size:",mnist.validation.num_examples)
效果如图:
二、运行代码
1.点击附加...运行程序,这个过程会很耗时

2.运行过程中会下载生成文件夹,生成的数据在MNIST_data文件夹下,我们不需要手动解压

3.之后程序开始运行参数设置,具体的各个参数意义和用法在这里不赘述
三、生成结果
最后生成结果如下:
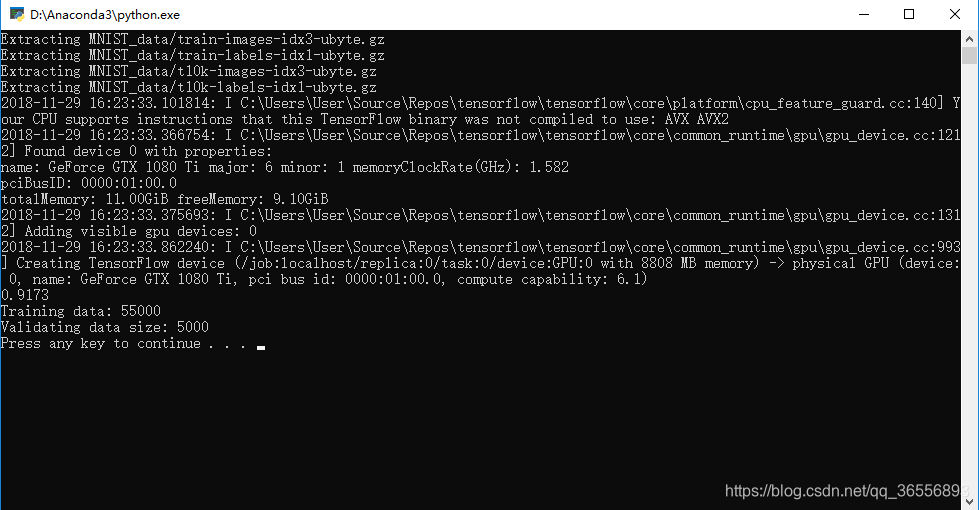
可以看到这次运行的准确率为91.73%,一般每次执行的结果都会不同,如果想提高精度可进行调参操作,这里不再赘述~
返回至原博客:vs2017安装和使用教程(详细)