一、安装nginx
更新系统软件(非必要)
安装nginx
1.安装nginx源
# yum localinstall http://nginx.org/packages/centos/7/noarch/RPMS/nginx-release-centos-7-0.el7.ngx.noarch.rpm
2.安装nginx
3.启动nginx
# service nginx start
Redirecting to /bin/systemctl start  nginx.service
4.访问
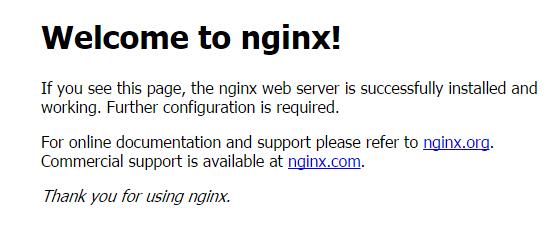
如果成功安装会出来nginx默认的欢迎界面
二、安装MySQL5.7.*
1.安装mysql源
# yum localinstall http://dev.mysql.com/get/mysql57-community-release-el7-7.noarch.rpm
2.安装mysql
# yum install mysql-community-server
3.安装mysql的开发包,以后会有用
yum install mysql-community-devel
4.启动mysql
# service mysqld start
Redirecting to /bin/systemctl start  mysqld.service
5.查看mysql启动状态
出现pid证明启动成功
6.获取mysql默认生成的密码
# grep 'temporary password' /var/log/mysqld.log
# 2016-10-28T02:28:38.449839Z 1 [Note] A temporary password is generated for root@localhost: 8Ba=2gtz+?wx
类似于8Ba=2gtz+?wx的东西就是密码 这个初始密码相当难记...改吧
7.换成自己的密码
Enter password:输入上页的密码,进入mysql
8. 更换密码
mysql> ALTER USER 'root'@'localhost' IDENTIFIED BY 'MyNewPasdfs4!';
这个密码一定要足够复杂,不然会不让你改,提示密码不合法;
9.退出mysql并试用下新密码
mysql> quit;
mysql> mysql -uroot -p
确认密码正确 mysql 就搞定了
三、编译安装php7
1.下载php7源码包
cd /root & wget -O php7.tar.gz http://cn2.php.net/get/php-7.0.1.tar.gz/from/this/mirror
2.解压源码包
3.进入目录
4.安装php依赖包
yum install libxml2 libxml2-devel openssl openssl-devel bzip2 bzip2-devel libcurl libcurl-devel libjpeg libjpeg-devel libpng libpng-devel freetype freetype-devel gmp gmp-devel libmcrypt libmcrypt-devel readline readline-devel libxslt libxslt-devel
5.编译配置,这里如果上一步的某些依赖包没有安装好,就会遇到很多configure error,我们一一解决,安装上相关软件开发包就可以
下面代码可直接复制
# ./configure --prefix=/usr/local/php --with-config-file-path=/etc --enable-fpm --with-fpm-user=nginx --with-fpm-group=nginx --enable-inline-optimization --disable-debug --disable-rpath --enable-shared --enable-soap --with-libxml-dir --with-xmlrpc --with-openssl --with-mcrypt --with-mhash --with-pcre-regex --with-sqlite3 --with-zlib --enable-bcmath --with-iconv --with-bz2 --enable-calendar --with-curl --with-cdb --enable-dom --enable-exif --enable-fileinfo --enable-filter --with-pcre-dir --enable-ftp --with-gd --with-openssl-dir --with-jpeg-dir --with-png-dir --with-zlib-dir --with-freetype-dir --enable-gd-native-ttf --enable-gd-jis-conv --with-gettext --with-gmp --with-mhash --enable-json --enable-mbstring --enable-mbregex --enable-mbregex-backtrack --with-libmbfl --with-onig --enable-pdo --with-mysqli=mysqlnd --with-pdo-mysql=mysqlnd --with-zlib-dir --with-pdo-sqlite --with-readline --enable-session --enable-shmop --enable-simplexml --enable-sockets --enable-sysvmsg --enable-sysvsem --enable-sysvshm --enable-wddx --with-libxml-dir --with-xsl --enable-zip --enable-mysqlnd-compression-support --with-pear --enable-opcache
编译时可能出现的错误,对照解决吧
configure error:
1.configure: error: xml2-config not found. Please check your libxml2 installation.
解决:# yum install libxml2 libxml2-devel
2.configure: error: Cannot find OpenSSL's <evp.h>
解决:# yum install openssl openssl-devel
3.configure: error: Please reinstall the BZip2 distribution
解决:# yum install bzip2 bzip2-devel
4.configure: error: Please reinstall the libcurl distribution - easy.h should be in <curl-dir>/include/curl/
解决:# yum install libcurl libcurl-devel
5.If configure fails try --with-webp-dir=<DIR> configure: error: jpeglib.h not found.
解决:# yum install libjpeg libjpeg-devel
6.If configure fails try --with-webp-dir=<DIR>
checking for jpeg_read_header in -ljpeg... yes
configure: error: png.h not found.
解决:# yum install libpng libpng-devel
7.If configure fails try --with-webp-dir=<DIR>
checking for jpeg_read_header in -ljpeg... yes
checking for png_write_image in -lpng... yes
If configure fails try --with-xpm-dir=<DIR>
configure: error: freetype-config not found.
解决:# yum install freetype freetype-devel
8.configure: error: Unable to locate gmp.h
解决:# yum install gmp gmp-devel
9.configure: error: mcrypt.h not found. Please reinstall libmcrypt.
解决:# yum install libmcrypt libmcrypt-devel
10.configure: error: Please reinstall readline - I cannot find readline.h
解决:# yum install readline readline-devel
11.configure: error: xslt-config not found. Please reinstall the libxslt >= 1.1.0 distribution
解决:# yum install libxslt libxslt-devel
6.编译与安装
这里要make好久,要耐心一下
7.添加 PHP 命令到环境变量
在末尾加入
PATH=$PATH:/usr/local/php/bin
export PATH
要使改动立即生效执行
查看环境变量
可以看到php的bin目录已经在环境变量里面了
查看php版本
8.配置php-fpm
# cp php.ini-production /etc/php.ini
# cp /usr/local/php/etc/php-fpm.conf.default /usr/local/php/etc/php-fpm.conf
# cp /usr/local/php/etc/php-fpm.d/www.conf.default /usr/local/php/etc/php-fpm.d/www.conf
# cp sapi/fpm/init.d.php-fpm /etc/init.d/php-fpm
# chmod +x /etc/init.d/php-fpm
由于php-fpm走的是9000端口,外网是无法访问的,我们需要在nginx的配置文件中增加代理的规则,即可让用户在访问80端口,请求php的时候,交由后端的fpm去执行。
9.启动php-fpm
/etc/init.d/php-fpm start
四、配置nginx虚拟机
        location ~ \.php$ {
            root           html;
            fastcgi_pass   127.0.0.1:9000;
            fastcgi_index  index.php;
            fastcgi_param  SCRIPT_FILENAME  /$document_root$fastcgi_script_name;
            include        fastcgi_params;
        }
将script 改为$document_root
2.重启nginx
3.添加一个文件
vim /var/www/html/php7/index.php
写入
4.查看访问http://你的ip;(默认80端口,其他的端口请在nginx里面自行分配)
phpinfo的内容就出现了
ok!搞定
redis安装
检测一下本地有没有gcc编译环境,如果没有执行下面命令安装gcc
下载源码:
wget http://download.redis.io/releases/redis-3.2.8.tar.gz
解压源码:
tar -zxvf redis-3.2.8.tar.gz
ps:可以自行选择安装目录,上面的命令是直接解压到当前文件夹的
进入到解压目录:
执行make编译Redis:
注意:make命令执行完成编译后,会在src目录下生成6个可执行文件,分别是redis-server、redis-cli、redis-benchmark、redis-check-aof、redis-check-rdb、redis-sentinel。
安装Redis:
make install // make test
不知道是不是我下载的版本 本来make test只是检测一下错误,结果我直接就装好了。。。
ls一下 文件夹中有这么多东西
启动redis:
或许是我太着急了,直接执行这条命令,然而又报错了
提醒错误:这个是说什么呢
you have Transparent Huge Pages (THP) support enabled in your kernel. This will create latency and memory usage issues with Redis. To fix this issue run the command 'echo never > /sys/kernel/mm/transparent_hugepage/enabled' as root, and add it to your /etc/rc.local in order to retain the setting after a reboot. Redis must be restarted after THP is disabled.
目前redis还没有在/ect/rc.d/init.d 的路径里面(可以理解为windows中的注册表)
echo never > /sys/kernel/mm/transparent_hugepage/enabled
输出上面代码,临时解决一下,后面把代码添加到你的/etc/rc.local里面就可以了
配置一下文件路径
mkdir -p /etc/redis
cp redis.conf /etc/redis
把redis.conf文件复制到/etc/redis文件夹下面
然后修改redis.conf文件 将daemonize 的值修改为yes 此处vi命令不做赘述
启动redis
/usr/local/bin/redis-server /etc/redis/redis.conf
这样redis就已经启动了
查看启动:
然后一大堆代码就出来了
使用客户端
试试熟悉的set key 然后get value 吧


