前几天,在项目重要节点的时候,突然有个VVM(visual voice mail)的问题被列为重点对象; 由于之前一直疏于查看voice mail相关的代码,所以有些手忙脚乱,虽然问题得到解决,但是对于这种比较少用的功能,还是做个记录,以备不时之需。
这里只是梳理了一个粗漏的代码流程,由于平时很少处理voice mail相关的问题,暂时不对voice mail做深入的学习,所以这里的内容对于不熟悉这部分代码的人可能会有点帮助。如果想深入学习voice mail相关的知识,还是要结合相关协议,仔细研读代码; 下面两个连接的内容或许有些帮助。
https://www.gsma.com/newsroom/all-documents/omtp-visual-voice-mail-interface-specification-v-1-3/
https://shubs.io/breaking-international-voicemail-security-via-vvm-exploitation/
Android O将voicemail相关的实现从TeleService挪到了Dialer, 所以下面内容所涉及到的code主要在packages/apps/Dialer库下,此外也涉及到了packages/service/Telephony库。
主要内容:
1. Voice mail的存储。
2. OMTP visual voice mail的启动。
3. Visual voice mail的接收。
4. Visual voice mail的显示。
5. Visual voice mail的播放。
1. Voice mail的存储
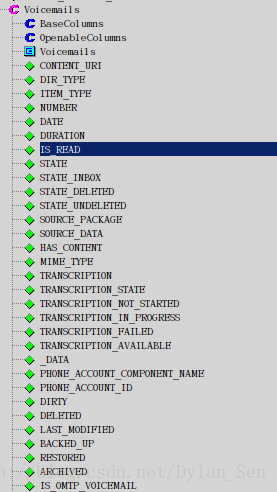
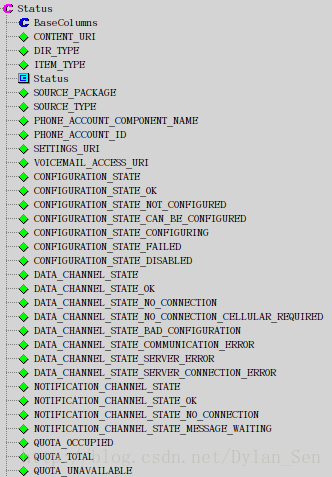
Voice mail存储在CallLog.db数据库里面,相关表是voicemail_status和calls。voicemail_status表用于存储voice mail状态相关的信息,比如用于voice mail的apk,account,vvm的类型等信息; calls表用于存储具体voice mail的信息, 比如日期,持续时间等。
CallLogProvider运行在进程android.process.acore内,开机后便会被创建,然后就是一系列的操作来创建CallLog.db; 这部分流程就不细说了,可参考TelephonyProvider的创建。相关table的创建可以查看CallLogDatabaseHelper.java。
VoicemailContract
VoicemailContract.java作为voicemail provider和应用间的纽带,内部定义了相关的URI和字段。
由于有两张表,所以字段比较多, 就不贴code了,贴两张截图吧。
VoicemailContentProvider
VoicemailContentProvider.java用于voice mail相关的查询,插入等数据库相关的操作。
由于需要操作两个表, 所以VoicemailContentProvider.onCreate方法创建了VoicemailContentTable.java和VoicemailStatusTable.java类型的两个对象,分别用于操作表calls和voicemail_status。
2. OMTP visual voice mail的启动:
在PhoneApp的AndroidMenifext.xml里面定义了下面的receiver:
        <receiver
            android:name="com.android.phone.vvm.VvmSimStateTracker"
            android:exported="false"
            androidprv:systemUserOnly="true">
            <intent-filter>
                <action android:name="android.intent.action.BOOT_COMPLETED"/>
                <action android:name="android.telephony.action.CARRIER_CONFIG_CHANGED"/>
                <action android:name="android.intent.action.SIM_STATE_CHANGED"/>
            </intent-filter>
        </receiver>
VvmSimStateTracker在系统里注册了三个广播的监听,ACTION_CARRIER_CONFIG_CHANGED广播和启动关系最大。单单用语言描述这个流程有些困难,画了一个简单的时序图, 如下:
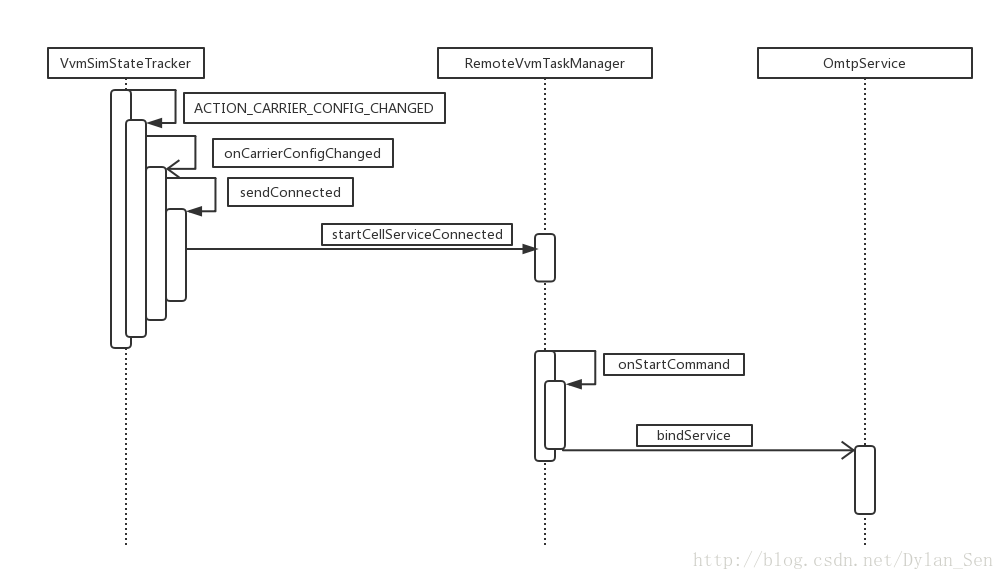
当收到ACTION_CARRIER_CONFIG_CHANGED后,VvmSimStateTracker.onCarrierConfigChanged方法被调用,而参数就是根据广播信息查询到的PhoneAccountHandle对象。
    private void onCarrierConfigChanged(Context context, PhoneAccountHandle phoneAccountHandle) {
        if (!isBootCompleted()) {//判断系统是否完成了启动, 如果没有完成,那么保存PhoneAccountHandle信息后返回。
            sPreBootHandles.add(phoneAccountHandle);
            return;
        }
        /*如果完成了启动,继续执行下面的code*/
        TelephonyManager telephonyManager = getTelephonyManager(context, phoneAccountHandle);
        if(telephonyManager == null){
            int subId = context.getSystemService(TelephonyManager.class).getSubIdForPhoneAccount(
                    context.getSystemService(TelecomManager.class)
                            .getPhoneAccount(phoneAccountHandle));
            VvmLog.e(TAG, "Cannot create TelephonyManager from " + phoneAccountHandle + ", subId="
                    + subId);
            // TODO(b/33945549): investigate more why this is happening. The PhoneAccountHandle was
            // just converted from a valid subId so createForPhoneAccountHandle shouldn't really
            // return null.
            return;
        }
        if (telephonyManager.getServiceState().getState()
                == ServiceState.STATE_IN_SERVICE) {//手机已经注册上了网络
            sendConnected(context, phoneAccountHandle);
            sListeners.put(phoneAccountHandle, null);
        } else {
            listenToAccount(context, phoneAccountHandle);
        }
    }
sendConnected方法比较简单,只是调用了RemoteVvmTaskManager.startCellServiceConnected, 后者代码如下:
    public static void startCellServiceConnected(Context context,
            PhoneAccountHandle phoneAccountHandle) {
        Intent intent = new Intent(ACTION_START_CELL_SERVICE_CONNECTED, null, context,
                RemoteVvmTaskManager.class);
        intent.putExtra(VisualVoicemailService.DATA_PHONE_ACCOUNT_HANDLE, phoneAccountHandle);
        context.startService(intent);
    }
RemoteVvmTaskManager继承了Service类,startCellServiceConnected方法只是启动了RemoteVvmTaskManager; 相应的onStartCommand方法被调用,该方法会调用RemoteVvmTaskManager.send方法,第二个参数为VisualVoicemailService.MSG_ON_CELL_SERVICE_CONNECTED(后续会用到)。
下面看看send方法的实现:
private void send(ComponentName remotePackage, int what, Bundle extras) {
        Assert.isMainThread();

        if (getBroadcastPackage(this) != null) {
            /*
             * Temporarily use a broadcast to notify dialer VVM events instead of using the
             * VisualVoicemailService.
             * b/35766990 The VisualVoicemailService is undergoing API changes. The dialer is in
             * a different repository so it can not be updated in sync with android SDK. It is also
             * hard to make a manifest service to work in the intermittent state.
             */
            VvmLog.i(TAG, "sending broadcast " + what + " to " + remotePackage);
            Intent intent = new Intent(ACTION_VISUAL_VOICEMAIL_SERVICE_EVENT);
            intent.putExtras(extras);
            intent.putExtra(EXTRA_WHAT, what);
            intent.setComponent(remotePackage);
            sendBroadcast(intent);
            return;
        }

        Message message = Message.obtain();//构建Message对象
        message.what = what;//将VisualVoicemailService.MSG_ON_CELL_SERVICE_CONNECTED放进Message对象。
        message.setData(new Bundle(extras));
        if (mConnection == null) {
            mConnection = new RemoteServiceConnection();
        }
        mConnection.enqueue(message);//将Message对象放进队列。

        if (!mConnection.isConnected()) {//首次调用,connection还没有连接,所以会去bind service。
            Intent intent = newBindIntent(this);//构建一个action为"android.telephony.VisualVoicemailService"的 Intent对象。
            intent.setComponent(remotePackage);
            VvmLog.i(TAG, "Binding to " + intent.getComponent());
            bindService(intent, mConnection, Context.BIND_AUTO_CREATE);
        }
bind 的service是OmtpService,继承自VisualVoicemailService。VisualVoicemailService.onBind方法比较简单,只是将成员变量mMessager的binder做为返回值return了。现在返回RemoteVvmTaskManager.RemoteServiceConnection看看service 连接之后做了哪些操作?
        public void onServiceConnected(ComponentName className,
                IBinder service) {
            mRemoteMessenger = new Messenger(service);//这个service就是mMessager的binder对象
            mConnected = true;
            runQueue();//继续处理队列里面的消息,我们在前面放了VisualVoicemailService.MSG_ON_CELL_SERVICE_CONNECTED消息。
        }
        ...
        private void runQueue() {
            Assert.isMainThread();
            Message message = mTaskQueue.poll();
            while (message != null) {
                message.replyTo = mMessenger;
                message.arg1 = getTaskId();

                try {
                    mRemoteMessenger.send(message);//此处send的消息会在VisualVoicemailService.mMessenger内处理。
                } catch (RemoteException e) {
                    VvmLog.e(TAG, "Error sending message to remote service", e);
                }
                message = mTaskQueue.poll();
            }
        }
VisualVoicemailService的mMessenger其实是匿名内部类的对象:
    private final Messenger mMessenger = new Messenger(new Handler() {
        @Override
        public void handleMessage(final Message msg) {
            final PhoneAccountHandle handle = msg.getData()
                    .getParcelable(DATA_PHONE_ACCOUNT_HANDLE);
            VisualVoicemailTask task = new VisualVoicemailTask(msg.replyTo, msg.arg1);
            switch (msg.what) {
                case MSG_ON_CELL_SERVICE_CONNECTED://OmtpService重写了onCellServiceConnected
                    onCellServiceConnected(task, handle);
                    break;
                case MSG_ON_SMS_RECEIVED:
                    VisualVoicemailSms sms = msg.getData().getParcelable(DATA_SMS);
                    onSmsReceived(task, sms);
                    break;
                case MSG_ON_SIM_REMOVED:
                    onSimRemoved(task, handle);
                    break;
                case MSG_TASK_STOPPED:
                    onStopped(task);
                    break;
                default:
                    super.handleMessage(msg);
                    break;
            }
        }
    });
总结:bind 完service后,这条逻辑线就走通了。RemoteVvmTaskManager负责发送任务(SMS reveived, SIM removed),而OmtpService负责处理任务。
OmtpService.onCellServiceConnected方法内会用到OmtpVvmCarrierConfigHelper以及VVM相关的配置信息,具体信息看code吧。
3. Visual voice mail的接收
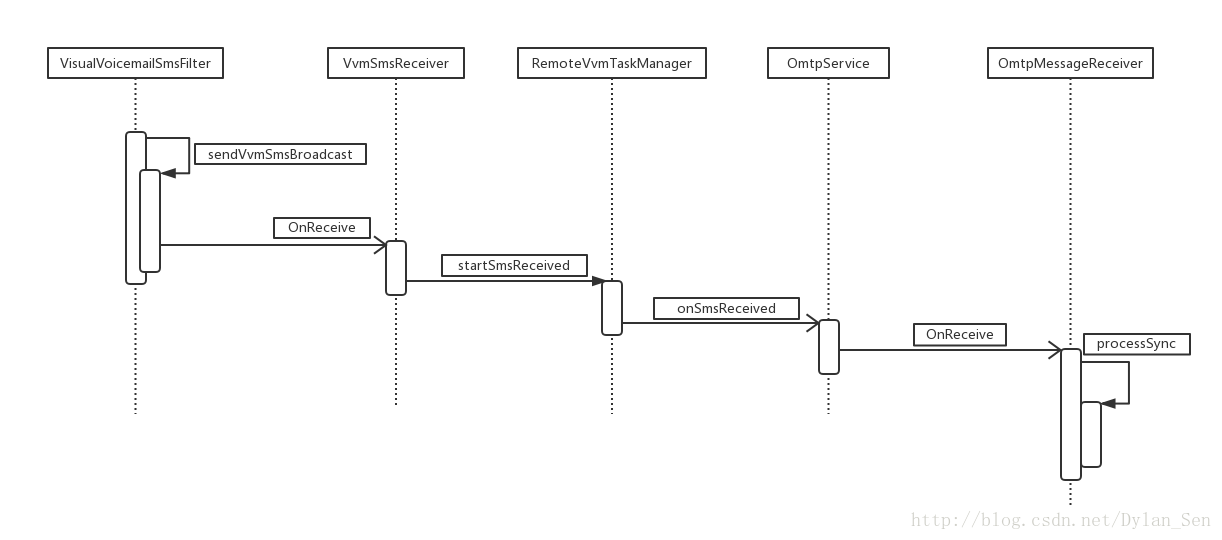
对于VVM的接收,以VisualVoicemailSmsFilter.filer为起点画了一个时序图,涵盖了主要节点。
VisualVoicemailSmsFilter.filer会对VVM按照协议做解析; OmtpMessageReceiver.OnReceive会对收到的mail,按照不同的协议做不同的处理, 主要是更新DB以及和IMAP server通信。
4. Visual voice mail的显示
现在针对voice mail已经有很多第三方应用,实现的方式也不尽相同。有些应用可以让用户设置显示的方式(calllog或者应用内部),有些应用直接将显示放在了第三方应用里。这里说下call log部分对于voice mail的显示。DialtactsActivity启动(上次关闭时没有保存状态)的时候会创建ListsFragment,ListsFragment.onResume会调用CallLogQueryHandler.fetchVoicemailStatus查询voice mail 的状态。
 public void fetchVoicemailStatus() {
    StringBuilder where = new StringBuilder();
    List<String> selectionArgs = new ArrayList<>();

    VoicemailComponent.get(mContext)
        .getVoicemailClient()
        .appendOmtpVoicemailStatusSelectionClause(mContext, where, selectionArgs);

    if (TelecomUtil.hasReadWriteVoicemailPermissions(mContext)) {
      startQuery(
          QUERY_VOICEMAIL_STATUS_TOKEN,
          null,
          Status.CONTENT_URI, //“content://com.android.voicemail/status",VoicemailContentProvider.query方法根据这个URI,会找到voicemail_status表。
          VoicemailStatusQuery.getProjection(),
          where.toString(),
          selectionArgs.toArray(new String[selectionArgs.size()]),
          null);
    }
  }
当获取查询结果后, ListsFragment.onVoicemailStatusFetched方法会被调用, 下面摘录了这个方法里最重要的一句。
  public void onVoicemailStatusFetched(Cursor statusCursor) {
    ....
    /*Update hasActiveVoicemailProvider, which controls the number of tabs displayed.*/
    boolean hasActiveVoicemailProvider =
        mVoicemailStatusHelper.getNumberActivityVoicemailSources(statusCursor) > 0;
    ...
  }
下面看VoicemailStatusHelper的getNumberActivityVoicemailSources方法,这个方法的注释写的很清楚:
返回值是已经安装的有效voicemail sources的数量,而这个数量是通过查询voicemail_status表获取的。
  /**
   * Returns the number of active voicemail sources installed.
   *
   * <p>The number of sources is counted by querying the voicemail status table.
   *
   * @param cursor The caller is responsible for the life cycle of the cursor and resetting the
   *     position
   */
  public int getNumberActivityVoicemailSources(Cursor cursor) {
    int count = 0;
    if (!cursor.moveToFirst()) {
      return 0;
    }
    do {
      if (isVoicemailSourceActive(cursor)) {
        ++count;
      }
    } while (cursor.moveToNext());
    return count;
  }
有效的Voicemail sources要满足下面的条件voicemail_status表里获取的package 名字存在,并且configuration state 不是NOT_CONFIGURED。所以如果第三方应用在voicemail_status表里存储了这些信息,那么call log里会显示voice mail相关的UI。
  /**
   * Returns whether the source status in the cursor corresponds to an active source. A source is
   * active if its' configuration state is not NOT_CONFIGURED. For most voicemail sources, only OK
   * and NOT_CONFIGURED are used. The OMTP visual voicemail client has the same behavior pre-NMR1.
   * NMR1 visual voicemail will only set it to NOT_CONFIGURED when it is deactivated. As soon as
   * activation is attempted, it will transition into CONFIGURING then into OK or other error state,
   * NOT_CONFIGURED is never set through an error.
   */
  private boolean isVoicemailSourceActive(Cursor cursor) {
    return cursor.getString(VoicemailStatusQuery.SOURCE_PACKAGE_INDEX) != null
        && cursor.getInt(VoicemailStatusQuery.CONFIGURATION_STATE_INDEX)
            != Status.CONFIGURATION_STATE_NOT_CONFIGURED;
  }
5. Visual voice mail的播放
ListsFragment.onCreateView方法会创建DialtactsPagerAdapter,当我们选择voice mail的tab(TAB_INDEX_VOICEMAIL)的时候,DialtactsPagerAdapter.getItem会返回VisualVoicemailCallLogFragment对象,如果需要,会创建新对象。VisualVoicemailCallLogFragment继承自CallLogFragment,所以也继承了很多逻辑实现,只有一部分方法做了重写。VVM的播放,是从UI操作开始的,对于UI 布局就不详细写了, 写太多容易精神崩溃,直接从VoicemailPlaybackPresenter.requestContent开始,简单画了一个时序图,可以让这个流程更清晰些。

VoicemailPlaybackPresenter.requestContent方法里面有个异步任务,这个任务在执行的时候会发action为ACTION_FETCH_VOICEMAIL的广播。
  protected boolean requestContent(int code) {
    "...省略..."
    mAsyncTaskExecutor.submit(
        Tasks.SEND_FETCH_REQUEST,
        new AsyncTask<Void, Void, Void>() {

          @Override
          protected Void doInBackground(Void... voids) {
              "...省略..."
              // Send voicemail fetch request.
              Intent intent = new Intent(VoicemailContract.ACTION_FETCH_VOICEMAIL, mVoicemailUri);
              intent.setPackage(sourcePackage);
              LogUtil.i(
                  "VoicemailPlaybackPresenter.requestContent",
                  "Sending ACTION_FETCH_VOICEMAIL to " + sourcePackage);
              mContext.sendBroadcast(intent);
            }
            return null;
          }
        });
    return true;
  }
FetchVoicemailReceiver.java会接收并处理上面的广播,
  @Override
  public void onReceive(final Context context, Intent intent) {
    if (!VoicemailComponent.get(context).getVoicemailClient().isVoicemailModuleEnabled())     {
      return;
    }
    if (VoicemailContract.ACTION_FETCH_VOICEMAIL.equals(intent.getAction())) {//处理ACTION_FETCH_VOICEMAIL广播
      VvmLog.i(TAG, "ACTION_FETCH_VOICEMAIL received");
      mContext = context;
      mContentResolver = context.getContentResolver();
      mUri = intent.getData();

      if (mUri == null) {
        VvmLog.w(TAG, VoicemailContract.ACTION_FETCH_VOICEMAIL + " intent sent with no data");
        return;
      }

      if (!context
          .getPackageName()
          .equals(mUri.getQueryParameter(VoicemailContract.PARAM_KEY_SOURCE_PACKAGE))) {
        // Ignore if the fetch request is for a voicemail not from this package.
        VvmLog.e(TAG, "ACTION_FETCH_VOICEMAIL from foreign pacakge " + context.getPackageName());
        return;
      }
      /*根据uri,从数据库获取对应的phone account信息*/
      Cursor cursor = mContentResolver.query(mUri, PROJECTION, null, null, null);
      if (cursor == null) {
        VvmLog.i(TAG, "ACTION_FETCH_VOICEMAIL query returned null");
        return;
      }
      try {
        if (cursor.moveToFirst()) {
          mUid = cursor.getString(SOURCE_DATA);
          String accountId = cursor.getString(PHONE_ACCOUNT_ID);
          if (TextUtils.isEmpty(accountId)) {
            TelephonyManager telephonyManager =
                (TelephonyManager) context.getSystemService(Context.TELEPHONY_SERVICE);
            accountId = telephonyManager.getSimSerialNumber();

            if (TextUtils.isEmpty(accountId)) {
              VvmLog.e(TAG, "Account null and no default sim found.");
              return;
            }
          }

          mPhoneAccount =
              new PhoneAccountHandle(
                  ComponentName.unflattenFromString(cursor.getString(PHONE_ACCOUNT_COMPONENT_NAME)),
                  cursor.getString(PHONE_ACCOUNT_ID));//构造PhoneAccountHandle对象
          TelephonyManager telephonyManager =
              context
                  .getSystemService(TelephonyManager.class)
                  .createForPhoneAccountHandle(mPhoneAccount);
          if (telephonyManager == null) {
            // can happen when trying to fetch voicemails from a SIM that is no longer on the
            // device
            VvmLog.e(TAG, "account no longer valid, cannot retrieve message");
            return;
          }
          if (!VvmAccountManager.isAccountActivated(context, mPhoneAccount)) {
            mPhoneAccount = getAccountFromMarshmallowAccount(context, mPhoneAccount);
            if (mPhoneAccount == null) {
              VvmLog.w(TAG, "Account not registered - cannot retrieve message.");
              return;
            }
            VvmLog.i(TAG, "Fetching voicemail with Marshmallow PhoneAccountHandle");
          }
          VvmLog.i(TAG, "Requesting network to fetch voicemail");
          mNetworkCallback = new fetchVoicemailNetworkRequestCallback(context, mPhoneAccount);
          mNetworkCallback.requestNetwork();//请求网络连接
        }
      } finally {
        cursor.close();
      }
    }
  }
fetchVoicemailNetworkRequestCallback继承自VvmNetworkRequestCallback,后者在构造方法里便创建了NetworkRequest对象:
  /**
   * @return NetworkRequest for a proper transport type. Use only cellular network if the carrier
   *     requires it. Otherwise use whatever available.
   */
  private NetworkRequest createNetworkRequest() {

    NetworkRequest.Builder builder =
        new NetworkRequest.Builder().addCapability(NetworkCapabilities.NET_CAPABILITY_INTERNET);

    TelephonyManager telephonyManager =
        mContext
            .getSystemService(TelephonyManager.class)
            .createForPhoneAccountHandle(mPhoneAccount);
    // At this point mPhoneAccount should always be valid and telephonyManager will never be null
    Assert.isNotNull(telephonyManager);
    if (mCarrierConfigHelper.isCellularDataRequired()) {//如果carrier config里面配置了使用cellular data的要求,那么就要使用NetworkCapabilities.TRANSPORT_CELLULAR。
      VvmLog.d(TAG, "Transport type: CELLULAR");
      builder
          .addTransportType(NetworkCapabilities.TRANSPORT_CELLULAR)
          .setNetworkSpecifier(telephonyManager.getNetworkSpecifier());
    } else {
      VvmLog.d(TAG, "Transport type: ANY");
    }
    return builder.build();
  }
当网络可用之后fetchVoicemailNetworkRequestCallback.onAvailable方法会被调用,该方法会调用fetchVoicemailNetworkRequestCallback.fetchVoicemail。
  private void fetchVoicemail(final Network network, final VoicemailStatus.Editor status) {
    Executor executor = Executors.newCachedThreadPool();
    executor.execute(
        new Runnable() {
          @Override
          public void run() {
            try {
              while (mRetryCount > 0) {//尝试次数,FetchVoicemailReceiver定义了一个常量NETWORK_RETRY_COUNT,值为3
                VvmLog.i(TAG, "fetching voicemail, retry count=" + mRetryCount);
                try (ImapHelper imapHelper =
                    new ImapHelper(mContext, mPhoneAccount, network, status)) {
                  boolean success =
                      imapHelper.fetchVoicemailPayload(
                          new VoicemailFetchedCallback(mContext, mUri, mPhoneAccount), mUid);//这里就是用来下载的。
                  if (!success && mRetryCount > 0) {
                    VvmLog.i(TAG, "fetch voicemail failed, retrying");
                    mRetryCount--;
                  } else {
                    return;
                  }
                } catch (InitializingException e) {
                  VvmLog.w(TAG, "Can't retrieve Imap credentials ", e);
                  return;
                }
              }
            } finally {
              if (mNetworkCallback != null) {
                mNetworkCallback.releaseNetwork();
              }
            }
          }
        });
  }
fetchVoicemailNetworkRequestCallback.fetchVoicemail方法构造了ImapHelper对象,并调用了fetchVoicemailPayload方法,这个方法完成了下载。看似很简单,但是ImapHelper对象的构造和fetchVoicemailPayload方法的调用完成了很多工作。