1、什么是并行?
并行处理(ParallelProcessing)是计算机系统中能同时执行两个或更多个处理机的一种计算方法。处理机可同时工作于同一程序的不同方面。并行处理的主要目的是节省大型和复杂问题的解决时间。
2、为什么需要并行?
并行计算只有在 图像处理 和 服务端编程 两个领域可以使用,并且它在这2个领域确实有着大量广泛的使用。但是在其它任何地方,并行计算毫无建树!
摩尔定律的失效。10年过去了,我们还停留在4GHZ。
并行计算还出于业务模型的需要。并不是为了提高系统性能,而是确实在业务上需要多个执行单元。比如HTTP服务器,为每一个Socket连接新建一个处理线程,让不同线程承担不同的业务工作,简化任务调度。
3、有几个重要的概念
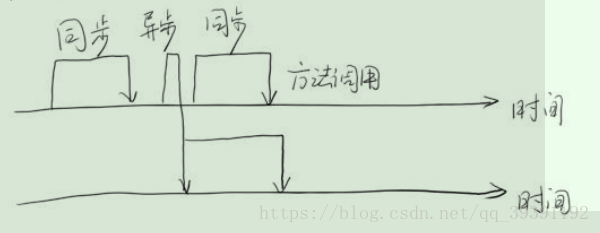
同步(synchronous)和异步(asynchronous):方法调用时间的区别
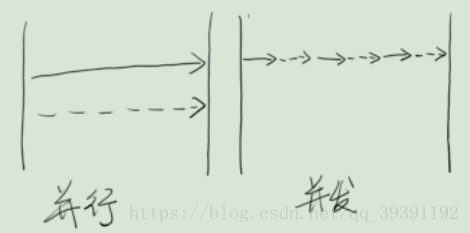
并发(Concurrency)和并行(Parallelism)
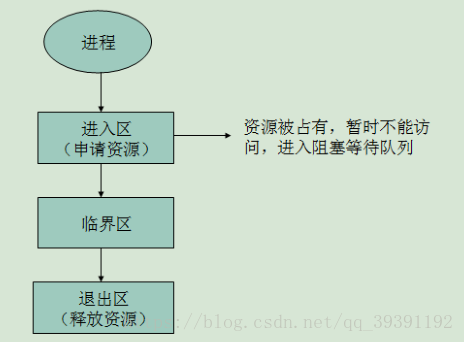
临界区 :临界区用来表示一种公共资源或者说是共享数据,可以被多个线程使用。但是每一次,只能有一个线程
使用它,一旦临界区资源被占用,其他线程要想使用这个资源,就必须等待。
阻塞(Blocking)和非阻塞(Non-Blocking):阻塞和非阻塞通常用来形容多线程间的相互影响。比如一个线程占用了临界区资源,那么其它所有需要这个资源的线程就必须在这个临界区中进行等待,等待会导致线程挂起。这种情况就是阻塞。此时,如
果占用资源的线程一直不愿意释放资源,那么其它所有阻塞在这个临界区上的线程都不能工作。非阻塞允许多个线程同时进入临界区。
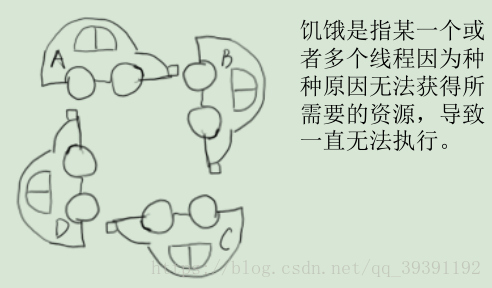
死锁(Deadlock)、饥饿(Starvation)和活锁(Livelock):死锁是由于多个进程相互请求导致无法满足资源需求;饥饿指线程长时间无法得到需要的资源,无法继续执行;活锁指在一定时间之后能够满足资源需要从而线程能够继续向下执行。
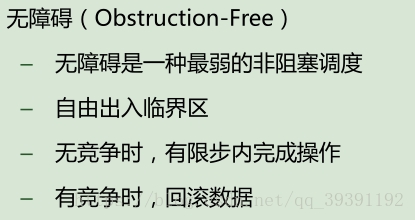
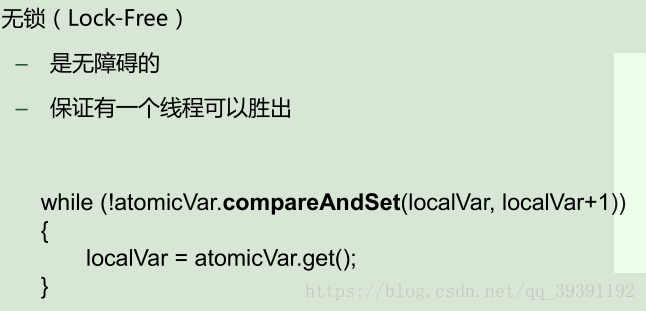
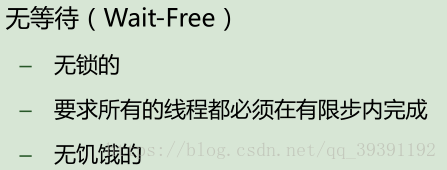
并发级别 :阻塞、无障碍、无锁、无等待(后三个为非阻塞)

4、两个定律
Amdahl定律:定义了串行系统并行化后的加速比的计算公式和理论上限;加速比定义:加速比=优化前系统耗时/优化后系统耗时。公式:Tn=T1(F+1/n*(1-F)),其中Tn为优化后耗时,T1为单核时耗时,F为串行比例,n为处理器个数。
Gustafson定律:说明处理器个数,串行比例和加速比之间的关系,只要有足够的并行化,那么加速比和CPU个数成正比。公式:S=n-F(n-1),其中S为加速比,n为处理器个数,F为串行比例。
5、线程相关
线程是进程内的执行单元。
Thread t1 = new Thread();// 新建线程
t1.start();// 启动线程
// Thread.stop();// 不建议使用,它会释放所有的monitor。
t1.interrupt(); // 中断线程
// t1.isInterrupted(); // 判断线程是否被中断
t1.interrupted(); // 判断线程是否被中断,并清除中断状态
// 挂起suspend和继续执行resume线程,如果加锁发生在resume()之前则产生死锁
// 等待线程结束join
// 让出当前占有资源,但还会继续竞争yield
// 守护进程:在后台默默地完成一些系统性的服务,比如垃圾回收线程、JIT线程就可以理解为守护线程,当一个Java应用内,只有守护线程时,Java虚拟机就会自然退出,必须在启动线程前设置为守护进程,否则报错
Thread t = new DaemonT();
t.setDaemon(true);
t.start();
// 线程优先级,高优先级线程更容易获得资源,但并不是绝对的
Thread high=new HightPriority();
LowPriority low=new LowPriority();
high.setPriority(Thread.MAX_PRIORITY);
low.setPriority(Thread.MIN_PRIORITY);
low.start();
high.start();
/* 基础的线程同步,使用synchronized。
指定加锁对象:对给定对象加锁,进入同步代码前要获得给定对象的锁。
public void run() {
    for(int j=0;j<10000000;j++){
        synchronized(instance){
            i++;
        }
    }
}
直接作用于实例方法:相当于对当前实例加锁,进入同步代码前要获得当前实例的锁。
public synchronized void increase(){
    i++;
}
直接作用于静态方法:相当于对当前类加锁,进入同步代码前要获得当前类的锁。
public static synchronized void increase(){
    i++;
}
此外还有Object.wait(),Object.notify()等操作实现线程同步
public static class T2 extends Thread{
    public void run()
    {
        synchronized (object) {
            System.out.println(System.currentTimeMillis()
                +":T2 start! notify one thread");
            object.notify();
            System.out.println(System.currentTimeMillis()+":T2 end!");
            try {
                Thread.sleep(2000);
            } catch (InterruptedException e) {
            }
        }
    }
}

public static class T1 extends Thread{
    public void run()
    {
        synchronized (object) {
            System.out.println(System.currentTimeMillis()+":T1 start! ");
            try {
                System.out.println(System.currentTimeMillis()
                    +":T1 wait for object ");
                object.wait();
            } catch (InterruptedException e) {
                e.printStackTrace();
            }
            System.out.println(System.currentTimeMillis()+":T1 end!");
        }
    }
}*/
6、内存模型和线程安全
原子性是指一个操作是不可中断的。即使是在多个线程一起执行的时候,一个操作一旦开始,就
不会被其它线程干扰。
有序性是指一条指令的执行分为很多步骤,按照一定的顺序向下执行。
可见性是指当一个线程修改了某一个共享变量的值,其他线程是否能够立即知道这个修改。
public class VisibilityTest extends Thread {
private boolean stop;
public void run() {
int i = 0;
while(!stop) {
i++;
}
System.out.println("finish loop,i=" + i);
}
public void stopIt() {
stop = true;
}
public boolean getStop(){
return stop;
}
public static void main(String[] args) throws Exception {
VisibilityTest v = new VisibilityTest();
v.start();
Thread.sleep(1000);
v.stopIt();
Thread.sleep(2000);
System.out.println("finish main");
System.out.println(v.getStop());
}
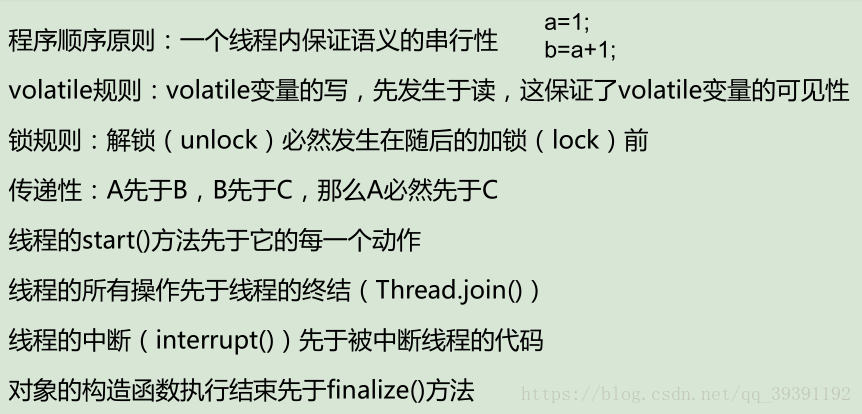
}Happen-Before原则
线程安全 指某个函数、函数库在多线程环境中被调用时,能够正确地处理各个线程的局部变量,使程序功能正确完成。
public class AccountingSync implements Runnable{
    static AccountingSync instance=new AccountingSync();
    static int i=0;
    @Override
    public void run() {
        for(int j=0;j<10000000;j++){
            synchronized(instance){
                i++;
            }
        }
    }
}
7、无锁
CAS:Compare and Swap
CAS算法的过程是这样:它包含3个参数CAS(V,E,N)。V表示要更新的变量,E表示预期值,N表示新值。仅当V值等于E值时,才会将V的值设为N,如果V值和E值不同,则说明已经有其他线程做了更新,则当前线程什么都不做。最后,CAS返回当前V的真实值。CAS操作是抱着乐观的态度进行的,它总是认为自己可以成功完成操作。当多个线程同时使用CAS操作一个变量时,只有一个会胜出,并成功更新,其余均会失败。失败的线程不会被挂起,仅是被告知失败,并且允许再次尝试,当然也允许失败的线程放弃操作。基于这样的原理,CAS操作即时没有锁,也可以发现其他线程对当前线程的干扰,并进行恰当的处理。
无锁类的使用
AtomicInteger:Number
主要接口:
public final int get() //取得当前值
public final void set(int newValue) //设置当前值
public final int getAndSet(int newValue) //设置新值,并返回旧值值
public final boolean compareAndSet(int expect, int u)//如果当前值为expect,则设置为u
public final int getAndIncrement() //当前值加1,返回旧值
public final int getAndDecrement() //当前值减1,返回旧值
public final int getAndAdd(int delta) //当前值增加delta,返回旧值
public final int incrementAndGet() //当前值加1,返回新值
public final int decrementAndGet() //当前值减1,返回新值
public final int addAndGet(int delta) //当前值增加delta,返回新值
Unsafe:非安全的操作,比如:根据偏移量设置值;park();底层的CAS操作;非公开API,在不同版本的JDK中, 可能有较大差异
主要接口:
//获得给定对象偏移量上的int值
public native int getInt(Object o, long offset);
//设置给定对象偏移量上的int值
public native void putInt(Object o, long offset, int x);
//获得字段在对象中的偏移量
public native long objectFieldOffset(Field f);
//设置给定对象的int值,使用volatile语义
public native void putIntVolatile(Object o, long offset, int x);
//获得给定对象对象的int值,使用volatile语义
public native int getIntVolatile(Object o, long offset);
//和putIntVolatile()一样,但是它要求被操作字段就是volatile类型的
public native void putOrderedInt(Object o, long offset, int x);
AtomicReference:对引用进行修改,是一个模板类,抽象化了数据类型
主要接口:
get()
set(V)
compareAndSet()
getAndSet(V)
AtomicStampedReference:针对ABA问题
主要接口:
//比较设置 参数依次为:期望值 写入新值 期望时间戳 新时间戳
public boolean compareAndSet(V expectedReference,V newReference,int expectedStamp,int newStamp)
//获得当前对象引用
public V getReference()
//获得当前时间戳
public int getStamp()
//设置当前对象引用和时间戳
public void set(V newReference, int newStamp)
AtomicIntegerArray:支持无锁的数组
主要接口:
//获得数组第i个下标的元素
public final int get(int i)
//获得数组的长度
public final int length()
//将数组第i个下标设置为newValue,并返回旧的值
public final int getAndSet(int i, int newValue)
//进行CAS操作,如果第i个下标的元素等于expect,则设置为update,设置成功返回true
public final boolean compareAndSet(int i, int expect, int update)
//将第i个下标的元素加1
public final int getAndIncrement(int i)
//将第i个下标的元素减1
public final int getAndDecrement(int i)
//将第i个下标的元素增加delta(delta可以是负数)
public final int getAndAdd(int i, int delta)
AtomicIntegerFieldUpdater:让普通变量也享受原子操作。ps:1.Updater只能修改它可见范围内的变量。因为Updater使用反射得到这个变量。如果变量不可见,就会出错。比如如果score申明为private,就是不可行的。2.为了确保变量被正确的读取,它必须是volatile类型的。如果我们原有代码中未申明这个类型,那么简单的申明一下就行,这不会引起什么问题。3.由于CAS操作会通过对象实例中的偏移量直接进行赋值,因此,它不支持static字段(Unsafe.objectFieldOffset()不支持静态变量)。
主要接口:
AtomicIntegerFieldUpdater.newUpdater()
incrementAndGet()
8、各种同步工具的使用
ReentrantLock:可重入锁
可重入(单线程可以重复进入,但要重复退出)、可中断(需要设置lockInterruptibly())、可限时(超时不能获得锁,就返回false,不会永久等待构成死锁)、公平锁(先来先得)
Condition:类似于 Object.wait()和Object.notify();与ReentrantLock结合使用
主要接口:
void await() throws InterruptedException;
void awaitUninterruptibly();
long awaitNanos(long nanosTimeout) throws InterruptedException;
boolean await(long time, TimeUnit unit) throws InterruptedException;
boolean awaitUntil(Date deadline) throws InterruptedException;
void signal();
void signalAll();
API详解:
1.await()方法会使当前线程等待,同时释放当前锁,当其他线程中使用signal()时或者signalAll()方法时,线
程会重新获得锁并继续执行。或者当线程被中断时,也能跳出等待。这和Object.wait()方法很相似。
2.awaitUninterruptibly()方法与await()方法基本相同,但是它并不会再等待过程中响应中断。
3.singal()方法用于唤醒一个在等待中的线程。相对的singalAll()方法会唤醒所有在等待中的线程。这和Obej
ct.notify()方法很类似。
Semaphore:共享锁;运行多个线程同时临界区
主要接口:
public void acquire()
public void acquireUninterruptibly()
public boolean tryAcquire()
public boolean tryAcquire(long timeout, TimeUnit unit)
public void release()
ReadWriteLock:JDK5中提供的读写分离锁
访问情况:
读-读不互斥:读读之间不阻塞。
读-写互斥:读阻塞写,写也会阻塞读。
写-写互斥:写写阻塞。
主要接口:
private static ReentrantReadWriteLock readWriteLock=new ReentrantReadWriteLock();
private static Lock readLock = readWriteLock.readLock();
private static Lock writeLock = readWriteLock.writeLock();
CountDownLatch:倒数计时器。一种典型的场景就是火箭发射。在火箭发射前,为了保证万无一失,往往还要进行各项设备、仪器的检查。只有等所有检查完毕后,引擎才能点火。这种场景就非常适合使用CountDownLatch。它可以使得点火线程
,等待所有检查线程全部完工后,再执行。
主要接口:
static final CountDownLatch end = new CountDownLatch(10);
end.countDown();
end.await();
CyclicBarrier:循环栅栏。Cyclic意为循环,也就是说这个计数器可以反复使用。比如,假设我们将计数器设置为10。那么凑齐第一批10个线程后,计数器就会归零,然后接着凑齐下一批10个线程。
主要接口:
public CyclicBarrier(int parties, Runnable barrierAction)barrierAction就是当计数器一次计数完成后,系统会执行的动作
await()
LockSupport:提供线程阻塞原语。与suspend()相比不容易引起线程冻结。能够响应中断,但不抛出异常。中断响应的结果是,park()函数的返回,可以从Thread.interrupted()得到中断标志。
主要接口:
LockSupport.park();
LockSupport.unpark(t1);
9、并发容器
集合包装
// Hash map
Collections.synchronizedMap
public static Map m=Collections.synchronizedMap(new HashMap());
// List
synchronizedList
// Set
synchronizedSetConcurrentHashMap:高性能HashMap
BlockingQueue:阻塞队列
10、线程池基础
JDK的内置线程池
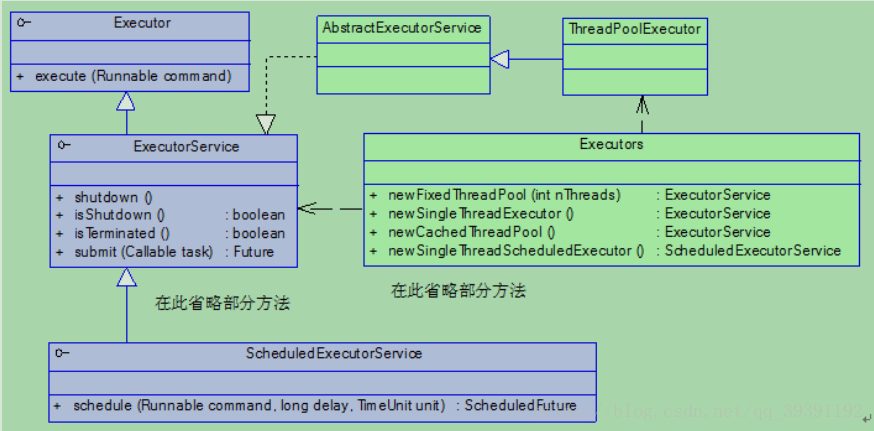
线程池种类
newFixedThreadPool:混合线程池
newSingleThreadExecutor:单例线程池
newCachedThreadPool:缓存线程池
newScheduledThreadPool:类似于事务
11、并发设计模式
在软件工程中,设计模式(design pattern)是对软件设计中普遍存在(反复出现)的各种问题,所提出的解决方案。这个术语是由埃里希·伽玛(Erich Gamma)等人在1990年代从建筑设计领域引入到计算机科学的。
单例模式:单例对象的类必须保证只有一个实例存在。许多时候整个系统只需要拥有一个的全局对象,这样有利于我们协调系统整体的行为 比如:全局信息配置。
public class Singleton {// 在类初始化时获取单例
    private Singleton(){
        System.out.println("Singleton is create");
    }
    private static Singleton instance = new Singleton();
    public static Singleton getInstance() {
        return instance;
    }
}

public class LazySingleton {// 以懒惰模式创建单例,当调用getInstance()方法时创建单例
    private LazySingleton() {
        System.out.println("LazySingleton is create");
    }
    private static LazySingleton instance = null;
    public static synchronized LazySingleton getInstance() {
        if (instance == null)
            instance = new LazySingleton();
        return instance;
    }
}

public class StaticSingleton {
    private StaticSingleton(){
        System.out.println("StaticSingleton is create");
    }
    private static class SingletonHolder {
        private static StaticSingleton instance = new StaticSingleton();
    }
    public static StaticSingleton getInstance() {
        return SingletonHolder.instance;
    }
}不变模式:一个类的内部状态创建后,在整个生命期间都不会发生变化时,就是不变类。不变模式不需要同步。
public final class Product {
    //确保无子类
    private final String no;
    //私有属性,不会被其他对象获取
    private final String name;
    //final保证属性不会被2次赋值
    private final double price;
    public Product(String no, String name, double price) {  //在创建对象时,必须指定数据
        super();
        //因为创建之后,无法进行修改
        this.no = no;
        this.name = name;
        this.price = price;
    }
    public String getNo() {
        return no;
    }
    public String getName() {
        return name;
    }
    public double getPrice() {
        return price;
    }
}
一些常用的比如String、Boolean、Byte、Character、Double、Float、Integer、Long、Short都是如此。
Future模式:核心思想是异步调用。在调用方法时只产生一个包装盒,具体耗时的实现在空闲时完成。
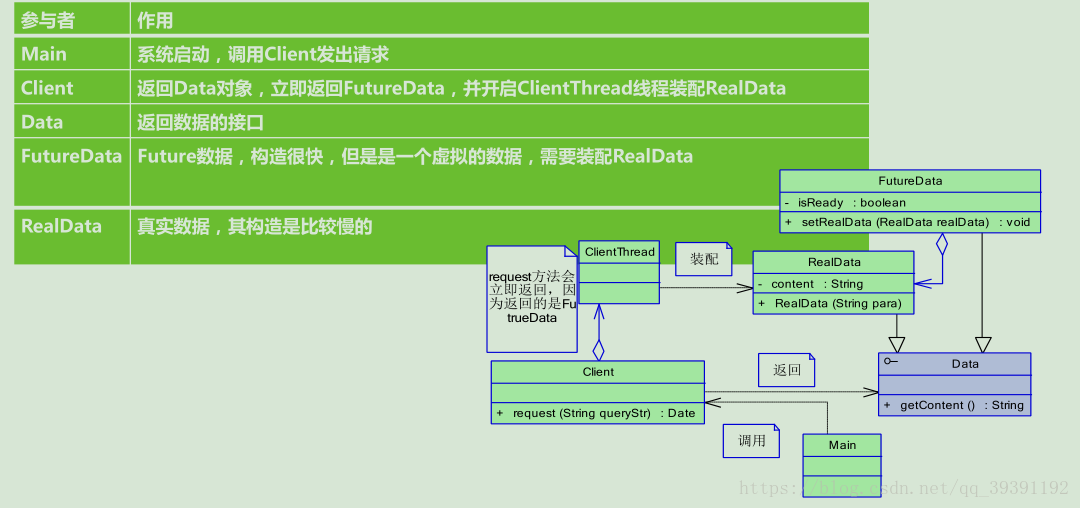
public interface Data {
    public String getResult ();
}

public class FutureData implements Data {
    protected RealData realdata = null;  //FutureData是RealData的包装
    protected boolean isReady = false;
    public synchronized void setRealData(RealData realdata) {
        if (isReady) {
            return;
        }
        this.realdata = realdata;
        isReady = true;
        notifyAll();  //RealData已经被注入,通知getResult()
    }
    public synchronized String getResult() { //会等待RealData构造完成
        while (!isReady) {
            try {
                wait();  //一直等待,知道RealData被注入
            } catch (InterruptedException e) {
            }
            }
        return realdata.result;  //由RealData实现
    }
}

public class RealData implements Data {
    protected final String result;
    public RealData(String para) {
        //RealData的构造可能很慢,需要用户等待很久,这里使用sleep模拟
        StringBuffer sb=new StringBuffer();
        for (int i = 0; i < 10; i++) {
            sb.append(para);
            try {
                //这里使用sleep,代替一个很慢的操作过程
                Thread.sleep(100);
            } catch (InterruptedException e) {
            }
            }
        result =sb.toString();
    }
    public String getResult() {
        return result;
    }
}

public class Client {
    public Data request(final String queryStr) {
        final FutureData future = new FutureData();
        new Thread() {
            public void run() {// RealData的构建很慢,
                //所以在单独的线程中进行
                RealData realdata = new RealData(queryStr);
                future.setRealData(realdata);
            }
        }.start();
        return future; // FutureData会被立即返回
    }

    public static void main(String[] args) {
        Client client = new Client();
        //这里会立即返回,因为得到的是FutureData而不是RealData
        Data data = client.request("name");
        System.out.println("请求完毕");
        try {
            //这里可以用一个sleep代替了对其他业务逻辑的处理
            //在处理这些业务逻辑的过程中,RealData被创建,从而充分利用了等待时间
            Thread.sleep(2000);
        } catch (InterruptedException e) {
        }
        //使用真实的数据
        System.out.println("数据 = " + data.getResult());
    }
}
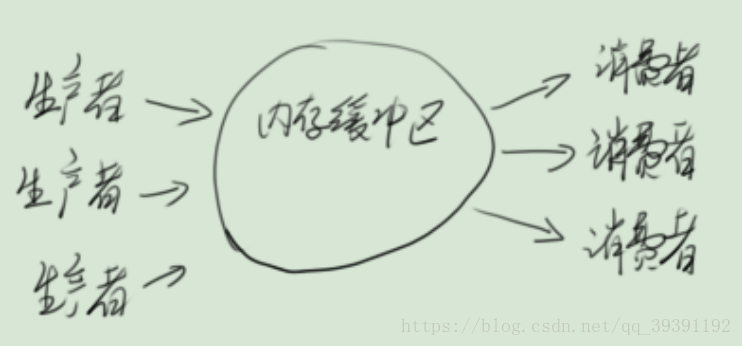
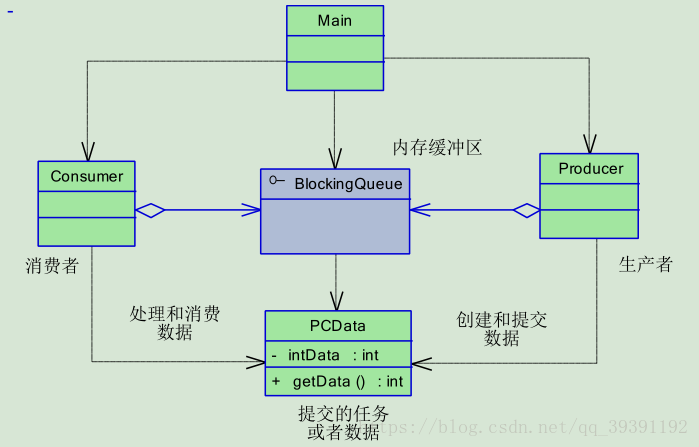
生产者消费者模式:生产者-消费者模式是一个经典的多线程设计模式。它为多线程间的协作提供了良好的解决方案。在生产者-消费者模式中,通常由两类线程,即若干个生产者线程和若干个消费者线程。生产者线程负责提交用户请求,消费者线程则负责具体处理生产者提交的任务。生产者和消费者之间则通过共享内存缓冲区进行通信。

12、悄悄插一嘴巴NIO和AIO
NIO是New I/O的简称,与旧式的基于流的I/O方法相对,从名字看,它表示新的一套Java I/O标准。它是在Java 1.4中被纳入到JDK中的,并具有以下特性:
– NIO是基于块(Block)的,它以块为基本单位处理数据
– 为所有的原始类型提供(Buffer)缓存支持,ByteBuffer最为常用,Buffer中有3个重要的参数:位置(position)、容量(capactiy)和上限(limit)
– 增加通道(Channel)对象,作为新的原始 I/O 抽象
– 支持锁和内存映射文件的文件访问接口
– 提供了基于Selector的异步网络I/O
// 使用NIO复制文件
public static void nioCopyFile(String resource, String destination) throws IOException {
    FileInputStream fis = new FileInputStream(resource);
    FileOutputStream fos = new FileOutputStream(destination);
    FileChannel readChannel = fis.getChannel();  //读文件通道
    FileChannel writeChannel = fos.getChannel(); //写文件通道
    ByteBuffer buffer = ByteBuffer.allocate(1024);  //读入数据缓存
    while (true) {
        buffer.clear();
        int len = readChannel.read(buffer);  //读入数据
        if (len == -1) {
            break;
            //读取完毕
        }
        buffer.flip();// 读写过程转换
        writeChannel.write(buffer);
        //写入文件
    }
    readChannel.close();
    writeChannel.close();
}
// 将文件映射到内存
RandomAccessFile raf = new RandomAccessFile("C:\\mapfile.txt", "rw");
FileChannel fc = raf.getChannel();
//将文件映射到内存中
MappedByteBuffer mbb = fc.map(FileChannel.MapMode.READ_WRITE, 0, raf.length());
while(mbb.hasRemaining()){
System.out.print((char)mbb.get());
}
mbb.put(0,(byte)98); //修改文件
raf.close();网络编程NIO
// 简单案例EchoServer
public static void main(String args[]) {
    ServerSocket echoServer = null;
    Socket clientSocket = null;
    try {
        echoServer = new ServerSocket(8000);
    } catch (IOException e) {
        System. out.println(e);
    }
    while (true) {
        try {
            clientSocket = echoServer.accept();
            System. out.println(clientSocket.getRemoteSocketAddress() + " connect!");
            tp.execute(new HandleMsg(clientSocket));
        } catch (IOException e) {
            System. out.println(e);
        }
    }
}
static class HandleMsg implements Runnable{
// 省略部分信息
public void run(){
try {
is = new BufferedReader(new InputStreamReader(clientSocket.getInputStream()));
os = new PrintWriter(clientSocket.getOutputStream(), true);
// 从InputStream当中读取客户端所发送的数据
String inputLine = null;
long b=System. currentTimeMillis();
while ((inputLine = is.readLine()) != null) {
os.println(inputLine);
}
long e=System. currentTimeMillis();
System. out.println("spend:"+(e-b)+"ms");
} catch (IOException e) {
e.printStackTrace();
}finally{
// 关闭资源
}
}
}// EchoServer客户端
public static void main(String[] args) throws IOException {
Socket client = null;
PrintWriter writer = null;
BufferedReader reader = null;
try {
client = new Socket();
client.connect(new InetSocketAddress("localhost", 8000));
writer = new PrintWriter(client.getOutputStream(), true);
writer.println("Hello!");
writer.flush();
reader = new BufferedReader(new InputStreamReader(client.getInputStream()));
System.out.println("from server: " + reader.readLine());
} catch {
} finally {
//省略资源关闭
}
}问题:
– 为每一个客户端使用一个线程,如果客户端出现延时等异常,线程可能会被占用很长时间。因为数据的
准备和读取都在这个线程中。
– 此时,如果客户端数量众多,可能会消耗大量的系统资源
解决:
– 非阻塞的NIO
– 数据准备好了在工作
总结:
– NIO会将数据准备好后,再交由应用进行处理,数据的读取过程依然在应用线程中完成
– 节省数据准备时间(因为Selector可以复用)
网络编程AIO
- 读完了再通知我
- 不会加快IO,只是在读完后进行通知
- 使用回调函数,进行业务处理
// AsynchronousSocketChannel使用举例
server.accept(null, new CompletionHandler<AsynchronousSocketChannel, Object>() {
    final ByteBuffer buffer = ByteBuffer.allocate(1024);
    public void completed(AsynchronousSocketChannel result, Object attachment) {
        System.out.println(Thread.currentThread().getName());
        Future<Integer> writeResult=null;
        try {
            buffer.clear();
            result.read(buffer).get(100, TimeUnit.SECONDS);
            buffer.flip();
            writeResult=result.write(buffer);
        } catch (InterruptedException | ExecutionException e) {
            e.printStackTrace();
        } catch (TimeoutException e) {
            e.printStackTrace();
        } finally {
            try {
                server.accept(null, this);
                writeResult.get();
                result.close();
            } catch (Exception e) {
                System.out.println(e.toString());
            }
        }
    }
    @Override
    public void failed(Throwable exc, Object attachment) {
        System.out.println("failed: " + exc);
    }
});
13、锁优化
减少锁持有时间:将无关代码块单独写,只将必要的代码包含在锁内
减小锁粒度:将大对象,拆成小对象,大大增加并行度,降低锁竞争;使用偏向锁、轻量级锁,取得锁的成功率提高;
HashMap的同步实现:
– Collections.synchronizedMap(Map<K,V> m)
– 返回SynchronizedMap对象
public V get(Object key) {
    synchronized (mutex) {return m.get(key);}
}
public V put(K key, V value) {
    synchronized (mutex) {return m.put(key, value);}
}
ConcurrentHashMap:
– 若干个Segment :Segment<K,V>[] segments
– Segment中维护HashEntry<K,V>
– put操作时先定位到Segment,锁定一个Segment,执行put
– 在减小锁粒度后, ConcurrentHashMap允许若干个线程同时进入
锁分离:根据功能进行锁分离,使用ReadWriteLock,读多写的情况可以提高性能。
延伸:操作互不影响,锁就可以分离,因而提出LinkedBlockingQueue,可在同时在头尾执行不同的操作
锁粗化:通常情况下,为了保证多线程间的有效并发,会要求每个线程持有锁的时间尽量短,即在使用完公共资源后,应该立即释放锁。只有这样,等待在这个锁上的其他线程才能尽早的获得资源执行任务。但是,凡事都有一个度,如果对同一个锁不停的进行请求、同步和释放,其本身也会消耗系统宝贵的资源,反而不利于性能的优化。
// 修改前
public void demoMethod(){
    synchronized(lock){
        //do sth.
    }
    //做其他不需要的同步的工作,但能很快执行完毕
    synchronized(lock){
        //do sth.
    }
}

// 修改后
public void demoMethod(){
    //整合成一次锁请求
    synchronized(lock){
        //do sth.
        //做其他不需要的同步的工作,但能很快执行完毕
    }
}锁消除:在即时编译器时,如果发现不可能被共享的对象,则可以消除这些对象的锁操作
public static void main(String args[]) throws InterruptedException {
    long start = System.currentTimeMillis();
    for (int i = 0; i < CIRCLE; i++) {
        craeteStringBuffer("JVM", "Diagnosis");
    }
    long bufferCost = System.currentTimeMillis() - start;
    System.out.println("craeteStringBuffer: " + bufferCost + " ms");
}
public static String craeteStringBuffer(String s1, String s2) {
    StringBuffer sb = new StringBuffer();
    sb.append(s1);
    sb.append(s2);
    return sb.toString();
}
启动JVM时使用该命令:-server -XX:+DoEscapeAnalysis -XX:+EliminateLocks(启用锁消除)
虚拟机内部的锁优化机制
偏向锁:锁偏向于当前已经占有锁的进程,只要没有竞争,获得偏向锁的线程,在将来进入同步块,不需要做同步,当其他线程请求相同的锁时,偏向模式结束。但在竞争激烈的场合,偏向锁会增加系统负担。-XX:+UseBiasedLocking 默认启用偏向锁
// 本例中启用偏向锁能提高5%左右的性能
// -XX:+UseBiasedLocking -XX:BiasedLockingStartupDelay=0
// -XX:-UseBiasedLocking
// 使用这两行启动JVM查看效果
public static List<Integer> numberList =new Vector<Integer>();
public static void main(String[] args) throws InterruptedException {
    long begin=System.currentTimeMillis();
    int count=0;
    int startnum=0;
    while(count<10000000){
        numberList.add(startnum);
        startnum+=2;
        count++;
    }
    long end=System.currentTimeMillis();
    System.out.println(end-begin);
}
轻量级锁:普通的锁处理性能不够理想,轻量级锁是一种快速的锁定方法。如果对象没有被锁定,将对象头的Mark指针保存到锁对象中,将对象头设置为指向锁的指针(在线程栈空间中)。如果轻量级锁失败,表示存在竞争,升级为重量级锁(常规锁)。在没有锁竞争的前提下,减少传统锁使用OS互斥量产生的性能损耗。在竞争激烈时,轻量级锁会多做很多额外操作,导致性能下降。
自旋锁:当竞争存在时,如果线程可以很快获得锁,那么可以不在OS层挂起线程,让线程做几个空操作(自旋),等待下一个任务的到来。如果同步块很长,自旋失败,会降低系统性能;如果同步块很短,自旋成功,节省线程挂起切换时间,提升系统性能。在JDK1.7之后内置实现。
小总结:
1.不是Java语言层面的锁优化方法
2.内置于JVM中的获取锁的优化方法和获取锁的步骤
– 偏向锁可用会先尝试偏向锁
– 轻量级锁可用会先尝试轻量级锁
– 以上都失败,尝试自旋锁
– 再失败,尝试普通锁,使用OS互斥量在操作系统层挂起
ThreadLocal及其源码分析
// SimpleDateFormat被多线程访问,锁没有起到原有效果
private static final SimpleDateFormat sdf = new SimpleDateFormat("yyyy-MM-dd HH:mm:ss");
public static class ParseDate implements Runnable{
    int i=0;
    public ParseDate(int i){this.i=i;}
    public void run() {
        try {
            Date t=sdf.parse("2015-03-29 19:29:"+i%60);
            System.out.println(i+":"+t);
        } catch (ParseException e) {
            e.printStackTrace();
        }
    }
}
public static void main(String[] args) {
    ExecutorService es=Executors.newFixedThreadPool(10);
    for(int i=0;i<1000;i++){
        es.execute(new ParseDate(i));
    }
}
// 为每一个线程分配一个实例
static ThreadLocal<SimpleDateFormat> tl=new ThreadLocal<SimpleDateFormat>();
public static class ParseDate implements Runnable{
int i=0;
public ParseDate(int i){this.i=i;}
public void run() {
try {
if(tl.get()==null){
tl.set(new SimpleDateFormat("yyyy-MM-dd HH:mm:ss"));
}
Date t=tl.get().parse("2015-03-29 19:29:"+i%60);
System.out.println(i+":"+t);
} catch (ParseException e) {
e.printStackTrace();
}
}
}
public static void main(String[] args) {
ExecutorService es=Executors.newFixedThreadPool(10);
for(int i=0;i<1000;i++){
es.execute(new ParseDate(i));
}
}14、并发调试
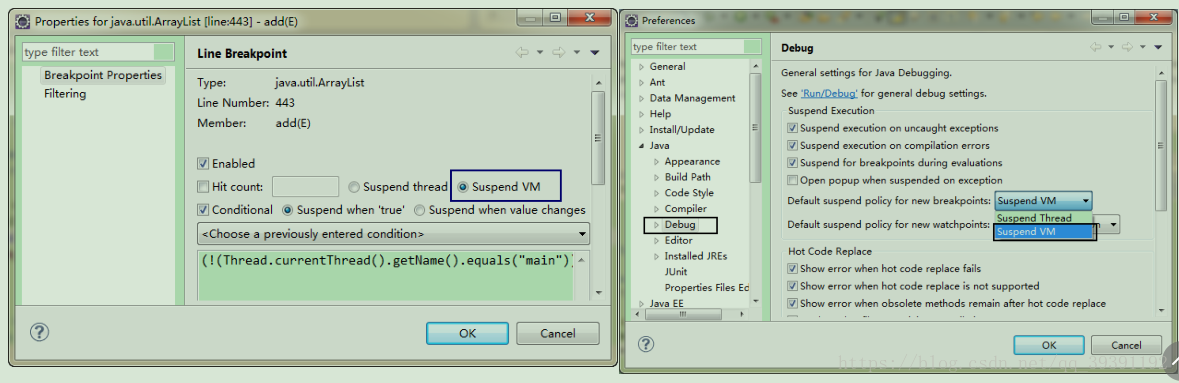
使用Eclipse进行调试。Eclipse中可以设置断点,在断点属性Breakpoint Properties中可以进行各类断点设置,包括挂起单个线程甚至挂起JVM等操作,方便快捷的对并发应用进行调试。
使用命令行调试。使用jsp命令得到JVM端口号,再使用jstack portid得到当前JVM的运行状态。
15、JDK8对并发的新支持
LongAdder
– 和AtomicInteger类似的使用方式
– 在AtomicInteger上进行了热点分离
– public void add(long x)
– public void increment()
– public void decrement()
– public long sum()
– public long longValue()
– public int intValue()
CompletableFuture
– 实现CompletionStage接口(40余个方法)
– Java 8中对Future的增强版
– 支持流式调用
– 完成后得到通知
public static class AskThread implements Runnable {
    CompletableFuture<Integer> re = null;

    public AskThread(CompletableFuture<Integer> re) {
        this.re = re;
    }

    @Override
    public void run() {
        int myRe = 0;
        try {
            myRe = re.get() * re.get();
        } catch (Exception e) {
        }
        System.out.println(myRe);
    }
}

public static void main(String[] args) throws InterruptedException {
    final CompletableFuture<Integer> future = new CompletableFuture<>();
    new Thread(new AskThread(future)).start();
    // 模拟长时间的计算过程
    Thread.sleep(1000);
    // 告知完成结果
    future.complete(60);
}
– 异步执行
public static Integer calc(Integer para) {
    try {
        // 模拟一个长时间的执行
        Thread.sleep(1000);
    } catch (InterruptedException e) {
    }
    return para*para;
}

public static void main(String[] args) throws InterruptedException, ExecutionException {
    final CompletableFuture<Integer> future = CompletableFuture.supplyAsync(() -> calc(50));
    System.out.println(future.get());
}
– 工厂方法
static <U> CompletableFuture<U> supplyAsync(Supplier<U> supplier);
static <U> CompletableFuture<U> supplyAsync(Supplier<U> supplier, Executor executor);
static CompletableFuture<Void> runAsync(Runnable runnable);
static CompletableFuture<Void> runAsync(Runnable runnable, Executor executor);
StampedLock
– 读写锁的改进
– 读不阻塞写
public class Point {
    private double x, y;
    private final StampedLock sl = new StampedLock();

    void move(double deltaX, double deltaY) { // an exclusively locked method
        long stamp = sl.writeLock();
        try {
            x += deltaX;
            y += deltaY;
        } finally {
            sl.unlockWrite(stamp);
        }
    }

    double distanceFromOrigin() { // A read-only method
        long stamp = sl.tryOptimisticRead();
        double currentX = x, currentY = y;
        if (!sl.validate(stamp)) {
            stamp = sl.readLock();
            try {
                currentX = x;
                currentY = y;
            } finally {
                sl.unlockRead(stamp);
            }
        }
        return Math.sqrt(currentX * currentX + currentY * currentY);
    }
}
实现思想:
– CLH自旋锁
– 锁维护一个等待线程队列,所有申请锁,但是没有成功的线程都记录在这个队列中。每一个节点(一个
节点代表一个线程),保存一个标记位(locked),用于判断当前线程是否已经释放锁。
– 当一个线程试图获得锁时,取得当前等待队列的尾部节点作为其前序节点。并使用类似如下代码判断前
序节点是否已经成功释放锁。
– 不会进行无休止的自旋,会在在若干次自旋后挂起线程。
16、jetty分析(偷个懒)
1.new Server()
public Server(@Name("port")int port)
{
this((ThreadPool)null);
ServerConnector connector=new ServerConnector(this);
connector.setPort(port);
setConnectors(new Connector[]{connector});
}
1.1. 初始化线程池
public Server(@Name("threadpool") ThreadPool pool)
{
_threadPool=pool!=null?pool:new QueuedThreadPool();
addBean(_threadPool);
setServer(this);
}
1.1.1.QueuedThreadPool
实现了SizedThreadPool
execute() 方法
@Override
public void execute(Runnable job)
{
if (!isRunning() || !_jobs.offer(job))
{
LOG.warn("{} rejected {}", this, job);
throw new RejectedExecutionException(job.toString());
}
else
{
// Make sure there is at least one thread executing the job.
if (getThreads() == 0)
startThreads(1);
}
}
BlockingQueue
将任务推入
BlockingQueue<Runnable> org.eclipse.jetty.util.thread.QueuedThreadPool._jobs
1.2. 初始化ServerConnector
HTTP connector using NIO ByteChannels and Selectors
继承自 AbstractConnector
1.2.1. 初始化ScheduledExecutorScheduler
based on JDK's {@link ScheduledThreadPoolExecutor}.
1.2.2. 初始化ByteBufferPool
在数据传输过程中,不可避免需要byte数组
buffer池
默认产生 ArrayByteBufferPool
ByteBufferPool 接口有2个方法:
public ByteBuffer acquire(int size, boolean direct);
public void release(ByteBuffer buffer);
这 是一个很好的 对 象池范本
ArrayByteBufferPool
public ArrayByteBufferPool(int minSize, int increment, int maxSize)
public ArrayByteBufferPool()
{
this(0,1024,64*1024);
}
_direct=new Bucket[maxSize/increment];
_indirect=new Bucket[maxSize/increment];
结构
Bucket
_direct Bucket数组
_indirect Bucket数组
为每一个大小,新建一个Bucket
但不初始化ByteBuffer
int size=0;
for (int i=0;i<_direct.length;i++)
{
size+=_inc;
_direct[i]=new Bucket(size);
_indirect[i]=new Bucket(size);
}
一个Bucekt存放 大小相同的所有的ByteBuffer
_size
bytebuffer大小
_queue
public final Queue<ByteBuffer> _queue= new ConcurrentLinkedQueue<>();
acquire
public ByteBuffer acquire(int size, boolean direct)
取得合适的Bucket
每个Bucket的大小不同,这里找到最合适的
Bucket bucket = bucketFor(size,direct);
从Bucket 中取得ByteBuffer
ByteBuffer buffer = bucket==null?null:bucket._queue.poll();
不存在则新建
if (buffer == null)
{
int capacity = bucket==null?size:bucket._size;
buffer = direct ? BufferUtil.allocateDirect(capacity) : BufferUtil.allocate(capacity);
}
release
public void release(ByteBuffer buffer)
{
if (buffer!=null)
{
Bucket bucket = bucketFor(buffer.capacity(),buffer.isDirect());
if (bucket!=null)
{
BufferUtil.clear(buffer);
bucket._queue.offer(buffer);
}
}
}
取得合适的Bucket
Bucket bucket = bucketFor(buffer.capacity(),buffer.isDirect());
清空Buffer
BufferUtil.clear(buffer);
归还Pool
bucket._queue.offer(buffer);
例外处理:
如果申请的ByteBuffer过大或者过小,无法在POOL中满足,则可以申请成功,但无法归还给POOL。
1.2.3. 维护ConnectionFactory
HttpConnectionFactory
用于创建连接,
比如Accept后,需要创建一个表示连接的对象
1.2.4. 取得可用CPU 数量
int cores = Runtime.getRuntime().availableProcessors();
1.2.5. 更新acceptor 数量
if (acceptors < 0)
acceptors=Math.max(1, Math.min(4,cores/8));
1.2.6. 创建acceptor线程组
_acceptors = new Thread[acceptors];
1.2.7. 初始化ServerConnectorManager
继承自 SelectorManager
_manager = new ServerConnectorManager(getExecutor(), getScheduler(),
selectors>0?selectors:Math.max(1,Math.min(4,Runtime.getRuntime().availableProcessors()/2)));
保存selector线程数量
Math.min(4,Runtime.getRuntime().availableProcessors()/2))
1.3. 设 置port
connector.setPort(port);
1.4. 关 联Sever 和Connector
setConnectors(new Connector[]{connector});
2.Server.start()
org.eclipse.jetty.server.Server
启动web服务器
WebAppContext context = new WebAppContext();
context.setContextPath("/");
context.setResourceBase("./web/");
context.setClassLoader(Thread.currentThread().getContextClassLoader());
server.setHandler(context);
server.start();
2.1. 设 置启 动 状 态
AbstractLifeCycle
private void setStarting()
{
if (LOG.isDebugEnabled())
LOG.debug("starting {}",this);
_state = __STARTING;
for (Listener listener : _listeners)
listener.lifeCycleStarting(this);
}
2.2. 启 动过 程doStart()
Server
启动整个server
protected void doStart() throws Exception
{
//If the Server should be stopped when the jvm exits, register
//with the shutdown handler thread.
if (getStopAtShutdown())
ShutdownThread.register(this);
//Register the Server with the handler thread for receiving
//remote stop commands
ShutdownMonitor.register(this);
//Start a thread waiting to receive "stop" commands.
ShutdownMonitor.getInstance().start(); // initialize
LOG.info("jetty-" + getVersion());
HttpGenerator.setJettyVersion(HttpConfiguration.SERVER_VERSION);
MultiException mex=new MultiException();
// check size of thread pool
SizedThreadPool pool = getBean(SizedThreadPool.class);
int max=pool==null?-1:pool.getMaxThreads();
int selectors=0;
int acceptors=0;
if (mex.size()==0)
{
for (Connector connector : _connectors)
{
if (connector instanceof AbstractConnector)
acceptors+=((AbstractConnector)connector).getAcceptors();
if (connector instanceof ServerConnector)
selectors+=((ServerConnector)connector).getSelectorManager().getSelectorCount();
}
}
int needed=1+selectors+acceptors;
if (max>0 && needed>max)
throw new IllegalStateException(String.format("Insufficient threads: max=%d < needed(acceptors=%d +
selectors=%d + request=1)",max,acceptors,selectors));
try
{
super.doStart();
}
catch(Throwable e)
{
mex.add(e);
}
// start connectors last
for (Connector connector : _connectors)
{
try
{
connector.start();
}
catch(Throwable e)
{
mex.add(e);
}
}
if (isDumpAfterStart())
dumpStdErr();
mex.ifExceptionThrow();
LOG.info(String.format("Started @%dms",Uptime.getUptime()));
}
2.2.1. 注册ShutdownMonitor
远程控制接口
//Register the Server with the handler thread for receiving
//remote stop commands
ShutdownMonitor.register(this);
//Start a thread waiting to receive "stop" commands.
ShutdownMonitor.getInstance().start(); // initialize
2.2.2. 获取化线程池
// check size of thread pool
SizedThreadPool pool = getBean(SizedThreadPool.class);
QueuedThreadPool
2.2.3. 设置selector 数量
根据Connector数量进行累计
大部分情况下,只有一个ServerConnector
for (Connector connector : _connectors)
{
if (connector instanceof AbstractConnector)
acceptors+=((AbstractConnector)connector).getAcceptors();
if (connector instanceof ServerConnector)
selectors+=((ServerConnector)connector).getSelectorManager().getSelectorCount();
}
累 计 所有Connector 的需求
2.2.4. 计算所需的所有 线 程数量
int needed=1+selectors+acceptors;
如果大于默 认 的200 则 中断程序
if (max>0 && needed>max)
throw new IllegalStateException(String.format("Insufficient threads: max=%d < needed(acceptors=%d
+ selectors=%d + request=1)",max,acceptors,selectors));
2.2.5. 维护Bean
启 动QueuedThreadPool
参 见: QueuedThreadPool
doStart()
startThreads()
建立需要的线程
创建线程
Thread thread = newThread(_runnable);
_runnable
_jobs中取任务并执行
设置线程的属性
thread.setDaemon(isDaemon());
thread.setPriority(getThreadsPriority());
thread.setName(_name + "-" + thread.getId());
_threads.add(thread);
启动线程
thread.start();
启 动WebAppContext
如果需要使用,在此处启动
2.2.6. 启动Connector
取得ConnectionFactory
_defaultConnectionFactory = getConnectionFactory(_defaultProtocol);
创 建selector 线 程并启 动
for (int i = 0; i < _selectors.length; i++)
{
ManagedSelector selector = newSelector(i);
_selectors[i] = selector;
selector.start();
execute(new NonBlockingThread(selector));
}
newSelector()
protected ManagedSelector newSelector(int id)
{
return new ManagedSelector(id);
}
创建Acceptor 线 程
_stopping=new CountDownLatch(_acceptors.length);
for (int i = 0; i < _acceptors.length; i++)
{
Acceptor a = new Acceptor(i);
addBean(a);
getExecutor().execute(a);
}
Acceptor
设置线程名字
final Thread thread = Thread.currentThread();
String name=thread.getName();
_name=String.format("%s-acceptor-%d@%x-
%s",name,_acceptor,hashCode(),AbstractConnector.this.toString());
thread.setName(_name);
设置优先级
将自己放入_acceptors数组
synchronized (AbstractConnector.this)
{
_acceptors[_acceptor] = thread;
}
监听端口
try
{
while (isAccepting())
{
try
{
accept(_acceptor);
}
catch (Throwable e)
{
if (isAccepting())
LOG.warn(e);
else
LOG.ignore(e);
}
}
}
finally
{
thread.setName(name);
if (_acceptorPriorityDelta!=0)
thread.setPriority(priority);
synchronized (AbstractConnector.this)
{
_acceptors[_acceptor] = null;
}
CountDownLatch stopping=_stopping;
if (stopping!=null)
stopping.countDown();
}
ServerConnector.accept()
public void accept(int acceptorID) throws IOException
{
ServerSocketChannel serverChannel = _acceptChannel;
if (serverChannel != null && serverChannel.isOpen())
{
SocketChannel channel = serverChannel.accept();
accepted(channel);
}
}
在accept的地方等待
没有Acceptor 的情况
channle默认是blocking的
如果acceptor数量为0,没有安排线程专门进行accept,则设置为非阻塞模式
若是非0,有专门线程进行accept,因此,为阻塞模式
protected void doStart() throws Exception
{
super.doStart();
if (getAcceptors()==0)
{
_acceptChannel.configureBlocking(false);
_manager.acceptor(_acceptChannel);
}
}
2.3. 启动完毕
AbstractLifeCycle
private void setStarted()
{
_state = __STARTED;
if (LOG.isDebugEnabled())
LOG.debug(STARTED+" @{}ms {}",Uptime.getUptime(),this);
for (Listener listener : _listeners)
listener.lifeCycleStarted(this);
}
3.Http请求
3.1.Accept成功
private void accepted(SocketChannel channel) throws IOException
{
channel.configureBlocking(false);
Socket socket = channel.socket();
configure(socket);
_manager.accept(channel);
}
17
3.1.1. 设 置 为 非阻塞模式
channel.configureBlocking(false);
3.1.2. 配置Socket
Socket socket = channel.socket();
configure(socket);
3.1.3. 正式处理
SelectorManager _manager;
_manager.accept(channel);
选择可用的ManagedSelector线程
private ManagedSelector chooseSelector()
{
// The ++ increment here is not atomic, but it does not matter,
// so long as the value changes sometimes, then connections will
// be distributed over the available selectors.
long s = _selectorIndex++;
int index = (int)(s % getSelectorCount());
return _selectors[index];
}
ManagedSelector 处 理
ManagedSelector 是一个线程
封装了Selector 的使用
提交任务
selector.submit(selector.new Accept(channel, attachment));
提交这个处理任务到ManagedSelector:
private final Queue<Runnable> _changes = new ConcurrentArrayQueue<>();
_changes.offer(change);
ConcurrentArrayQueue
与ConcurrentLinkedQueue相似的性能,但直接保存元素
而不是node,因此需要更少的对象,更少的GC
3.2. 请 求 处 理
3.2.1.ManagedSelector.run()
while (isRunning())
select();
select()
发现有任务就执行
runChanges();
runChanges()
参见: 提交任务
private void runChanges()
{
Runnable change;
while ((change = _changes.poll()) != null)
runChange(change);
}
runChange()
change.run();
Accept.run
SelectionKey key = channel.register(_selector, 0, attachment);
EndPoint endpoint = createEndPoint(channel, key);
key.attach(endpoint);
select()
int selected = _selector.select();
处理SelectionKey
Set<SelectionKey> selectedKeys = _selector.selectedKeys();
for (SelectionKey key : selectedKeys)
{
if (key.isValid())
{
processKey(key);
}
else
{
if (debug)
LOG.debug("Selector loop ignoring invalid key for channel {}", key.channel());
Object attachment = key.attachment();
if (attachment instanceof EndPoint)
((EndPoint)attachment).close();
}
}
selectedKeys.clear();
processKey()
private void processKey(SelectionKey key)
{
Object attachment = key.attachment();
try
{
if (attachment instanceof SelectableEndPoint)
{
((SelectableEndPoint)attachment).onSelected();
}
else if (key.isConnectable())
{
processConnect(key, (Connect)attachment);
}
else if (key.isAcceptable())
{
processAccept(key);
}
else
{
throw new IllegalStateException();
}
}
catch (CancelledKeyException x)
{
LOG.debug("Ignoring cancelled key for channel {}", key.channel());
if (attachment instanceof EndPoint)
closeNoExceptions((EndPoint)attachment);
}
catch (Throwable x)
{
LOG.warn("Could not process key for channel " + key.channel(), x);
if (attachment instanceof EndPoint)
closeNoExceptions((EndPoint)attachment);
}
}
onSelected()
@Override
public void onSelected()
{
assert _selector.isSelectorThread();
int oldInterestOps = _key.interestOps();
int readyOps = _key.readyOps();
int newInterestOps = oldInterestOps & ~readyOps;
setKeyInterests(oldInterestOps, newInterestOps);
updateLocalInterests(readyOps, false);
if (_key.isReadable())
getFillInterest().fillable();
if (_key.isWritable())
getWriteFlusher().completeWrite();
}
会使用新的线程进行HTTP业务处理 (提交到线程池)
如果看起来不方便的话最后一节可以关注我们的公众号:落饼枫林,发送 jetty分析 获取源pdf文件。

欢迎加入我们一起讨论,后期会有更多的资料发上来。
最后,感谢 炼数成金 的学习资料,让我整理这份博客。