一、JMS入门
1.1 JMS简介
JMS是Java平台上有关面向消息中间件的技术规范,它本身只定义了一系列的接口规范,是一种与厂商无关的API,用来访问消息收发系统。消息是JMS中的一种类型对象,由两部分组成:报头和消息主体。报头由路由信息以及有关该消息的元数据组成。消息主体则携带者应用程序的数据或有效负载。
JMS定义了五中不同的消息正文格式,以及调用的消息类型,允许你发送并接受一些不同形式的数据,提供现有消息格式的一些级别的兼容性。
- TextMessage:一个字符串对象
- MapMessage:一套名称值对
- ObjectMessage:一个序列化的Java对象
- ByteMessage:一个字节的数据流
- StreamMessage:Java原始的数据流
JMS消息传递类型:
一种是点对点的,就是一个生产者和一个消费者一一对应

另一种是发布/订阅模式,就是一个生产者产生消息并进行发送后,可以由多个消费者进行接收。

1.2 消息中间件
消息中间件利用高效可靠的消息传递机制进行平台无关的数据交流,并基于数据通信来进行分布式系统的集成。通过提供消息传递和消息排队模型,它可以在分布式环境下扩展进程间的通信。对于消息中间件,常见的角色就有Producer(生产者)、Consumer(消费者)。
常见的消息中间件产品:ActiveMQ、RabbitMQ、ZeroMQ、Kafka。
本次讲解使用ActiveMQ。
1.3 ActiveMQ下载与安装
1.下载
官网:http://activemq.apache.org/
2.安装(Linux)
- 将安装包 apache-activemq-5.12.0-bin.tar.gz上传至服务器
- 解压安装包:tar zxvf apache-activemq-5.12.0-bin.tar.gz
- 为解压后的目录赋权:chmod 777 apache-activemq-5.12.0
- 进入apache-activemq-5.12.0\bin目录启动:./activemq start

如上图启动成功。
访问自己服务器中的的服务,我的是:http://192.168.25.128:8161

点击红色箭头位置登录,账号密码均为admin
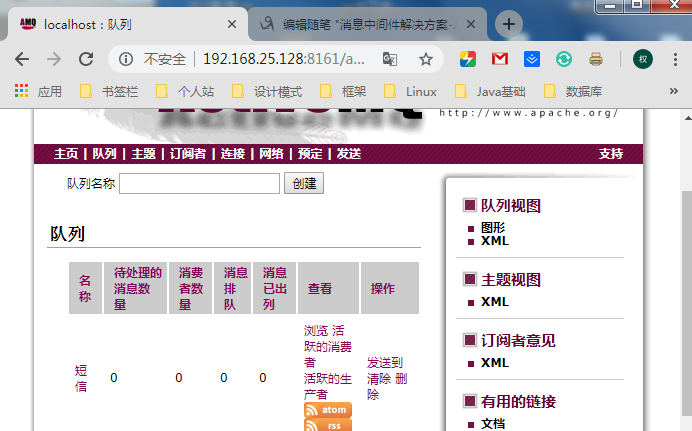
因为我使用的是chrome浏览器,页面回自动翻译成为中文,正常我们看到的是英文的界面。
二、JMS入门Demo
2.1 点对点模式
点对点的模式主要建立在一个队列上面,当连接一个队列的时候,发送端不需要知道接收端是否在接收,可以直接向ActiveMQ发送消息,发送的消息,会先进入队列中,如果有接收端在监听,则会发向接收端,如果没有接收端接收,则会保存在ActiveMQ服务器,直到接收端接收消息,点对点的消息模式可以由多个发送端,多个接收端,但是一条消息只会被一个接收端给接收到,哪个接收端先连上ActiveMQ,则会先接收到,后面的接收端则接收不到消息。
案例:向mq发送一条消息
1.搭建maven工程并导入坐标依赖
1         <dependency>
2             <groupId>org.apache.activemq</groupId>
3             <artifactId>activemq-client</artifactId>
4             <version>5.13.4</version>
5         </dependency>
2.创建消息生产者:QueueProducer
 1 public class QueueProducer {
 2     public static void main(String[] args) {
 3         // 1.创建连接工厂,我们前面输入的客户端的接收端口号是8161,现在使用的服务端端口号是61616
 4         ActiveMQConnectionFactory connectionFactory =
 5                 new ActiveMQConnectionFactory("tcp://192.168.25.128:61616");
 6         // 预定义对象
 7         Connection connection = null;
 8         Session session = null;
 9         MessageProducer producer = null;
10         try {
11             // 2.获取连接
12             connection = connectionFactory.createConnection();
13             // 3.启动连接
14             connection.start();
15             // 4.获取session(参数1:是否启动事务,参数2:消息确认模式)
16             // 消息确认模式:AUTO_ACKNOWLEDGE = 1 自动确认,CLIENT_ACKNOWLEDGE = 2 客户端手动确认
17             // DUPS_OK_ACKNOWLEDGE = 3 自动批量确认,SESSION_TRANSACTED = 0 事务提交并确认
18             session = connection.createSession(false, Session.AUTO_ACKNOWLEDGE);
19             // 5.创建队列对象
20             Queue queue = session.createQueue("test-queue");
21             // 6.创建消息生产者
22             producer = session.createProducer(queue);
23             // 7.创建消息
24             TextMessage textMessage = session.createTextMessage("吃了么?");
25             // 8.发送消息
26             producer.send(textMessage);
27         } catch (JMSException e) {
28             e.printStackTrace();
29         } finally {
30             // 9.关闭资源
31             try {
32                 if (producer!=null){
33                     producer.close();
34                 }
35                 if (session!=null){
36                     session.close();
37                 }
38                 if (connection!=null){
39                     connection.close();
40                 }
41             } catch (JMSException e) {
42                 e.printStackTrace();
43             }
44         }
45     }
46 }
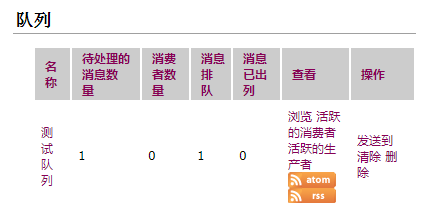
3.运行main方法 -- 查询ActiveMQ界面如下
4.创建消息消费者:QueueConsumer
 1 public class QueueConsumer {
 2     public static void main(String[] args) {
 3         // 1.创建连接工厂,我们前面输入的客户端的接收端口号是8161,现在使用的服务端端口号是61616
 4         ActiveMQConnectionFactory connectionFactory =
 5                 new ActiveMQConnectionFactory("tcp://192.168.25.128:61616");
 6         // 预定义对象
 7         Connection connection = null;
 8         Session session = null;
 9         MessageConsumer consumer = null;
10         try {
11             // 2.获取连接
12             connection = connectionFactory.createConnection();
13             // 3.启动连接
14             connection.start();
15             // 4.获取session(参数1:是否启动事务,参数2:消息确认模式)
16             // 消息确认模式:AUTO_ACKNOWLEDGE = 1 自动确认,CLIENT_ACKNOWLEDGE = 2 客户端手动确认
17             // DUPS_OK_ACKNOWLEDGE = 3 自动批量确认,SESSION_TRANSACTED = 0 事务提交并确认
18             session = connection.createSession(false, Session.AUTO_ACKNOWLEDGE);
19             // 5.创建队列对象
20             Queue queue = session.createQueue("test-queue");
21             // 6.创建消息消费者
22             consumer = session.createConsumer(queue);
23             // 7.监听消息
24             consumer.setMessageListener(new MessageListener() {
25                 @Override
26                 public void onMessage(Message message) {
27                     TextMessage textMessage = (TextMessage) message;
28                     try {
29                         System.out.println("接收到消息:"+textMessage.getText());
30                     } catch (JMSException e) {
31                         e.printStackTrace();
32                     }
33                 }
34             });
35             // 8.等待键盘输入 -- 为了不让程序终止,始终进行监听
36             System.in.read();
37         } catch (JMSException e) {
38             e.printStackTrace();
39         } catch (IOException e) {
40             e.printStackTrace();
41         } finally {
42             // 9.关闭资源
43             try {
44                 if (consumer != null) {
45                     consumer.close();
46                 }
47                 if (session != null) {
48                     session.close();
49                 }
50                 if (connection != null) {
51                     connection.close();
52                 }
53             } catch (JMSException e) {
54                 e.printStackTrace();
55             }
56         }
57     }
58 }
执行后控制台输出:

5.测试
同时开启两个以上的消费者,再次运行生产者,观察每个消费者控制台的输出,会发现只有一个消费者会接收到消息。
2.2 发布订阅模式
1.创建消息生产者:TopicProducer
与点对点模式不一样的部分代码如下:
1     // 5.创建队列对象
2     Topic topic = session.createTopic("test-topic");
3     // 6.创建消息生产者
4     producer = session.createProducer(topic);
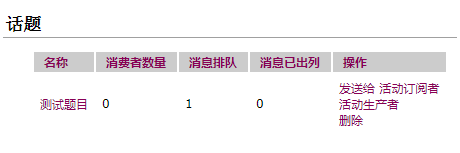
运行效果如下:
2.创建消息消费者:TopicConsumer
与点对点模式不一样部分代码如下:
1     // 5.创建主题对象
2     Topic topic = session.createTopic("test-topic");
3     // 6.创建消息消费者
4     consumer = session.createConsumer(topic);
执行消息消费者的main方法,会发现控制台无输出内容,这是因为发布订阅模式的情况下要想接收到消息需先启动消息消费者,再启动消息生产者。
3.测试
首先同时开启两个以上的消费者,再次运行生产者,发现每个消费者都会接收到消息。
三、Spring整合JMS
3.1 点对点模式
1.消息生产者
- 创建工程spring-jms-producer,pom.xml中引入SpringJms、activeMQ以及Spring核心配置、测试等相关依赖


 1 <?xml version="1.0" encoding="UTF-8"?>
 2 <project xmlns="http://maven.apache.org/POM/4.0.0"
 3          xmlns:xsi="http://www.w3.org/2001/XMLSchema-instance"
 4          xsi:schemaLocation="http://maven.apache.org/POM/4.0.0 http://maven.apache.org/xsd/maven-4.0.0.xsd">
 5     <modelVersion>4.0.0</modelVersion>
 6
 7     <groupId>com.buwei</groupId>
 8     <artifactId>spring-jms-producer</artifactId>
 9     <version>1.0-SNAPSHOT</version>
10
11     <!-- 集中定义依赖版本号 -->
12     <properties>
13         <junit.version>4.12</junit.version>
14         <spring.version>4.2.4.RELEASE</spring.version>
15         <mysql.version>5.1.32</mysql.version>
16         <activemq.version>5.11.2</activemq.version>
17     </properties>
18
19     <dependencies>
20         <!-- Spring -->
21         <dependency>
22             <groupId>org.springframework</groupId>
23             <artifactId>spring-context</artifactId>
24             <version>${spring.version}</version>
25         </dependency>
26         <dependency>
27             <groupId>org.springframework</groupId>
28             <artifactId>spring-beans</artifactId>
29             <version>${spring.version}</version>
30         </dependency>
31         <dependency>
32             <groupId>org.springframework</groupId>
33             <artifactId>spring-webmvc</artifactId>
34             <version>${spring.version}</version>
35         </dependency>
36         <dependency>
37             <groupId>org.springframework</groupId>
38             <artifactId>spring-jdbc</artifactId>
39             <version>${spring.version}</version>
40         </dependency>
41         <dependency>
42             <groupId>org.springframework</groupId>
43             <artifactId>spring-aspects</artifactId>
44             <version>${spring.version}</version>
45         </dependency>
46         <dependency>
47             <groupId>org.springframework</groupId>
48             <artifactId>spring-jms</artifactId>
49             <version>${spring.version}</version>
50         </dependency>
51         <dependency>
52             <groupId>org.springframework</groupId>
53             <artifactId>spring-context-support</artifactId>
54             <version>${spring.version}</version>
55         </dependency>
56         <dependency>
57             <groupId>org.springframework</groupId>
58             <artifactId>spring-test</artifactId>
59             <version>${spring.version}</version>
60         </dependency>
61         <dependency>
62             <groupId>org.apache.activemq</groupId>
63             <artifactId>activemq-client</artifactId>
64             <version>5.13.4</version>
65         </dependency>
66         <dependency>
67             <groupId>org.apache.activemq</groupId>
68             <artifactId>activemq-all</artifactId>
69             <version>${activemq.version}</version>
70         </dependency>
71         <dependency>
72             <groupId>junit</groupId>
73             <artifactId>junit</artifactId>
74             <version>${junit.version}</version>
75             <scope>test</scope>
76         </dependency>
77     </dependencies>
78 </project>
- 1.创建Spring配置文件:applicationContext-jms-producer-queue.xml
 1 <?xml version="1.0" encoding="UTF-8"?>
 2 <beans xmlns="http://www.springframework.org/schema/beans"
 3        xmlns:context="http://www.springframework.org/schema/context"
 4        xmlns:xsi="http://www.w3.org/2001/XMLSchema-instance"
 5        xmlns:amq="http://activemq.apache.org/schema/core"
 6        xmlns:jms="http://www.springframework.org/schema/jms"
 7        xsi:schemaLocation="http://www.springframework.org/schema/beans
 8         http://www.springframework.org/schema/beans/spring-beans.xsd
 9         http://www.springframework.org/schema/context
10         http://www.springframework.org/schema/context/spring-context.xsd">
11
12     <!--包扫描-->
13     <context:component-scan base-package="com.buwei"></context:component-scan>
14
15     <!-- 真正可以产生Connection的ConnectionFactory,由对应的 JMS服务厂商提供-->
16     <bean id="targetConnectionFactory" class="org.apache.activemq.ActiveMQConnectionFactory">
17         <property name="brokerURL" value="tcp://192.168.25.128:61616"/>
18     </bean>
19     <!-- Spring用于管理真正的ConnectionFactory的ConnectionFactory -->
20     <bean id="connectionFactory" class="org.springframework.jms.connection.SingleConnectionFactory">
21         <!-- 目标ConnectionFactory对应真实的可以产生JMS Connection的ConnectionFactory -->
22         <property name="targetConnectionFactory" ref="targetConnectionFactory"/>
23     </bean>
24     <!-- Spring提供的JMS工具类,它可以进行消息发送、接收等 -->
25     <bean id="jmsTemplate" class="org.springframework.jms.core.JmsTemplate">
26         <!-- 这个connectionFactory对应的是我们定义的Spring提供的那个ConnectionFactory对象 -->
27         <property name="connectionFactory" ref="connectionFactory"/>
28     </bean>
29     <!--这个是队列目的地,点对点的  文本信息-->
30     <bean id="queueTextDestination" class="org.apache.activemq.command.ActiveMQQueue">
31         <constructor-arg value="jms-queue"/>
32     </bean>
33 </beans>
- 创建消息生产者类:QueueProducer
 1 @Component
 2 public class QueueProducer {
 3     @Autowired
 4     private JmsTemplate jmsTemplate;
 5
 6     @Autowired // 注意Destination是javax.jms.Destination;
 7     private Destination queueTextDestination;
 8
 9     /**
10      * 点对点方式发送文本信息
11      * @param message
12      */
13     public void sendTestMessage(final String message){
14         jmsTemplate.send(queueTextDestination, new MessageCreator() {
15             @Override
16             public Message createMessage(Session session) throws JMSException {
17                 return session.createTextMessage(message);
18             }
19         });
20     }
21 }
- 单元测试类,TestQueueProducer
 1 @RunWith(SpringJUnit4ClassRunner.class)
 2 @ContextConfiguration(locations = "classpath:applicationContext-jms-producer-queue.xml")
 3 public class TestQueueProducer {
 4
 5     @Autowired
 6     private QueueProducer queueProducer;
 7
 8     @Test
 9     public void testQueueSend(){
10         queueProducer.sendTestMessage("SpringJms-点对点模式,吃了嘛?");
11     }
12 }
2.消息消费者
- 创建工程spring-jms-consumer,pom文件中依赖同上一个工程
- 创建消息监听者 - - MyMessageListenerQueue
 1 public class MyMessageListenerQueue implements MessageListener {
 2     @Override
 3     public void onMessage(Message message) {
 4         TextMessage textMessage = (TextMessage)message;
 5         try {
 6             System.out.println("接收到新消息"+textMessage.getText());
 7         } catch (JMSException e) {
 8             e.printStackTrace();
 9         }
10     }
11 }
- 创建配置文件:applicationContext-jms-consumer-queue.xml
 1 <?xml version="1.0" encoding="UTF-8"?>
 2 <beans xmlns="http://www.springframework.org/schema/beans"
 3        xmlns:context="http://www.springframework.org/schema/context"
 4        xmlns:xsi="http://www.w3.org/2001/XMLSchema-instance"
 5        xmlns:amq="http://activemq.apache.org/schema/core"
 6        xmlns:jms="http://www.springframework.org/schema/jms"
 7        xsi:schemaLocation="http://www.springframework.org/schema/beans
 8         http://www.springframework.org/schema/beans/spring-beans.xsd
 9         http://www.springframework.org/schema/context
10         http://www.springframework.org/schema/context/spring-context.xsd">
11
12     <!--包扫描-->
13     <context:component-scan base-package="com.buwei"></context:component-scan>
14
15     <!-- 真正可以产生Connection的ConnectionFactory,由对应的 JMS服务厂商提供-->
16     <bean id="targetConnectionFactory" class="org.apache.activemq.ActiveMQConnectionFactory">
17         <property name="brokerURL" value="tcp://192.168.25.128:61616"/>
18     </bean>
19     <!-- Spring用于管理真正的ConnectionFactory的ConnectionFactory -->
20     <bean id="connectionFactory" class="org.springframework.jms.connection.SingleConnectionFactory">
21         <!-- 目标ConnectionFactory对应真实的可以产生JMS Connection的ConnectionFactory -->
22         <property name="targetConnectionFactory" ref="targetConnectionFactory"/>
23     </bean>
24     <!-- Spring提供的JMS工具类,它可以进行消息发送、接收等 -->
25     <bean id="jmsTemplate" class="org.springframework.jms.core.JmsTemplate">
26         <!-- 这个connectionFactory对应的是我们定义的Spring提供的那个ConnectionFactory对象 -->
27         <property name="connectionFactory" ref="connectionFactory"/>
28     </bean>
29
30     <!--这个是消息目的地,点对点的  文本信息-->
31     <bean id="queueTextDestination" class="org.apache.activemq.command.ActiveMQQueue">
32         <constructor-arg value="jms-queue"/>
33     </bean>
34     <!--我的监听类-->
35     <bean id="myMessageListenerQueue" class="com.buwei.MyMessageListenerQueue"></bean>
36     <!--消息监听容器-->
37     <bean class="org.springframework.jms.listener.DefaultMessageListenerContainer">
38         <property name="connectionFactory" ref="connectionFactory" />
39         <property name="destination" ref="queueTextDestination" />
40         <property name="messageListener" ref="myMessageListenerQueue" />
41     </bean>
42 </beans>
- 单元测试类,TestQueueConsumer
 1 @RunWith(SpringJUnit4ClassRunner.class)
 2 @ContextConfiguration(locations = "classpath:applicationContext-jms-consumer-queue.xml")
 3 public class TestQueueConsumer {
 4
 5     @Test
 6     public void testQueueReceive(){
 7         try {
 8             System.in.read();
 9         } catch (IOException e) {
10             e.printStackTrace();
11         }
12     }
13 }
测试:分别执行TestQueueProducer和TestQueueConsumer中的测试方法(先后顺序没有关系),控制台打印接收到的消息

3.2 发布订阅模式
1.消息生产者
- 在工程spring-jms-producer中创建配置文件:applicationContext-jms-producer-topic.xml
 1 <?xml version="1.0" encoding="UTF-8"?>
 2 <beans xmlns="http://www.springframework.org/schema/beans"
 3        xmlns:context="http://www.springframework.org/schema/context"
 4        xmlns:xsi="http://www.w3.org/2001/XMLSchema-instance"
 5        xmlns:amq="http://activemq.apache.org/schema/core"
 6        xmlns:jms="http://www.springframework.org/schema/jms"
 7        xsi:schemaLocation="http://www.springframework.org/schema/beans
 8         http://www.springframework.org/schema/beans/spring-beans.xsd
 9         http://www.springframework.org/schema/context
10         http://www.springframework.org/schema/context/spring-context.xsd">
11
12     <!--包扫描-->
13     <context:component-scan base-package="com.buwei"></context:component-scan>
14
15     <!-- 真正可以产生Connection的ConnectionFactory,由对应的 JMS服务厂商提供-->
16     <bean id="targetConnectionFactory" class="org.apache.activemq.ActiveMQConnectionFactory">
17         <property name="brokerURL" value="tcp://192.168.25.128:61616"/>
18     </bean>
19     <!-- Spring用于管理真正的ConnectionFactory的ConnectionFactory -->
20     <bean id="connectionFactory" class="org.springframework.jms.connection.SingleConnectionFactory">
21         <!-- 目标ConnectionFactory对应真实的可以产生JMS Connection的ConnectionFactory -->
22         <property name="targetConnectionFactory" ref="targetConnectionFactory"/>
23     </bean>
24     <!-- Spring提供的JMS工具类,它可以进行消息发送、接收等 -->
25     <bean id="jmsTemplate" class="org.springframework.jms.core.JmsTemplate">
26         <!-- 这个connectionFactory对应的是我们定义的Spring提供的那个ConnectionFactory对象 -->
27         <property name="connectionFactory" ref="connectionFactory"/>
28     </bean>
29     <!--这个是订阅模式 文本信息-->
30     <bean id="topicTextDestination" class="org.apache.activemq.command.ActiveMQTopic">
31         <constructor-arg value="jms-topic"/>
32     </bean>
33 </beans>
- 创建消息生产者类:TopicProducer
 1 @Component
 2 public class TopicProducer {
 3     @Autowired
 4     private JmsTemplate jmsTemplate;
 5
 6     @Autowired // 注意Destination是javax.jms.Destination;
 7     private Destination topicTextDestination;
 8
 9     /**
10      * 发布订阅方式发送
11      * @param message
12      */
13     public void sendTestMessage(final String message){
14         jmsTemplate.send(topicTextDestination, new MessageCreator() {
15             @Override
16             public Message createMessage(Session session) throws JMSException {
17                 return session.createTextMessage(message);
18             }
19         });
20     }
21 }
- 单元测试类,TestTopicProducer
 1 @RunWith(SpringJUnit4ClassRunner.class)
 2 @ContextConfiguration(locations= "classpath:applicationContext-jms-producer-topic.xml ")
 3 public class TestTopicProducer {
 4     @Autowired
 5     private TopicProducer topicProducer;
 6
 7     @Test
 8     public void  testTopicSend(){
 9         topicProducer.sendTestMessage("SpringJms-发布订阅模式,吃好了");
10     }
11 }
2.消息消费者
- 在工程spring-jms-consumer中创建消息监听者 - - MyMessageListenerTopic
 1 public class MyMessageListenerTopic implements MessageListener {
 2     @Override
 3     public void onMessage(Message message) {
 4         TextMessage textMessage = (TextMessage)message;
 5         try {
 6             System.out.println("接收到新消息"+textMessage.getText());
 7         } catch (JMSException e) {
 8             e.printStackTrace();
 9         }
10     }
11 }
- 在工程spring-jms-consumer中创建配置文件:applicationContext-jms-consumer-topic.xml
 1 <?xml version="1.0" encoding="UTF-8"?>
 2 <beans xmlns="http://www.springframework.org/schema/beans"
 3        xmlns:context="http://www.springframework.org/schema/context"
 4        xmlns:xsi="http://www.w3.org/2001/XMLSchema-instance"
 5        xmlns:amq="http://activemq.apache.org/schema/core"
 6        xmlns:jms="http://www.springframework.org/schema/jms"
 7        xsi:schemaLocation="http://www.springframework.org/schema/beans
 8         http://www.springframework.org/schema/beans/spring-beans.xsd
 9         http://www.springframework.org/schema/context
10         http://www.springframework.org/schema/context/spring-context.xsd">
11
12     <!--包扫描-->
13     <context:component-scan base-package="com.buwei"></context:component-scan>
14
15     <!-- 真正可以产生Connection的ConnectionFactory,由对应的 JMS服务厂商提供-->
16     <bean id="targetConnectionFactory" class="org.apache.activemq.ActiveMQConnectionFactory">
17         <property name="brokerURL" value="tcp://192.168.25.128:61616"/>
18     </bean>
19     <!-- Spring用于管理真正的ConnectionFactory的ConnectionFactory -->
20     <bean id="connectionFactory" class="org.springframework.jms.connection.SingleConnectionFactory">
21         <!-- 目标ConnectionFactory对应真实的可以产生JMS Connection的ConnectionFactory -->
22         <property name="targetConnectionFactory" ref="targetConnectionFactory"/>
23     </bean>
24     <!-- Spring提供的JMS工具类,它可以进行消息发送、接收等 -->
25     <bean id="jmsTemplate" class="org.springframework.jms.core.JmsTemplate">
26         <!-- 这个connectionFactory对应的是我们定义的Spring提供的那个ConnectionFactory对象 -->
27         <property name="connectionFactory" ref="connectionFactory"/>
28     </bean>
29     <!--这个消息目的地,发布订阅的,文本信息-->
30     <bean id="topicTextDestination"  class="org.apache.activemq.command.ActiveMQTopic">
31         <constructor-arg value="jms-topic"/>
32     </bean>
33     <!--我的监听类-->
34     <bean id="myMessageListenerTopic" class="com.buwei.MyMessageListenerTopic"></bean>
35     <!--消息监听容器-->
36     <bean class="org.springframework.jms.listener.DefaultMessageListenerContainer">
37         <property name="connectionFactory" ref="connectionFactory" />
38         <property name="destination" ref="topicTextDestination" />
39         <property name="messageListener" ref="myMessageListenerTopic" />
40     </bean>
41 </beans>
- 单元测试类,TestTopicConsumer
 1 @RunWith(SpringJUnit4ClassRunner.class)
 2 @ContextConfiguration(locations = "classpath:applicationContext-jms-consumer-topic.xml")
 3 public class TestTopicConsumer {
 4
 5     @Test
 6     public void testTopicReceive(){
 7         try {
 8             System.in.read();
 9         } catch (IOException e) {
10             e.printStackTrace();
11         }
12     }
13 }
测试:分别执行TestTopicProducer和TestTopicConsumer中的测试方法(消费者中的测试方法要先执行),控制台打印接收到的消息

同时执行多个消息消费者工程,再执行消息生产者工程,查看控制台都可以打印出消息。