上一节通过一个小例子分析了Timer运行过程,牵涉的执行线程虽然只有两个,但实际场景会比上面复杂一些。
首先通过一张简单类图(只列出简单的依赖关系)看一下Timer暴露的接口。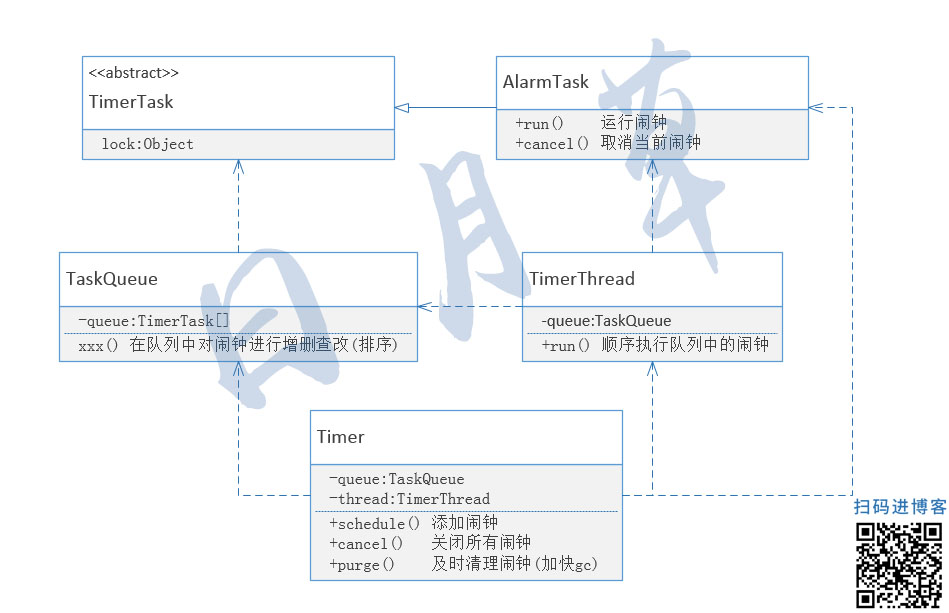
为了演示Timer所暴露的接口,下面举一个极端的例子(每一个接口方法面向单独的执行线程),照样以闹钟为例(源码只列出关键部分,下同)。
public class ScheduleDemo {

    public static void main(String[] args) throws Exception {
        AlarmTask alarm1 = new AlarmTask("闹钟1");
        AlarmTask alarm2 = new AlarmTask("闹钟2");
        new Thread("线程1"){
            public void run() {
                log.info("["+Thread.currentThread().getName()+"]调度闹钟1");
                timer.schedule(alarm1,delay,period);
            }
        }.start();
        new Thread("线程2"){
            public void run() {
                log.info("["+Thread.currentThread().getName()+"]调度闹钟2");
                timer.schedule(alarm2,delay,period);
            }
        }.start();
        Thread.sleep(1500);
        new Thread("线程3"){
            public void run() {
                log.info("["+Thread.currentThread().getName()+"]取消闹钟2");
                alarm2.cancel();
            }
        }.start();
        new Thread("线程4"){
            public void run() {
                log.info("["+Thread.currentThread().getName()+"]清理无用闹钟");
                timer.purge();
            }
        }.start();
        new Thread("线程5"){
            public void run() {
                log.info("["+Thread.currentThread().getName()+"]关闭所有闹钟");
                timer.cancel();
            }
        }.start();
    }

    /**
     *     模拟闹钟
     */
    static class AlarmTask extends TimerTask{
        String name ;
        public AlarmTask(String name){
            this.name=name;
        }
        public void run() {
            log.info("["+Thread.currentThread().getName()+"]-["+name+"]嘀。。。");
            Thread.sleep(1000); //模拟闹钟执行时间
        }
    }
}
执行结果
[线程2]调度闹钟2
[线程1]调度闹钟1
[Timer-0]-[闹钟2]嘀。。。
[线程3]取消闹钟2
[线程4]清理无用闹钟
[线程5]关闭所有闹钟
下面我们依次查看一下每个接口方法的源码。
1. 查看Timer.sched()源码
public void schedule(TimerTask task, long delay, long period) {
    sched(task, System.currentTimeMillis()+delay, -period);
}

private void sched(TimerTask task, long time, long period) {
    // 如果period无限大,保证其在一个合理的范围内
    if (Math.abs(period) > (Long.MAX_VALUE >> 1))
        period >>= 1;
    // 加queue锁,保证队列操作的线程安全
    synchronized(queue) {
        // 加lock锁,保证任务状态的一致性(多线程环境下)
        synchronized(task.lock) {
            task.nextExecutionTime = time;
            task.period = period;
            task.state = TimerTask.SCHEDULED;
        }
        // 将任务加入队列实现排序
        queue.add(task);
        if (queue.getMin() == task)
            queue.notify();
    }
}
其中queue.add(task在)将任务加入队列的同时实现了内部排序。

void add(TimerTask task) {
    // 队列不足时,以两倍容量扩增
    if (size + 1 == queue.length)
        // 从性能上要快于new一个数组的效率
        queue = Arrays.copyOf(queue, 2 * queue.length);
    queue[++size] = task;
    // 利用二分查找算法实现任务排序
    fixUp(size);
}

private void fixUp(int k) {
    while (k > 1) {
        int j = k >> 1;
        if (queue[j].nextExecutionTime <= queue[k].nextExecutionTime)
            break;
        TimerTask tmp = queue[j];  queue[j] = queue[k]; queue[k] = tmp;
        k = j;
    }
}
从方法sched()可以看到,该方法一方面持有queue锁,用来维护队列排序的线程安全;一方面持有lock锁,用来维护任务状态的线程安全。
2. 查看TimerTask.cancel()源码
public abstract class TimerTask implements Runnable {

    final Object lock = new Object();

    public boolean cancel() {
        synchronized(lock) {
            boolean result = (state == SCHEDULED);
            state = CANCELLED;
            return result;
        }
    }
对于任务的取消操作,只是简单的修改一下任务状态,中途也只占有一个lock锁!接着看一下执行任务的线程逻辑。
class TimerThread extends Thread {

    private TaskQueue queue;

    public void run() {
       mainLoop();
    }

    private void mainLoop() {
        while (true) {
                synchronized(queue) {
                    while (queue.isEmpty() && newTasksMayBeScheduled)
                        queue.wait();
                    task = queue.getMin();
                    // 此处加task锁,防止其他线程同时调用task.cancel()
                    synchronized(task.lock) {
                      // ...维护闹钟状态
                    }
                  }
                  if (!taskFired) // 时间未到
                    queue.wait(executionTime - currentTime);
                }
                if (taskFired)
                    // 执行闹钟时,没有保持任何锁
                    task.run();
        }
    }
可以看到当TimerThead真正执行闹钟时,是没有持锁的,所以当闹钟正在运行的时候AlarmTask.cancel()对其是不起作用的,换言之,只能取消下一次将要执行的闹钟。
3. 查看Timer.purge()源码
public class Timer {

    private final TaskQueue queue = new TaskQueue();

    // 保证被取消的task能及时进行垃圾回收
    public int purge() {
        int result = 0;
        synchronized(queue) {
            for (int i = queue.size(); i > 0; i--) {
                if (queue.get(i).state == TimerTask.CANCELLED) {
                    queue.quickRemove(i);
                    result++;
                }
            }
            if (result != 0)
                // 重新整理队列中有效的任务
                queue.heapify();
        }
        return result;
    }
进一步查看queue.quickRemove(i)和queue.heapify()。
class TaskQueue {

    void quickRemove(int i) {
        queue[i] = queue[size];
        queue[size--] = null;  //清除无效任务,防止内存泄漏
    }

    private void fixDown(int k) {
        int j;
        while ((j = k << 1) <= size && j > 0) {
            if (j < size &&
                    queue[j].nextExecutionTime > queue[j+1].nextExecutionTime)
                j++; // j indexes smallest kid
            if (queue[k].nextExecutionTime <= queue[j].nextExecutionTime)
                break;
            TimerTask tmp = queue[j];  queue[j] = queue[k]; queue[k] = tmp;
            k = j;
        }
    }

    void heapify() {
        for (int i = size/2; i >= 1; i--)
            fixDown(i);
    }
可以看到Timer.purge()在持有queue锁时主要做两件事
1.及时清除队列中无效的闹钟防止内存泄漏。
2.重新规整队列中闹钟。
4. 最后看一下Timer.cancel()源码
public class Timer {

    private final TaskQueue queue = new TaskQueue();

    private final TimerThread thread = new TimerThread(queue);

    public void cancel() {
        synchronized(queue) {
            thread.newTasksMayBeScheduled = false;
            queue.clear();
          //防止队列为空的情况下,TimerThead无限等待
            queue.notify();
        }
    }
该方法在清除所有闹钟的同时,与TimerThread发生了一次线程通信——唤醒TimerThread并让其永久退出。
private void mainLoop() {
    while (true) {
            synchronized(queue) {
                while (queue.isEmpty() && newTasksMayBeScheduled)
                    queue.wait();
                if (queue.isEmpty())
                    break;  // TimerThread永久退出
                queue.wait(executionTime - currentTime);
            }
     }
} 以上是整个过程的静态分析,现在捕捉一个线程快照进行动态分析。为了dump一个特定时刻的线程快照,现在在Timer.sched()打一个断点(注意断点的方式与位置)。
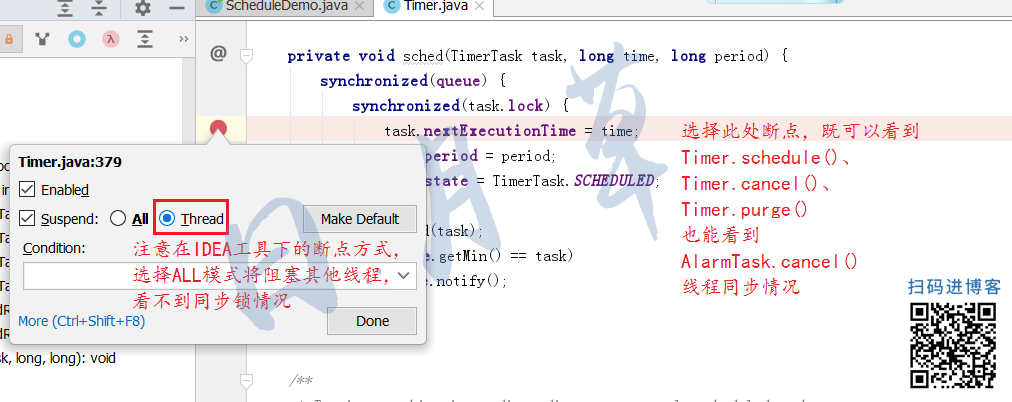
以debug模式运行下面的例子。
public class ScheduleDemo {

    public static void main(String[] args) throws Exception {
        AlarmTask alarm1 = new AlarmTask("闹钟1");
        AlarmTask alarm2 = new AlarmTask("闹钟2");
        new Thread("线程1"){
            public void run() {
                log.info("["+Thread.currentThread().getName()+"]调度闹钟1");
                timer.schedule(alarm1,delay,period);
            }
        }.start();
        new Thread("线程2"){
            public void run() {
                log.info("["+Thread.currentThread().getName()+"]调度闹钟2");
                timer.schedule(alarm2,delay,period);
            }
        }.start();
        Thread.sleep(1500);
        new Thread("线程3"){
            public void run() {
                log.info("["+Thread.currentThread().getName()+"]取消闹钟2");
                alarm2.cancel();
            }
        }.start();
        new Thread("线程4"){
            public void run() {
                log.info("["+Thread.currentThread().getName()+"]清理无用闹钟");
                timer.purge();
            }
        }.start();
        new Thread("线程5"){
            public void run() {
                log.info("["+Thread.currentThread().getName()+"]关闭所有闹钟");
                timer.cancel();
            }
        }.start();
    }

    /**
     *     模拟闹钟
     */
    static class AlarmTask extends TimerTask{
        String name ;
        public AlarmTask(String name){
            this.name=name;
        }
        public void run() {
            log.info("["+Thread.currentThread().getName()+"]-["+name+"]嘀。。。");
            Thread.sleep(1000); //模拟闹钟执行时间
        }
    }
}
下图是visualVM工具dump出的线程快照(断点处)
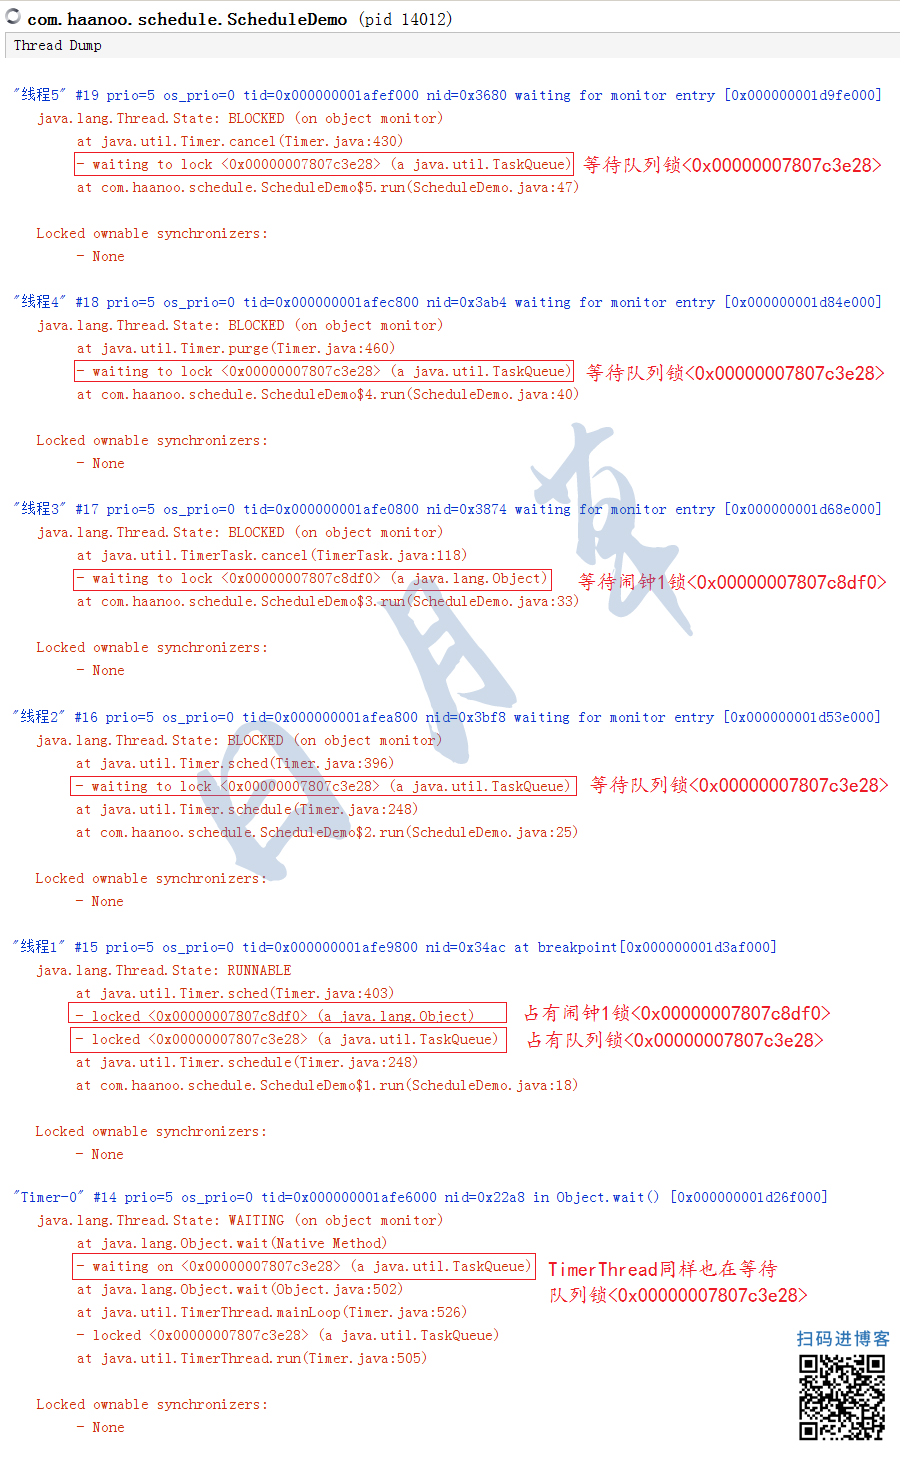
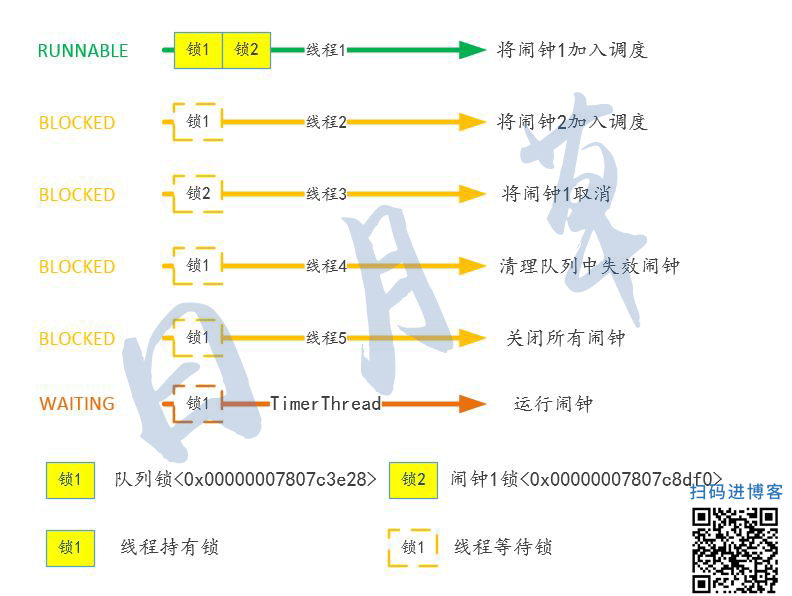
通过上面的快照可以看到,当“线程1“(持有两把锁)处于RUNNABLE状态时,”线程2“、“线程3”、“线程4”、“线程5”都处于BLOCKED状态。需要注意的是,因为TimerThread的时间未到,暂时处于WATING状态(等待唤醒)。
下面是一个简单的形象图
总结:Timer为了保证线程安全,使用了大量的锁机制,整体上对CPU的利用率不高。