1. 算法介绍
Graph Cut(图形切割)应用于计算机视觉领域用来有效的解决各种低级计算机视觉问题,例如图像平滑(image smoothing)、立体应对问题(stereo correspondence problem)、图像分割(image segmentation)等等。此类方法把图像分割问题与图的最小割(min cut)问题相关联,在计算机视觉的很多类似的问题中,最小能量(minimum energy)方案对应解决方案的最大后验估计(maximum posterior estimate)。
友情链接:图像分割经典算法(最小割最大流)
使用Graph Cut的方法可以精确的解决”二进制问题“(binary problem),例如对二进制图像进行去噪。可以用两个以上不同的标签(例如立体对应(stereo correspondence)或灰度图像的去噪)标记像素的问题不能精确解决,但产生的解决方案通常能够接近全局最优的效果。
2. GrapCut
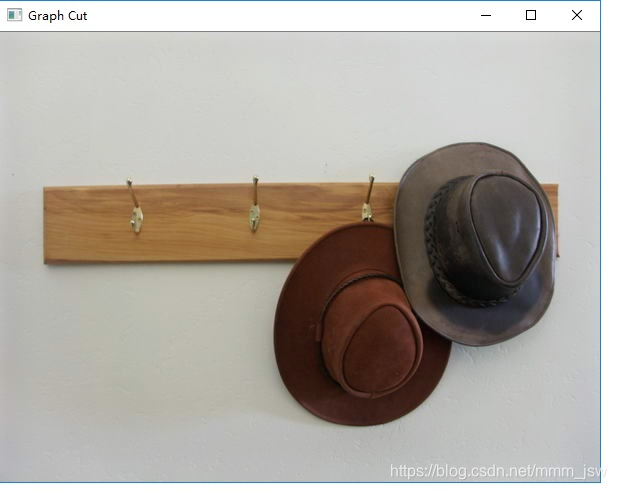
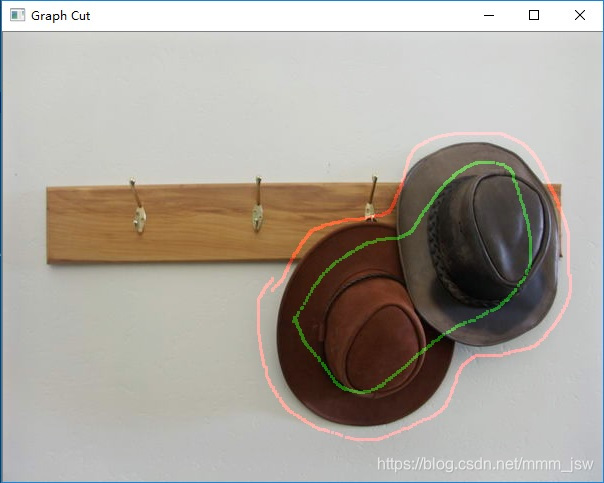
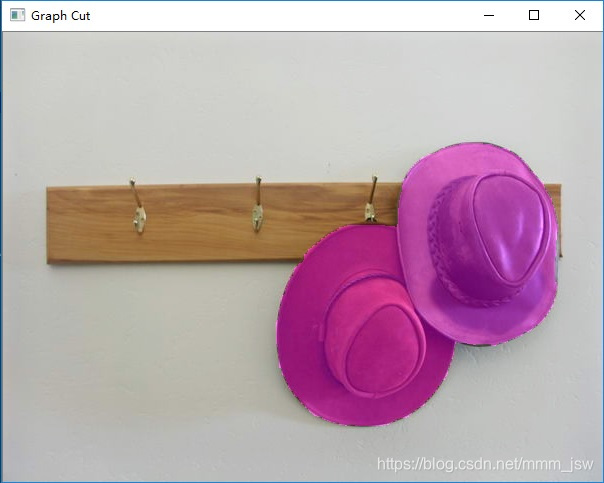
GraphCut利用最小割最大流算法进行图像的分割,可以将图像分割为前景和背景。使用该算法时需要在前景和背景处各画几笔作为输入,算法将建立各个像素点与前景背景相似度的赋权图,并通过求解最小切割区分前景和背景。算法效果图如下:
原始图片
标注图片
分割后的图片
相关论文及python实现代码:
PAPER:
1.Fast approximate energy minimization via graph cuts
2.Graph based algorithms for scene reconstruction from two or more views
3.What energy functions can be minimized via graph cuts?
4.Interactive Graph Cuts for Optimal Boundary & Region Segmentation of Objects in N-D Images
CODE
https://github.com/NathanZabriskie/GraphCut
3.GrabCut
GrabCut的详细解释参考博客:
图像分割之(三)从Graph Cut到Grab Cut
图像分割之(四)OpenCV的GrabCut函数使用和源码解读
GrabCut
GrabCut是对其的改进版,是迭代的Graph Cut。OpenCV中的GrabCut算法是依据《“GrabCut” - Interactive Foreground Extraction using Iterated Graph Cuts》这篇文章来实现的。该算法利用了图像中的纹理(颜色)信息和边界(反差)信息,只要少量的用户交互操作即可得到比较好的分割结果。
GrabCut优点
(1)只需要在目标外面画一个框,把目标框住,它就可以实现良好的分割效果;

(2)增加额外的用户交互(由用户指定一些像素属于目标),对实现的效果进行优化以得到更好的效果;

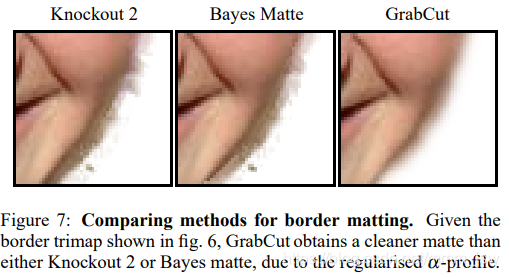
(3)它的Border Matting技术会使目标分割边界更加自然和完美。

GrabCut同时存在这一些缺点:1.如果背景比较复杂或者背景和目标相似度很大,那分割的效果不太好;2.由于时迭代的GraphCut,所以速度较慢。
GrabCut和GraphCut的不同点
(1)GraphCut的目标和背景的模型是灰度直方图,GrabCut取代为RGB三通道的混合高斯模型GMM;
(2)GraphCut的能量最小化(分割)是一次达到的,而GrabCut取代为一个不断进行分割估计和模型参数学习的交互迭代过程;
(3)GraphCut需要用户指定目标和背景的一些种子点,但是GrabCut只需要提供背景区域的像素集就可以了。也就是说你只需要框选目标,那么在方框外的像素全部当成背景,这时候就可以对GMM进行建模和完成良好的分割了。即GrabCut允许不完全的标注(incomplete labelling)。
Python实现
代码:
		#!/usr/bin/env python
'''
===============================================================================
Interactive Image Segmentation using GrabCut algorithm.
This application shows interactive image segmentation using grabcut algorithm.
USAGE :
    python grabcut.py <filename>
README FIRST:
    Two windows will show up, one for input and one for output.
    At first, in input window, draw a rectangle around the object using
mouse right button. Then press 'n' to segment the object (once or a few times)
For any finer touch-ups, you can press any of the keys below and draw lines on
the areas you want. Then again press 'n' for updating the output.
Key '0' - To select areas of sure background
Key '1' - To select areas of sure foreground
Key '2' - To select areas of probable background
Key '3' - To select areas of probable foreground
Key 'n' - To update the segmentation
Key 'r' - To reset the setup
Key 's' - To save the results
===============================================================================
'''

import numpy as np
import cv2
import sys

BLUE = [255,0,0]        # rectangle color
RED = [0,0,255]         # PR BG
GREEN = [0,255,0]       # PR FG
BLACK = [0,0,0]         # sure BG
WHITE = [255,255,255]   # sure FG

DRAW_BG = {'color' : BLACK, 'val' : 0}
DRAW_FG = {'color' : WHITE, 'val' : 1}
DRAW_PR_FG = {'color' : GREEN, 'val' : 3}
DRAW_PR_BG = {'color' : RED, 'val' : 2}

# setting up flags
rect = (0,0,1,1)
drawing = False         # flag for drawing curves
rectangle = False       # flag for drawing rect
rect_over = False       # flag to check if rect drawn
rect_or_mask = 100      # flag for selecting rect or mask mode
value = DRAW_FG         # drawing initialized to FG
thickness = 3           # brush thickness

def onmouse(event,x,y,flags,param):
    global img,img2,drawing,value,mask,rectangle,rect,rect_or_mask,ix,iy,rect_over

    # Draw Rectangle
    if event == cv2.EVENT_RBUTTONDOWN:
        rectangle = True
        ix,iy = x,y

    elif event == cv2.EVENT_MOUSEMOVE:
        if rectangle == True:
            img = img2.copy()
            cv2.rectangle(img,(ix,iy),(x,y),BLUE,2)
            rect = (ix,iy,abs(ix-x),abs(iy-y))
            rect_or_mask = 0

    elif event == cv2.EVENT_RBUTTONUP:
        rectangle = False
        rect_over = True
        cv2.rectangle(img,(ix,iy),(x,y),BLUE,2)
        rect = (ix,iy,abs(ix-x),abs(iy-y))
        rect_or_mask = 0
        print " Now press the key 'n' a few times until no further change \n"

    # draw touchup curves

    if event == cv2.EVENT_LBUTTONDOWN:
        if rect_over == False:
            print "first draw rectangle \n"
        else:
            drawing = True
            cv2.circle(img,(x,y),thickness,value['color'],-1)
            cv2.circle(mask,(x,y),thickness,value['val'],-1)

    elif event == cv2.EVENT_MOUSEMOVE:
        if drawing == True:
            cv2.circle(img,(x,y),thickness,value['color'],-1)
            cv2.circle(mask,(x,y),thickness,value['val'],-1)

    elif event == cv2.EVENT_LBUTTONUP:
        if drawing == True:
            drawing = False
            cv2.circle(img,(x,y),thickness,value['color'],-1)
            cv2.circle(mask,(x,y),thickness,value['val'],-1)

# print documentation
print __doc__

# Loading images
if len(sys.argv) == 2:
    filename = sys.argv[1] # for drawing purposes
else:
    print "No input image given, so loading default image, far.jpg \n"
    print "Correct Usage : python grabcut.py <filename> \n"
    filename = 'far.jpg'

img = cv2.imread(filename)
img2 = img.copy()                               # a copy of original image
mask = np.zeros(img.shape[:2],dtype = np.uint8) # mask initialized to PR_BG
output = np.zeros(img.shape,np.uint8)           # output image to be shown

# input and output windows
cv2.namedWindow('output')
cv2.namedWindow('input')
cv2.setMouseCallback('input',onmouse)
cv2.moveWindow('input',img.shape[1]+10,90)

print " Instructions : \n"
print " Draw a rectangle around the object using right mouse button \n"

while(1):

    cv2.imshow('output',output)
    cv2.imshow('input',img)
    k = 0xFF & cv2.waitKey(1)

    # key bindings
    if k == 27:         # esc to exit
        break
    elif k == ord('0'): # BG drawing
        print " mark background regions with left mouse button \n"
        value = DRAW_BG
    elif k == ord('1'): # FG drawing
        print " mark foreground regions with left mouse button \n"
        value = DRAW_FG
    elif k == ord('2'): # PR_BG drawing
        value = DRAW_PR_BG
    elif k == ord('3'): # PR_FG drawing
        value = DRAW_PR_FG
    elif k == ord('s'): # save image
        bar = np.zeros((img.shape[0],5,3),np.uint8)
        res = np.hstack((img2,bar,img,bar,output))
        cv2.imwrite('grabcut_output.png',output)
        cv2.imwrite('grabcut_output_combined.png',res)
        print " Result saved as image \n"
    elif k == ord('r'): # reset everything
        print "resetting \n"
        rect = (0,0,1,1)
        drawing = False
        rectangle = False
        rect_or_mask = 100
        rect_over = False
        value = DRAW_FG
        img = img2.copy()
        mask = np.zeros(img.shape[:2],dtype = np.uint8) # mask initialized to PR_BG
        output = np.zeros(img.shape,np.uint8)           # output image to be shown
    elif k == ord('n'): # segment the image
        print """ For finer touchups, mark foreground and background after pressing keys 0-3
        and again press 'n' \n"""
        if (rect_or_mask == 0):         # grabcut with rect
            bgdmodel = np.zeros((1,65),np.float64)
            fgdmodel = np.zeros((1,65),np.float64)
            cv2.grabCut(img2,mask,rect,bgdmodel,fgdmodel,1,cv2.GC_INIT_WITH_RECT)
            rect_or_mask = 1
        elif rect_or_mask == 1:         # grabcut with mask
            bgdmodel = np.zeros((1,65),np.float64)
            fgdmodel = np.zeros((1,65),np.float64)
            cv2.grabCut(img2,mask,rect,bgdmodel,fgdmodel,1,cv2.GC_INIT_WITH_MASK)

    mask2 = np.where((mask==1) + (mask==3),255,0).astype('uint8')
    output = cv2.bitwise_and(img2,img2,mask=mask2)

cv2.destroyAllWindows()
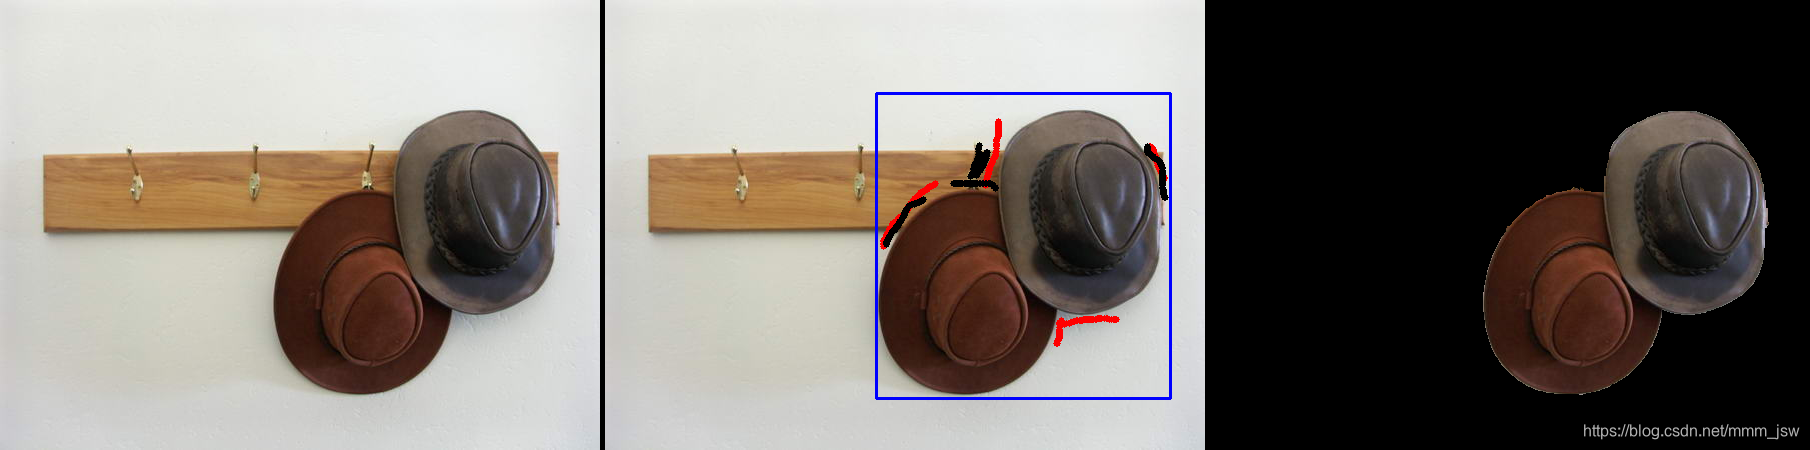
实现效果:
原始图片、处理过程、处理后的照片分别如下:
GitHub代码:
- https://github.com/downingstreet/GrabCut
- https://github.com/Orcuslc/GrabCuthttps://github.com/Orcuslc/GrabCut
Grab Cut论文:
“GrabCut”: interactive foreground extraction using iterated graph cuts