一、maven-jar-plugin插件详解
<plugin>
                <groupId>org.apache.maven.plugins</groupId>
                <artifactId>maven-jar-plugin</artifactId>
                <version>2.4</version>
                <configuration>
                    <archive>
                        <!-- 生成的jar中,包含pom.xml和pom.properties这两个文件 -->
                        <addMavenDescriptor>true</addMavenDescriptor>
                        <!-- 生成MANIFEST.MF的设置 -->
                        <manifest>
                            <!--这个属性特别关键,如果没有这个属性,有时候我们引用的包maven库 下面可能会有多个包,并且只有一个是正确的,其余的可能是带时间戳的,
                                此时会在classpath下面把那个带时间戳的给添加上去,然后我们 在依赖打包的时候,打的是正确的,所以两头会对不上,报错。 -->
                            <useUniqueVersions>false</useUniqueVersions>
                            <!-- 为依赖包添加路径, 这些路径会写在MANIFEST文件的Class-Path下 -->
                            <addClasspath>true</addClasspath>
                            <!-- 这个jar所依赖的jar包添加classPath的时候的前缀,如果这个 jar本身和依赖包在同一级目录,则不需要添加 -->
                            <classpathPrefix>lib/</classpathPrefix>
                            <!-- jar启动入口类 -->
                            <mainClass>com.ht.pojo.Test</mainClass>
                        </manifest>
                        <manifestEntries>
                            <!-- 在Class-Path下添加配置文件的路径 -->
                            <Class-Path>../config/</Class-Path>
                            <!-- 假如这个项目可能要引入一些外部资源,但是你打包的时候并不想把 这些资源文件打进包里面,这个时候你必须在这边额外指定一些这些资源
                                文件的路径,这个位置指定的话,要根据你预期的这些位置去设置,我这边 所有jar都在lib下,资源文件都在config下,lib和config是同级的
                                同时还需要注意另外一个问题,假如你的pom文件里面配置了 <scope>system</scope>,就是你依赖是你本地的资源,这个时候使用 这个插件,classPath里面是不会添加,所以你得手动把这个依赖添加进
                                这个地方,用空格隔开就行 -->
                        </manifestEntries>
                    </archive>
                    <!-- jar包的位置 -->
                    <outputDirectory>${project.build.directory}/lib</outputDirectory>
                    <includes>
                        <!-- 打jar包时,打包class文件和config目录下面的 properties文件-->
                        <!-- 有时候可能需要一些其他文件,这边可以配置,包括剔除的文件等等 -->
                        <include>**/*.class</include>
                        <include>**/*.properties</include>
                    </includes>
                </configuration>
            </plugin>
使用clean package命令打包成功后,目录结构如下所示:
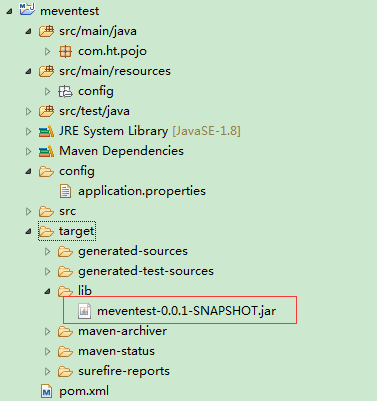
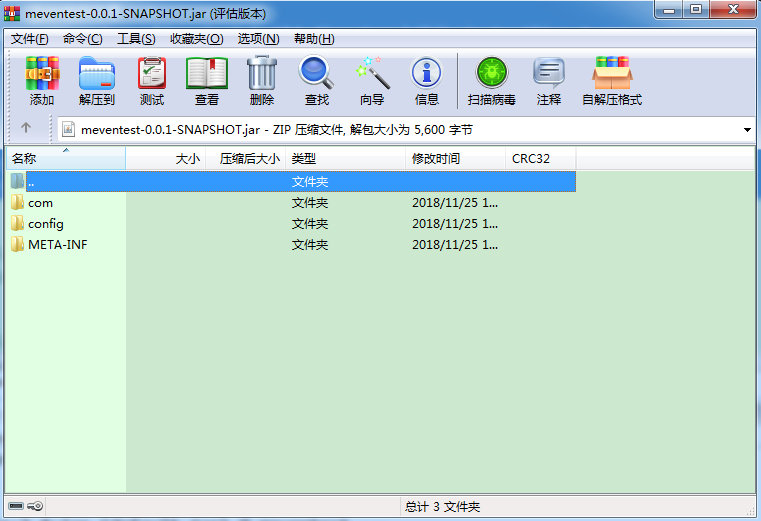
打开meventest-0.0.1-SNAPSHOT.jar文件,查看打包成功后的项目结构
二、maven-dependency-plugin
说明:该插件可以把依赖的jar包,打包到项目的指定目录中
 1             <plugin>
 2                 <groupId>org.apache.maven.plugins</groupId>
 3                 <artifactId>maven-dependency-plugin</artifactId>
 4                 <executions>
 5                     <execution>
 6                         <id>copy-dependencies</id>
 7                         <phase>package</phase>
 8                         <goals>
 9                             <goal>copy-dependencies</goal>
10                         </goals>
11                         <configuration>
12                             <!-- 拷贝项目依赖包到lib/目录下 -->
13                             <outputDirectory>${project.build.directory}/lib</outputDirectory>
14                             <!-- 间接依赖也拷贝 -->
15                             <excludeTransitive>false</excludeTransitive>
16                             <!-- 带上版本号 -->
17                             <stripVersion>false</stripVersion>
18                         </configuration>
19                     </execution>
20                 </executions>
21             </plugin>
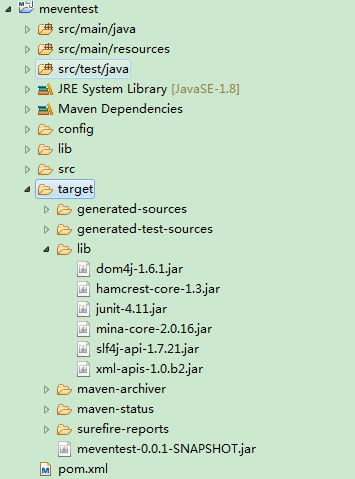
打包后的目录结构如下所示:
三、maven-assembly-plugin
- 该插件可以把项目依赖的jar包编译成class文件,以包的形式生成在项目中
- 将Assembly插件的assembly:single加入到Maven的package阶段
 1 <plugin>
 2                 <artifactId>maven-assembly-plugin</artifactId>
 3                 <version>3.1.0</version>
 4                 <configuration>
 5                     <archive>
 6                         <manifest>
 7                             <mainClass>com.ht.pojo.Test</mainClass>
 8                         </manifest>
 9                     </archive>
10                     <descriptorRefs>
11                         <descriptorRef>jar-with-dependencies</descriptorRef>
12                     </descriptorRefs>
13                 </configuration>
14                 <executions>
15                     <execution>
16                         <id>make-assembly</id>
17                         <phase>package</phase>
18                         <goals>
19                             <goal>single</goal>
20                         </goals>
21                     </execution>
22                 </executions>
23             </plugin>
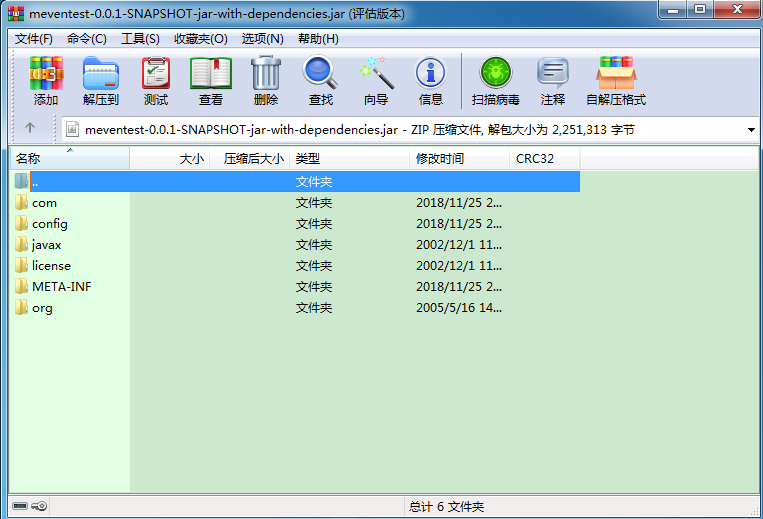
打包成功后会生成meventest-0.0.1-SNAPSHOT-jar-with-dependencies.jar文件,这个jar包中包含依赖的编译后的jar文件、meventest-0.0.1-SNAPSHOT.jar不包含。
meventest-0.0.1-SNAPSHOT-jar-with-dependencies.jar打开后的目录如下所示:
四、maven-bundle-plugin
- 该插件可以把项目依赖的jar包打包到项目的根目录,前提是必须加上必须加上<Embed-Dependency>*;scope=compile|runtime;inline=false</Embed-Dependency>这个配置
 1         <groupId>com.ht.maventest</groupId>
 2         <artifactId>meventest</artifactId>
 3         <version>0.0.1-SNAPSHOT</version>
 4         <!-- 必须加上packaging这个节点 -->
 5         <packaging>bundle</packaging>
 6
 7
 8             <plugin>
 9                 <groupId>org.apache.felix</groupId>
10                 <artifactId>maven-bundle-plugin</artifactId>
11                 <version>3.2.0</version>
12                 <extensions>true</extensions>
13                 <configuration>
14                     <instructions>
15                         <Embed-Dependency>*;scope=compile|runtime;inline=false</Embed-Dependency>
16                     </instructions>
17                     <archive>
18                         <manifestEntries>
19                             <Bundle-ManifestVersion>2</Bundle-ManifestVersion>
20                             <Bundle-Name>${project.groupId}.${project.artifactId}</Bundle-Name>
21                             <Bundle-SymbolicName>${project.groupId}.${project.artifactId}
22                             </Bundle-SymbolicName>
23                             <Bundle-Version>${project.version}</Bundle-Version>
24                             <Bundle-Vendor>${project.groupId}</Bundle-Vendor>
25                             <Bundle-Activator>com.ht.pojo.Activator</Bundle-Activator>
26                             <Export-Package>com.ht.pojo</Export-Package>
27                             <Import-Package>org.osgi.framework</Import-Package>
28                         </manifestEntries>
29                     </archive>
30                 </configuration>
31             </plugin>
打包成功后的解压目录如下所示:
