**
引言:
**关于Mybatis的话 本主也是最近开始才逐渐开始研究,以前也没有深挖过,由于某些原因吧,决定集中自己手中的资源以及个人理解写了这篇博文,希望帮助那些和我一样在IT路上前行的小伙伴~
原生JDBC处理数据库相关业务基本步骤分解:
1、加载数据库驱动
2、创建并获取数据库链接
3、创建jdbc statement对象
4、设置sql语句
5、设置sql语句中的参数(使用preparedStatement)
6、通过statement执行sql并获取结果
7、对sql执行结果进行解析处理
8、释放资源(resultSet、preparedstatement、connection)
话不多说直接上代码:
public static void main(String[] args) {
			Connection connection = null;
			PreparedStatement preparedStatement = null;
			ResultSet resultSet = null;
			try {
				//加载数据库驱动
				Class.forName("com.mysql.jdbc.Driver");
				//通过驱动管理类获取数据库链接
				connection =  DriverManager.getConnection("jdbc:mysql://localhost:3306/mybatis?characterEncoding=utf-8", "root", "root");
				//定义sql语句 ?表示占位符
			String sql = "select * from user where username = ?";
				//获取预处理statement
				preparedStatement = connection.prepareStatement(sql);
				//设置参数,第一个参数为sql语句中参数的序号(从1开始),第二个参数为设置的参数值
				preparedStatement.setString(1, "王五");
				//向数据库发出sql执行查询,查询出结果集
				resultSet =  preparedStatement.executeQuery();
				//遍历查询结果集
				while(resultSet.next()){
					System.out.println(resultSet.getString("id")+"  "+resultSet.getString("username"));
				}
			} catch (Exception e) {
				e.printStackTrace();
			}finally{
				//释放资源
				if(resultSet!=null){
					try {
						resultSet.close();
					} catch (SQLException e) {
						// TODO Auto-generated catch block
						e.printStackTrace();
					}
				}
				if(preparedStatement!=null){
					try {
						preparedStatement.close();
					} catch (SQLException e) {
						// TODO Auto-generated catch block
						e.printStackTrace();
					}
				}
				if(connection!=null){
					try {
						connection.close();
					} catch (SQLException e) {
						// TODO Auto-generated catch block
						e.printStackTrace();
					}
				}

			}

		}
原始JDBC问题分析与提取:
1、数据库链接创建、释放频繁造成系统资源浪费从而影响系统性能,如果使用数据库链接池可解决此问题。
2、Sql语句在代码中硬编码,造成代码不易维护,实际应用sql变化的可能较大,sql变动需要改变java代码。
3、使用preparedStatement向占有位符号传参数存在硬编码,因为sql语句的where条件不一定,可能多也可能少,修改sql还要修改代码,系统不易维护。
4、对结果集解析存在硬编码(查询列名),sql变化导致解析代码变化,系统不易维护,如果能将数据库记录封装成pojo对象解析比较方便。
在正式介绍Mybatis数据源
Mybatis官方文档数据源(dataSource)
dataSource 元素使用标准的 JDBC 数据源接口来配置 JDBC 连接对象的资源。
许多 MyBatis 的应用程序都会配置数据源。虽然这是可选的,但为了使用延迟加载,数据源是必须配置的。
有三种内建的数据源类型(也就是 type=”[UNPOOLED|POOLED|JNDI]”):
(1)、UNPOOLED– 这个数据源的实现只是每次被请求时打开和关闭连接。虽然有点慢,但对于在数据库连接可用性方面没有太高要求的简单应用程序来说,是一个很好的选择。 不同的数据库在性能方面的表现也是不一样的,对于某些数据库来说,使用连接池并不重要,这个配置就很适合这种情形。UNPOOLED 类型的数据源仅仅需要配置以下 5 种属性:
1)、driver– 这是 JDBC 驱动的 Java 类的完全限定名(并不是 JDBC 驱动中可能包含的数据源类)。
2)、url – 这是数据库的 JDBC URL 地址。username – 登录数据库的用户名。
3)、password – 登录数据库的密码。
4)、defaultTransactionIsolationLevel– 默认的连接事务隔离级别。
作为可选项,你也可以传递属性给数据库驱动。要这样做,属性的前缀为“driver.”,例如:
driver.encoding=UTF8
这将通过 DriverManager.getConnection(url,driverProperties) 方法传递值为 UTF8 的 encoding 属性给数据库驱动。
(2)、POOLED– 这种数据源的实现利用“池”的概念将 JDBC 连接对象组织起来,避免了创建新的连接实例时所必需的初始化和认证时间。 这是一种使得并发 Web 应用快速响应请求的流行处理方式。
除了上述提到 UNPOOLED 下的属性外,还有更多属性用来配置 POOLED 的数据源:
a、poolMaximumActiveConnections – 在任意时间可以存在的活动(也就是正在使用)连接数量,默认值:10
b、poolMaximumIdleConnections – 任意时间可能存在的空闲连接数。
c、poolMaximumCheckoutTime – 在被强制返回之前,池中连接被检出(checked out)时间,默认值:20000 毫秒
(即 20 秒)
d、poolTimeToWait– 这是一个底层设置,如果获取连接花费了相当长的时间,连接池会打印状态日志并重新尝试获取一个连接(避免在误配置的情况下一直安静的失败),默认值:20000 毫秒(即 20 秒)。
e、poolMaximumLocalBadConnectionTolerance– 这是一个关于坏连接容忍度的底层设置, 作用于每一个尝试从缓存池获取连接的线程. 如果这个线程获取到的是一个坏的连接,那么这个数据源允许这个线程尝试重新获取一个新的连接,但是这个重新尝试的次数不应该超过 poolMaximumIdleConnections与 poolMaximumLocalBadConnectionTolerance之和。 默认值:3 (新增于3.4.5)
f、poolPingQuery –发送到数据库的侦测查询,用来检验连接是否正常工作并准备接受请求。默认是“NO PING QUERY SET”,这会导致多数数据库驱动失败时带有一个恰当的错误消息。
g、poolPingEnabled –是否启用侦测查询。若开启,需要设置
是一个速度非常快的 SQL 语句),默认值:false。
属性为一个可执行的 SQL 语句(最好是一个速度非常快的SQL语句
h、poolPingConnectionsNotUsedFor –– 配置 poolPingQuery 的频率。可以被设置为和数据库连接超时时间一样,来避免不必要的侦测,默认值:0(即所有连接每一时刻都被侦测 — 当然仅当 poolPingEnabled 为 true 时适用)。
JNDI – 这个数据源的实现是为了能在如 EJB 或应用服务器这类容器中使用,容器可以集中或在外部配置数据源,然后放置一个 JNDI 上下文的引用。这种数据源配置只需要两个属性:
–这个属性用来在 InitialContext 中寻找上下文(即,initialContext.lookup(initial_context))。这是个可选属性,如果忽略,那么 data_source 属性将会直接从 InitialContext 中寻找。
– 这是引用数据源实例位置的上下文的路径。提供了 initial_context 配置时会在其返回的上下文中进行查找,没有提供时则直接在 InitialContext 中查找。
和其他数据源配置类似,可以通过添加前缀“env.”直接把属性传递给初始上下文。比如:
env.encoding=UTF8
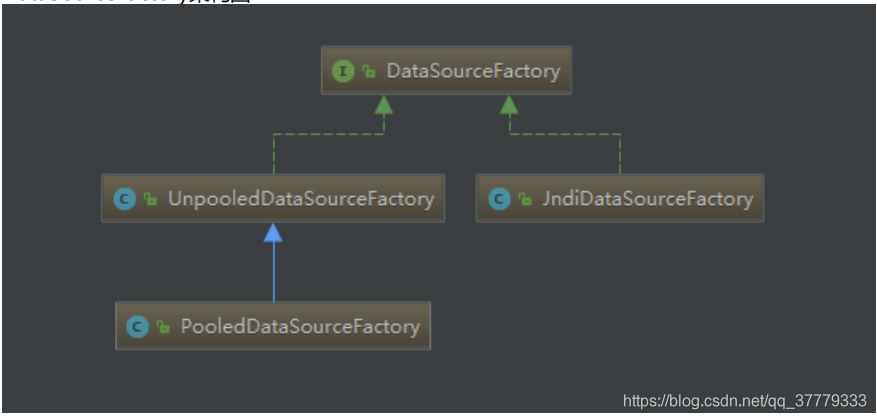
本篇文章重点讲解POOLED配置的源码解析和构建配置DataSourceFactory架构图
(1)SimpleExecutor这里开始获取Connection
(2)那么我们带着问题来进行思考个小点DataSourceFactory封装之后究竟什么时候才能使用呢,咱们跟踪一条update语句来到JdbcTransaction类
protected void openConnection() throws SQLException {
if (log.isDebugEnabled()) {
log.debug("Opening JDBC Connection");
}
// 获取一个数据库连接
connection = dataSource.getConnection();
if (level != null) {
connection.setTransactionIsolation(level.getLevel());
}
setDesiredAutoCommit(autoCommmit);
}
private Statement prepareStatement(StatementHandler handler, Log statementLog) throws SQLException {
Statement stmt;
Connection connection = getConnection(statementLog);
stmt = handler.prepare(connection, transaction.getTimeout());
handler.parameterize(stmt);
return stmt;
}
咱们目前只考虑POOLED的配置,所以这里的getConnection获取的是一个PooledConnection(Connection的代理对象),这里
我们需要注意到两个类PooledDataSource和PooledConnection(JDBC Connection被包含在其中)
另外,Mybatis官网中提到得参数全部维护在PooledDataSource中,作为JDBC Connection得全局配置其中有三个关键类:PooledDataSource、PooledConnection和PooledState
// 这里维护一些参数和两个队列public class PoolState {
protected PooledDataSource dataSource;
protected final List<PooledConnection> idleConnections = new ArrayList<PooledConnection>(); protected final List<PooledConnection> activeConnections = new ArrayList<PooledConnection>(); protected long requestCount = 0;
protected long accumulatedRequestTime = 0; protected long accumulatedCheckoutTime = 0; protected long claimedOverdueConnectionCount = 0;
protected long accumulatedCheckoutTimeOfOverdueConnections = 0; protected long accumulatedWaitTime = 0;
protected long hadToWaitCount = 0; protected long badConnectionCount = 0;


private PooledConnection popConnection(String username, String password) throws SQLException { boolean countedWait = false;
// Connection的代理类
PooledConnection conn = null;
// 计算获取一个Connection的执行时长
long t = System.currentTimeMillis(); int localBadConnectionCount = 0;
while (conn == null) {
// 同步锁 性能不好
synchronized (state) {
// 查看空闲列表还有空闲连接
if (state.idleConnections.size() > 0) {
// Pool has available connection
conn = state.idleConnections.remove(0); if (log.isDebugEnabled()) {
log.debug("Checked out connection " + conn.getRealHashCode() + " from pool.");
}
} else {
// Pool does not have available connection 没有可以用的连接
if (state.activeConnections.size() < poolMaximumActiveConnections) {
// Can create new connection
conn = new PooledConnection(dataSource.getConnection(), this); @SuppressWarnings("unused")
//used in logging, if enabled
Connection realConn = conn.getRealConnection(); if (log.isDebugEnabled()) {
log.debug("Created connection " + conn.getRealHashCode() + ".");
}
} else {

// Cannot create new connection 无法创建连接 获取一个存在active列表中存活时间最长的连接PooledConnection oldestActiveConnection = state.activeConnections.get(0);
long longestCheckoutTime =  oldestActiveConnection.getCheckoutTime(); if (longestCheckoutTime > poolMaximumCheckoutTime) {
// Can claim overdue connection state.claimedOverdueConnectionCount++;
state.accumulatedCheckoutTimeOfOverdueConnections += longestCheckoutTime; state.accumulatedCheckoutTime += longestCheckoutTime; state.activeConnections.remove(oldestActiveConnection);
if (!oldestActiveConnection.getRealConnection().getAutoCommit()) { oldestActiveConnection.getRealConnection().rollback();
}
conn = new PooledConnection(oldestActiveConnection.getRealConnection(), this); oldestActiveConnection.invalidate();
if (log.isDebugEnabled()) {
log.debug("Claimed overdue connection " + conn.getRealHashCode() + ".");
}
} else {
// Must wait try {
if (!countedWait) { state.hadToWaitCount++; countedWait = true;
}
if (log.isDebugEnabled()) {
log.debug("Waiting as long as " + poolTimeToWait + " milliseconds for connection.");
}
long wt = System.currentTimeMillis(); state.wait(poolTimeToWait);
state.accumulatedWaitTime += System.currentTimeMillis() - wt;
} catch (InterruptedException e) { break;
}
}
}
}
if (conn != null) { if (conn.isValid()) {
if (!conn.getRealConnection().getAutoCommit()) { conn.getRealConnection().rollback();
}
conn.setConnectionTypeCode(assembleConnectionTypeCode(dataSource.getUrl(), username, password)); conn.setCheckoutTimestamp(System.currentTimeMillis()); conn.setLastUsedTimestamp(System.currentTimeMillis());
state.activeConnections.add(conn); state.requestCount++;
state.accumulatedRequestTime += System.currentTimeMillis() - t;
} else {
if (log.isDebugEnabled()) {
log.debug("A bad connection (" + conn.getRealHashCode() + ") was returned from the pool, getting another connection.");
}
state.badConnectionCount++; localBadConnectionCount++; conn = null;
if (localBadConnectionCount > (poolMaximumIdleConnections + 3)) { if (log.isDebugEnabled()) {
log.debug("PooledDataSource: Could not get a good connection to the database.");
PooledConnection什么时候放回到PooledDataSource中呢,首先PooledConnected是一个代理对象,在调用Connection的 方法的时候可以做中间处理,就是在中间处理的过程中将PooledConnection放入到了PooledDataSource中
连接如何放入到PooledDataSouce中
这篇讲解涉及了一些源码的解读,对于初学者来说能解读明白的话还是很有帮助的,对于以后用Mybatis会更加的自信。(尾注:加油小胖子 朕只能帮你这么多了 哈哈哈~)