实验验目的: Zabbix 3.x 服务端的安装
实验主机: m01 (centos 7.4) IP 10.0.0.61/172.16.1.61
1) 配置yum源, 并用wget命令把相关的软件包下载到本地, 然后再进行安装, 如下所示
#配置yum 源解决依赖的问题
[root@m01 /]#  rpm -ivh https://mirrors.aliyun.com/zabbix/zabbix/3.4/rhel/7/x86_64/zabbix-release-3.4-2.el7.noarch.rpm
...

安装wget losf 命令
[root@m01 /]# yum -y install wget lsof
...

#使用wget命令将上述的软件包下载到一个目录,然后使用yum本地安装即可
[root@m01 /]# mkdir zabbix-pkg
[root@m01 /]# wget  https://mirrors.aliyun.com/zabbix/zabbix/3.4/rhel/7/x86_64/zabbix-server-mysql-3.4.10-1.el7.x86_64.rpm https://mirrors.aliyun.com/zabbix/zabbix/3.4/rhel/7/x86_64/zabbix-web-3.4.10-1.el7.noarch.rpm https://mirrors.aliyun.com/zabbix/zabbix/3.4/rhel/7/x86_64/zabbix-get-3.4.10-1.el7.x86_64.rpm https://mirrors.aliyun.com/zabbix/zabbix/3.4/rhel/7/x86_64/zabbix-agent-3.4.10-1.el7.x86_64.rpm https://mirrors.aliyun.com/zabbix/zabbix/3.4/rhel/7/x86_64/zabbix-web-mysql-3.4.10-1.el7.noarch.rpm -P zabbix-pkg/
...

#使用yum本地安装
[root@m01 /]# yum -y localinstall zabbix-pkg/*
...
2) 安装LAMP平台 MariaDB至m01 主机上
#安装LAMP平台
[root@m01 /]# yum -y install httpd mariadb-server php php-mysql
....

#设置数据库
[root@m01 /]# systemctl start mariadb
[root@m01 /]# lsof -i :3306
COMMAND  PID  USER   FD   TYPE DEVICE SIZE/OFF NODE NAME
mysqld  1861 mysql   13u  IPv4  25413      0t0  TCP *:mysql (LISTEN)
[root@m01 /]# mysql -uroot -p
Enter password:
Welcome to the MariaDB monitor.  Commands end with ; or \g.
Your MariaDB connection id is 2
Server version: 5.5.60-MariaDB MariaDB Server

Copyright (c) 2000, 2018, Oracle, MariaDB Corporation Ab and others.

Type 'help;' or '\h' for help. Type '\c' to clear the current input statement.

MariaDB [(none)]> create database zabbix character set utf8 collate utf8_bin;
Query OK, 1 row affected (0.00 sec)

MariaDB [(none)]> grant all privileges on zabbix.* to zabbix@localhost identified by '123456';
Query OK, 0 rows affected (0.00 sec)

MariaDB [(none)]> quit
Bye
[root@m01 /]# mysql -u zabbix -p123456
Welcome to the MariaDB monitor.  Commands end with ; or \g.
Your MariaDB connection id is 3
Server version: 5.5.60-MariaDB MariaDB Server

Copyright (c) 2000, 2018, Oracle, MariaDB Corporation Ab and others.

Type 'help;' or '\h' for help. Type '\c' to clear the current input statement.

MariaDB [(none)]> quit
Bye
[root@m01 /]# zcat /usr/share/doc/zabbix-server-mysql*/create.sql.gz | mysql -uzabbix -p zabbix
Enter password:
[root@m01 /]# !mysql
mysql -u zabbix -p123456
Welcome to the MariaDB monitor.  Commands end with ; or \g.
Your MariaDB connection id is 5
Server version: 5.5.60-MariaDB MariaDB Server

Copyright (c) 2000, 2018, Oracle, MariaDB Corporation Ab and others.

Type 'help;' or '\h' for help. Type '\c' to clear the current input statement.

MariaDB [(none)]> show databases;
+--------------------+
| Database           |
+--------------------+
| information_schema |
| test               |
| zabbix             |
+--------------------+
3 rows in set (0.00 sec)

MariaDB [(none)]> use zabbix;
Reading table information for completion of table and column names
You can turn off this feature to get a quicker startup with -A

Database changed
MariaDB [zabbix]> show tables;
+----------------------------+
| Tables_in_zabbix           |
+----------------------------+
| acknowledges               |
| actions                    |
| alerts                     |
| application_discovery      |
| application_prototype      |
......
3)编辑zabbix server 配置文件, DBPassword 设置为123456
#编辑 zabbix server 配置文件
[root@m01 /]# vim /etc/zabbix/zabbix_server.conf
119 ### Option: DBPassword
120 #       Database password. Ignored for SQLite.
121 #       Comment this line if no password is used.
122 #
123 # Mandatory: no
124 # Default:
125 # DBPassword=
126 DBPassword=123456
4) 修改为亚洲/上海时区
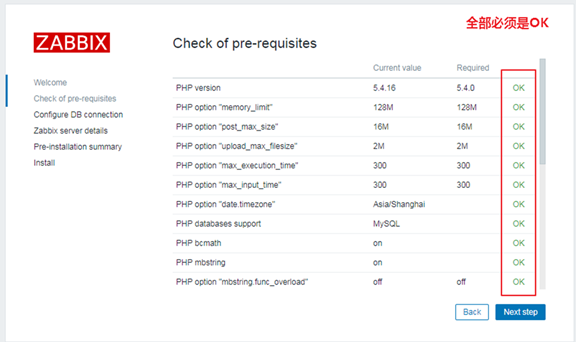
#修改WEB时区为亚洲/上海
[root@m01 /]#sed -i -e '/# php_value/s/#//;s/Europe\/Riga/Asia\/Shanghai/' /etc/httpd/conf.d/zabbix.conf
5) 设置zabbix服务开机启动 ,设置字符集, 以及登录账号
#并设置zabbix服务开机启动,
[root@m01 /]# systemctl start httpd zabbix-server zabbix-agent
[root@m01 /]# systemctl enable httpd zabbix-server zabbix-agent mariadb
Created symlink from /etc/systemd/system/multi-user.target.wants/httpd.service to /usr/lib/systemd/system/httpd.service.
Created symlink from /etc/systemd/system/multi-user.target.wants/zabbix-server.service to /usr/lib/systemd/system/zabbix-server.service.
Created symlink from /etc/systemd/system/multi-user.target.wants/zabbix-agent.service to /usr/lib/systemd/system/zabbix-agent.service.
Created symlink from /etc/systemd/system/multi-user.target.wants/mariadb.service to /usr/lib/systemd/system/mariadb.service.
[root@m01 /]# systemctl is-active httpd zabbix-server zabbix-agent mariadb
active
active
active
active

#解决中文字体乱码问题
[root@m01 /]# yum -y install wqy-microhei-fonts
...
[root@m01 /]# cp /usr/share/fonts/wqy-microhei/wqy-microhei.ttc /usr/share/fonts/dejavu/DejaVuSans.ttf
cp: overwrite ‘/usr/share/fonts/dejavu/DejaVuSans.ttf’? y
...

#web 登陆账号密码
用户: Admin
密码: zabbix
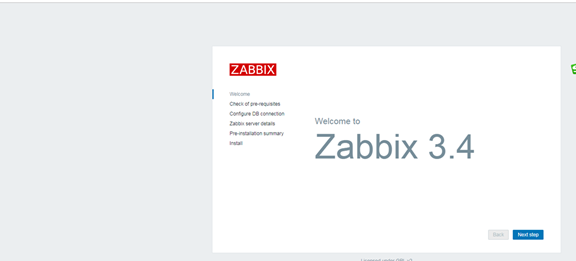
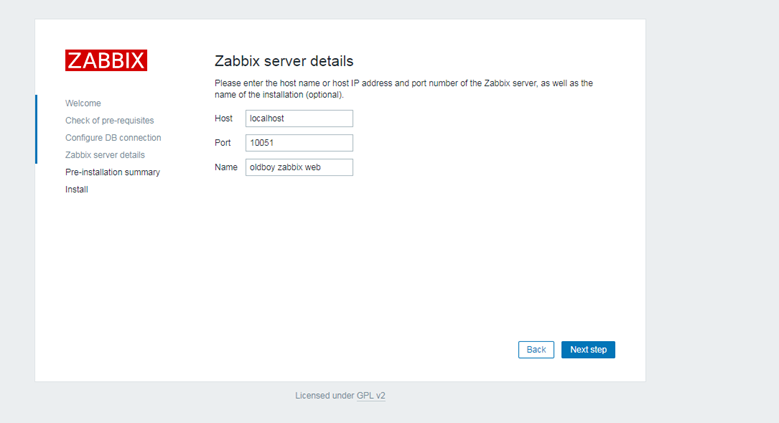
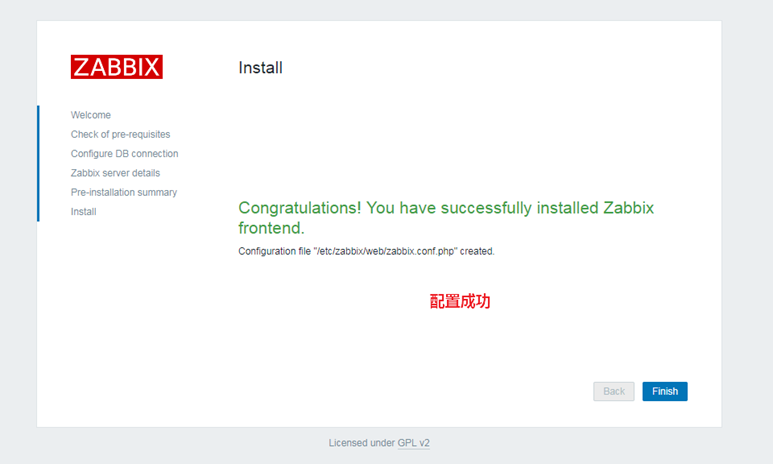
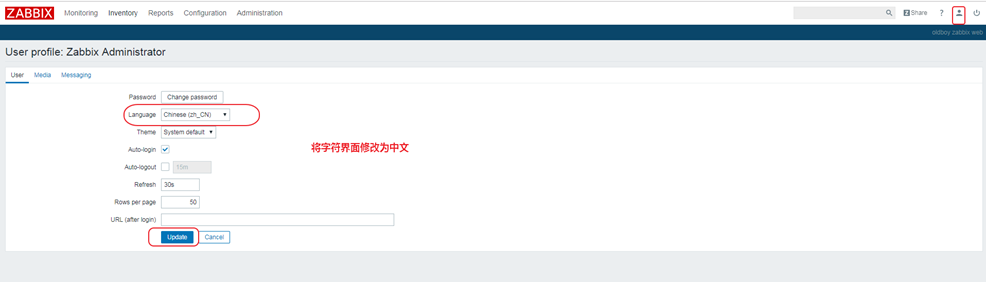
6)
在web页面中,设置后, 显示如下界面表示zabbix服务端安装成功
10.0.0.61/zabbix


将m01 添加到zabbix 监控中, 让zabbix服务端先监控自己

