以YSQ人脸检测算法为例,测试其在FDDB上的精度。(其它算法可以自行生成检测结果,从第二步开始看)
一、生成FDDB人脸检测数据
使用ShiqiYu/libfacedetection项目,在windows下跑FDDB数据集。直接修改example/libfacedetect-example.cpp即可
#include <stdio.h>
#include <fstream>
#include <iostream>
#include <opencv2/opencv.hpp>
#include "facedetect-dll.h"

//#pragma comment(lib,"libfacedetect.lib")
#pragma comment(lib,"libfacedetect-x64.lib")

//define the buffer size. Do not change the size!
#define DETECT_BUFFER_SIZE 0x20000
using namespace cv;

void split_dir_name(std::string& s, std::vector<std::string>& v, const std::string& c)
{
	std::string::size_type pos1, pos2;
	pos2 = s.find(c);
	pos1 = 0;
	while (std::string::npos != pos2)
	{
		v.push_back(s.substr(pos1, pos2 - pos1));

		pos1 = pos2 + c.size();
		pos2 = s.find(c, pos1);
	}
	if (pos1 != s.length())
		v.push_back(s.substr(pos1));
}

int main(int argc, char* argv[])
{
        const char * dir = ".............../FDDB/originalPics/";   /* FDDB图片目录. */
	const char * out = "ysq_fddb.txt";   /* 输出的检测结果文件. */
	const char * in = ".............../FDDB/fold_all.txt"; /* FDDB图片列表(10-fold合在一起). */

	std::ifstream fbox(in, std::ios::in);
	if (!fbox.is_open())
	{
		std::cerr << "Can not open fbox from " << in << std::endl;
		std::cerr << "Set fbox using -f option. See usage: ." << std::endl;
		return -1;
	}

	std::ofstream output(out);
	output.close();

	while (!fbox.eof())
	{
		std::string filename = "";
		fbox >> filename;

		std::string full_filename = (std::string)dir + filename + ".jpg";
		std::cout << "Processing: " << filename << std::endl;

		//load an image and convert it to gray (single-channel)
		Mat image = imread(full_filename);
		if (image.empty())
		{
			fprintf(stderr, "Can not load the image file %s.\n", full_filename);
			return -1;
		}
		Mat gray;
		cvtColor(image, gray, CV_BGR2GRAY);

		int * pResults = NULL;
		//pBuffer is used in the detection functions.
		//If you call functions in multiple threads, please create one buffer for each thread!
		unsigned char * pBuffer = (unsigned char *)malloc(DETECT_BUFFER_SIZE);
		if (!pBuffer)
		{
			fprintf(stderr, "Can not alloc buffer.\n");
			return -1;
		}

		int doLandmark = 1;

		///////////////////////////////////////////
		// reinforced multiview face detection / 68 landmark detection
		// it can detect side view faces, better but slower than facedetect_multiview().
		//////////////////////////////////////////
		//!!! The input image must be a gray one (single-channel)
		//!!! DO NOT RELEASE pResults !!!
		pResults = facedetect_multiview_reinforce(pBuffer, (unsigned char*)(gray.ptr(0)), gray.cols, gray.rows, (int)gray.step,
			1.08f, 3, 16, 0, doLandmark);

		int faces = pResults ? *pResults : 0;

		std::ofstream output(out, std::ios::app);
		output << filename << std::endl;
		output << faces << std::endl;
		output.close();

		printf("%d faces detected.\n", faces);

		//print the detection results
		for (int i = 0; i < faces; i++)
		{
			short * p = ((short*)(pResults + 1)) + 142 * i;
			int x = p[0];
			int y = p[1];
			int w = p[2];
			int h = p[3];
			int neighbors = p[4];
			int angle = p[5];

			// 把检测出来的人脸信息输出到output文件中,格式为:img_name, x, y, width, height, score
			std::ofstream output(out, std::ios::app);
			output << x << " " << y << " " << w << " " << 1.2 * h << " " << neighbors << std::endl;
			output.close();

			printf("face_rect=[%d, %d, %d, %d], neighbors=%d, angle=%d\n", x, y, w, h, neighbors, angle);
		}
		//release the buffer
		free(pBuffer);
	}
	fbox.close();
	return 0;
}
二、使用FDDB评估程序生成评估结果
1. 官网下载evaluate code,Ubuntu下解压,cd到evaluate目录,make编译可执行程序。
注意如果你是用的是OpenCV 3.x版本,则需要修改Makefile才能编译通过
添加以下两行,并修改evaluate的顺序
INCS = -I/usr/local/include/opencv

LIBS = -L/usr/local/lib -lopencv_core -lopencv_imgproc -lopencv_highgui
       -lopencv_ml -lopencv_video -lopencv_features2d -lopencv_calib3d
       -lopencv_objdetect -lopencv_imgcodecs
evaluate: $(OBJS)
$(CC) $(OBJS) -o $@ $(LIBS)
2. 将第一步生成的人脸检测结果ysq_fddb.txt 和 FDDB groundtrue文件 和评估程序放到一个文件夹,运行evaluate程序,参数可根据实际情况修改。
./evaluation/evaluate -a fold_all_ellipsetList.txt -d ysq_fddb.txt -f 0 -i ./originalPics -l fold_all.txt -r ysq_三、根据结果画出ROC曲线
1. 这里需要安装Gnuplot,
sudo apt-get install gnuplot2. 修改discROC.p或者自己新建编辑都可以,最后的plot是你的数据,只要把第一个参数指向刚刚evaluate生成的txt即可,上面的参数都是控制画图的,可根据需要修改。set output 即输出的ROC图片,plot下可以添加多行数据,对比不同算法的精度,这里对比了MTCNN人脸检测算法。
# Compare your discrete ROC curves with other methods
# At terminal: gnuplot discROC.p
set terminal png size 1280, 1200 enhanced font 'Verdana,18'
set size 1,1
set xtics 500
set ytics 0.1
set grid
set ylabel "True positive rate"
set xlabel "False positive"
set xr [0:2000]
set yr [0:1.0]
set key below
set output "discROC.png"
plot  "ret/mtcnn_ori_DiscROC.txt" using 2:1 title 'MTCNN-ori' with linespoints pointinterval 50 lw 3 , \
"ret/ysq_DiscROC.txt" using 2:1 title 'YSQ' with linespoints pointinterval 50 lw 3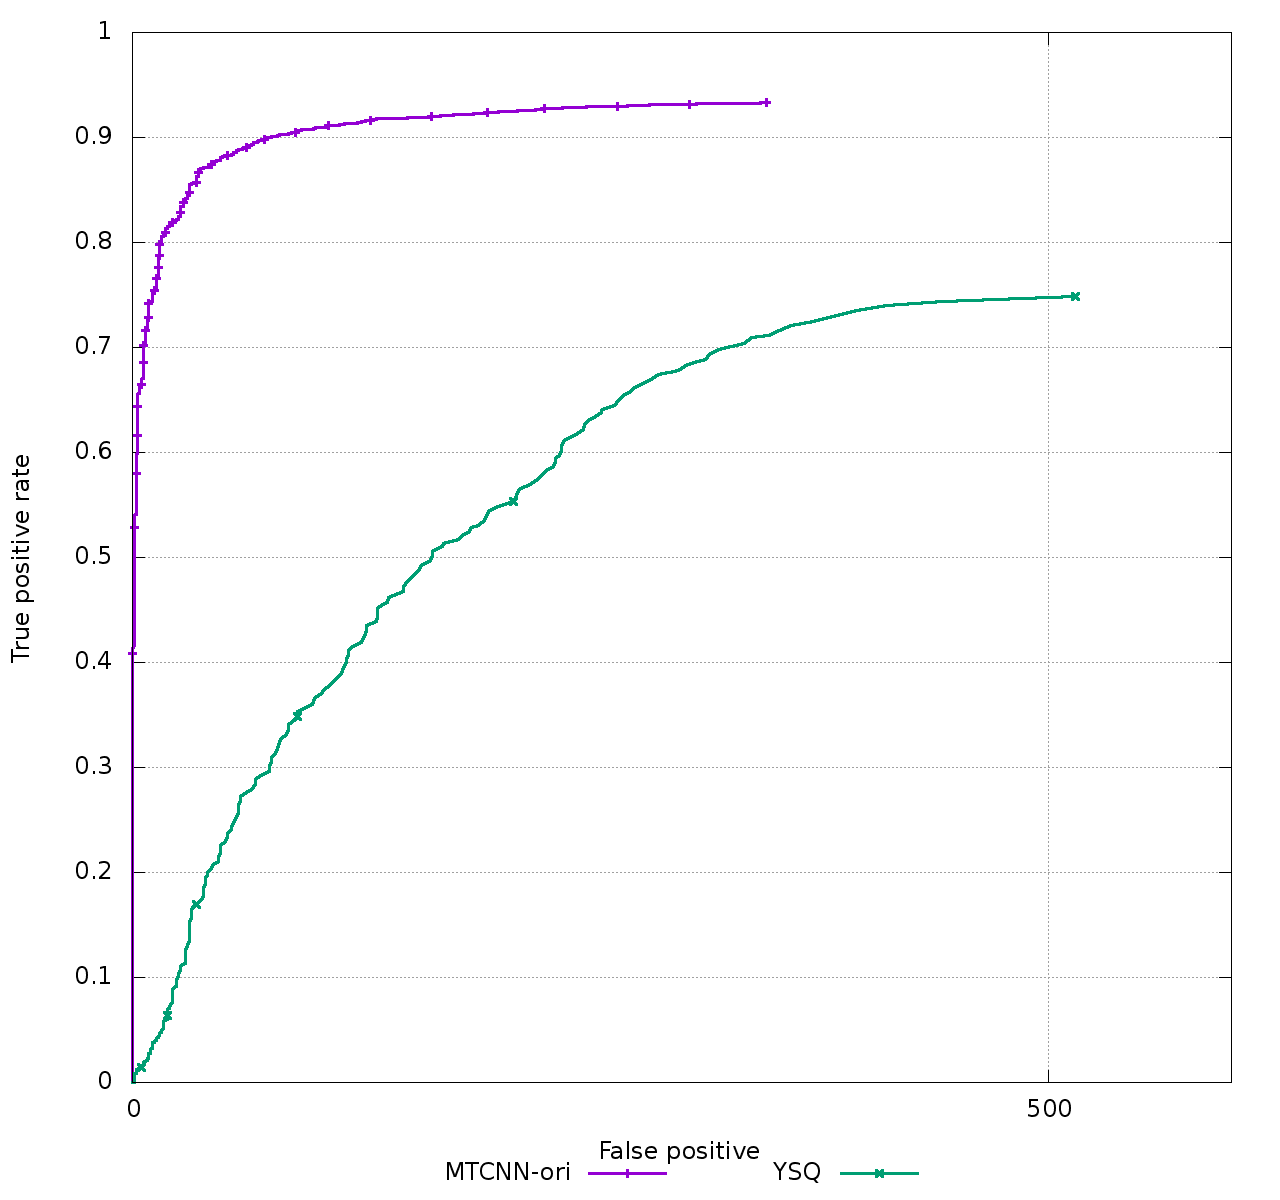
注意点:
1. windows下生成的output文件必须处理一下,不然txt的换行符不一样,导致使用evaluate程序的比较的时候把同一张图片的名字当作两个人的而报错:
