我们都知道View的绘制流程需要经历measure、layout、draw这个三个过程,如果布局嵌套层次比较深的话,每一步都需要进行遍历所有子View进行对应的measure、layout、draw过程,由此就会降低绘制效率,嵌套越多,耗时就越多;其实不光光只会影响view的绘制效率,同样的也会影响xml布局的解析效率。
针对上面的问题,Android为我们引入了merger标签来降低布局嵌套的问题。如果在布局文件中使用merge标签,则需要在include标签中引入,可以这么说吧,merge标签是include标签一种辅助扩展。
merge_title_bar布局
<?xml version="1.0" encoding="utf-8"?>
<merge
    xmlns:android="http://schemas.android.com/apk/res/android"
    xmlns:tools="http://schemas.android.com/tools"
    android:layout_width="match_parent"
    android:layout_height="wrap_content"
    tools:ignore="all">

    <Button
        android:id="@+id/back"
        android:layout_width="wrap_content"
        android:layout_height="wrap_content"
        android:layout_alignParentStart="true"
        android:textAllCaps="false"
        android:text="返回"/>

    <Button
        android:id="@+id/title"
        android:layout_width="wrap_content"
        android:layout_height="wrap_content"
        android:layout_centerHorizontal="true"
        android:background="@android:color/white"
        android:textAllCaps="false"
        android:text="标题"/>


    <Button
        android:id="@+id/share"
        android:layout_width="wrap_content"
        android:layout_height="wrap_content"
       android:layout_alignParentEnd="true"
        android:text="分享"
        android:textAllCaps="false"/>

</merge>
普通布局title_bar
<?xml version="1.0" encoding="utf-8"?>
<RelativeLayout
    xmlns:android="http://schemas.android.com/apk/res/android"
    xmlns:tools="http://schemas.android.com/tools"
    android:layout_width="match_parent"
    android:layout_height="wrap_content"
    tools:ignore="all">

    <Button
        android:id="@+id/back"
        android:layout_width="wrap_content"
        android:layout_height="wrap_content"
        android:textAllCaps="false"
        android:layout_alignParentStart="true"
        android:text="返回"/>

    <Button
        android:id="@+id/title"
        android:layout_width="wrap_content"
        android:layout_height="wrap_content"
        android:background="@android:color/white"
        android:layout_centerInParent="true"
        android:textAllCaps="false"
        android:onClick="onClick"
        android:text="标题"/>


    <Button
        android:id="@+id/share"
        android:layout_width="wrap_content"
        android:layout_height="wrap_content"
        android:textAllCaps="false"
        android:layout_alignParentEnd="true"
        android:text="分享"/>

</RelativeLayout>
接下来我们在activity_ui_optimize布局中分别引用merge_title_bar和title_bar这两个布局,看看之间的嵌套层级
<?xml version="1.0" encoding="utf-8"?>
<LinearLayout
xmlns:android="http://schemas.android.com/apk/res/android"
android:id="@+id/ll_root_view"
android:orientation="vertical"
android:layout_width="match_parent"
android:layout_height="wrap_content">
<!--引入普通布局-->
<include
android:layout_width="match_parent"
android:layout_height="wrap_content"
layout="@layout/title_bar"/>
<!--引入merge标签布局1-->
<include
android:layout_width="match_parent"
android:layout_height="wrap_content"
layout="@layout/merge_title_bar"/>
<!--引入merge标签布局2-->
<RelativeLayout
android:id="@+id/rl_merge_view"
android:layout_width="match_parent"
android:layout_height="wrap_content">
<include
layout="@layout/merge_title_bar"/>
</RelativeLayout>
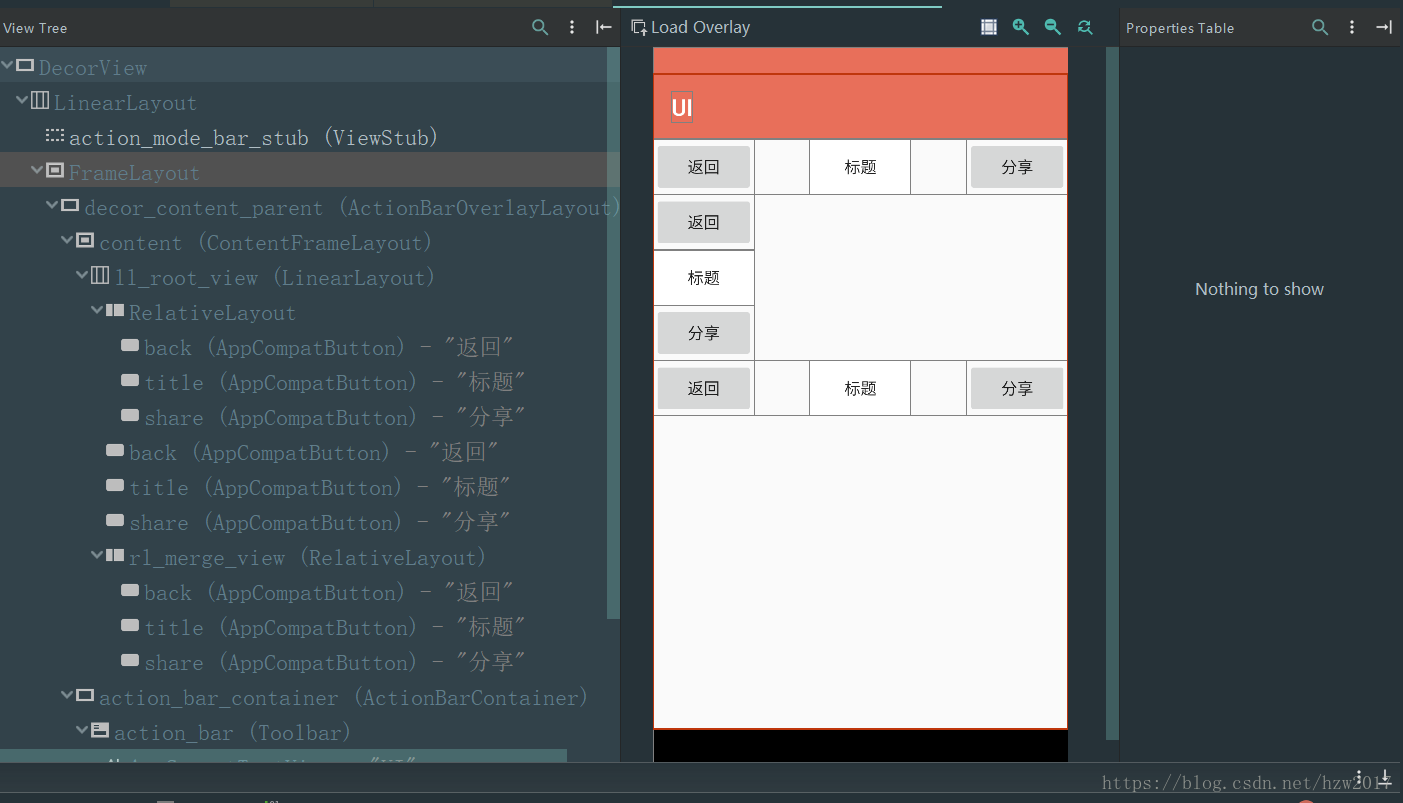
</LinearLayout>下面看看这个三个区域的view嵌套层级是如何的
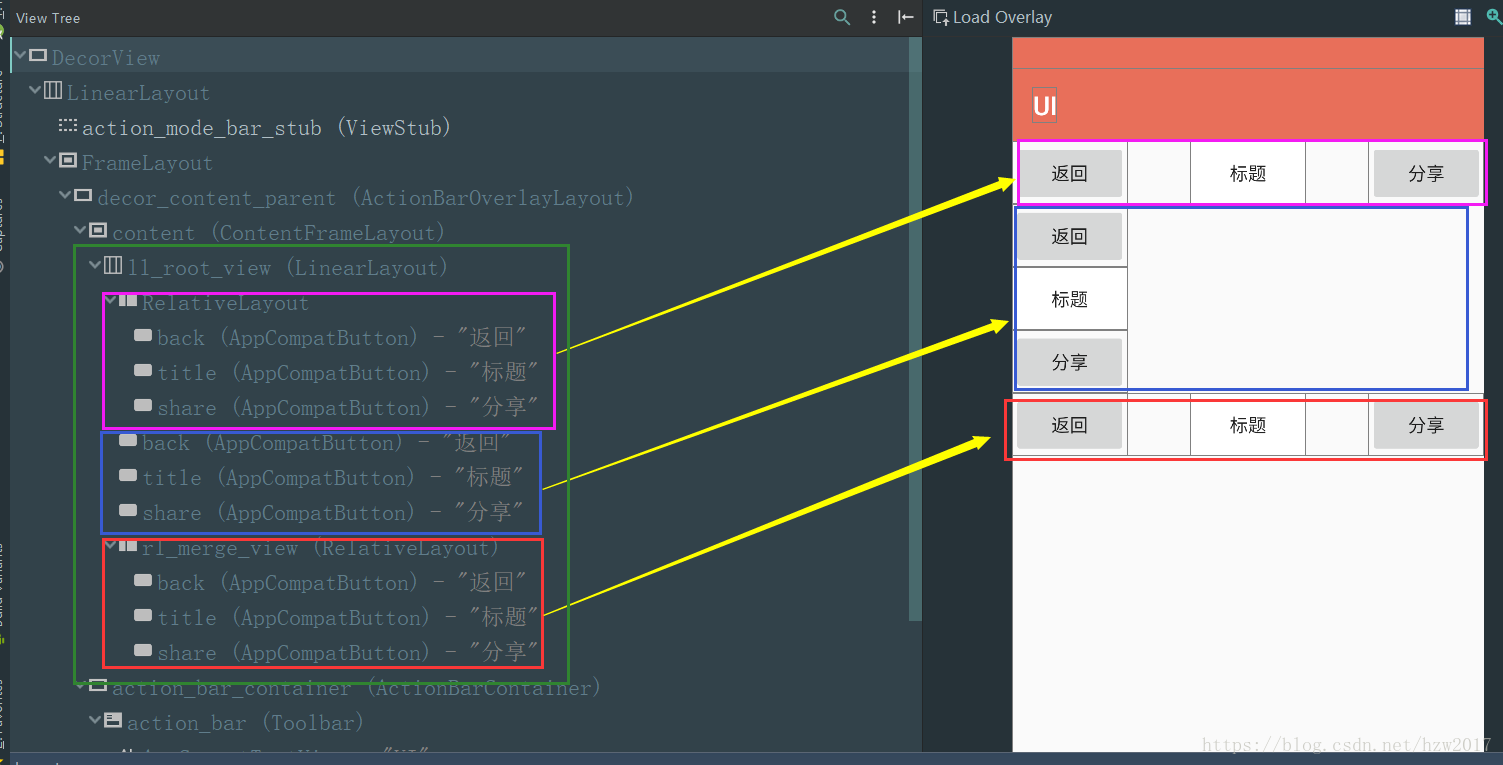
紫色区域:就是使用普通布局的效果
蓝色区域:使用了merge标签
红色区域:同样的使用了merge标签,不同的是用RelativeLayout包裹了include标签。
绿色区域:就是activity_ui_optimize布局
从图中可以看出紫色区域的button与蓝色区域的button不在同一样层级节点上,蓝色区域的button少了一层嵌套,可见merge标签可以减少view的嵌套;同样的你会发现紫色区域与蓝色区域的布局位置有所不同,一个是横排,另外一个是竖排,关于merge标签元素布局定位的问题,相信很多人在刚使用的时候可能会和我一样产生疑问,merge标签内元素的定位是受什么影响,其实是由父布局决定的,我们可以从源码的角度进行解释:
首先我们要从Activity的setContentView方法讲起
 public void setContentView(@LayoutRes int layoutResID) {
        getWindow().setContentView(layoutResID);
        initWindowDecorActionBar();
    }
可见真正负责Activity的视图展示并不是Activity本身,而是交给Window对象处理,Window是一个抽象类,PhoneWindow是它的唯一实现类,接下来进入PhoneWindow的setContentView方法看看
    @Override
    public void setContentView(int layoutResID) {
        // Note: FEATURE_CONTENT_TRANSITIONS may be set in the process of installing the window
        // decor, when theme attributes and the like are crystalized. Do not check the feature
        // before this happens.
        if (mContentParent == null) {
            installDecor();
        } else if (!hasFeature(FEATURE_CONTENT_TRANSITIONS)) {
            mContentParent.removeAllViews();
        }

        if (hasFeature(FEATURE_CONTENT_TRANSITIONS)) {
            final Scene newScene = Scene.getSceneForLayout(mContentParent, layoutResID,
                    getContext());
            transitionTo(newScene);
        } else {
            mLayoutInflater.inflate(layoutResID, mContentParent);
        }
        mContentParent.requestApplyInsets();
        final Callback cb = getCallback();
        if (cb != null && !isDestroyed()) {
            cb.onContentChanged();
        }
        mContentParentExplicitlySet = true;
    }
从setContentView方法可知,首先会通过installDecor方法创建DecorView,同时会把DecorView放入Window中,可见DecorView对象是Window顶级的视图,紧接着会调用mLayoutInflater.inflate方法,下面进入LayoutInfater中的inflate方法探知
private static final String TAG_MERGE = "merge";

 public View inflate(XmlPullParser parser, @Nullable ViewGroup root, boolean attachToRoot) {
        synchronized (mConstructorArgs) {
            Trace.traceBegin(Trace.TRACE_TAG_VIEW, "inflate");

            final Context inflaterContext = mContext;
            final AttributeSet attrs = Xml.asAttributeSet(parser);
            Context lastContext = (Context) mConstructorArgs[0];
            mConstructorArgs[0] = inflaterContext;
            View result = root;

            try {
                // Look for the root node.
                int type;
                while ((type = parser.next()) != XmlPullParser.START_TAG &&
                        type != XmlPullParser.END_DOCUMENT) {
                    // Empty
                }

                if (type != XmlPullParser.START_TAG) {
                    throw new InflateException(parser.getPositionDescription()
                            + ": No start tag found!");
                }
                //得到节点名称
                final String name = parser.getName();

                if (DEBUG) {
                    System.out.println("**************************");
                    System.out.println("Creating root view: "
                            + name);
                    System.out.println("**************************");
                }
                //判断是否是merge标签
                if (TAG_MERGE.equals(name)) {
                    if (root == null || !attachToRoot) {
                        throw new InflateException("<merge /> can be used only with a valid "
                                + "ViewGroup root and attachToRoot=true");
                    }

                    rInflate(parser, root, inflaterContext, attrs, false);
                } else {
                ……省略
                }

            return result;
        }
    }
在inflate方法中,通过Pull解析,parser.getName()方法得到xml布局节点的属性名称,紧接着会判断节点的是不是merge标签,如果是merge标签,首先会判断是否有父视图root,如果没有会抛出InflateException异常,可见merge标签的引入使用必须依赖于父视图(根视图),紧接着才会进入rInflate方法
    void rInflate(XmlPullParser parser, View parent, Context context,
            AttributeSet attrs, boolean finishInflate) throws XmlPullParserException, IOException {

        final int depth = parser.getDepth();
        int type;
        boolean pendingRequestFocus = false;

        while (((type = parser.next()) != XmlPullParser.END_TAG ||
                parser.getDepth() > depth) && type != XmlPullParser.END_DOCUMENT) {

            if (type != XmlPullParser.START_TAG) {
                continue;
            }
            //获取节点的属性名称
            final String name = parser.getName();

            if (TAG_REQUEST_FOCUS.equals(name)) {
                pendingRequestFocus = true;
                consumeChildElements(parser);
            } else if (TAG_TAG.equals(name)) {
                parseViewTag(parser, parent, attrs);
            } else if (TAG_INCLUDE.equals(name)) {
                if (parser.getDepth() == 0) {
                    throw new InflateException("<include /> cannot be the root element");
                }
                parseInclude(parser, context, parent, attrs);
            } else if (TAG_MERGE.equals(name)) {
                //在xml文件中,merge必须是根节点,
                throw new InflateException("<merge /> must be the root element");
            } else {
                //创建merge标签下的view
                final View view = createViewFromTag(parent, name, context, attrs);
                //得到父视图布局参数
                final ViewGroup viewGroup = (ViewGroup) parent;
                final ViewGroup.LayoutParams params = viewGroup.generateLayoutParams(attrs);
                //构建view下的子view
                rInflateChildren(parser, view, attrs, true);
                //将view添加到父视图在中
                viewGroup.addView(view, params);
            }
        }

        if (pendingRequestFocus) {
            parent.restoreDefaultFocus();
        }

        if (finishInflate) {
            parent.onFinishInflate();
        }
    }
在rInflate方法中,定义一个while循环来遍历解析布局View每个子节点,得到每个节点属性名称,经过一系列的判断,从中可知,在一个xml布局文件中,merge必须是根节点,在merge根标签内不能再有其他的merge标签。最后会根据merge根标签内的每个标签创建对应的view视图,紧接着会得到父视图的布局参数,接着绘制父视图下每个子view,最后将子View添加到父视图中,到此可以发现merge标签内容元素的定位最终还是由父视图来决定的。
回过头来,再去看看蓝色区域与红色区域的merge标签布局显示,就会决定很清晰了,蓝色区域下的button显示为垂直竖排,是因为它的父视图是垂直线性布局LinearLayout(id:ll_root_view),而红色区域下的button显示水平横排,是因为它的父视图是相对布局relativeLayout(id:rl_merge_view),在相对布局中,为每个button设置了相应的定位属性值。
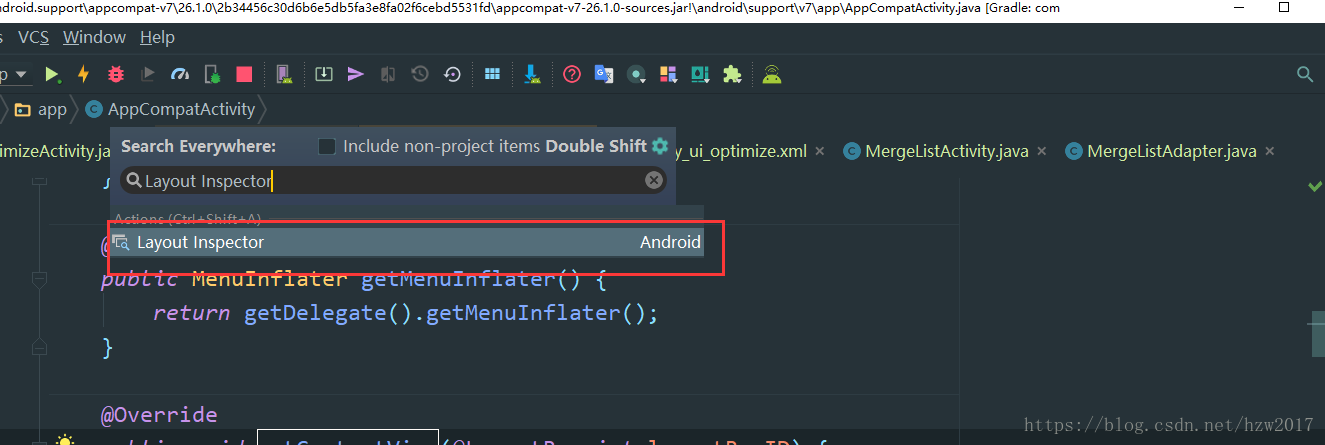
这里使用Android studio3.0的Layout Inspector工具,取代了之前的HierarchyViewer工具,下面就简单介绍下使用方法:
1、首先找到Layout Inspector,可以通过搜索方式找到
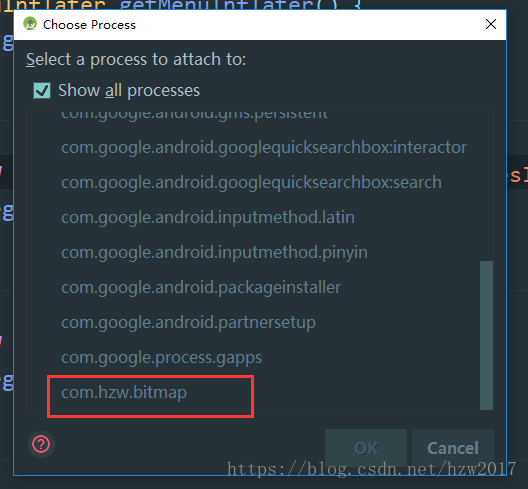
2、点击进入Layout Inspector ,Choose Process 对话框中,选择您想要检查的应用进程,然后点击 OK
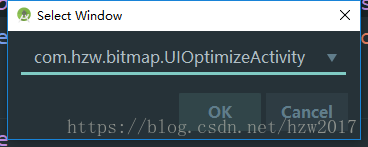
3、在Select Window对话框中,选择对应的Activity
4、到此基本就可以展示出来了
详细的介绍可以参考官方介绍Layout Inspector,如果要使用之前的HierarchyViewer工具,需要到sdk目录下tools下找到monitor.bat这个文件点击就可以打开,包括DDMS也在其中。
参考: