搭建源码阅读环境
首先在IDEA中建立一个Maven工程,然后在pom.xml中加入依赖,因为以后可能会用到其他的功能,所以这里直接使用的是springboot的依赖
<?xml version="1.0" encoding="UTF-8"?>
<project xmlns="http://maven.apache.org/POM/4.0.0"
         xmlns:xsi="http://www.w3.org/2001/XMLSchema-instance"
         xsi:schemaLocation="http://maven.apache.org/POM/4.0.0 http://maven.apache.org/xsd/maven-4.0.0.xsd">
    <modelVersion>4.0.0</modelVersion>

    <groupId>tech.codemine</groupId>
    <artifactId>spring-test</artifactId>
    <version>1.0-SNAPSHOT</version>

    <dependencies>
        <!-- https://mvnrepository.com/artifact/org.springframework.boot/spring-boot-starter-web -->
        <dependency>
            <groupId>org.springframework.boot</groupId>
            <artifactId>spring-boot-starter-web</artifactId>
            <version>2.1.0.RELEASE</version>
        </dependency>
    </dependencies>
</project>
接着在resources文件夹中建立一个applicationContext.xml,作为spring的配置文件,内容如下
<?xml version="1.0" encoding="UTF-8"?>
<beans xmlns="http://www.springframework.org/schema/beans" xmlns:xsi="http://www.w3.org/2001/XMLSchema-instance" xmlns:context="http://www.springframework.org/schema/context"
       xmlns:tx="http://www.springframework.org/schema/tx"
       xsi:schemaLocation="http://www.springframework.org/schema/beans http://www.springframework.org/schema/beans/spring-beans-2.5.xsd
				http://www.springframework.org/schema/context http://www.springframework.org/schema/context/spring-context-2.5.xsd
				http://www.springframework.org/schema/tx http://www.springframework.org/schema/tx/spring-tx-2.5.xsd">

    <context:component-scan base-package="tech.codemine.autowired"/>
</beans>
只需要设置一下spring的扫描路径即可,然后建立一个包,名为tech.codemine.autowired,在里面新建几个测试用的类,分别为Main.java,MyClass.java,MyBean.java
Main.java主要用于激活spring,内容如下
package tech.codemine.autowired;

import org.springframework.context.ApplicationContext;
import org.springframework.context.support.ClassPathXmlApplicationContext;

public class Main {

    public static void main(String[] args) {
        ApplicationContext applicationContext = new ClassPathXmlApplicationContext("applicationContext.xml");
    }
}
MyBean.java用于作为一个被注入的bean,内容如下
package tech.codemine.autowired;

import org.springframework.stereotype.Component;

@Component
public class MyBean {

}
MyClass.java用于使用MyBean来注入,内容如下
package tech.codemine.autowired;

import org.springframework.beans.factory.annotation.Autowired;
import org.springframework.stereotype.Component;

@Component
public class MyClass {

    private final MyBean myBean;

    @Autowired
    public MyClass(MyBean myBean) {
        this.myBean = myBean;
    }
}
在这里为了方便观察Spring的注入过程,使用了构造器来进行bean的注入,只要在构造器上打上debug的断点就可以看到整个执行栈的情况。
最后使用Debug模式运行Main.java,让程序在构造器的断点暂停运行,即可在IDEA的左下角看到运行栈的情况。
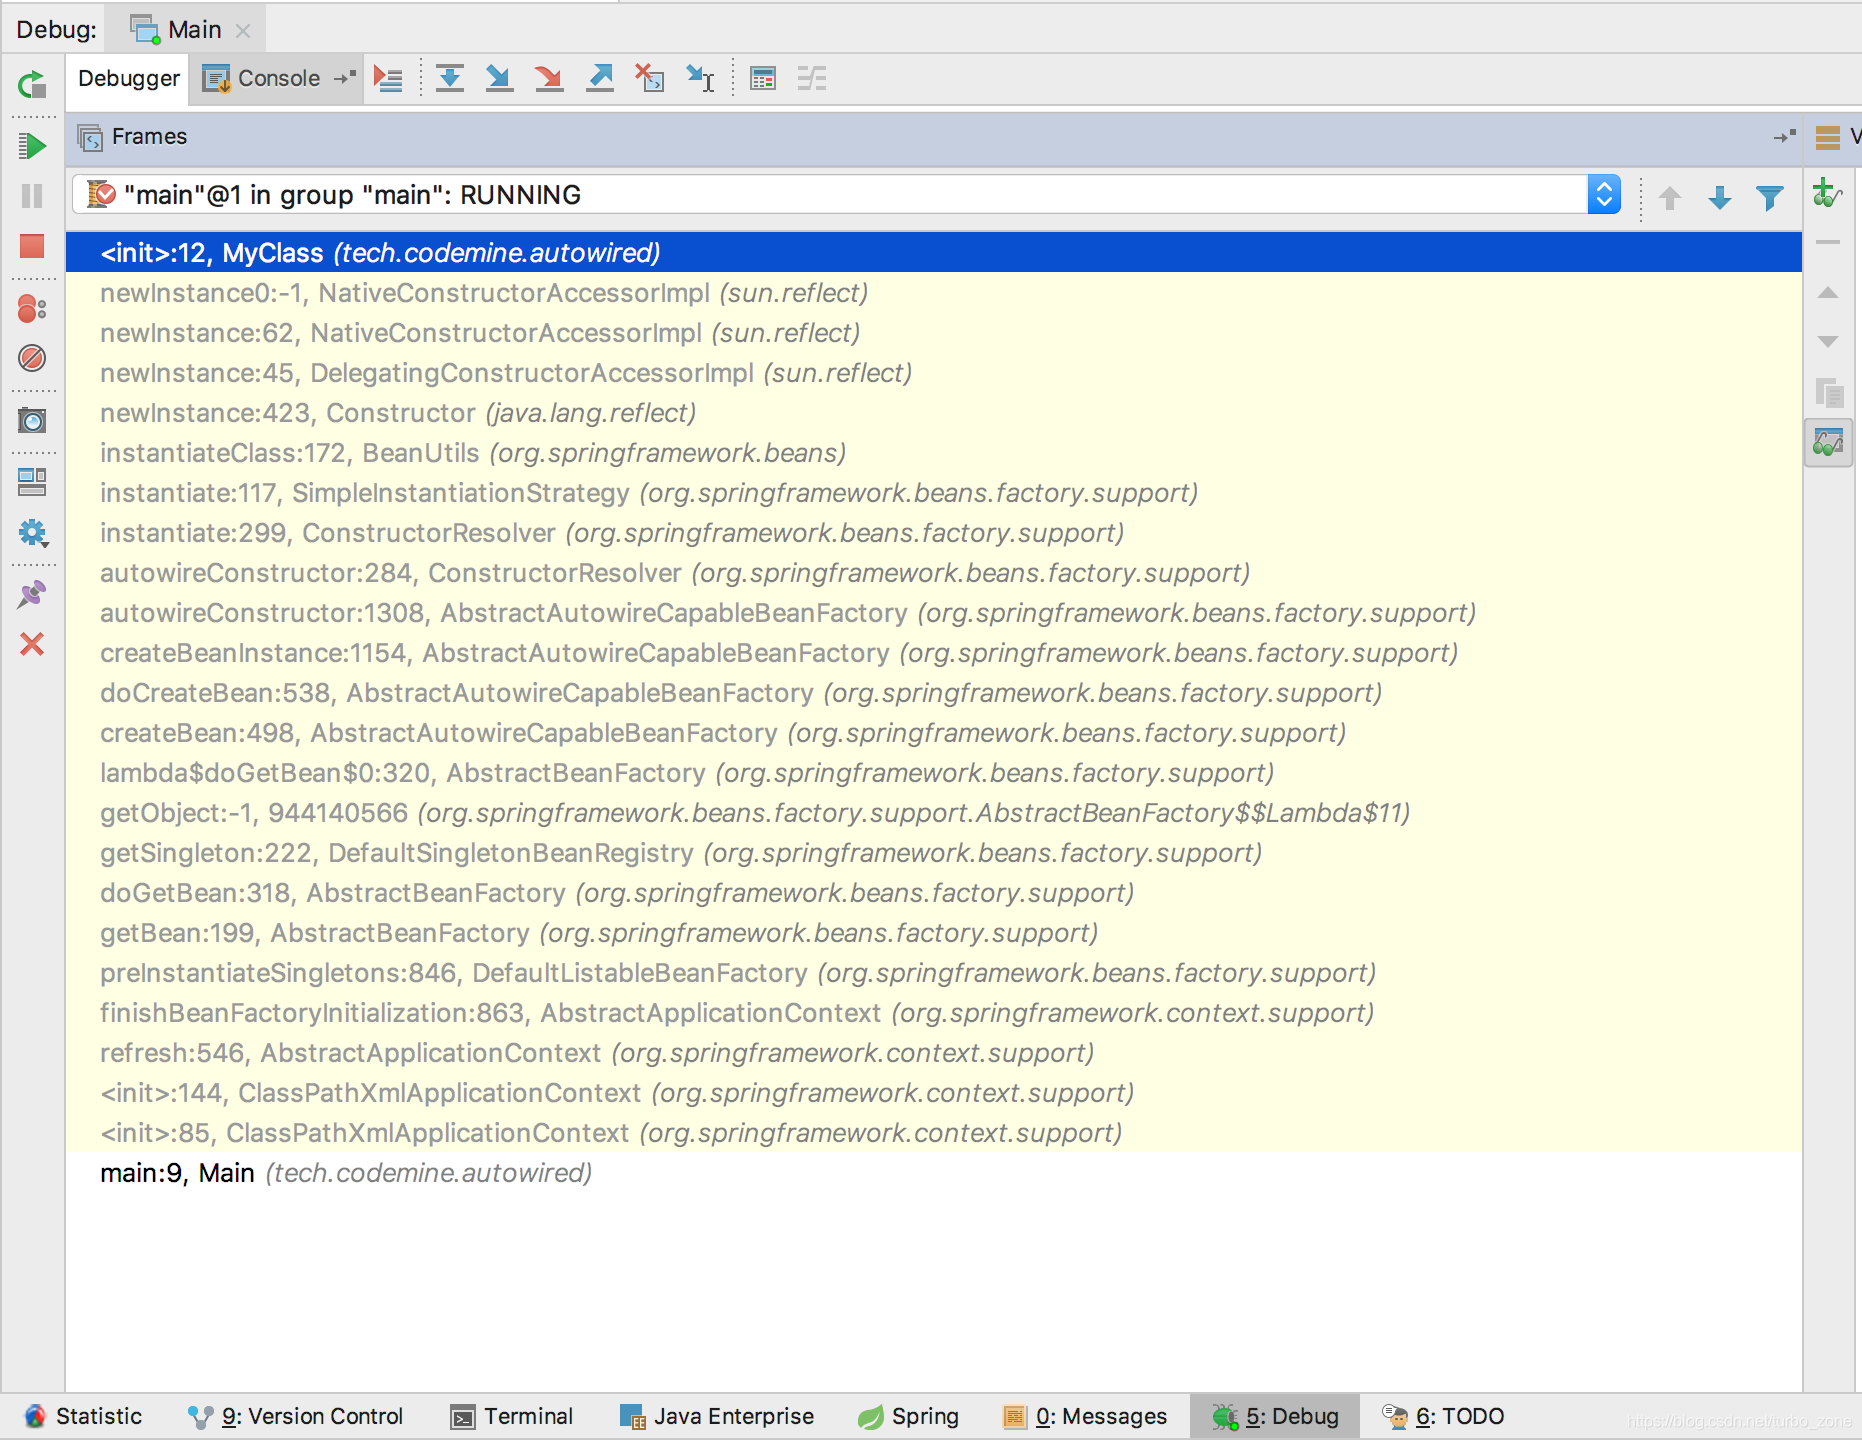
源码分析
接下来是对运行栈中每一层源码的分析。
ClassPathXmlApplicationContext
由于我们new了一个ClassPathXmlApplicationContext对象,所以首先进入的是ClassPathXmlApplicationContext的构造方法
/**
 * Create a new ClassPathXmlApplicationContext, loading the definitions
 * from the given XML file and automatically refreshing the context.
 * @param configLocation resource location
 * @throws BeansException if context creation failed
 */
public ClassPathXmlApplicationContext(String configLocation) throws BeansException {
	this(new String[] {configLocation}, true, null);
}
这个构造方法调用了自身的另外一个构造方法
/**
 * Create a new ClassPathXmlApplicationContext with the given parent,
 * loading the definitions from the given XML files.
 * @param configLocations array of resource locations
 * @param refresh whether to automatically refresh the context,
 * loading all bean definitions and creating all singletons.
 * Alternatively, call refresh manually after further configuring the context.
 * @param parent the parent context
 * @throws BeansException if context creation failed
 * @see #refresh()
 */
public ClassPathXmlApplicationContext(
		String[] configLocations, boolean refresh, @Nullable ApplicationContext parent)
		throws BeansException {

	super(parent);
	setConfigLocations(configLocations);
	if (refresh) {
		refresh();
	}
}
从这个构造方法中可以看到大名鼎鼎的refresh()方法,spring从这里开始进入容器的初始化。
进入refresh()方法可以在这里看到初始化的所有主体步骤
@Override
public void refresh() throws BeansException, IllegalStateException {
	synchronized (this.startupShutdownMonitor) {
		// Prepare this context for refreshing.
		prepareRefresh();

		// Tell the subclass to refresh the internal bean factory.
		ConfigurableListableBeanFactory beanFactory = obtainFreshBeanFactory();

		// Prepare the bean factory for use in this context.
		prepareBeanFactory(beanFactory);

		try {
			// Allows post-processing of the bean factory in context subclasses.
			postProcessBeanFactory(beanFactory);

			// Invoke factory processors registered as beans in the context.
			invokeBeanFactoryPostProcessors(beanFactory);

			// Register bean processors that intercept bean creation.
			registerBeanPostProcessors(beanFactory);

			// Initialize message source for this context.
			initMessageSource();

			// Initialize event multicaster for this context.
			initApplicationEventMulticaster();

			// Initialize other special beans in specific context subclasses.
			onRefresh();

			// Check for listener beans and register them.
			registerListeners();

			// Instantiate all remaining (non-lazy-init) singletons.
			//在这里进行autowired的逻辑的处理
			finishBeanFactoryInitialization(beanFactory);

			// Last step: publish corresponding event.
			finishRefresh();
		}
        ...
	}
}
而@Autowired的具体步骤是在倒数第二个方法finishBeanFactoryInitialization(beanFactory),在这之前的步骤中构造了一个beanFactory,这个beanFactory中包含了所有我们配置的或是spring默认配置的一些信息,而autowired就是使用这个beanFactory中的信息来进行的,我们再往下一层进入finishBeanFactoryInitialization(beanFactory)方法。
protected void finishBeanFactoryInitialization(ConfigurableListableBeanFactory beanFactory) {
	// Initialize conversion service for this context.
	if (beanFactory.containsBean(CONVERSION_SERVICE_BEAN_NAME) &&
			beanFactory.isTypeMatch(CONVERSION_SERVICE_BEAN_NAME, ConversionService.class)) {
		beanFactory.setConversionService(
				beanFactory.getBean(CONVERSION_SERVICE_BEAN_NAME, ConversionService.class));
	}

	// Register a default embedded value resolver if no bean post-processor
	// (such as a PropertyPlaceholderConfigurer bean) registered any before:
	// at this point, primarily for resolution in annotation attribute values.
	if (!beanFactory.hasEmbeddedValueResolver()) {
		beanFactory.addEmbeddedValueResolver(strVal -> getEnvironment().resolvePlaceholders(strVal));
	}

	// Initialize LoadTimeWeaverAware beans early to allow for registering their transformers early.
	String[] weaverAwareNames = beanFactory.getBeanNamesForType(LoadTimeWeaverAware.class, false, false);
	for (String weaverAwareName : weaverAwareNames) {
		getBean(weaverAwareName);
	}

	// Stop using the temporary ClassLoader for type matching.
	beanFactory.setTempClassLoader(null);

	// Allow for caching all bean definition metadata, not expecting further changes.
	beanFactory.freezeConfiguration();

	// Instantiate all remaining (non-lazy-init) singletons.
	beanFactory.preInstantiateSingletons();
}
在这个方法中,和之前refresh()方法一样,首先是对bean进行了一系列的配置操作,并最终进入最后一行,调用beanFactory的preInstantiateSingletons()方法进行初始化所有非lazy-init的bean。
再次往下一层,进入preInstantiateSingletons()方法,看看beanFactory是如何进行bean的初始化的,要进行初始化就必须对所有被@Autowired注解的属性进行注入操作,一下是preInstantiateSingletons()的主要代码,为了便于理解,把所有的讲解都以注释的形式写在代码中。
@Override
public void preInstantiateSingletons() throws BeansException {
    ...

	// Iterate over a copy to allow for init methods which in turn register new bean definitions.
	// While this may not be part of the regular factory bootstrap, it does otherwise work fine.
	List<String> beanNames = new ArrayList<>(this.beanDefinitionNames);

	// Trigger initialization of all non-lazy singleton beans...
	// beanNames变量中包含了所有用户自定义的bean以及Spring自带的bean,在这里的beanNames的值详见下面的截图
	for (String beanName : beanNames) {
		RootBeanDefinition bd = getMergedLocalBeanDefinition(beanName);
		if (!bd.isAbstract() && bd.isSingleton() && !bd.isLazyInit()) {
			if (isFactoryBean(beanName)) {
			    // 如果是FactoryBean就进行以下操作
				...
			}
			else {
			    // 我们定义的bean都不是工厂bean,所以直接进入这个方法,beanName此时为我们定义的MyClass
				getBean(beanName);
			}
		}
	}

	// Trigger post-initialization callback for all applicable beans...
	...
}
beanNames和beanName的主要内容如下
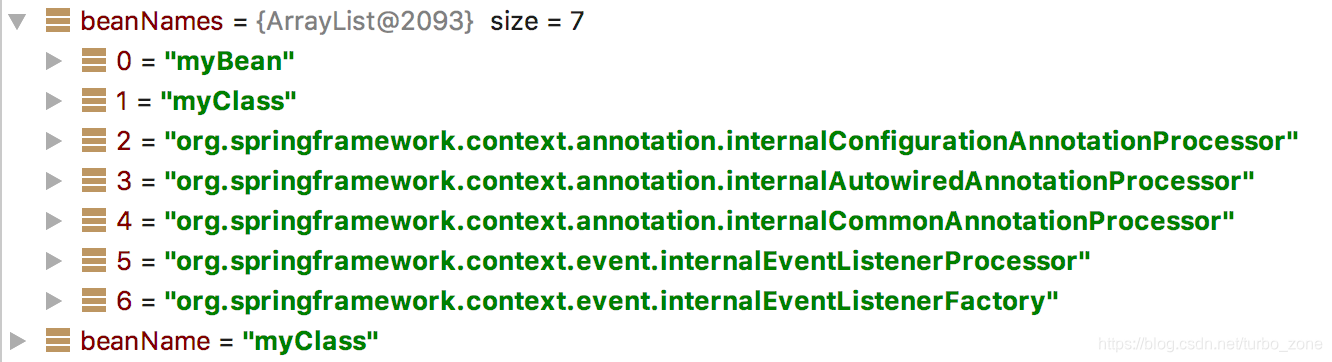
可以看到这里包含了我们自定义的两个bean以及一些spring内部定义的一些默认bean,这些默认bean的作用会在后续博客中说明。
回到autowired,接下来进入getBean()方法,这个方法很简单,调用了自身的一个doGetBean()方法
@Override
public Object getBean(String name) throws BeansException {
	return doGetBean(name, null, null, false);
}
进入doGetBean()方法,这个方法有点复杂,去掉无关代码只留下有用的部分,同样加上一些中文注释
/**
 * Return an instance, which may be shared or independent, of the specified bean.
 * @param name the name of the bean to retrieve
 * @param requiredType the required type of the bean to retrieve
 * @param args arguments to use when creating a bean instance using explicit arguments
 * (only applied when creating a new instance as opposed to retrieving an existing one)
 * @param typeCheckOnly whether the instance is obtained for a type check,
 * not for actual use
 * @return an instance of the bean
 * @throws BeansException if the bean could not be created
 */
@SuppressWarnings("unchecked")
protected <T> T doGetBean(final String name, @Nullable final Class<T> requiredType,
		@Nullable final Object[] args, boolean typeCheckOnly) throws BeansException {

	final String beanName = transformedBeanName(name);
	Object bean;

	// Eagerly check singleton cache for manually registered singletons.
	Object sharedInstance = getSingleton(beanName);
	if (sharedInstance != null && args == null) {
		...
	}

	else {
		...

		try {
		    // 可以把mbd看做是对bean的一种包装,在这里本质上是代表了MyClass这个bean,同时保存了很多其他后续会用到的信息,比如bean的Scope是singleton还是prototype之类的bena属性
			final RootBeanDefinition mbd = getMergedLocalBeanDefinition(beanName);
			checkMergedBeanDefinition(mbd, beanName, args);

			// Guarantee initialization of beans that the current bean depends on.
			String[] dependsOn = mbd.getDependsOn();
			if (dependsOn != null) {
			    // 如果这个bean有其他的依赖则保证先初始化所有的依赖
				for (String dep : dependsOn) {
					if (isDependent(beanName, dep)) {
						throw new BeanCreationException(mbd.getResourceDescription(), beanName,
								"Circular depends-on relationship between '" + beanName + "' and '" + dep + "'");
					}
					registerDependentBean(dep, beanName);
					try {
						getBean(dep);
					}
					catch (NoSuchBeanDefinitionException ex) {
						throw new BeanCreationException(mbd.getResourceDescription(), beanName,
								"'" + beanName + "' depends on missing bean '" + dep + "'", ex);
					}
				}
			}

			// Create bean instance.
			if (mbd.isSingleton()) {
			    // 如果是单例则开始对bean进行解析生成
				sharedInstance = getSingleton(beanName, () -> {
					try {
						return createBean(beanName, mbd, args);
					}
					catch (BeansException ex) {
						// Explicitly remove instance from singleton cache: It might have been put there
						// eagerly by the creation process, to allow for circular reference resolution.
						// Also remove any beans that received a temporary reference to the bean.
						destroySingleton(beanName);
						throw ex;
					}
				});
				bean = getObjectForBeanInstance(sharedInstance, name, beanName, mbd);
			}

			...
		}
		catch (BeansException ex) {
			cleanupAfterBeanCreationFailure(beanName);
			throw ex;
		}
	}

	// Check if required type matches the type of the actual bean instance.
	if (requiredType != null && !requiredType.isInstance(bean)) {
		...
	}
	return (T) bean;
}
在以上代码的getSingleton()方法中进入下一层
/**
 * Return the (raw) singleton object registered under the given name,
 * creating and registering a new one if none registered yet.
 * @param beanName the name of the bean
 * @param singletonFactory the ObjectFactory to lazily create the singleton
 * with, if necessary
 * @return the registered singleton object
 */
public Object getSingleton(String beanName, ObjectFactory<?> singletonFactory) {
    ...
	synchronized (this.singletonObjects) {
		Object singletonObject = this.singletonObjects.get(beanName);
		if (singletonObject == null) {
			...
			try {
				singletonObject = singletonFactory.getObject();
				newSingleton = true;
			}
			...
		return singletonObject;
	}
}
在getSingleton()方法中,主要作用是调用了singletonFactory的getObject()方法,在方法调用栈的接下来几个层次主要是嵌套调用了各种doGetBean()
的重载方法,并最终进入了AbstractAutowireCapableBeanFactory类的createBeanInstance()方法,代码如下
/**
 * Create a new instance for the specified bean, using an appropriate instantiation strategy:
 * factory method, constructor autowiring, or simple instantiation.
 * @param beanName the name of the bean
 * @param mbd the bean definition for the bean
 * @param args explicit arguments to use for constructor or factory method invocation
 * @return a BeanWrapper for the new instance
 * @see #obtainFromSupplier
 * @see #instantiateUsingFactoryMethod
 * @see #autowireConstructor
 * @see #instantiateBean
 */
protected BeanWrapper createBeanInstance(String beanName, RootBeanDefinition mbd, @Nullable Object[] args) {
	...
	// Candidate constructors for autowiring?
	Constructor<?>[] ctors = determineConstructorsFromBeanPostProcessors(beanClass, beanName);
	if (ctors != null || mbd.getResolvedAutowireMode() == AUTOWIRE_CONSTRUCTOR ||
			mbd.hasConstructorArgumentValues() || !ObjectUtils.isEmpty(args)) {
		return autowireConstructor(beanName, mbd, ctors, args);
	}

	// Preferred constructors for default construction?
	ctors = mbd.getPreferredConstructors();
	if (ctors != null) {
		return autowireConstructor(beanName, mbd, ctors, null);
	}

	// No special handling: simply use no-arg constructor.
	return instantiateBean(beanName, mbd);
}
终于我们看到了和Autowired直接相关的代码,由于我们使用的是构造器自动注入,所以会进入第一个if判断,在这里进行自动注入,接着进入autowireConstructor()方法看看具体是如何注入的
/**
 * "autowire constructor" (with constructor arguments by type) behavior.
 * Also applied if explicit constructor argument values are specified,
 * matching all remaining arguments with beans from the bean factory.
 * <p>This corresponds to constructor injection: In this mode, a Spring
 * bean factory is able to host components that expect constructor-based
 * dependency resolution.
 * @param beanName the name of the bean
 * @param mbd the bean definition for the bean
 * @param ctors the chosen candidate constructors
 * @param explicitArgs argument values passed in programmatically via the getBean method,
 * or {@code null} if none (-> use constructor argument values from bean definition)
 * @return a BeanWrapper for the new instance
 */
protected BeanWrapper autowireConstructor(
		String beanName, RootBeanDefinition mbd, @Nullable Constructor<?>[] ctors, @Nullable Object[] explicitArgs) {

	return new ConstructorResolver(this).autowireConstructor(beanName, mbd, ctors, explicitArgs);
}
这里简单地调用了autowireConstructor()方法,将bean使用构造器初始化时需要的构造器以及构造参数都传递给了这个方法,最终在autowireConstructor()方法中进行初始化,方法的主要代码如下,重点关注argsToUse变量,这个变量包含了要注入的bean的具体的值,如果说在上一个方法中只是对构造器传入的bean的形式进行约束,那么在这个方法中,会将所有涉及到的bean的具体的值进行生成,保证再次往下进行方法调用的时候传入的是已经进行初始化完毕的可以直接使用的bean值
/**
 * "autowire constructor" (with constructor arguments by type) behavior.
 * Also applied if explicit constructor argument values are specified,
 * matching all remaining arguments with beans from the bean factory.
 * <p>This corresponds to constructor injection: In this mode, a Spring
 * bean factory is able to host components that expect constructor-based
 * dependency resolution.
 * @param beanName the name of the bean
 * @param mbd the merged bean definition for the bean
 * @param chosenCtors chosen candidate constructors (or {@code null} if none)
 * @param explicitArgs argument values passed in programmatically via the getBean method,
 * or {@code null} if none (-> use constructor argument values from bean definition)
 * @return a BeanWrapper for the new instance
 */
public BeanWrapper autowireConstructor(String beanName, RootBeanDefinition mbd,
		@Nullable Constructor<?>[] chosenCtors, @Nullable Object[] explicitArgs) {

	BeanWrapperImpl bw = new BeanWrapperImpl();
	this.beanFactory.initBeanWrapper(bw);

	Constructor<?> constructorToUse = null;
	ArgumentsHolder argsHolderToUse = null;
	Object[] argsToUse = null;

	if (explicitArgs != null) {
		argsToUse = explicitArgs;
	}
	else {
		Object[] argsToResolve = null;
		synchronized (mbd.constructorArgumentLock) {
			constructorToUse = (Constructor<?>) mbd.resolvedConstructorOrFactoryMethod;
			if (constructorToUse != null && mbd.constructorArgumentsResolved) {
				// Found a cached constructor...
				argsToUse = mbd.resolvedConstructorArguments;
				if (argsToUse == null) {
					argsToResolve = mbd.preparedConstructorArguments;
				}
			}
		}
		if (argsToResolve != null) {
		    // 最关键一步,将构造器依赖的bean进行初始化
			argsToUse = resolvePreparedArguments(beanName, mbd, bw, constructorToUse, argsToResolve, true);
		}
	}

	...

	bw.setBeanInstance(instantiate(beanName, mbd, constructorToUse, argsToUse));
	return bw;
}
resolvePreparedArguments是全场最关键的部分,它的代码如下
/**
 * Resolve the prepared arguments stored in the given bean definition.
 */
private Object[] resolvePreparedArguments(String beanName, RootBeanDefinition mbd, BeanWrapper bw,
		Executable executable, Object[] argsToResolve, boolean fallback) {

	TypeConverter customConverter = this.beanFactory.getCustomTypeConverter();
	TypeConverter converter = (customConverter != null ? customConverter : bw);
	BeanDefinitionValueResolver valueResolver =
			new BeanDefinitionValueResolver(this.beanFactory, beanName, mbd, converter);
	Class<?>[] paramTypes = executable.getParameterTypes();

	Object[] resolvedArgs = new Object[argsToResolve.length];
	for (int argIndex = 0; argIndex < argsToResolve.length; argIndex++) {
		Object argValue = argsToResolve[argIndex];
		MethodParameter methodParam = MethodParameter.forExecutable(executable, argIndex);
		GenericTypeResolver.resolveParameterType(methodParam, executable.getDeclaringClass());
		if (argValue instanceof AutowiredArgumentMarker) {
			argValue = resolveAutowiredArgument(methodParam, beanName, null, converter, fallback);
		}
		else if (argValue instanceof BeanMetadataElement) {
			argValue = valueResolver.resolveValueIfNecessary("constructor argument", argValue);
		}
		else if (argValue instanceof String) {
			argValue = this.beanFactory.evaluateBeanDefinitionString((String) argValue, mbd);
		}
		Class<?> paramType = paramTypes[argIndex];
		try {
			resolvedArgs[argIndex] = converter.convertIfNecessary(argValue, paramType, methodParam);
		}
		catch (TypeMismatchException ex) {
			throw new UnsatisfiedDependencyException(
					mbd.getResourceDescription(), beanName, new InjectionPoint(methodParam),
					"Could not convert argument value of type [" + ObjectUtils.nullSafeClassName(argValue) +
					"] to required type [" + paramType.getName() + "]: " + ex.getMessage());
		}
	}
	return resolvedArgs;
}
可以看到,在这个方法中一次对构造器参数的每一个bean进行初始化,使用的即是beanFactory来进行的。
在将所有构造MyClass对象需要的bean都进行实例化完毕之后,就会通过反射调用MyClass的构造器进行构造,并最终将MyClass作为一个bean放入容器中,至此,一个@Autowired的注入就算是完成了,至于其他方式的自动注入,都是大同小异的,用同样的代码阅读步骤就可以很轻松地看到Spring是如何神奇地将bean自动注入的。